

Can we renovate a sketchy ruin?
Started 4y. Edited 1yStarted about 4 years ago. Last edit about 1 year ago
Construction
In Progress
More Information


%20--%3e%3csvg%20version='1.1'%20id='Layer_1'%20xmlns='http://www.w3.org/2000/svg'%20xmlns:xlink='http://www.w3.org/1999/xlink'%20x='0px'%20y='0px'%20viewBox='0%200%2064%2063'%20style='enable-background:new%200%200%2064%2063;'%20xml:space='preserve'%3e%3cstyle%20type='text/css'%3e%20.st0{fill:%23231F20;}%20%3c/style%3e%3cdesc%3eCreated%20with%20Sketch.%3c/desc%3e%3cg%20id='Page-1'%3e%3cg%20id='OA-Logo-Black-Background'%3e%3cpath%20id='Shape'%20class='st0'%20d='M14.1,30.1c-1.5-0.8-8.6-3.8-14.1-7.8c1.8-3.4,3.1-5.6,5-9.1c2.7,1.1,1.9,0.5,4.6,1.7%20c0.8,0.4,10.1,4.5,13.8,6.2c2.4,1.1,4.7,2.2,7,3.3L43,30.5l8.1,3.9c4,2,7.2,3.5,11.3,5.5c0.5,0.3-3.7,9.4-3.7,9.4%20c-1.7-0.6-3.9-1.8-5.5-2.5c-4.7-2.1-9-3.9-13.7-6c-4-1.8-6.7-2.9-10.8-4.5C25,34.9,17.1,31.6,14.1,30.1z'/%3e%3cpath%20id='Shape_1_'%20class='st0'%20d='M12.1,54.9c-0.8,0.6-1.6,1.2-2.5,1.6c-0.4-0.5-0.9-1-1.3-1.5c-0.3-1.2-2.3-4.9-2.7-6.2%20c-0.1-0.4-0.7-2.2-0.8-2.6c0,0,5-3.4,8.2-5.9c3.2-2.6,6.2-5,9.3-7.5c1.4-1.1,3.9-2.5,5.3-3.5c2.5-1.7,13-9.1,15.6-10.5%20c5.4-3.3,11.1-6.3,16.8-9c1.7,3.5,1.8,3,3.8,6.9c0,0-17.8,13.5-22.7,17.1c-3.8,2.8-7.5,5.7-11.3,8.5c-1.7,1.3-3.5,2.4-5.2,3.7'/%3e%3cpath%20id='Shape_2_'%20class='st0'%20d='M20.8,2.9l-0.2-0.8C25,0,31.2-0.3,31.4,0.2c0.4,1.1,0.9,2.2,1.2,3.4c1.4,4.4,2.7,8.7,4,13.1%20c0.4,1.4,2.8,10,2.9,10.5c0.5,2.8,1.2,5.6,1.6,8.4c0.8,4.7,1.4,8.6,2.3,13.3c0.6,3.1,1.3,6.3,2.3,11.3c0,0-5.8,1.4-7.5,1.8%20c-0.8,0.2-1.5,0.4-2.4,0.6c-0.3-1.1-0.2-1.2-0.5-2.1c-0.9-3.7-1.8-7.3-2.6-11c-1.5-6.4-3-12.9-4.4-19.3%20c-1.2-5.4-2.6-10.7-4.4-15.9c-1-3.1-1.8-6.3-2.7-9.5C21.1,3.8,21,3.8,20.8,2.9z'/%3e%3c/g%3e%3c/g%3e%3c/svg%3e)


1
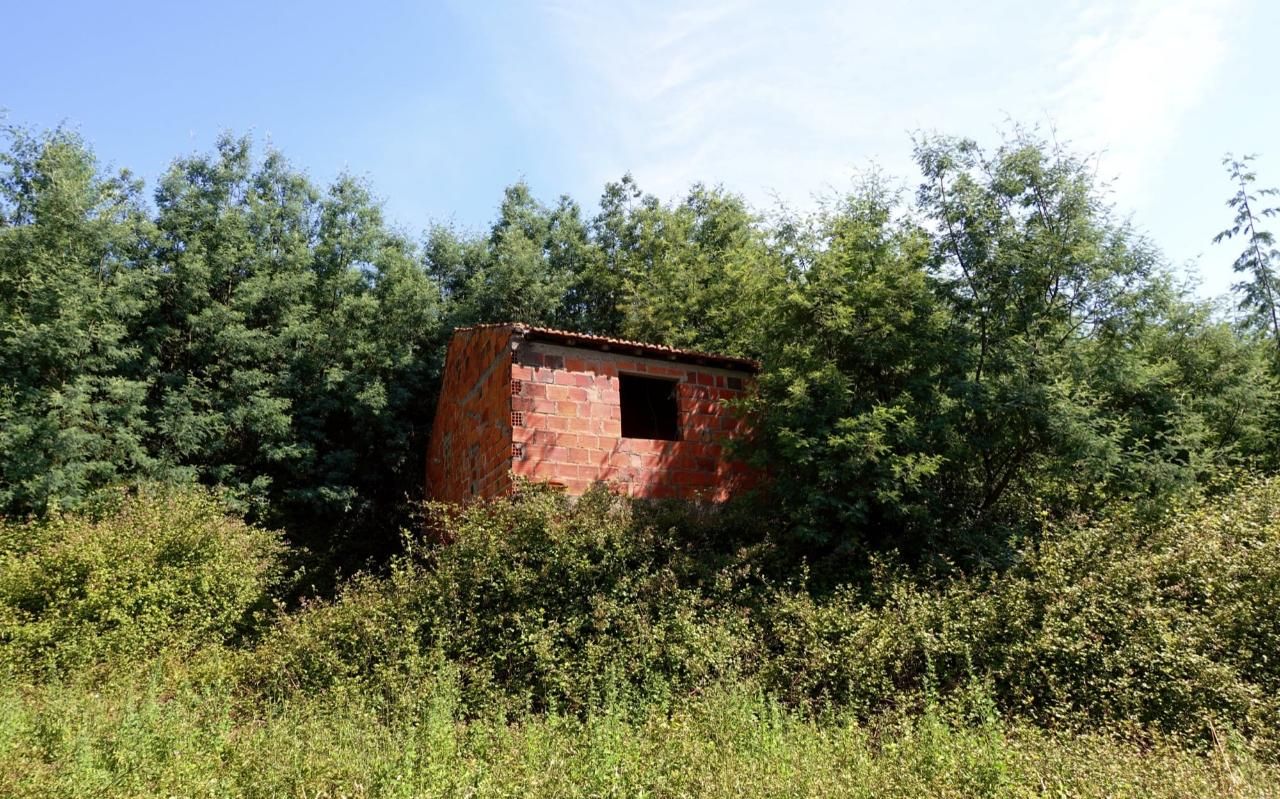
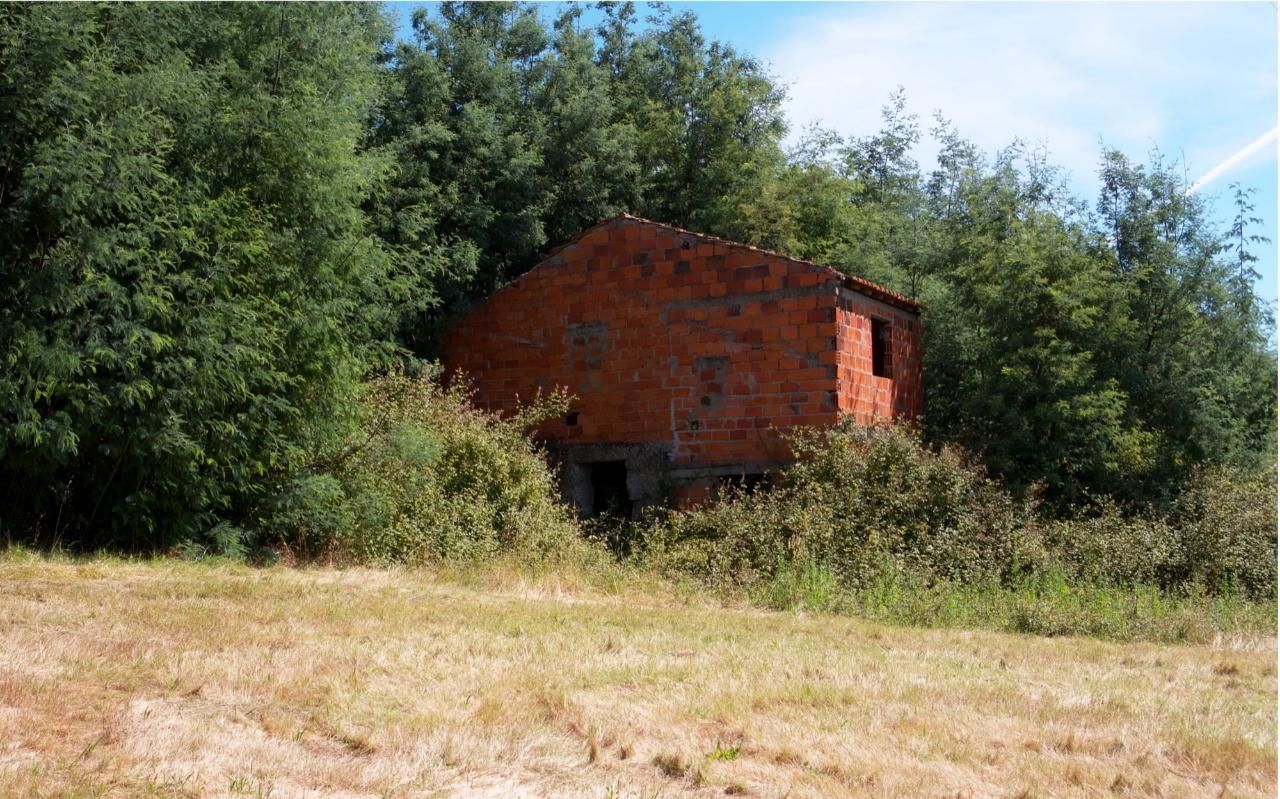
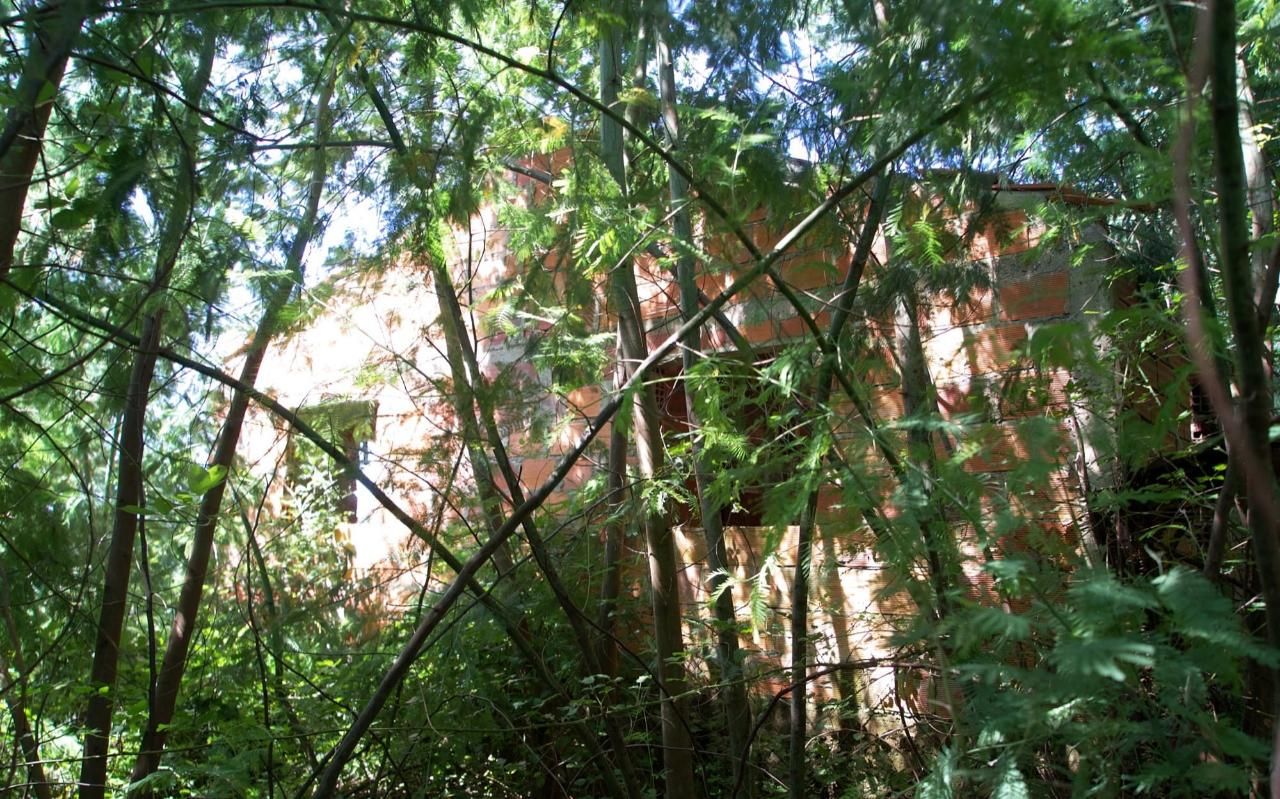
First look at the Ruin
Published 4yPublished about 4 years ago
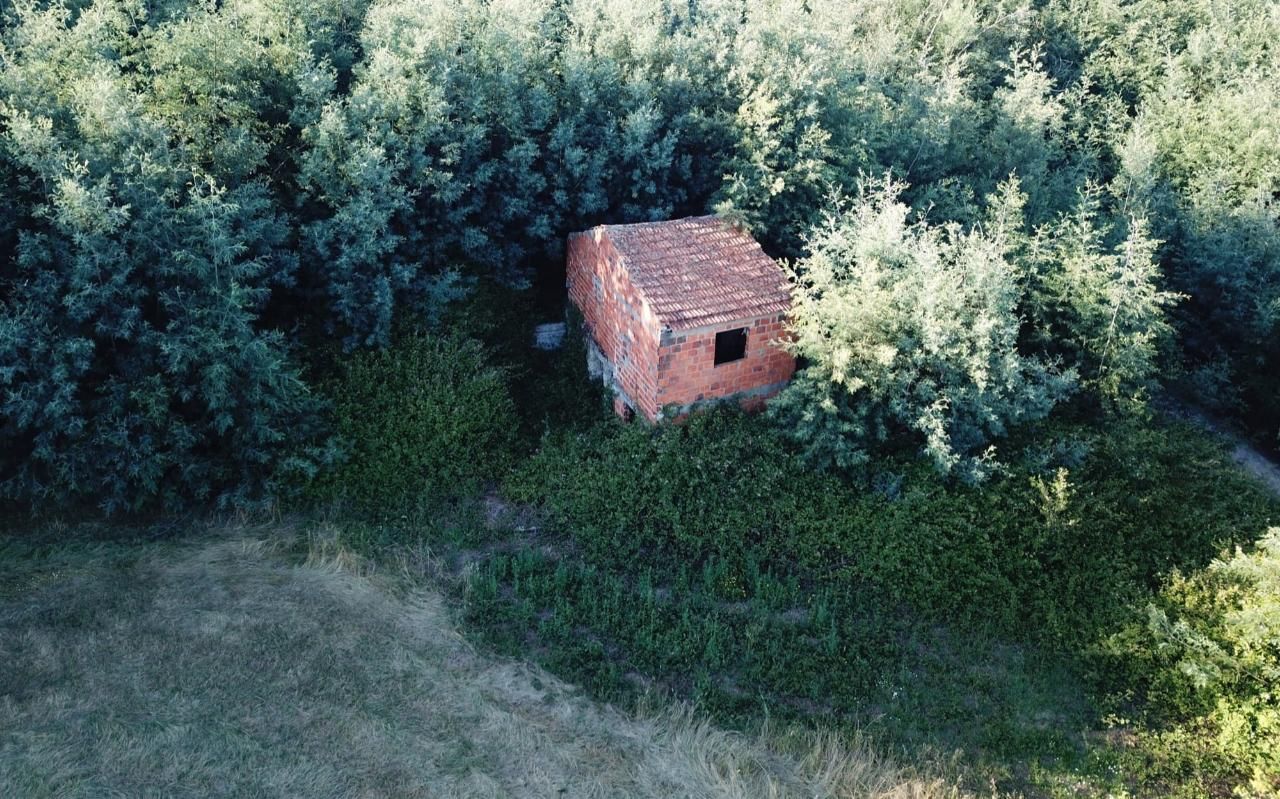
The land the ruin is one was abandon and not taken care of for many years. It’s fully overgrown with torns and mimosa trees around it. We can’t really go in or have a good look at it. Our first step will be to clean it up so we can have a closer look. This is the last moment you will see it like this!
2
Clearing the Ruin
Published 4yPublished about 4 years ago
In this video you can see how we cleared the ruin. It was quite a satisfying job to slowly discover and see what is underneath this pile of spikey bushes. It did quickly confirm that the building itself is in a pretty rough condition..
3
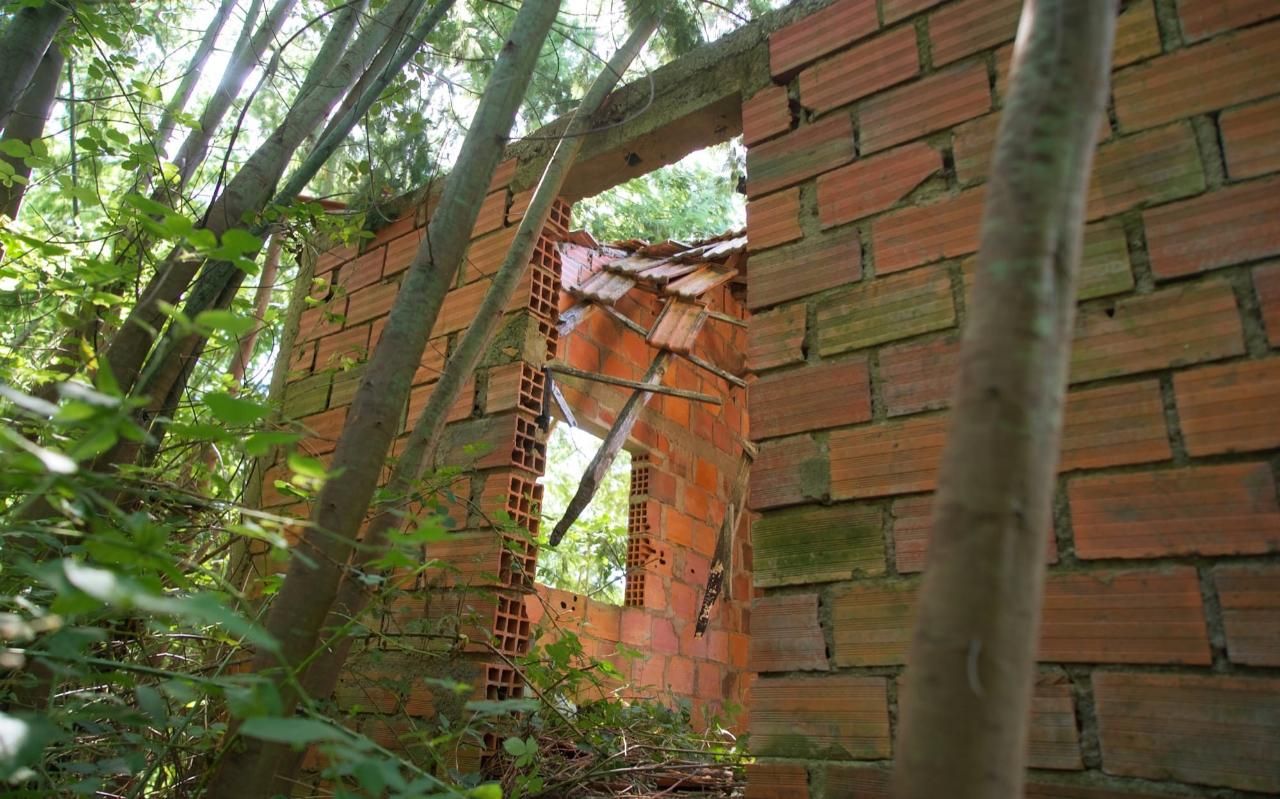
Analysing the condition
Published 4y. Edited 4yPublished about 4 years ago. Last edit about 4 years ago
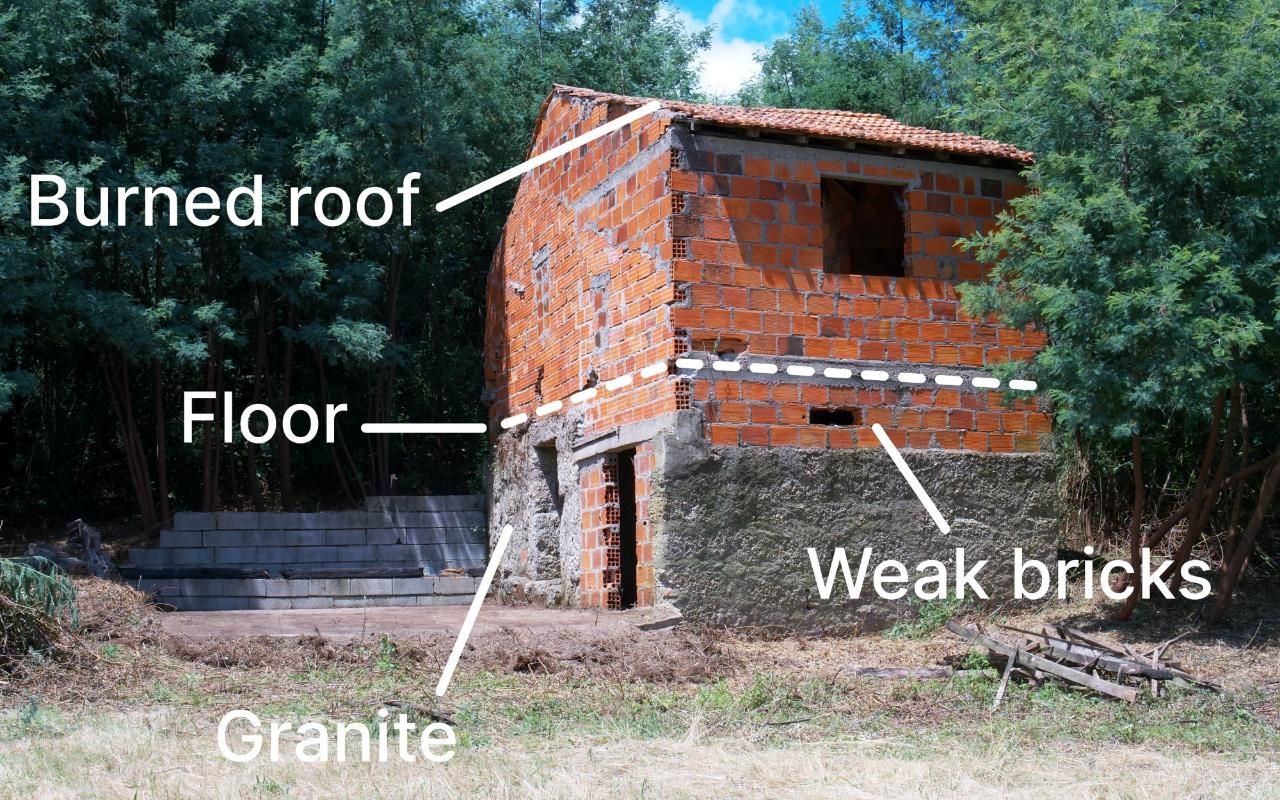
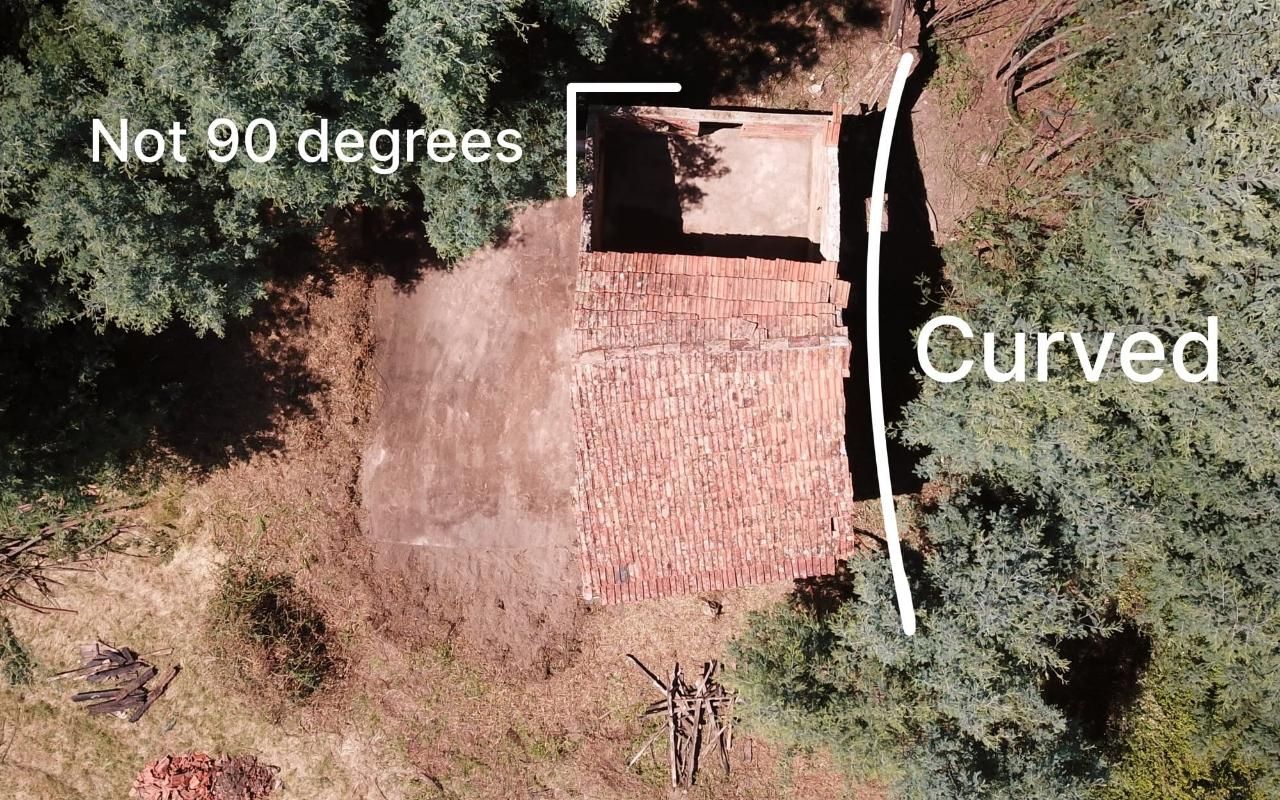
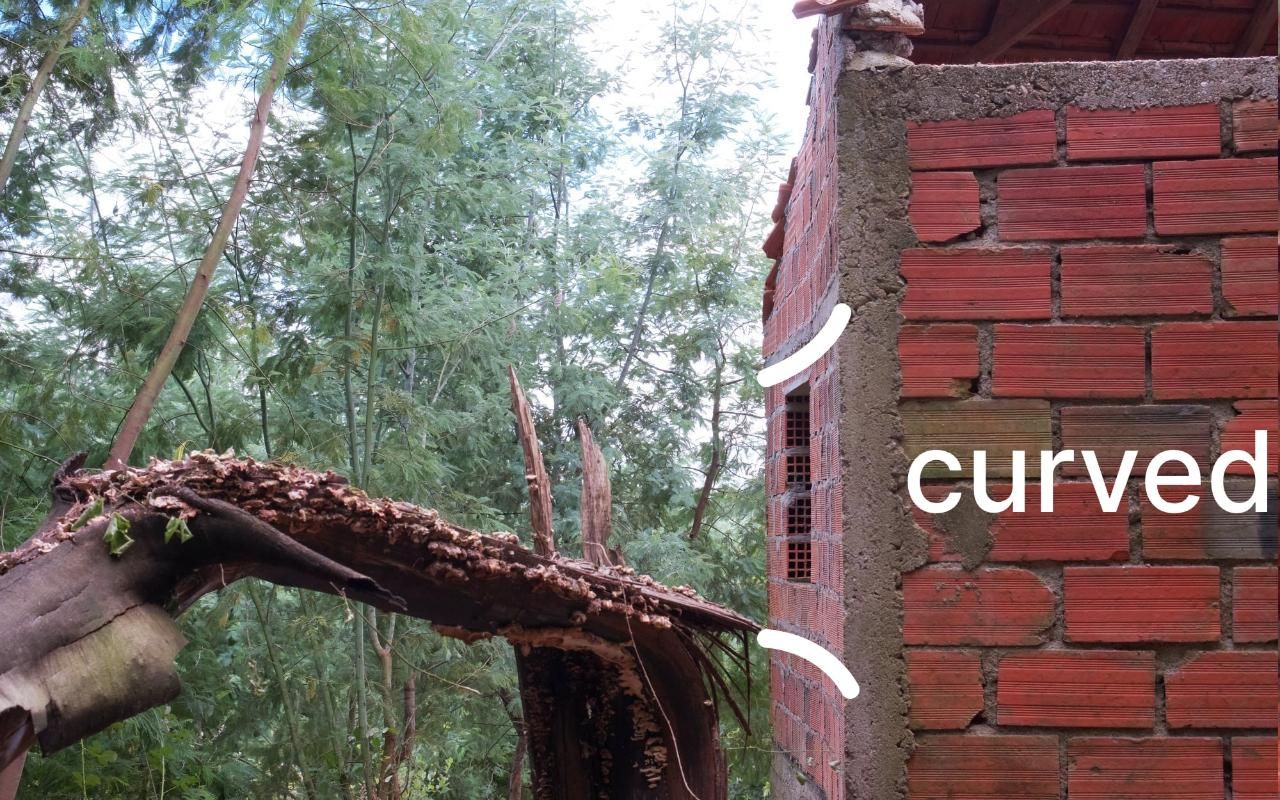
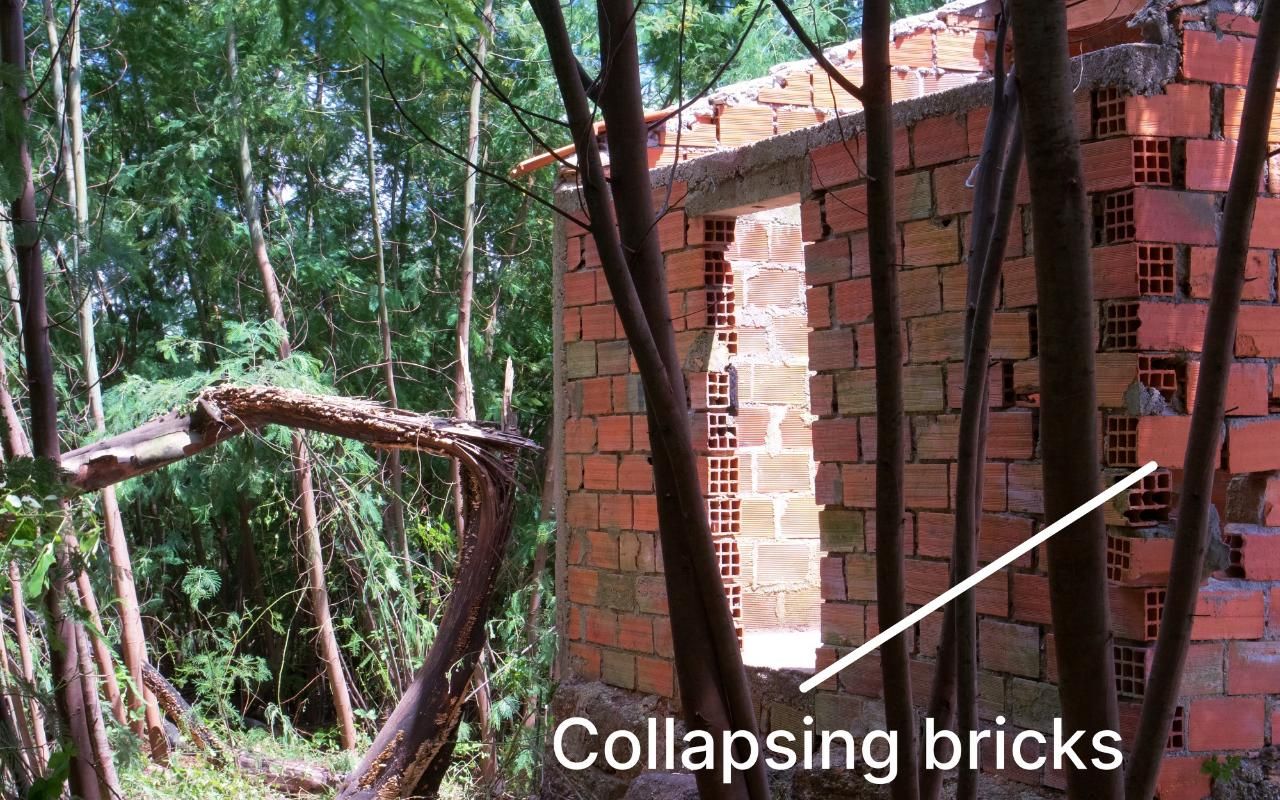
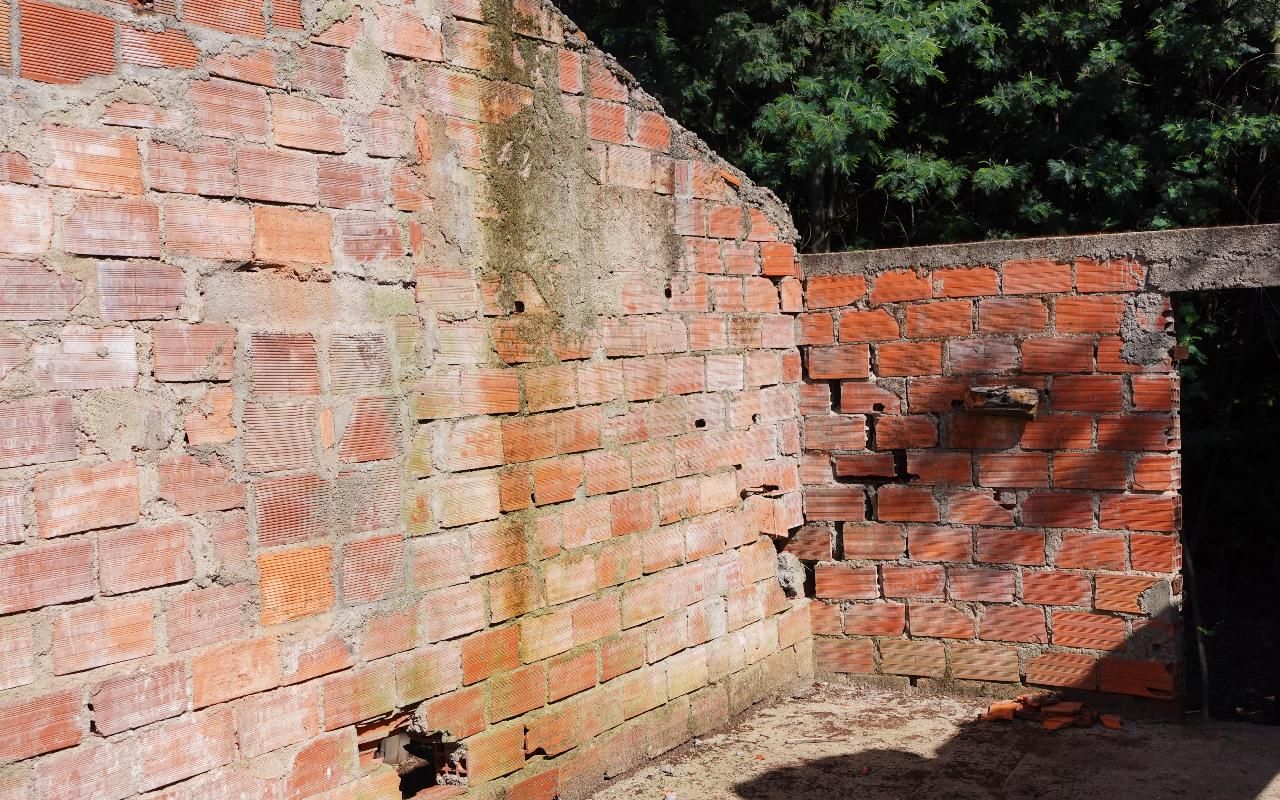
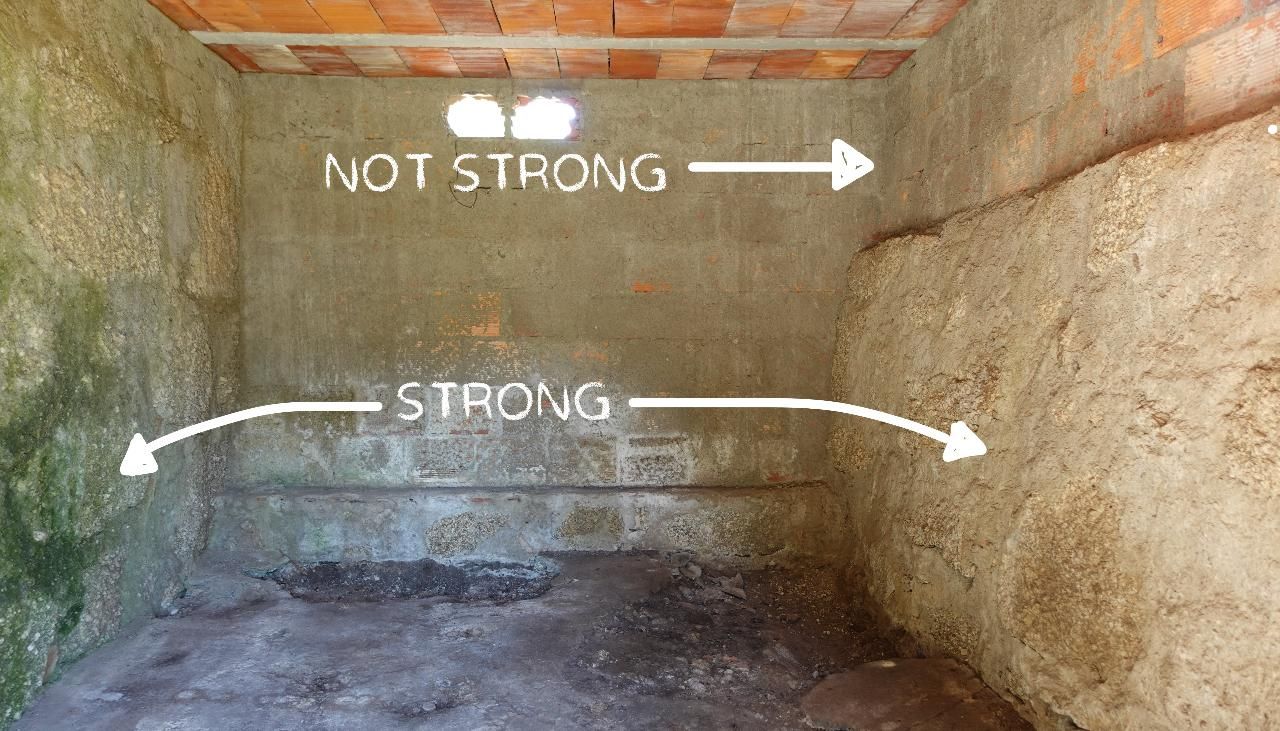
Now the building is cleaned and openend up we can go in and around the building. Take some measurements and look at the structural strength of it. Turn out there is a big curve in the wall and many angles are not 90 degrees. The bottom part that is build on granite seems quite stable, it might need to be reinforced in one wall where the top floor is only leaning on the hollow bricks, which is very weak. The top is in worse condition. There are big gaps and cracks in the wall. The roof on top is also about the collapse so it’s still hard to access. So we will take that down first. for safety.
4
Take the roof down
Published 4yPublished about 4 years ago
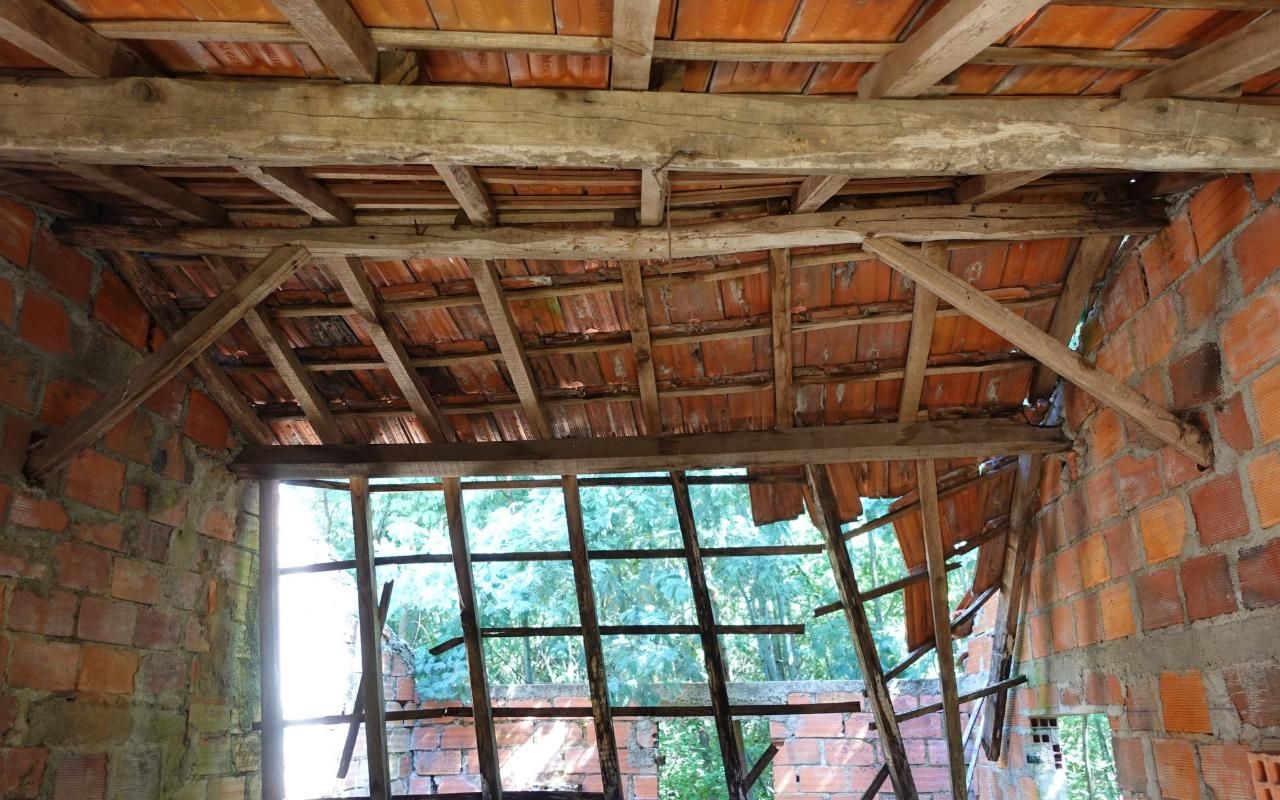
We took down the wooden beams and rooftiles. You can see in update #46 how we did it
The wooden beams are just placed on top of the bricks with some cement around it. Some were almost rotten away. Removing the roof took away some additional strength that holds the walls together. At this point we are still thinking what to do with the walls. Taking them down would be the easy and safe option. But there is something very interesting about trying to reuse them. To save material. But also as a little piece of standing history that reminds us of the beautiful Portuguese construction methods.
5
3D model of the building
Published 4yPublished about 4 years ago
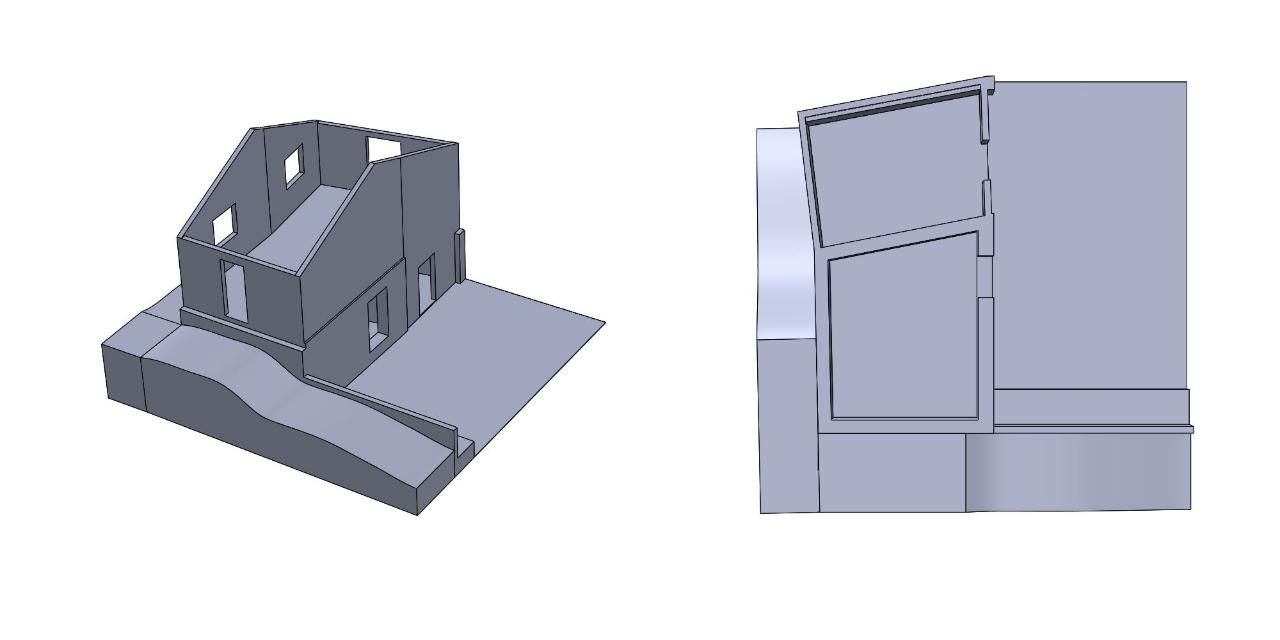
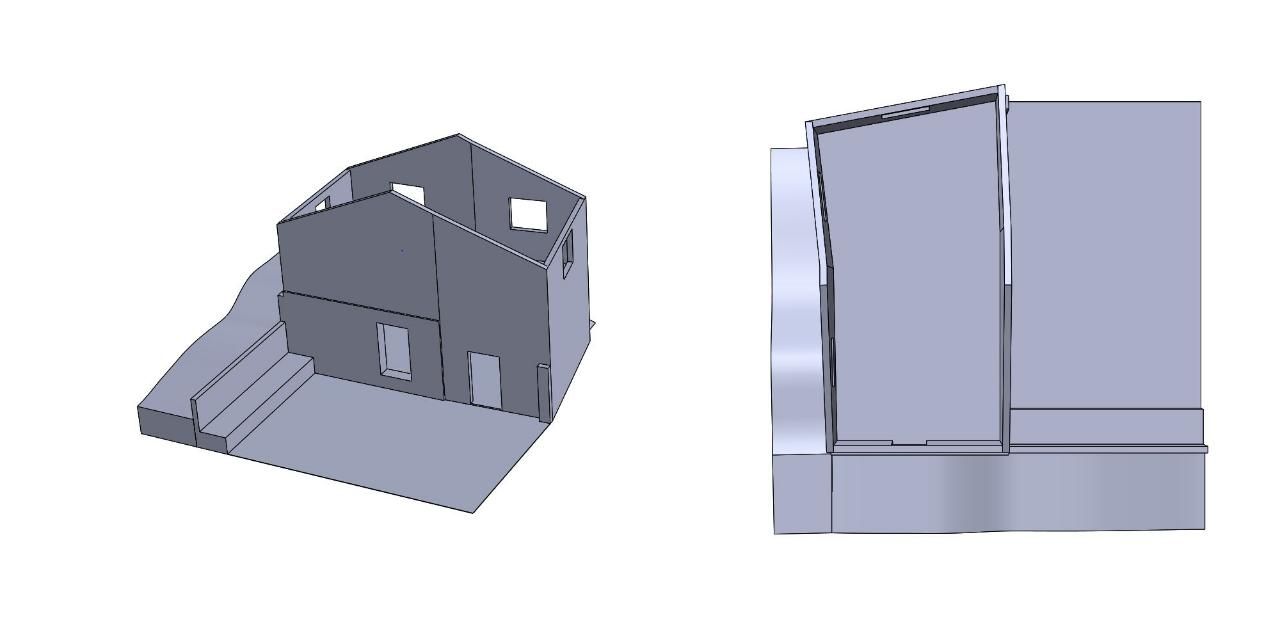
We made a basic 3D model of the stripped down ruin.
Somewhat precise, its not an easy task with many bricks going in and out and non 90° angles.
However this should give a reference to start of with.
We will continue to reinforce the bottom and walls, feel free to download the model and propose designs/layout.
The goal is to become a guesthouse with 2 bedrooms downstairs and a simple living area upstairs
Files https://drive.google.com/drive/folders/1l9DQ7bK2Kq51IygSZ1gvRBjivGyVcrK3?usp=sharing
6
Design submission member (Martijn)
Published 4y. Edited 4yPublished about 4 years ago. Last edit about 4 years ago
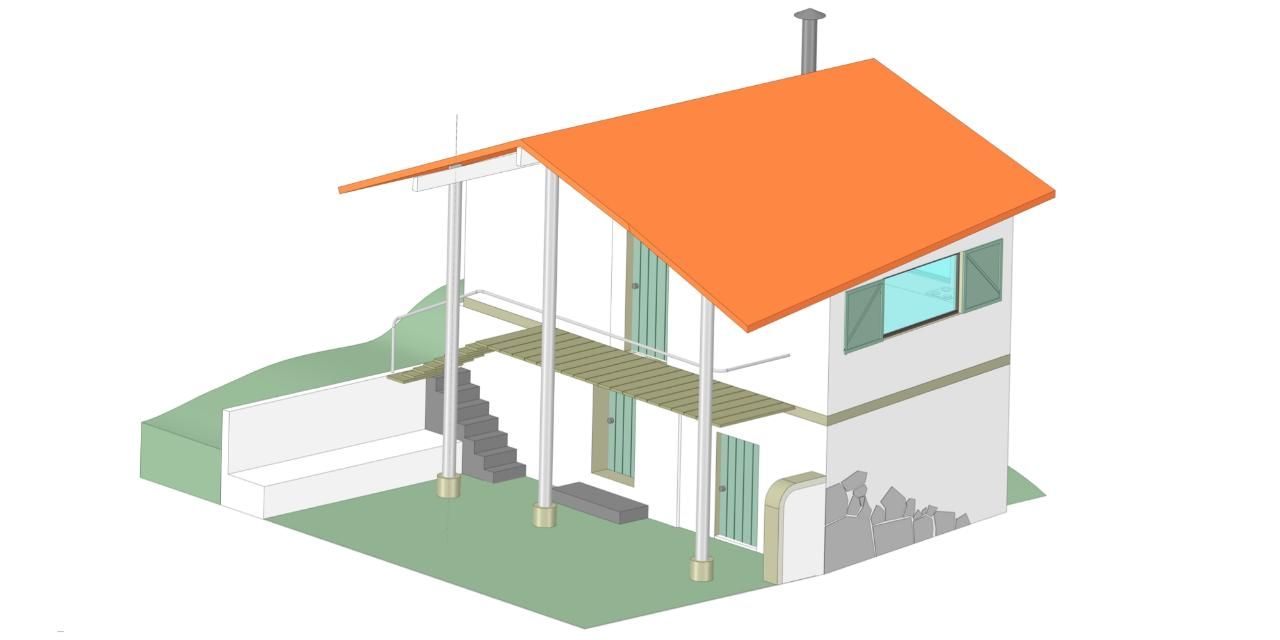
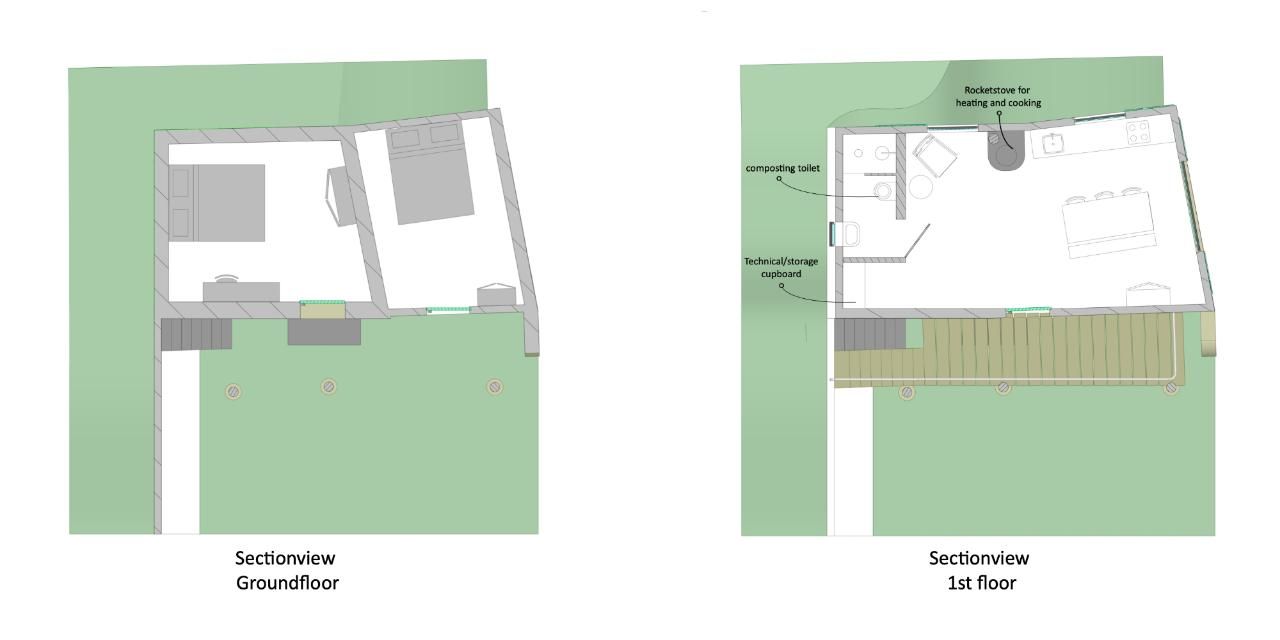
Here is a proposal from community member Martijn + his thoughts behind the design:
"Judging from the videos the walls look unstable and hard to fix in a good way. So I made use of the opportunity to move the door and windows. The bricks could probably be used for future building projects, simple projects that dont need loads of structural strenght. I was wondering if it would be possible to use materials that can be found on the propperty. Here at the work away we are working with stones that we find here and use lime mortar to build the walls. I've also seen a lot of schicht houses around here.
I've put in kind of a boardwalk and overhanging roof to have a dry passage from bedroom to livingroom in those wet portuguese winters. I thought it would aslo be nice to have a warm space to have a shower in winter so I've added a bathroom with a composting toilet but the outhouse could also be used of course.
The roof is overhanging to keep the heat summer sun out. We would have to look into the right angle to let the sun in in winter.
The place is heated with a rocketstove, I've seen some nice designs.
The stove could be used for heating the shower and cooking aswell."
Let us know if you have any feedback or suggestions :)

7
Reinforce the bottom part
Published 4y. Edited 4yPublished about 4 years ago. Last edit about 4 years ago
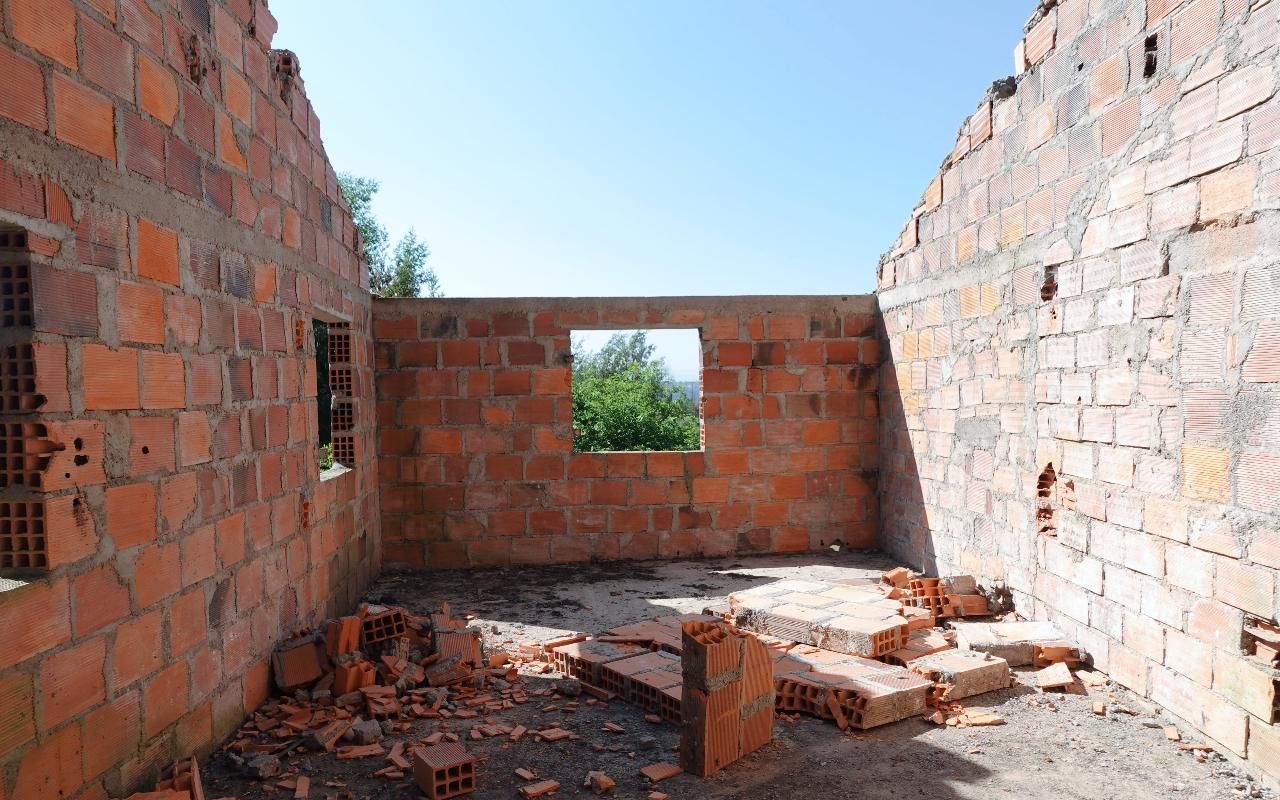
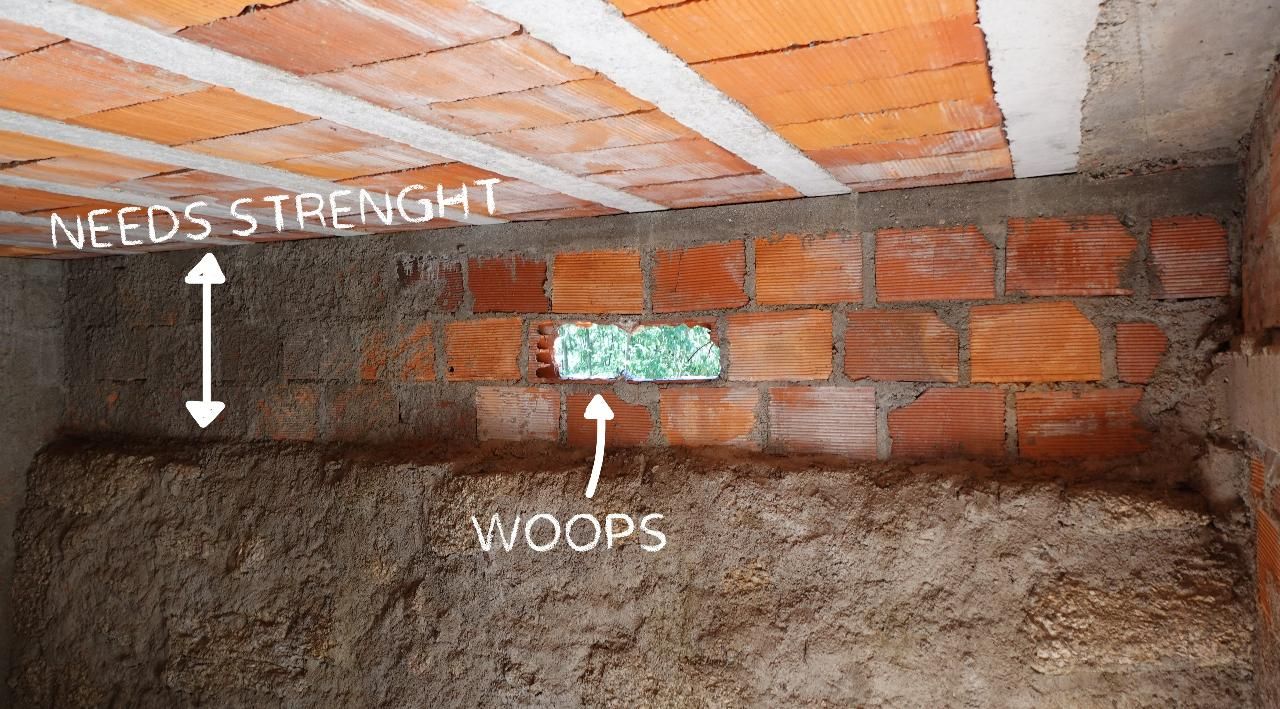
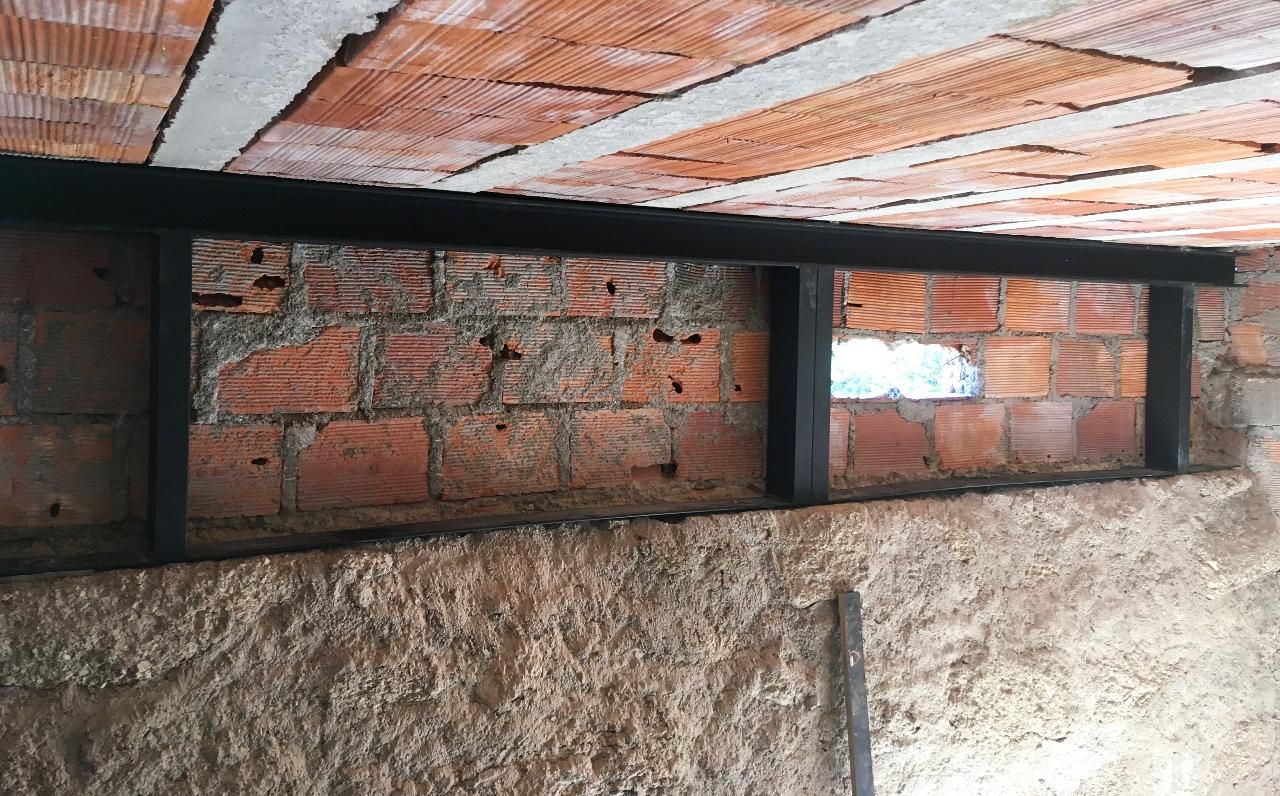
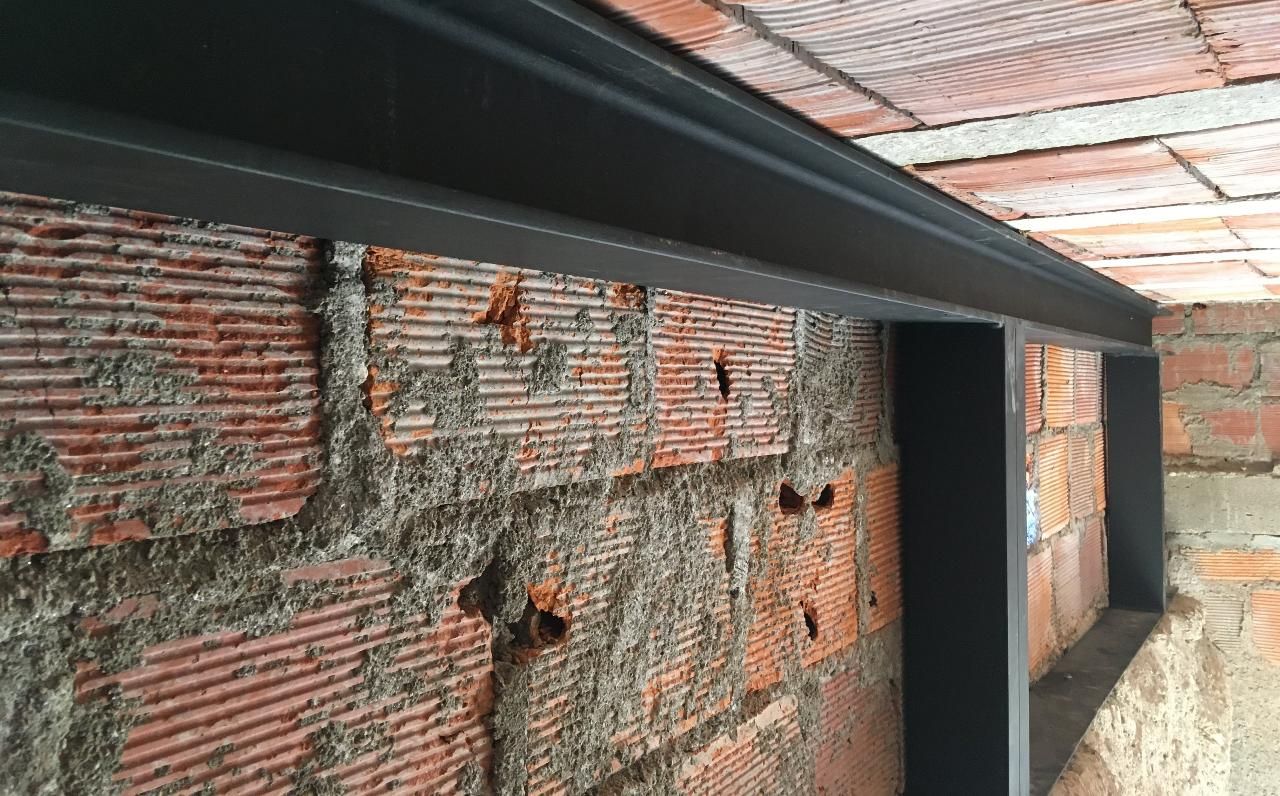
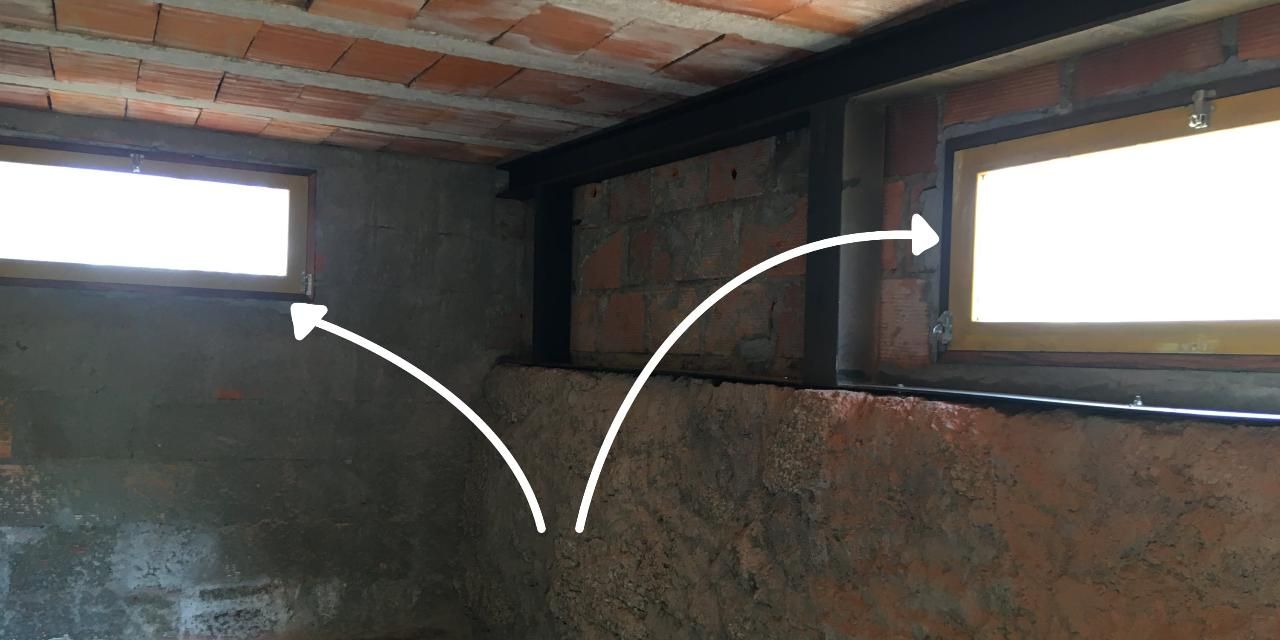
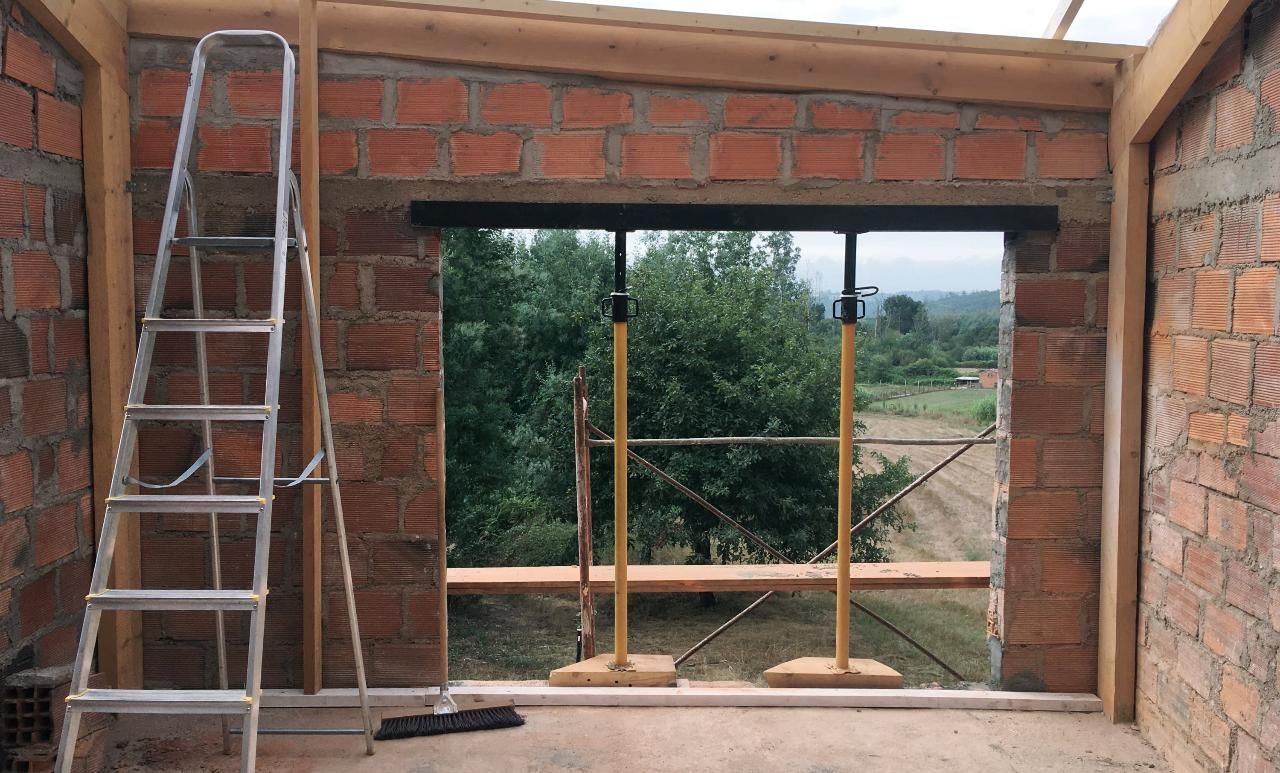
The second floor in the ruin is build on top of thick granite rocks. Solid. They can carry a lot of load. However one of the main things we've noticed to improve is that in the front of the ruin, the load of the second floor is carried on a layer of bricks (you can see on the image above in update 3) However bricks are not made for those loads. On top of that there are also some holes in it 😅
So we've reinforced that part with a 12 CM H-beam mounted on a metal frame. At the moment the load it still on the bricks, but the beam is there as additional support and to make sure the thing won't collapse. Next we will have a look at the top wall
8
Fix the broken wall + add door
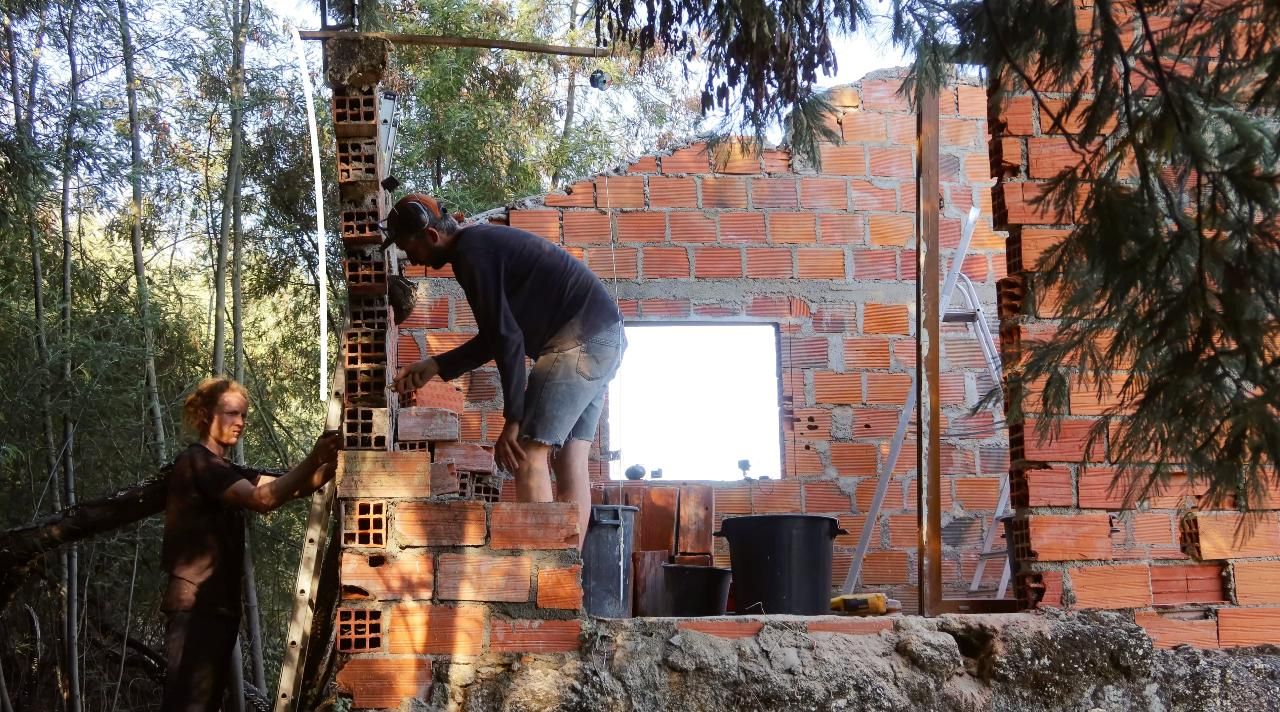
Published 4yPublished about 4 years ago
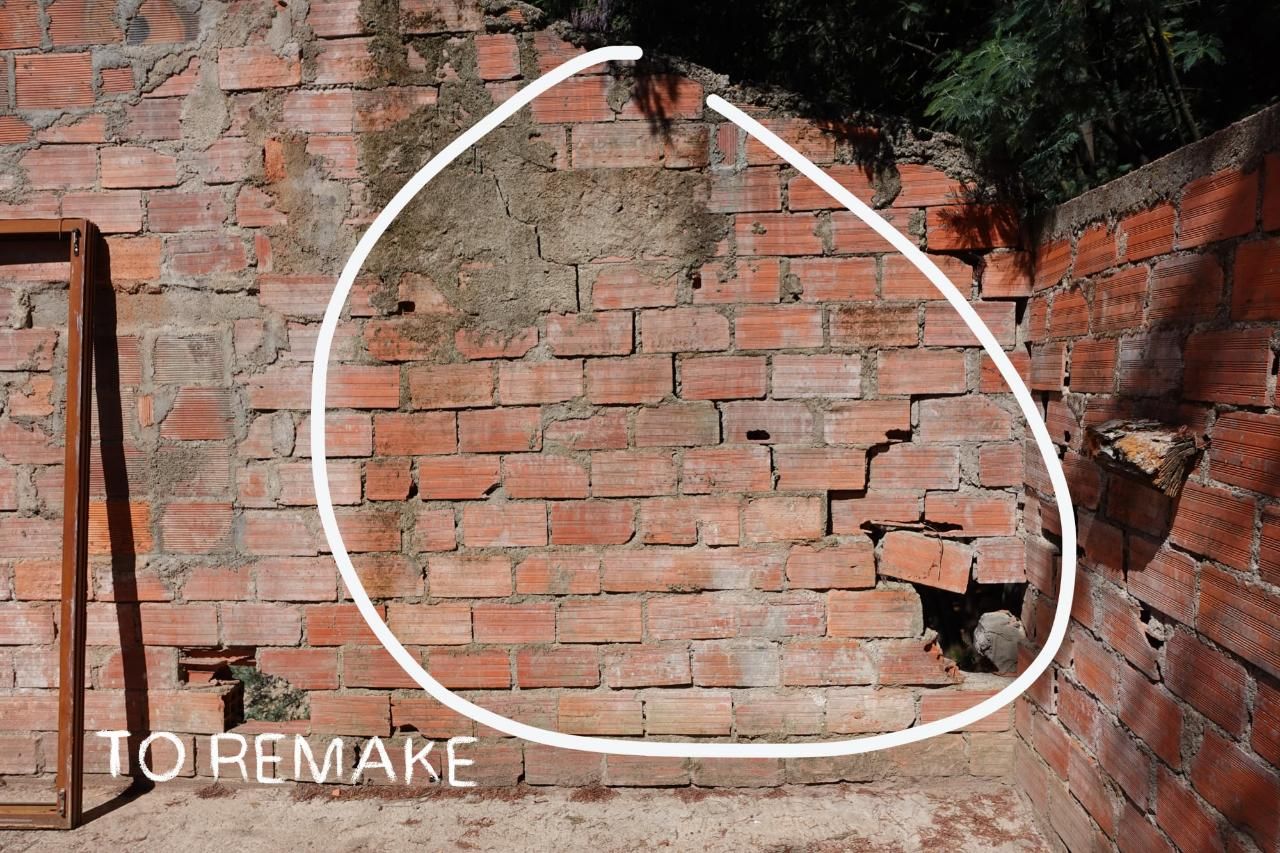
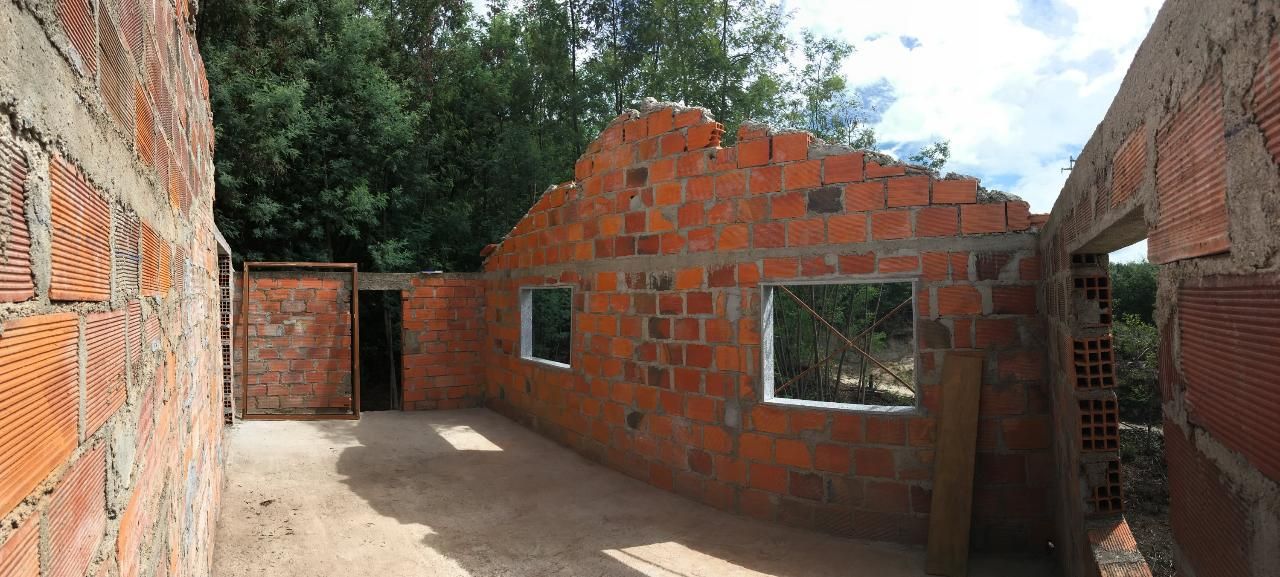
One wall had a big hole inside and the bricks disconnected itself from the rest. They are just hanging in there and you can pull them out. (Probably due to the fire) It's also the corner piece which should provide some strength. We wanted to break the wall, repair the crack and connect everything together. While we are at it, we also want to put a (sliding) door frame in there. This will also be the moment to validate the structural strength of the wall, see how it behaves when we start chopping into it.
Picture 1: What we will remake
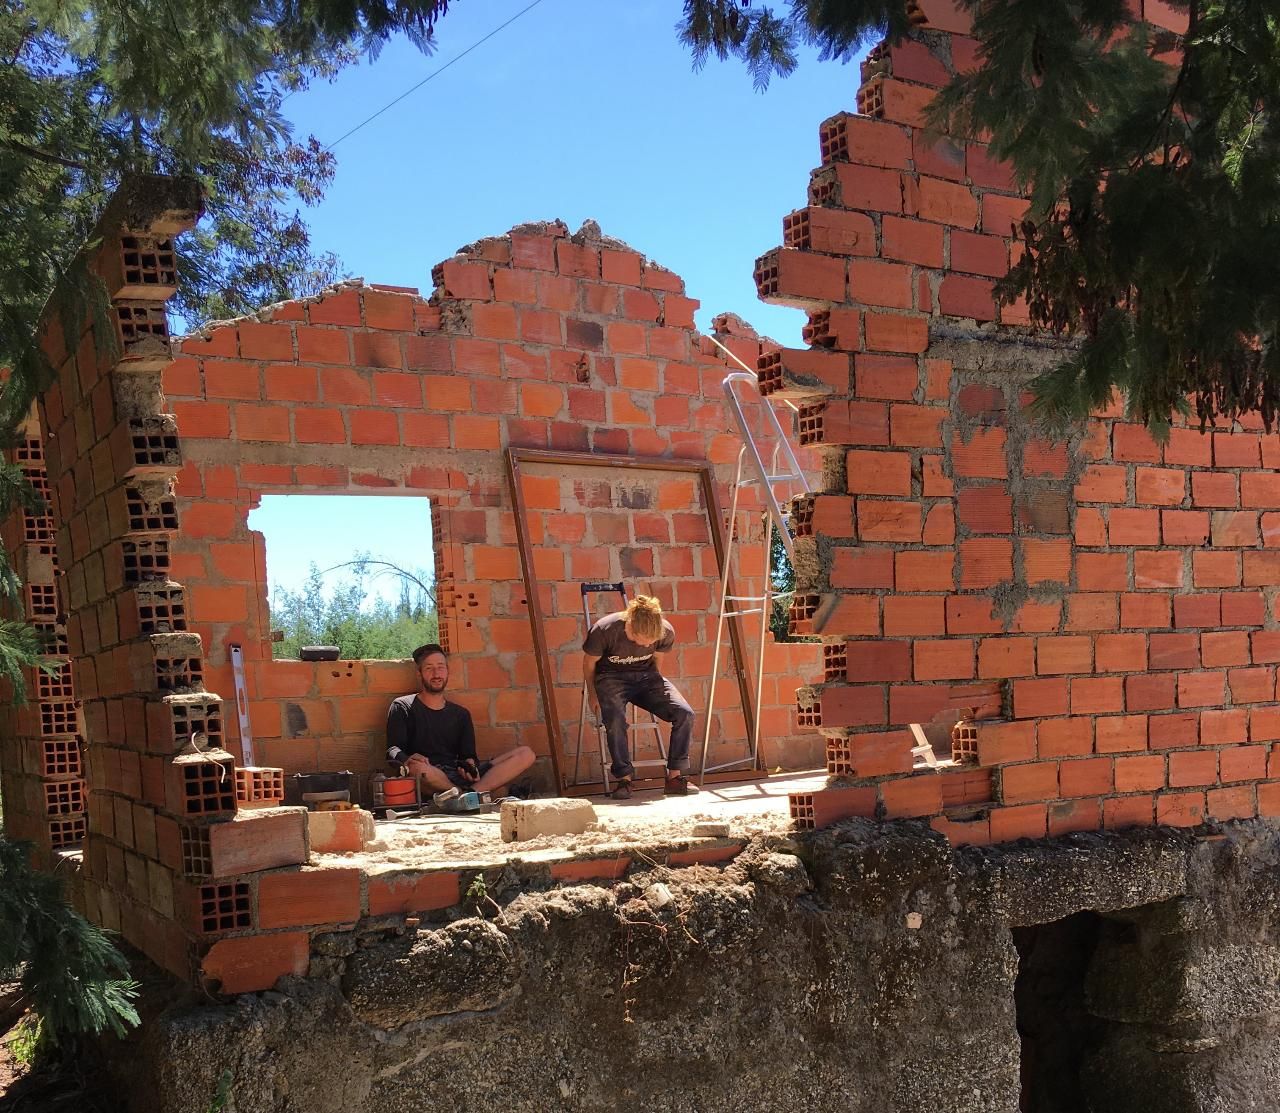
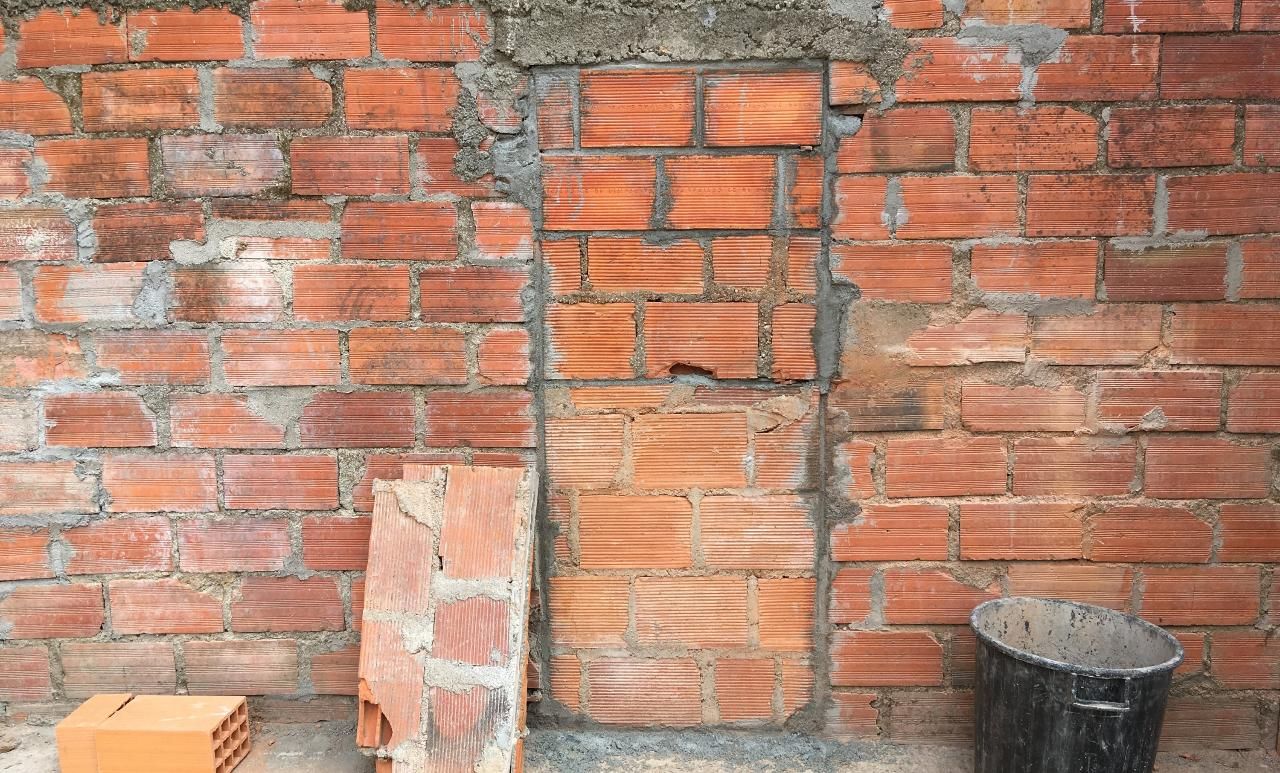
Picture 2: The wall chopped out
Picture 3: No description needed
Picture 4: Building back the wall (in the same sketchy style :)
Picture 5: Final result, a fixed wall + hole for the door + lintel on top
Final wall analysis: Not mega bad, but definitely needs some extra love (support)
9
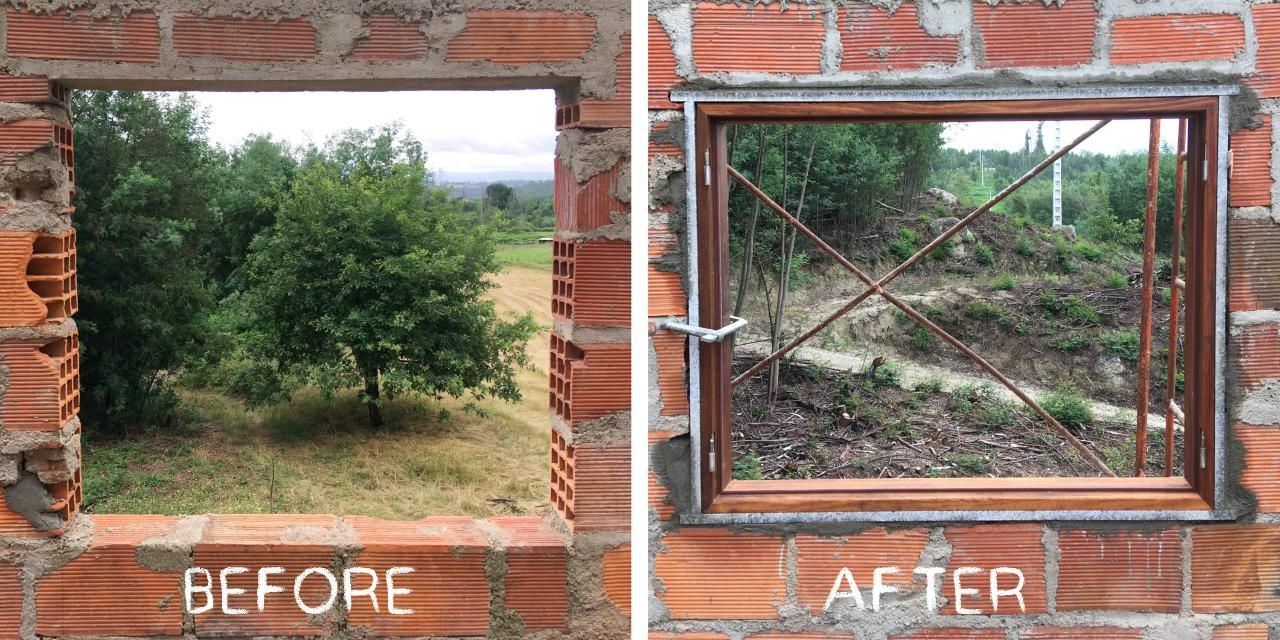
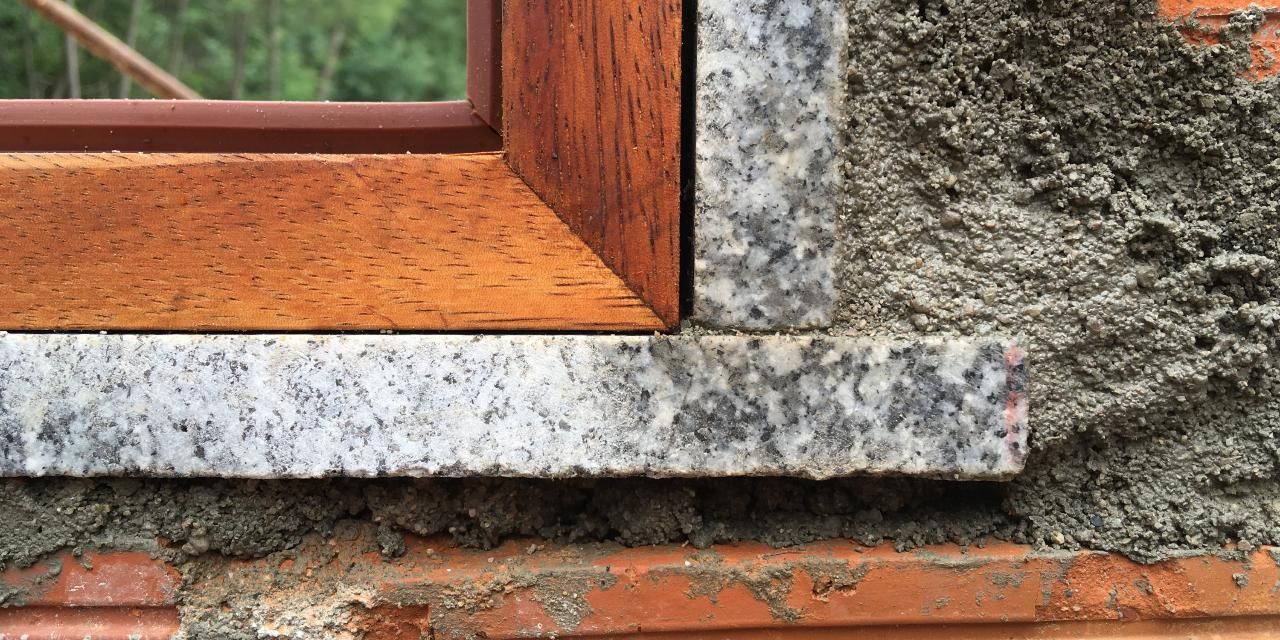
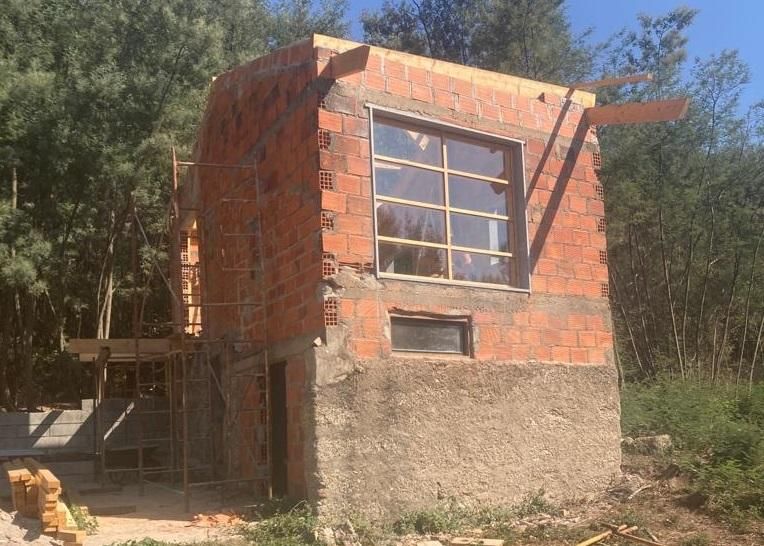
Adding windows
Published 4yPublished about 4 years ago
The Ruin itself already has a few open spaces for windows, and well also just a few holes from broken bricks. We got in touch with a local guy (Ronald) that had some old window frames laying around from his own renovation. The outer frame was missing so we asked a woodworker to make a fitting frame. We used those to install in the Ruin. We installed two on the top and two in the bottom. The bottom ones are installed directly cementing the wooden frames straight into the holes (sketchy but fast local technique) On top we've added a granite frame so we can easier remove the wooden frame in case it needs to be replaced. Lets see which technique turns out better!
10
Add a sturdy frame
Published 3y. Edited 3yPublished almost 4 years ago. Last edit almost 4 years ago
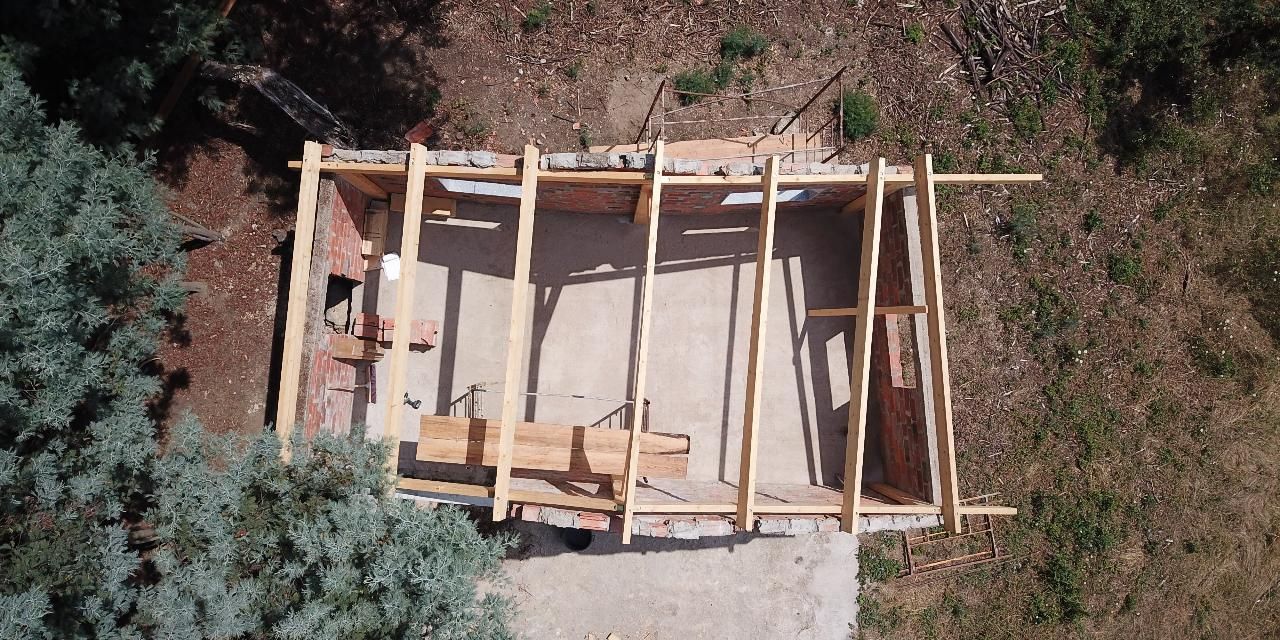
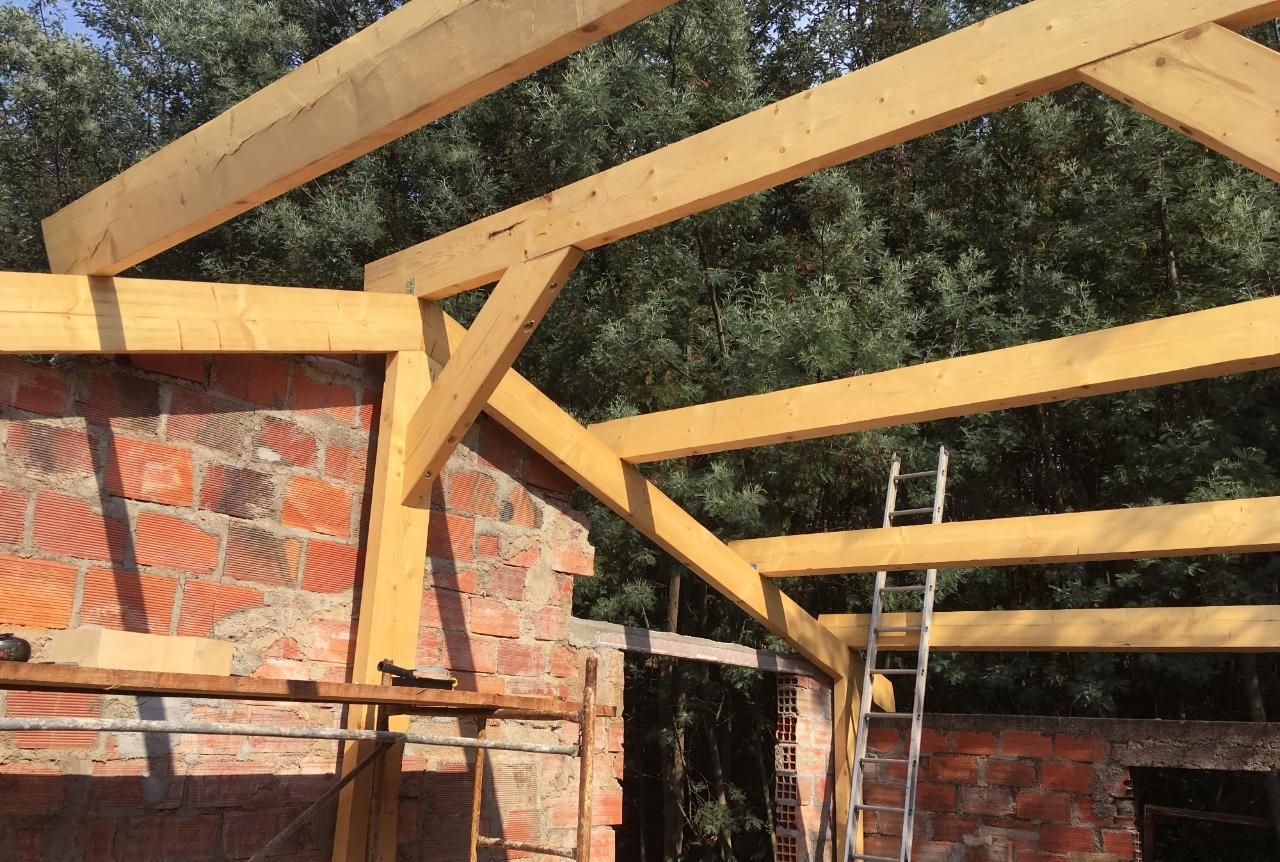
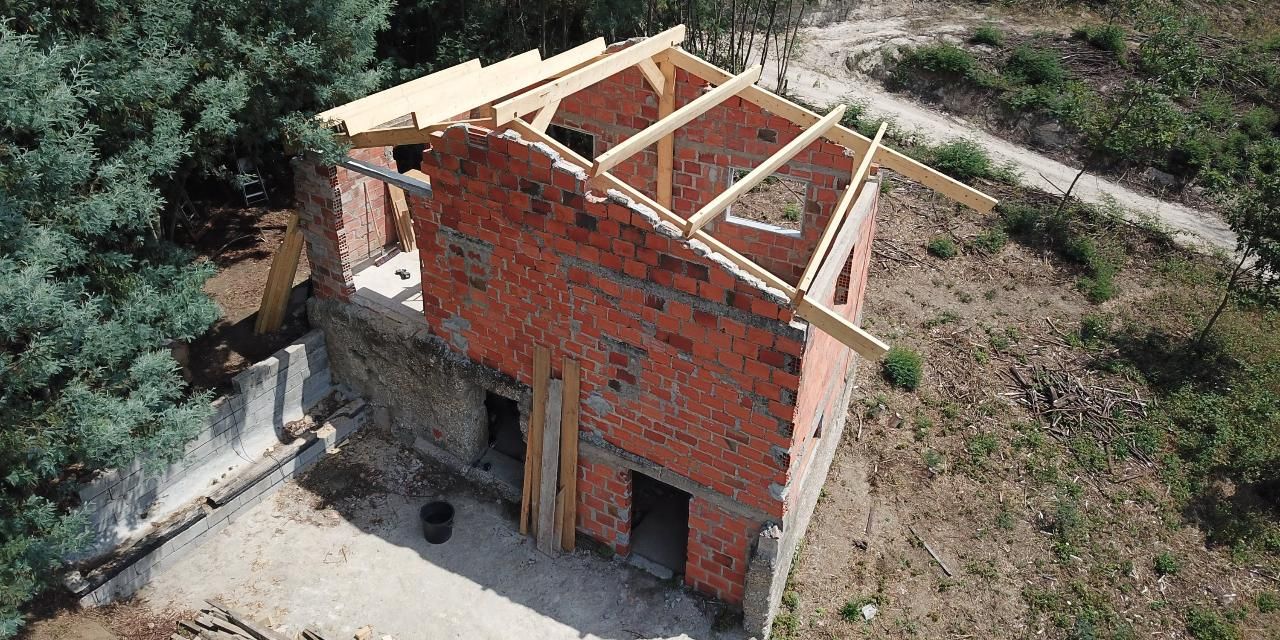
As you might have seen in previous updates, the wall is not in a very stable condition. So we build a wooden frame inside that carries the load of the roof so it’s not leaning on the brick walls. But most importantly it will connect the walls back together (how it was originally) to give back strength and stability. The frame is made from 7x22CM beams made from Pine Wood. (which are standard available here) It was quite a challenge because the ruin has many weird angles in there. non straight walls and not 90 degree corners. Specially when we started putting the straight wooden beams next to it we noticed. So far we got this frame. Next we will build the wall up to the wooden frame and connect them together.
11
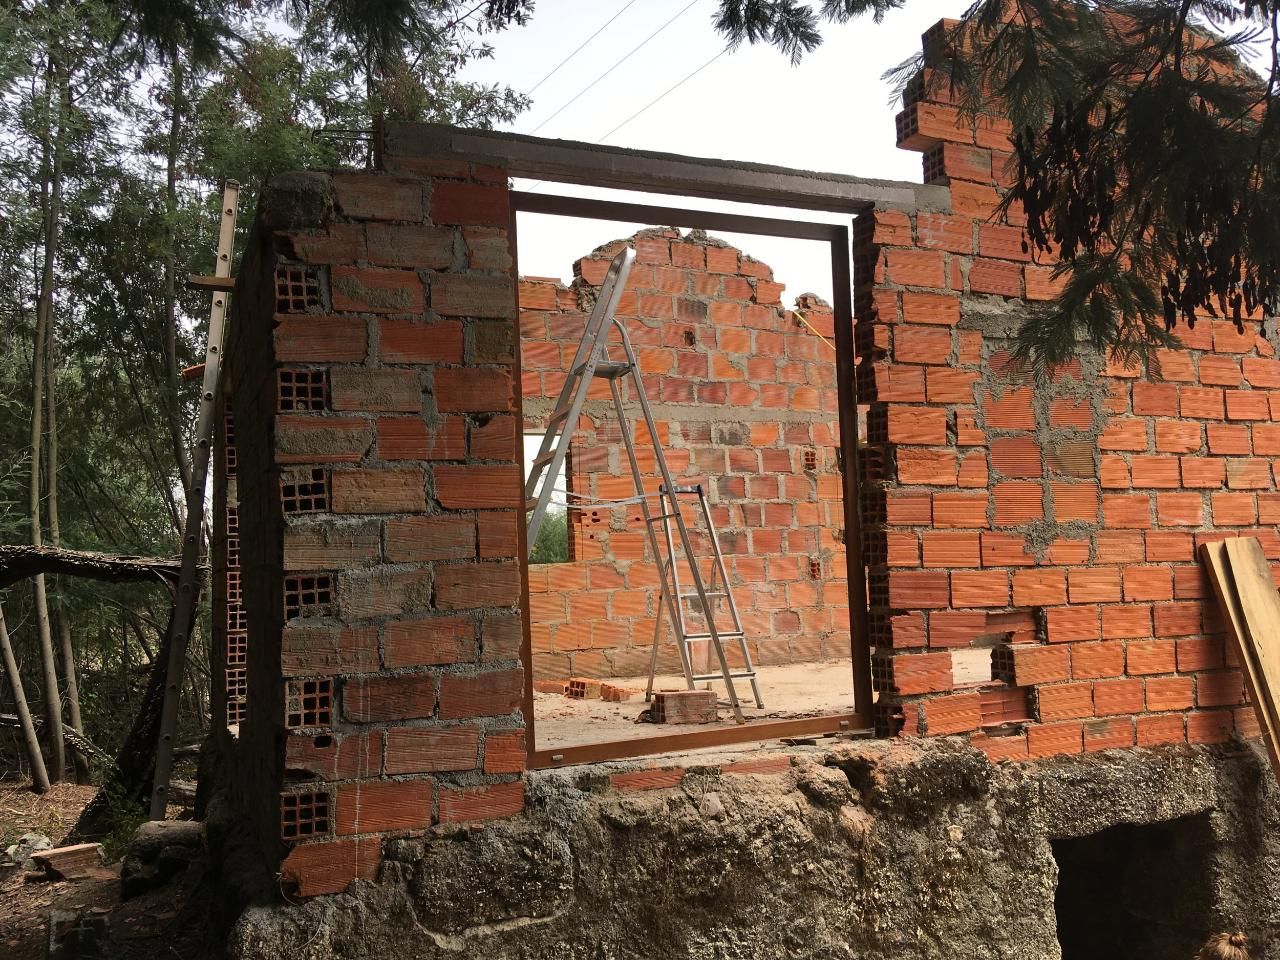
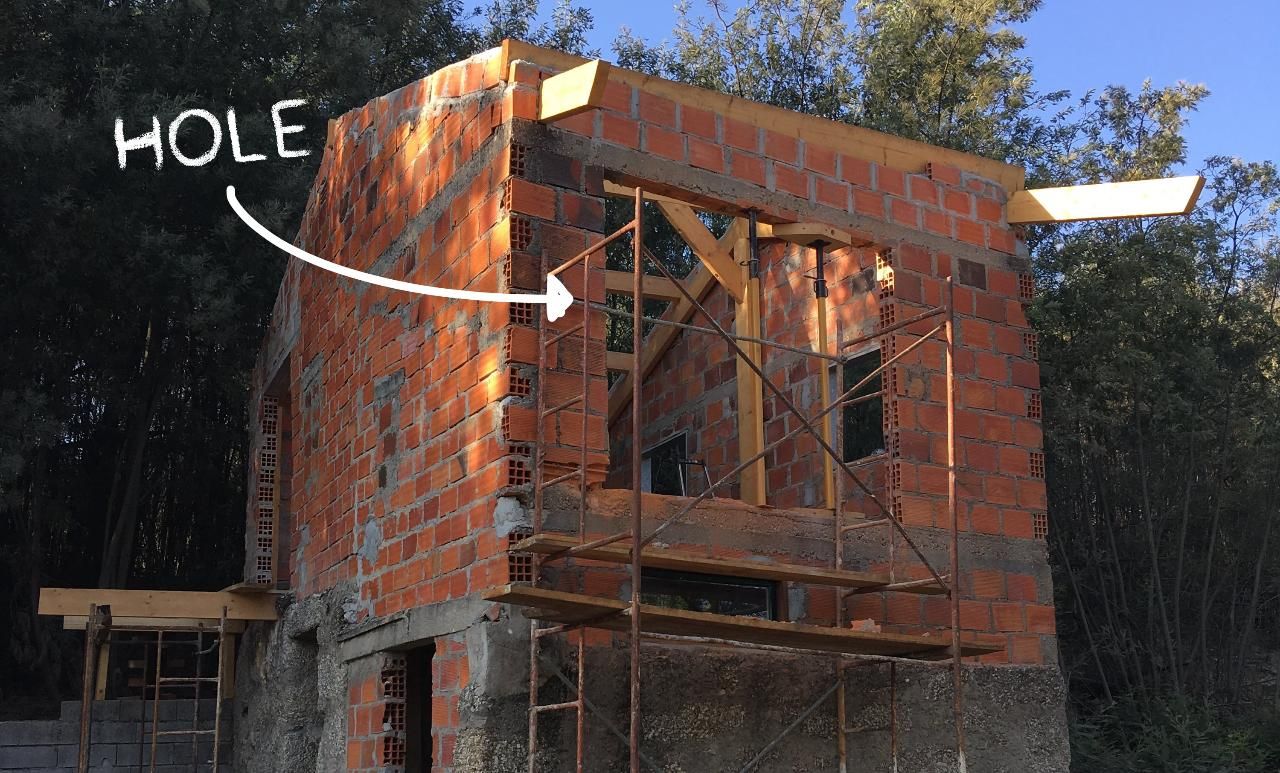
Final hole
Published 3yPublished almost 4 years ago
We’ve added a final hole into the wall. Ideally we would have done this earlier while we made the other ones. But we were worried cutting a big opening would remove stability from the sidewalls. So we waited for the wooden frame to be inside that keeps everything together. We've added a L profile for support and the bricks we cut out our used in the backside to close the original door. Next step is making a wooden window frame
12
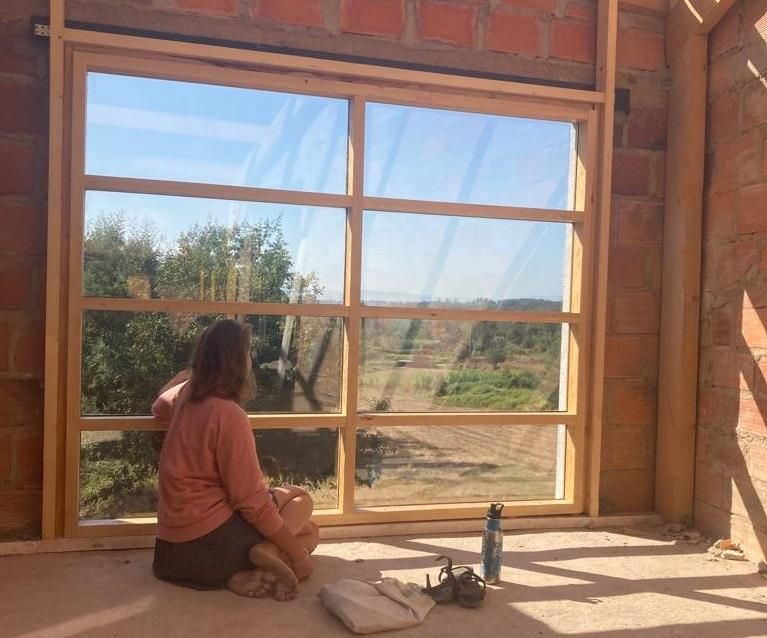
Making the windowframe
Published 3y. Edited 3yPublished almost 4 years ago. Last edit almost 4 years ago
We have made a wooden window frame to make a window out of the big hole we have made in the front. The frame is made out of pine wood. Probably coming from northern Europe. We asked a local furniture maker to make some straight beams for us and cut a groove to later put the glass. For now, we wanted to keep it simple, but we have decided on a fixed window, it cannot be opened. But it’s mounted in a way that this could be changed later if it turns out to be too warm inside.
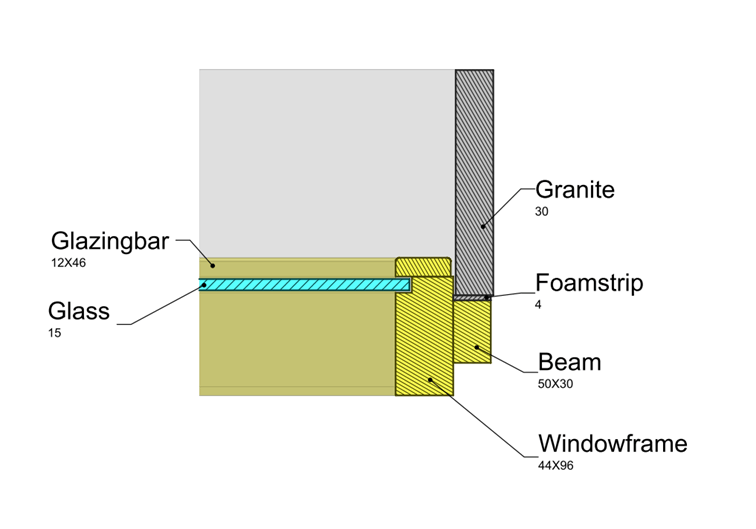
We have designed the window frame to fit the insulated glass panels that we’ve got given. The panels are 1050 X 435 and 15mm thick. The panels sit in a 20mm deep rebate with 4mm thick glazing tape on both sides. The glass is held in place with glazing bars which are screwed to the frame.
The window frame will be under an overhang of the roof and in that way mostly protected by the rain. But to be sure no water will leak in around the glass we have used a silicon window seal. To prevent water from sitting in the rebate in the unlikely event of leaking past the silicon we have made channels in the vertical direction to let the water drain out.
To make an airtight seal we have installed a foam strip all around the window frame which will be pressed up to the granite.
In this video you can see us making it: https://youtu.be/39m3QUGHm7Y
13
Making a new roof
Published 3y. Edited 3yPublished almost 4 years ago. Last edit almost 4 years ago
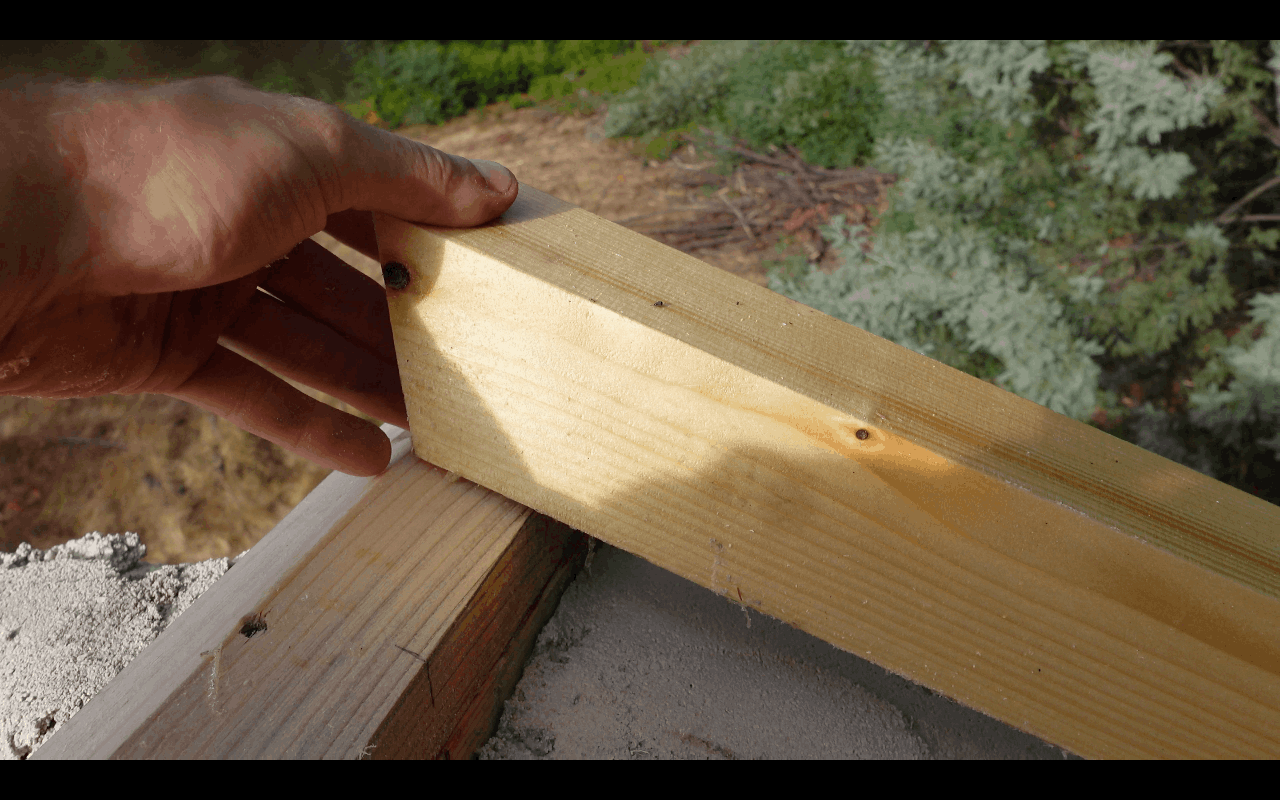
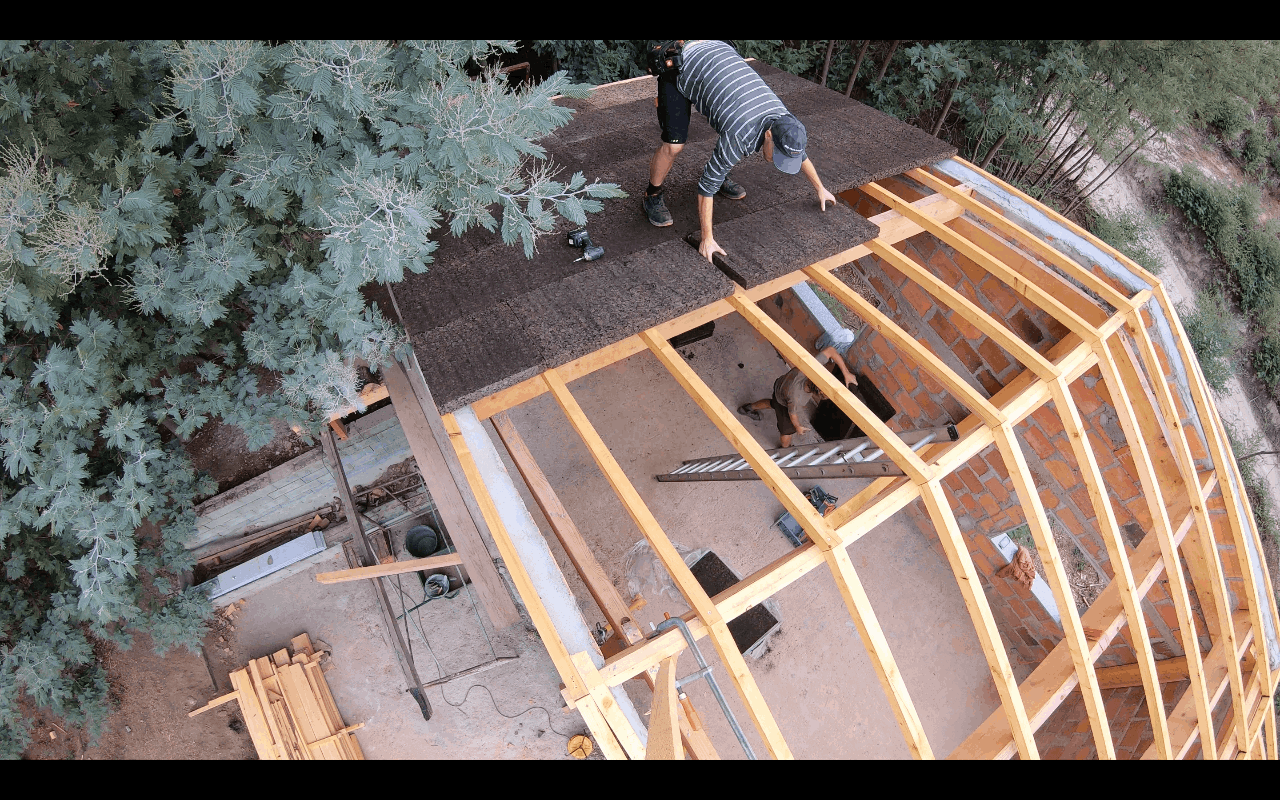
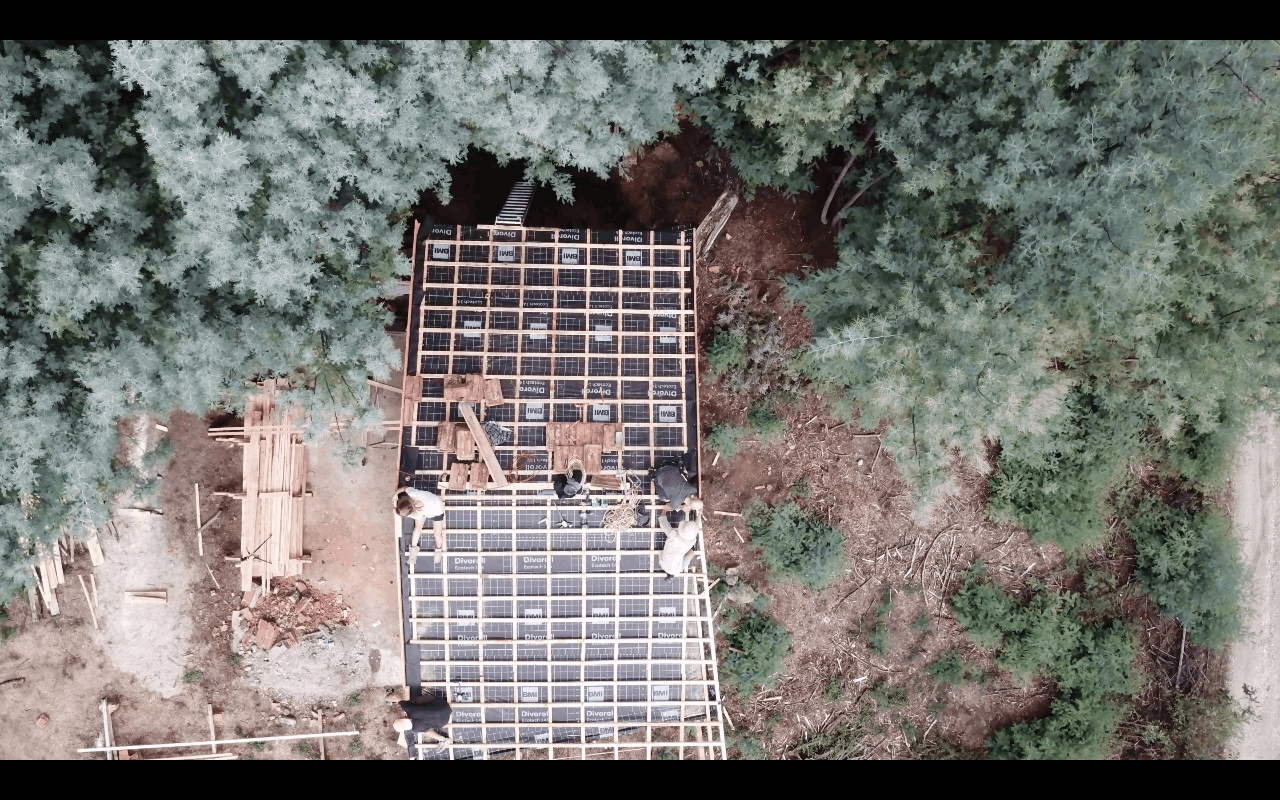
Earlier we put in the reinforcement frame. On this, we are putting our roofing construction.
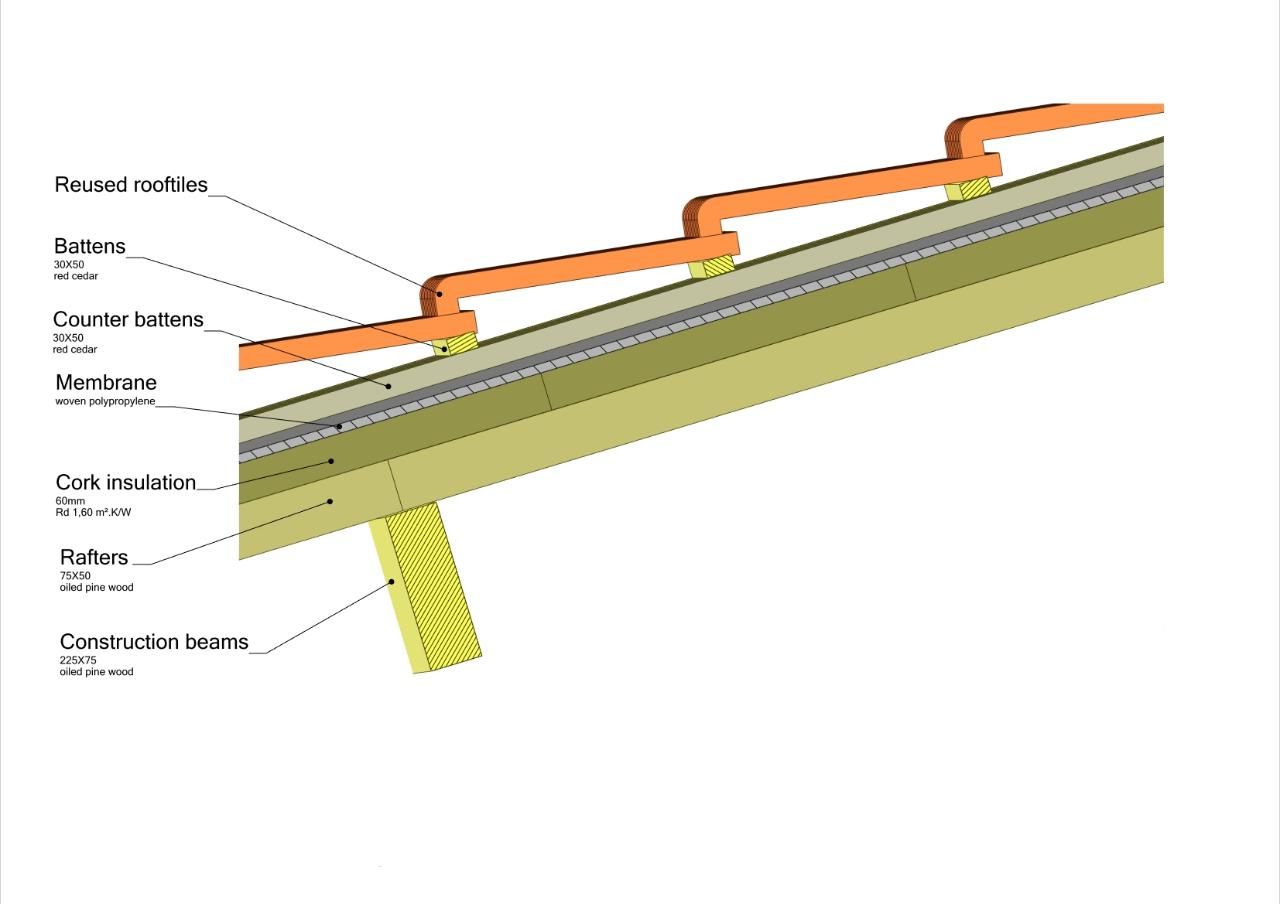
The roof is made up of 6 layers.
Pine Wood rafters 75X50mm
Cork 60mm
Membrane
Counter battens 50X30
Battens 50X30
Reused roof tiles
We are using cork to insulate the roof. The cork is lying on the rafters to have as minimum gaps as possible. The cork is 60mm thick and has an Rd of 1,6 K-m2/W comparable to Rockwool. On top of the cork, we have placed a waterproof membrane. This is our backup waterproof layer. Since we are reusing old tiles and have to cut the tiles on the sides of the roof we think it makes sense to have a layer that we know for sure keeps us dry. The cork and foil are held in place by the counter battens. These are small wooden beams running over the roof vertically. They are screwed onto the rafters keeping the foil and cork in place. They also make sure water can run down the roof if the roof tiles would leak. As the final layer of the roof, we have used roof tiles. We already had a bunch of them which were on the ruin before we took the roof down but they were not enough. we found more in the village where an old roof was being replaced. The neighbor told us they were almost 100 years old!

14
Insulating our walls with cork.
Published 3y. Edited 3yPublished over 3 years ago. Last edit over 3 years ago
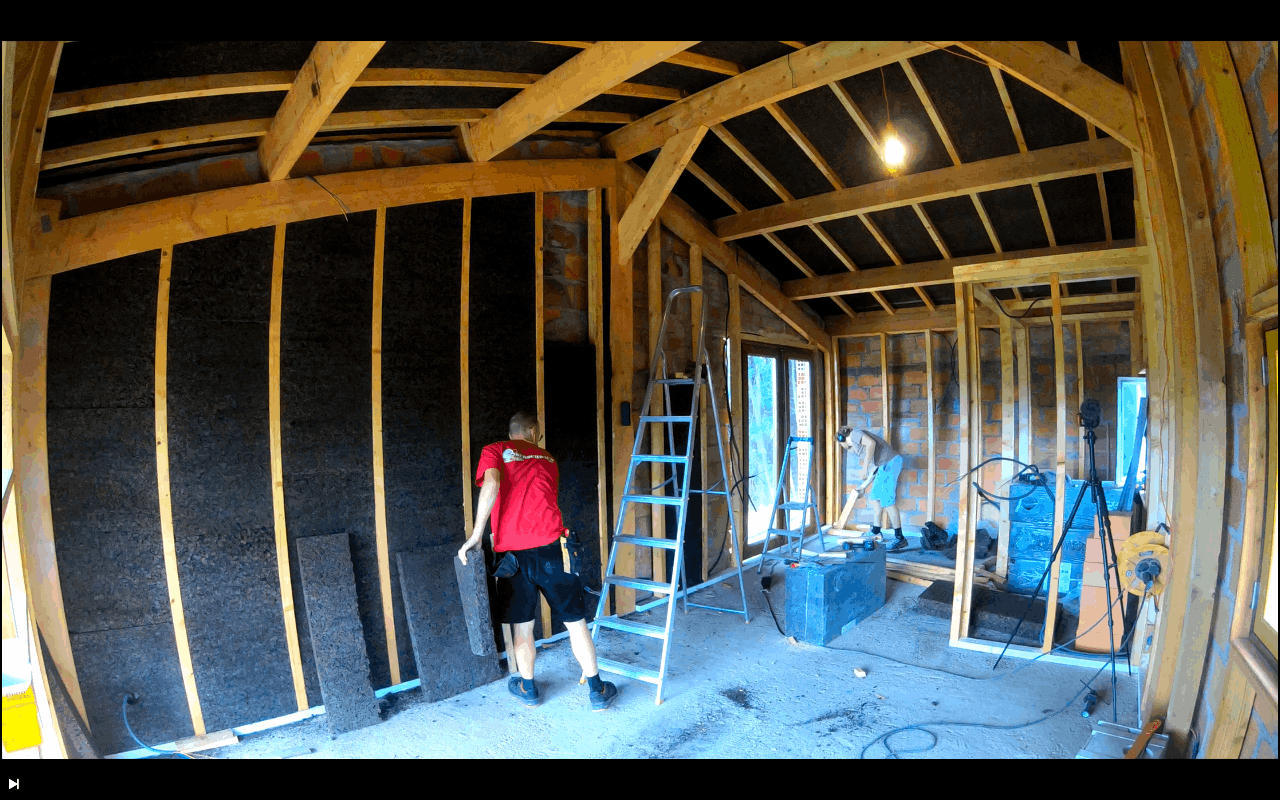
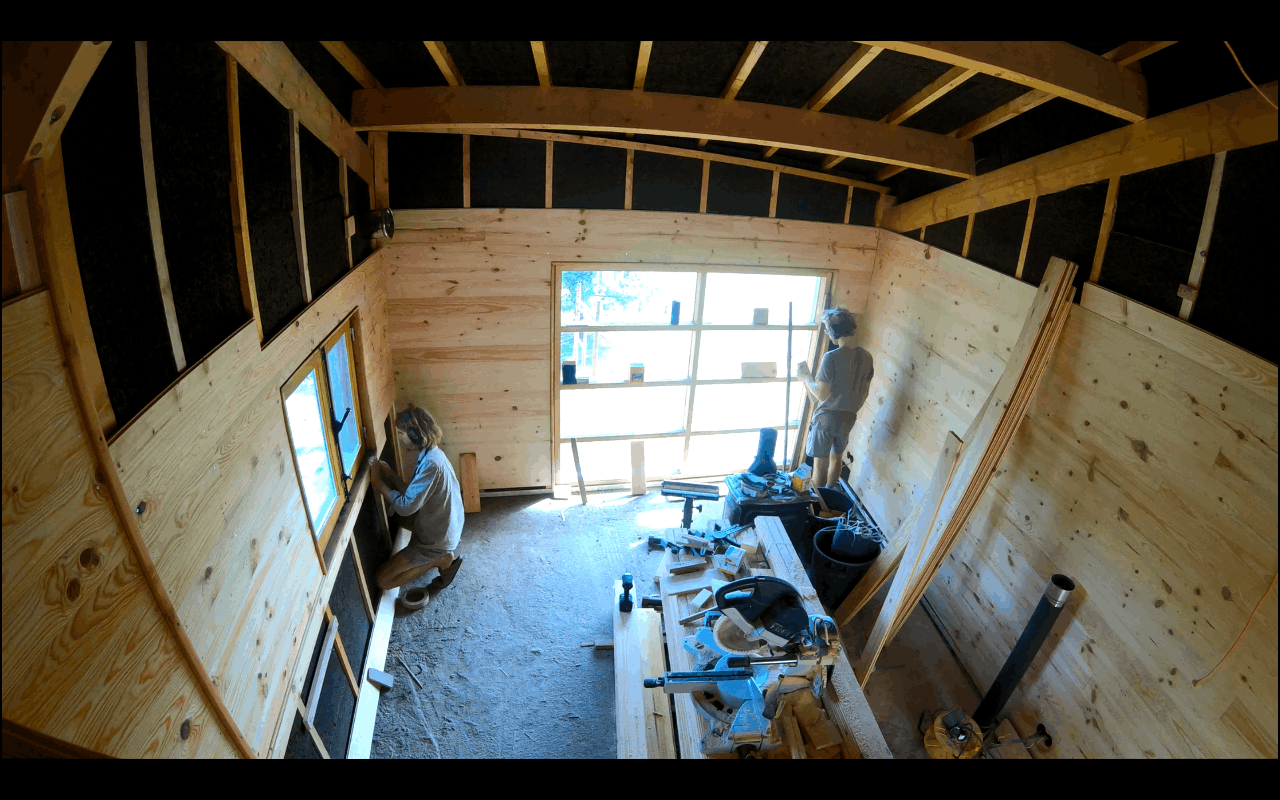
Now that we have put a new roof on the ruin we have a dry inside space. But besides it being a dry space we would like to have it warm in winter. And we would like it to look more finished so it will be a nice space to be in. Let’s be honest, those bricks are a bit rough, even for us kampers.
As a first step in finishing our interior walls, we have put in a frame of vertical 50X90 beams. These beams will serve three purposes.
- Help support our roof frame.
- Create a structure for our cork insulation panels
- Act as a frame for the wooden boards which will finish the walls.
We want the cork panels to be tight between the beams to reduce the number of air gaps as much as possible. To do this we have spaced the beams 498 mm apart. That is 2mm smaller than the 500 mm that the cork panels are. To have a constant spacing we have used a wooden spacer block while placing them. This approach worked pretty well for us, the cork fitted nicely. There were however some awkward small corners that were hard to fill tightly and may result in some thermal leaks.
While working with the cork we found out there are also other ways to use cork as insulation. It can be used to insulate a building from the outside and act as a finishing layer. And it can be pasted to the wall with lime mortar to be finished with a clay mortar directly on the cork. In the future, we hope to explore these other options.

15
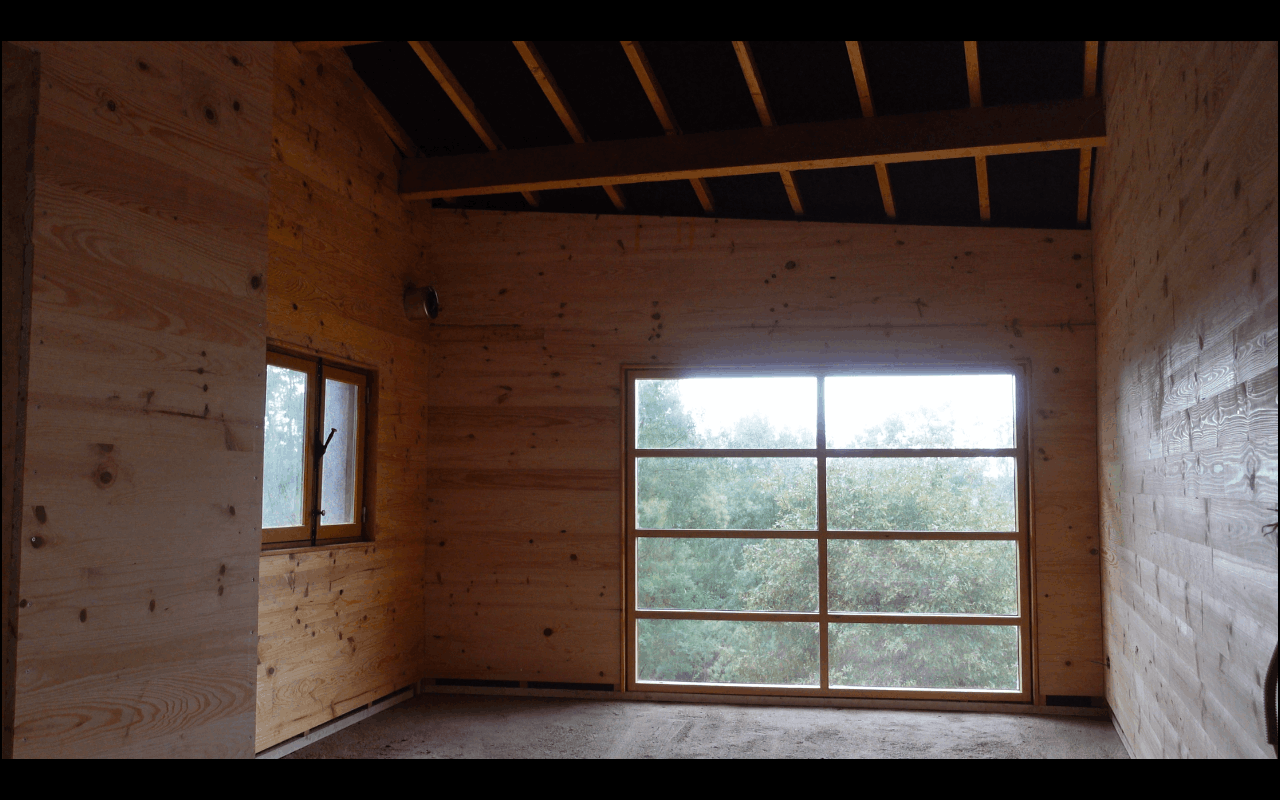
Finishing our inside walls with wood
Published 3y. Edited 3yPublished over 3 years ago. Last edit over 3 years ago
To finish our walls we have discussed different options like cork, clay plaster, OSB, and granite in the end we have chosen to use pine boards because:
- Local material, we have gone for Portuguese pine
- Short and simple production process
- Easy and fast to install
- Pretty cheap
- Using wood as a building material makes it into a carbon sink
- Easy to disassemble
The boards are 20mm thick and have tongue and groove all around that will be screwed onto the wall frame. By using screws we make it easy to disassemble the boards in the future which makes it easier to reuse them for something else. We are using 4X40 Torx screws from our recently installed screwsystem.
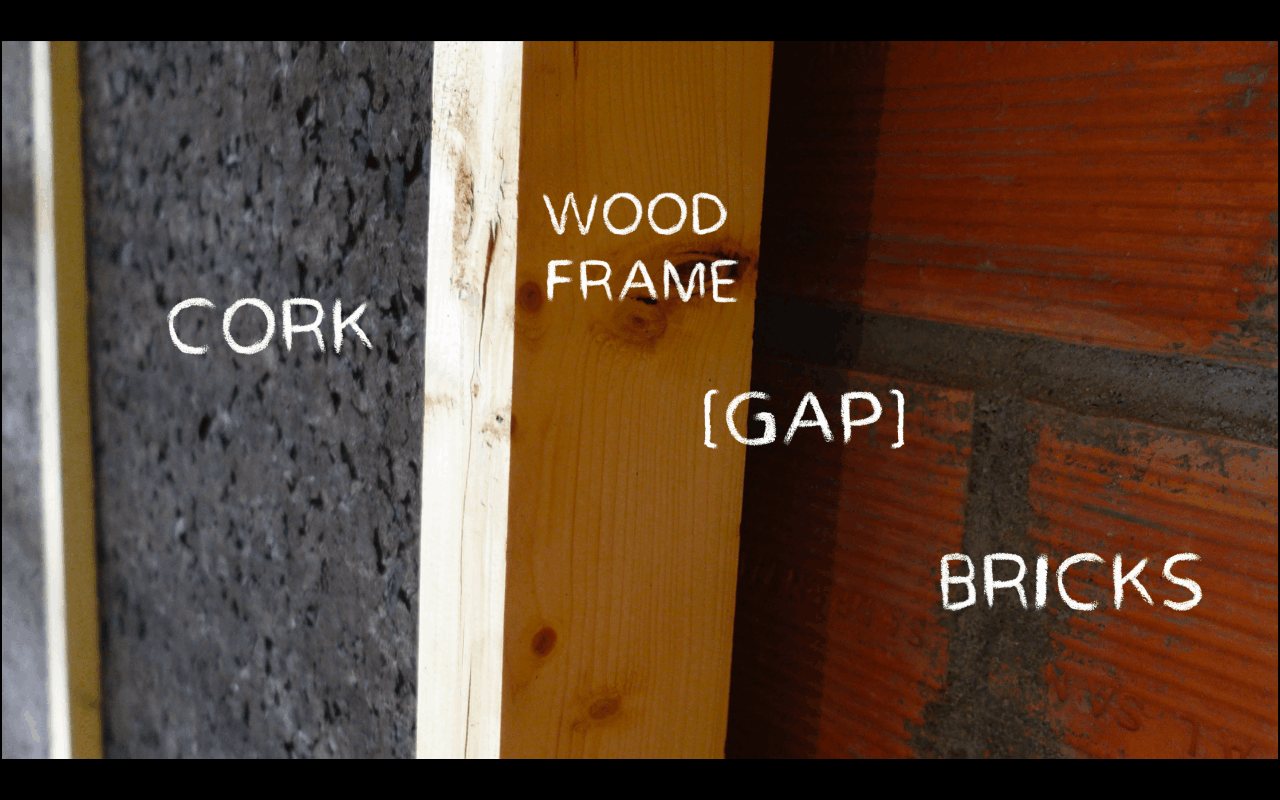
Normally a vapor barrier would be installed behind the boards that finish the walls. A vapor barrier is a plastic foil that stops water vapor which is produced by cooking, showering, and just breathing inside the house from going into the insulation and wall construction. We didn’t want to use a plastic sheet so we designed our wall system so that we could leave it out we think. To make this possible we have placed our wooden construction and the insulation 2cm away from the brick wall. In winter the water vapor from inside the house will condensate on the cold brick wall. Because the bricks are porous and we have left a space for ventilation the bricks can dry. We think it will work but let’s see this winter.
-184242ab417-18425d001ff.png?width=1280&resize=contain)
16
Finishing our floor with wooden boards
Published 3y. Edited 3yPublished about 3 years ago. Last edit about 3 years ago
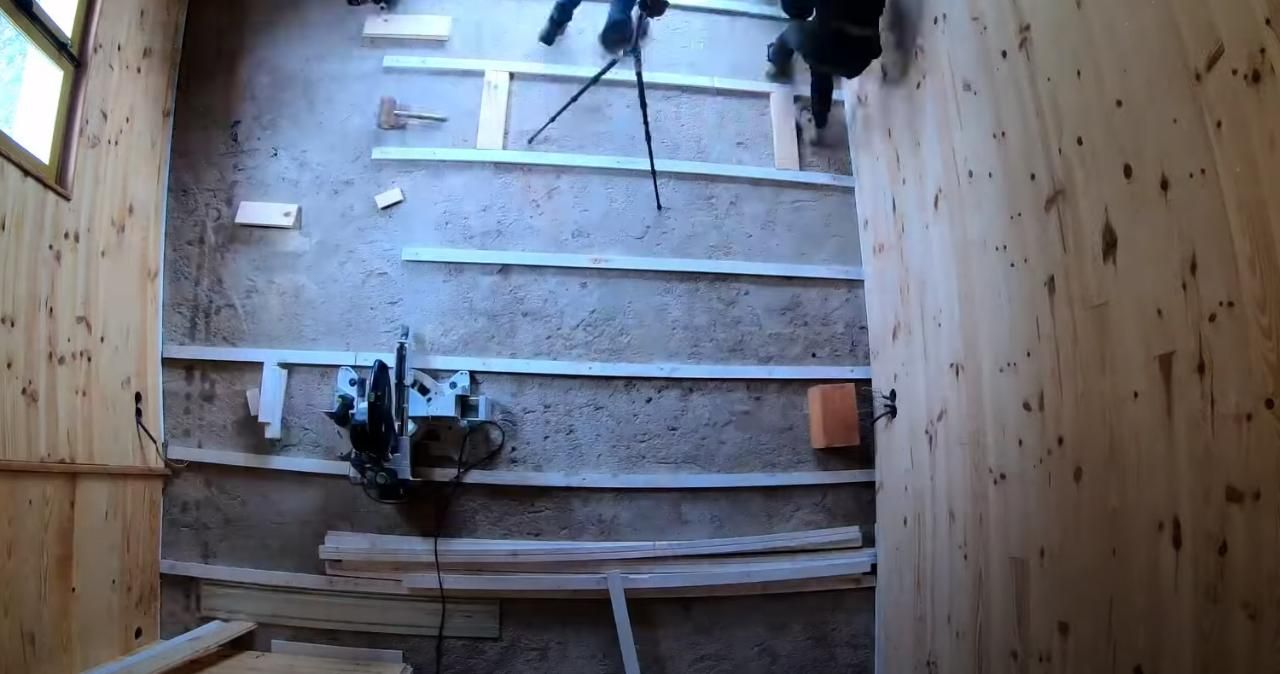
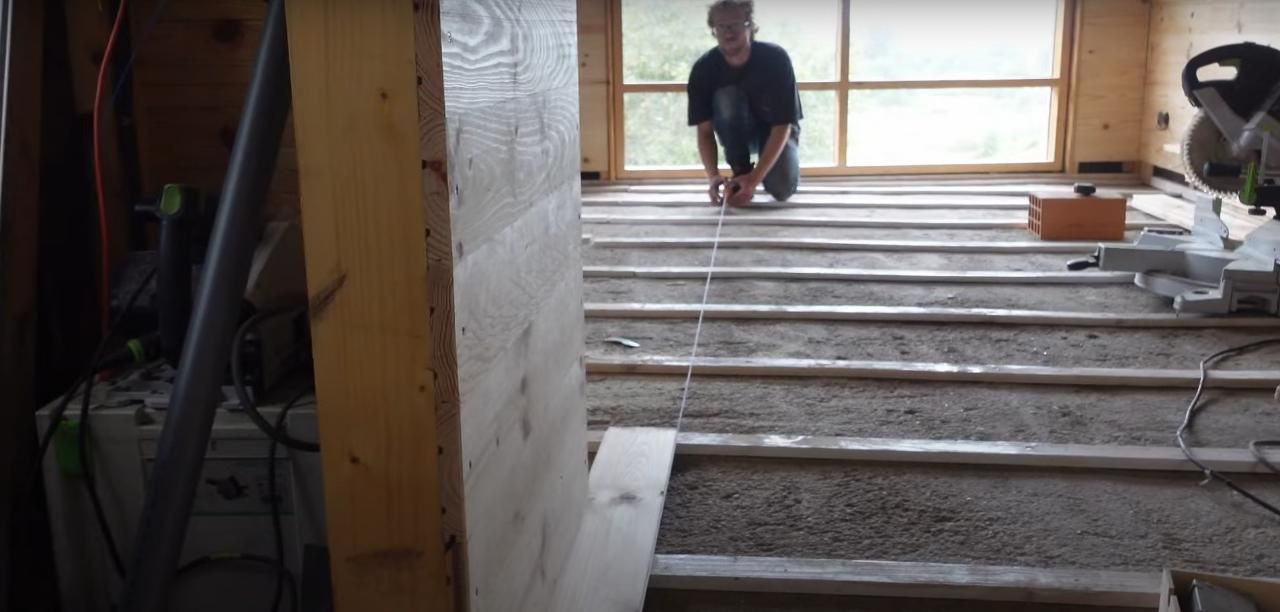
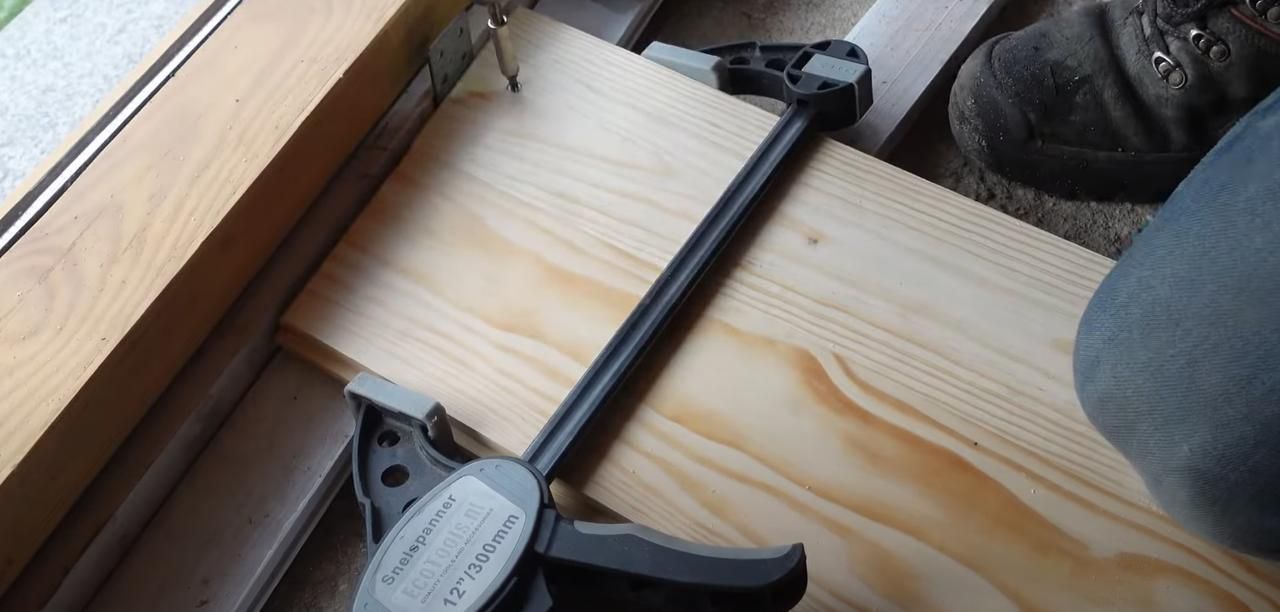
To finish the interior of the house we are going to put in a floor. To keep things simpleThe raw concrete floor of the house isn't exacly level or straight We didn't want to add extra concrete or leveling materials so we took the unsttraightness for what it is, keeping it sketchy ;). Besides the wonky floor the boards are also bendy. To end up with a solid and flat floor, we choose to skrew the boards to the floor. For this we have mounted a first level of laths to the concrete on a 40cm spacing. This makes screwing the boards a lot easier and levels out the biggest uneavenness. These where painted white to give them some moisture protection.
On these laths the floorboards were placed. We started from the middle because we took the bathroom wall as a reference. We then worked our way to both walls we left a small gap between the floor and the walls to give the floor some space to expand.
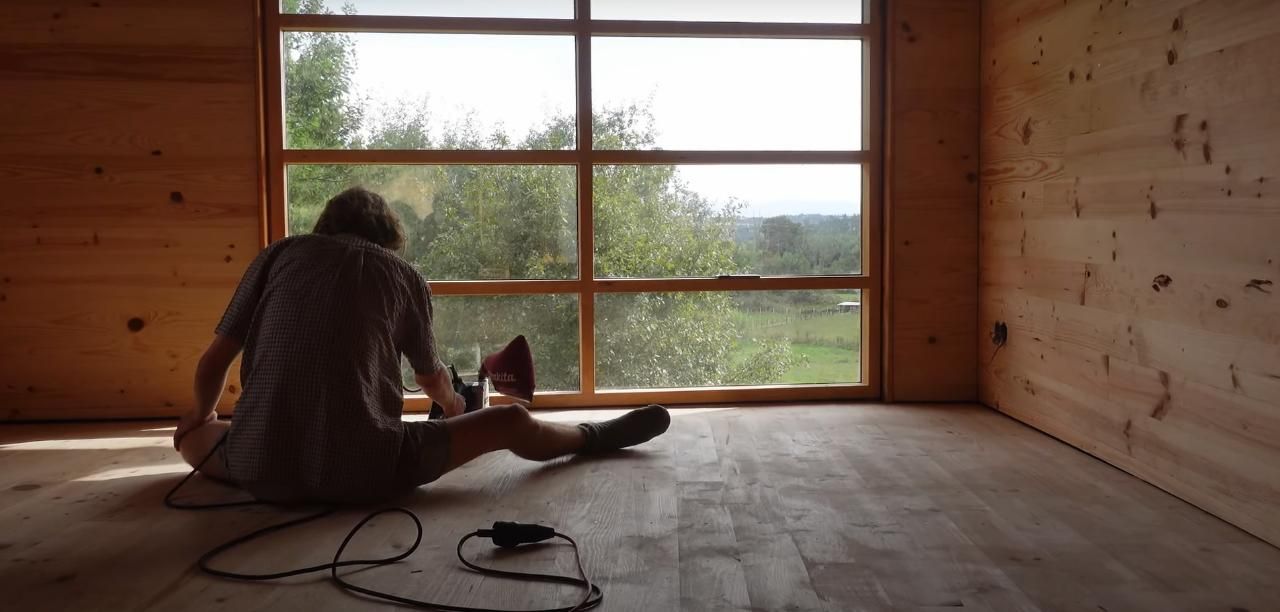
After the floorboards were in place we finished the floor with 3 coats of clear interior floorcoating.
17
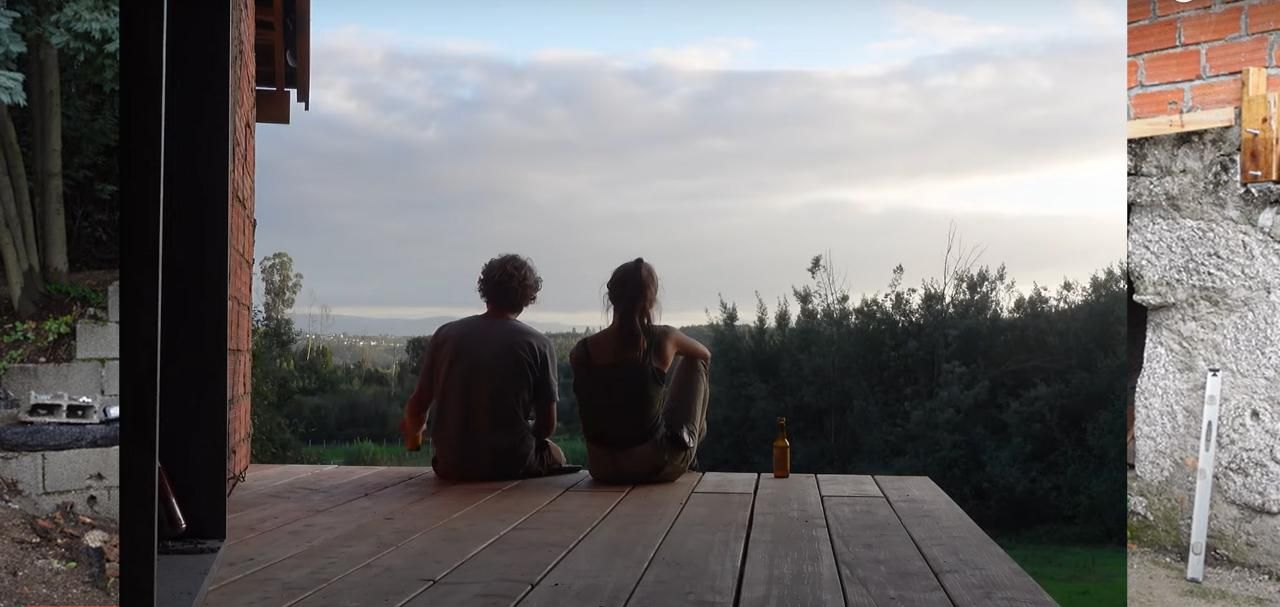
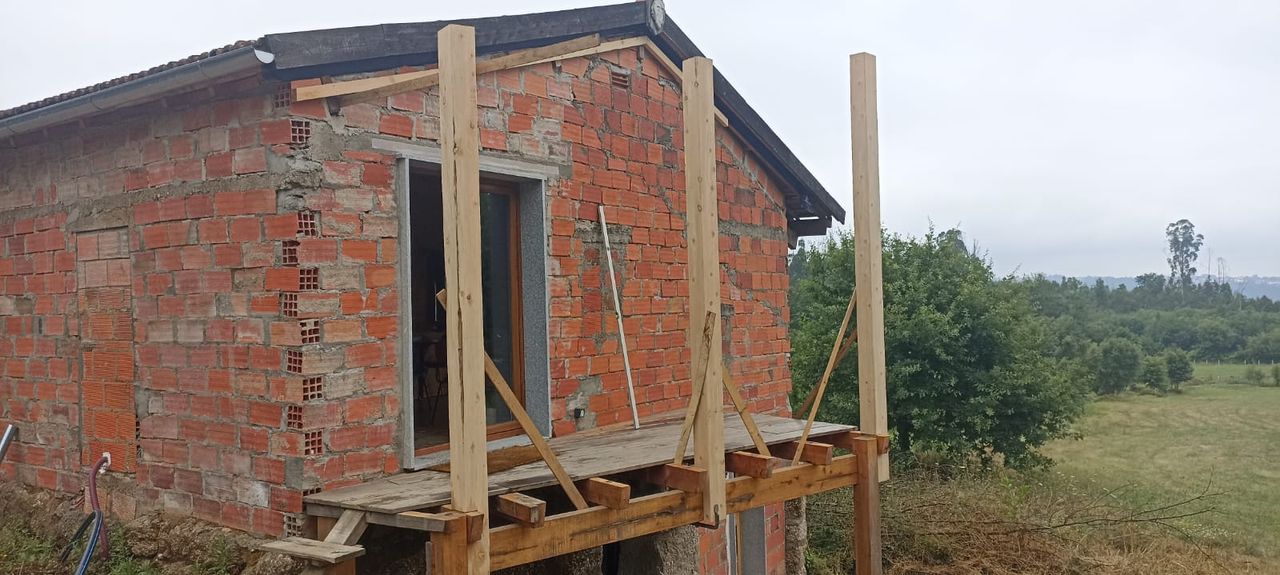
Entrance Platform
Published 3yPublished about 3 years ago
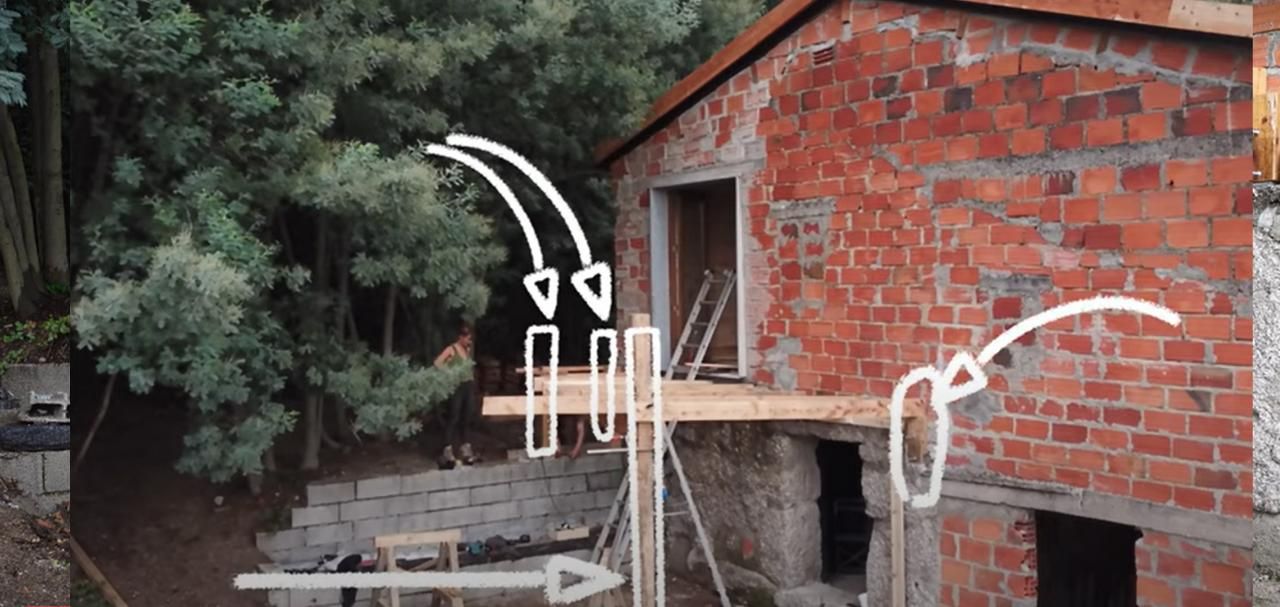
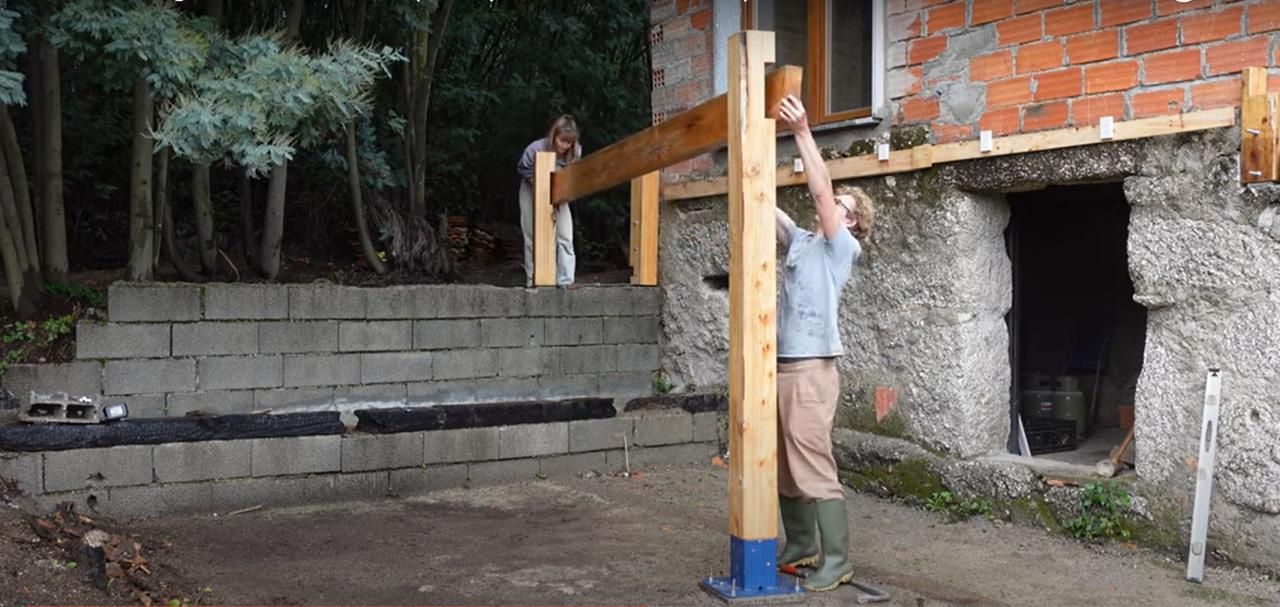
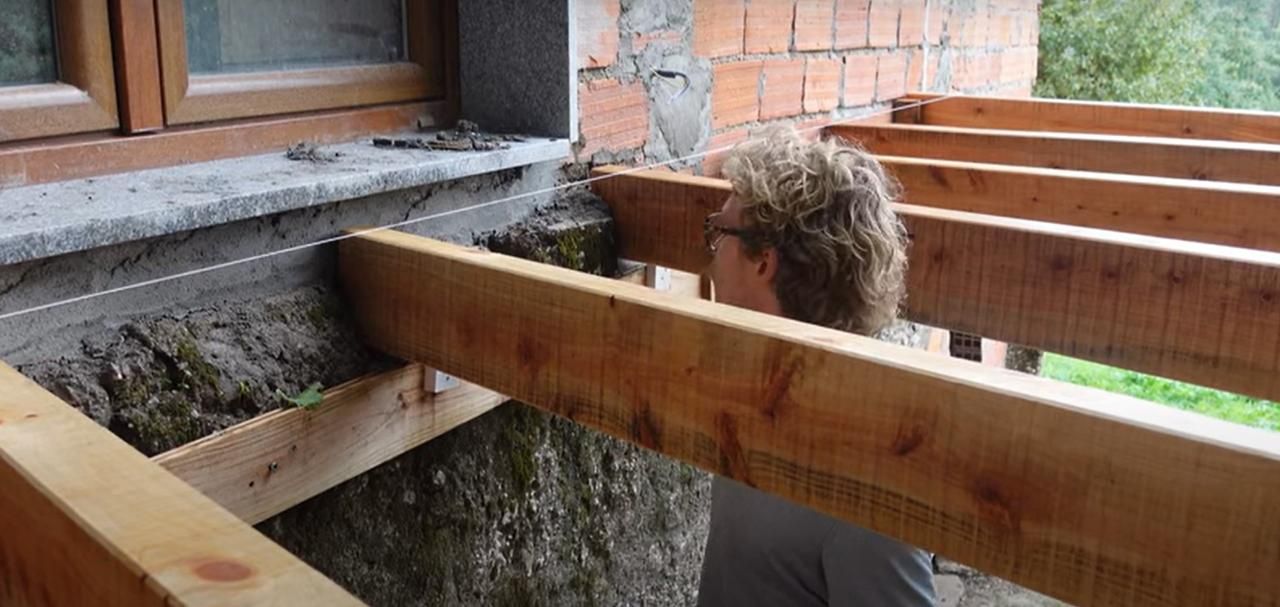
The main entrance to the building was moved from the back wall to the side. Because the doors are not at ground level stairs needed to be built. We decided to combine the useful with the pleasant and went for a deck to have just another place to chill out and enjoy the view. The deck was made using Ceder wood from the local sawmill. Cedar is very good for outdoor conditions but to make it last even longer we treated the wood with Bondex Classic.
To make the deck we used:
3 Posts 200 X 200
1 Bigg Beam 225 X 90
7 Smaller Beams 150 X 90
The board are 30 X 150
The posts on the side of the building were bolted to the wall. By this, we make use of the stability.... of the walls that are already there. The Frame was bolted together with Lag Bolts. The boards were screwed from the top.
18
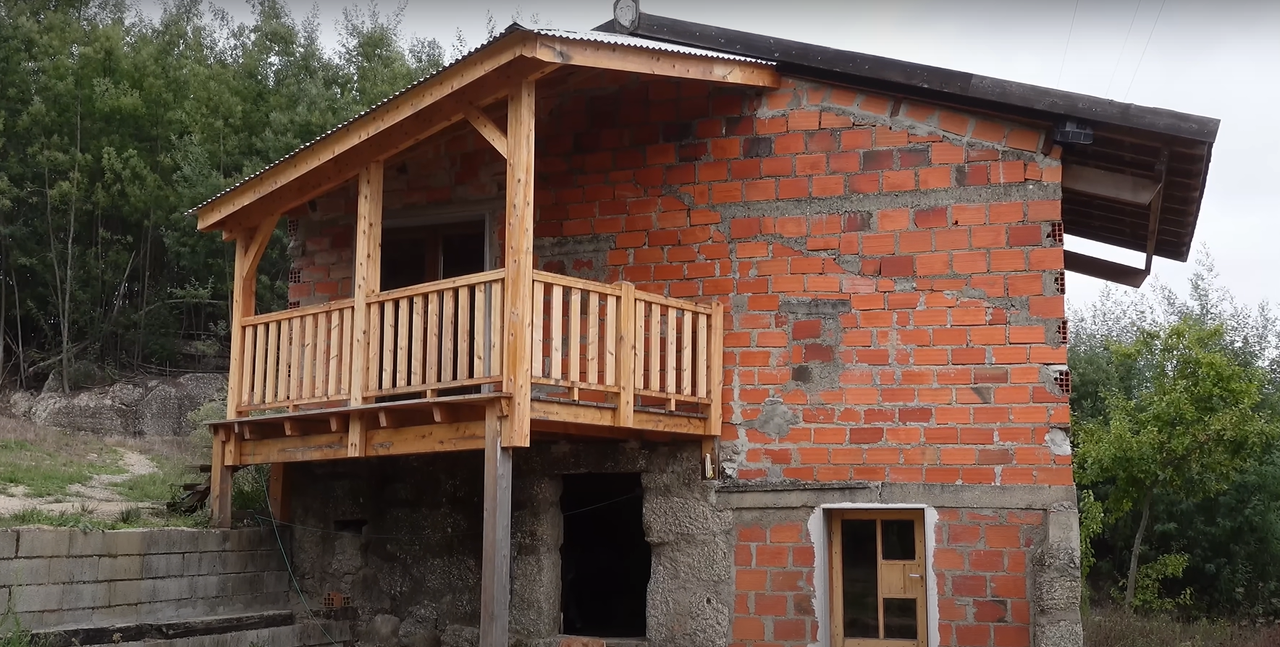
Renovating our small bottom room
Published 2yPublished about 2 years ago
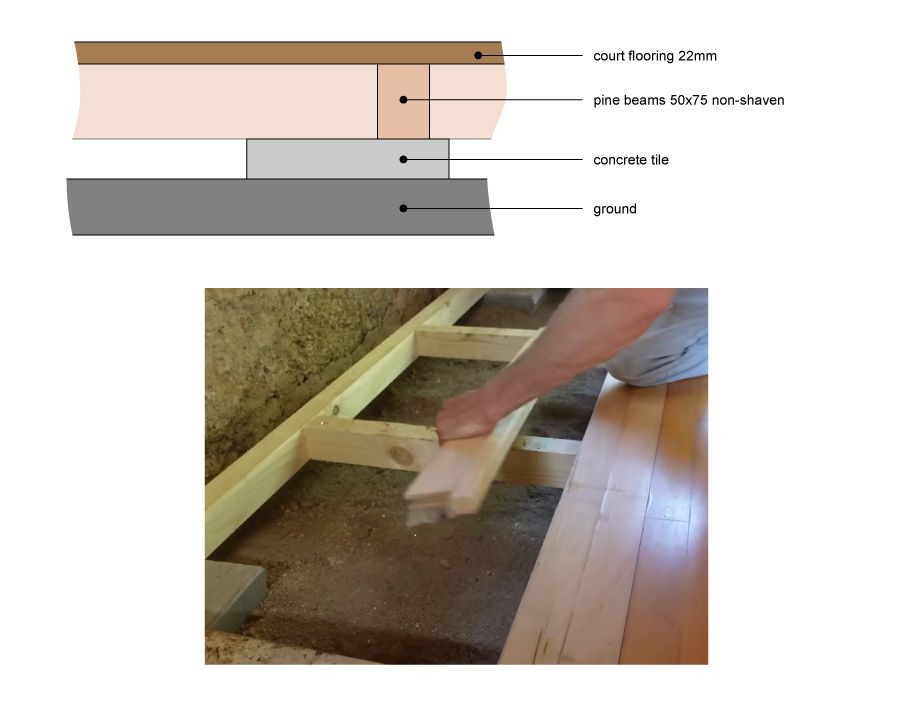
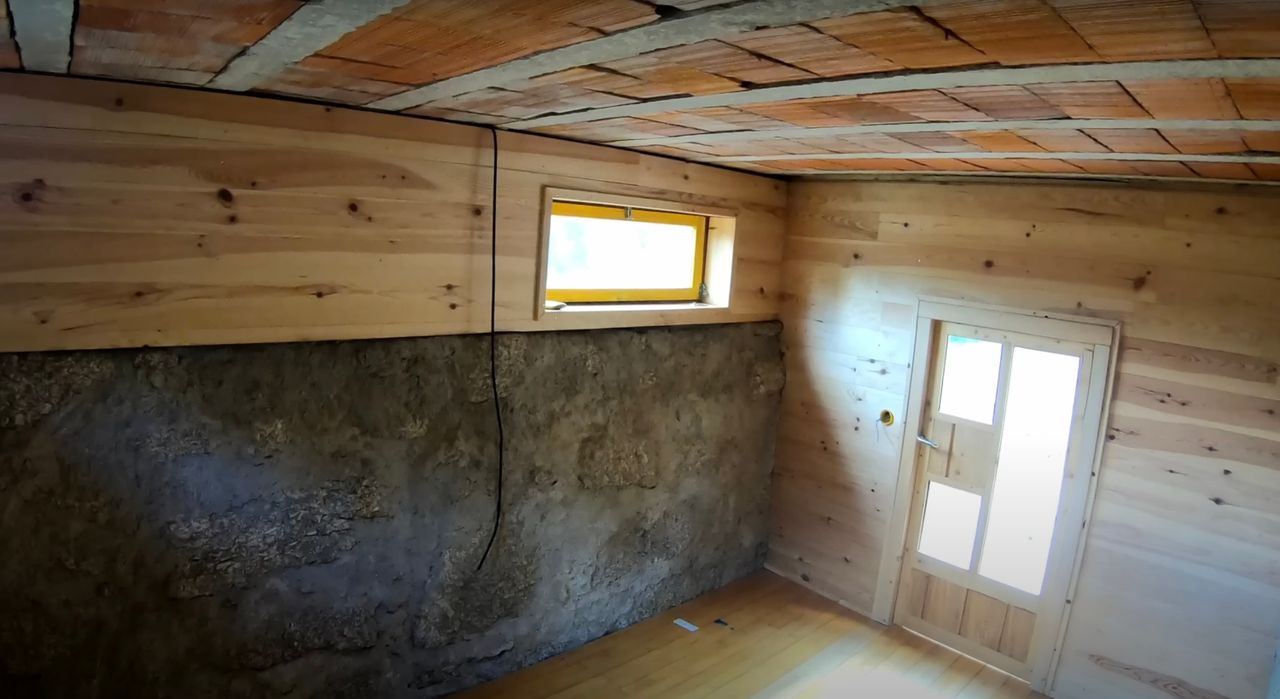
We renovated one of the two bottom rooms, that will be used as a multi-purpose room. A floor, walls and a door were constructed.
After clearing the floor, concrete tiles were placed to help level the floor. The floor frame was made of 50x72mm pine beams (non-shaven), joined together with 6x100mm screws, and rests on the concrete tiles. The flooring was finished by placing 22mm sports courts flooring with tongue and groove on top. The boards are screwed onto the frame with 4x40mm screws.
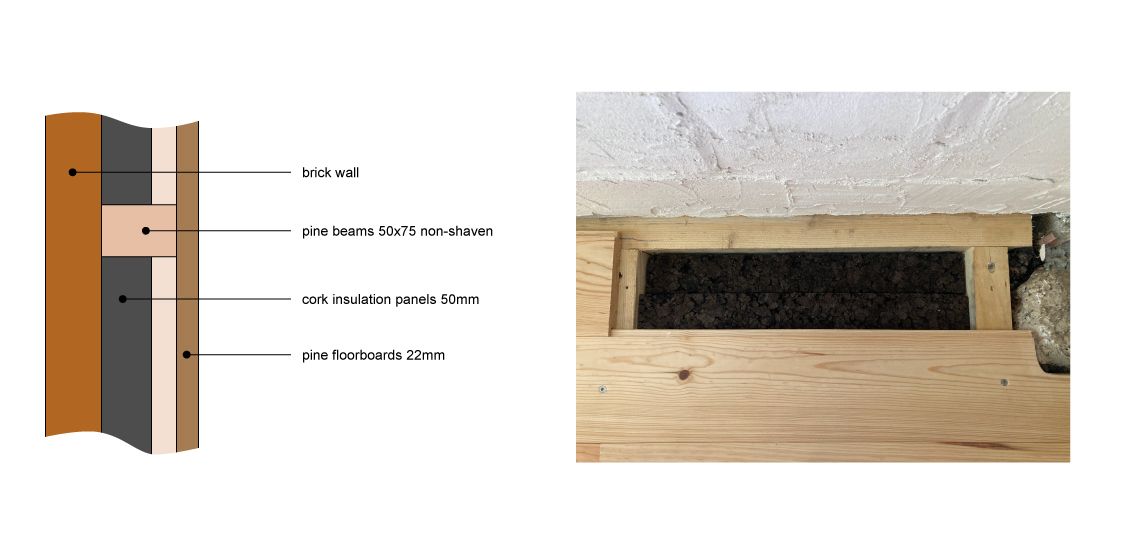
The wall frame is made of the same 50x72mm beams. The frame is filled with 50mm cork insulation panels. While the walls were still open, the electricity cables were placed in the walls. Finally, 22mm tongue and groove pine floorboards were screwed onto the frame with 5x60mm screws.
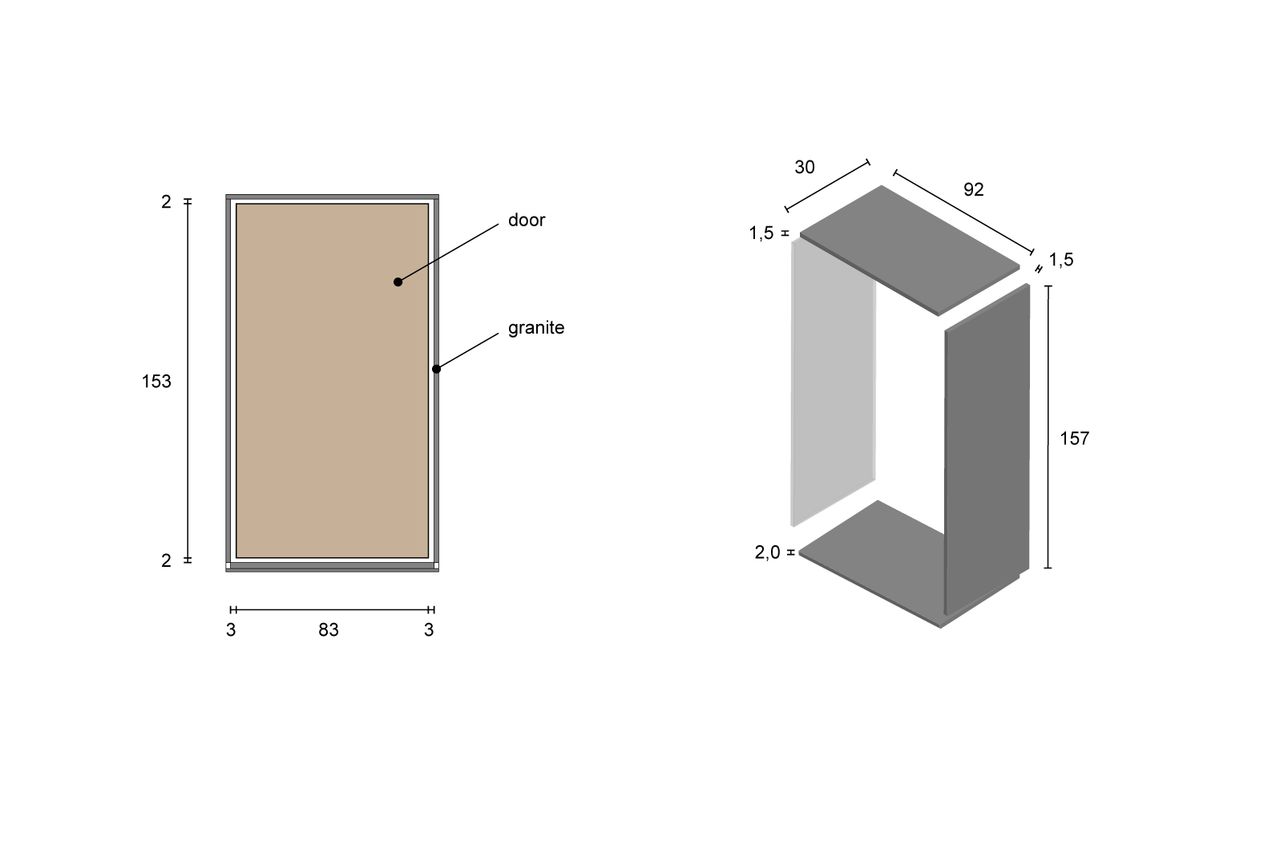
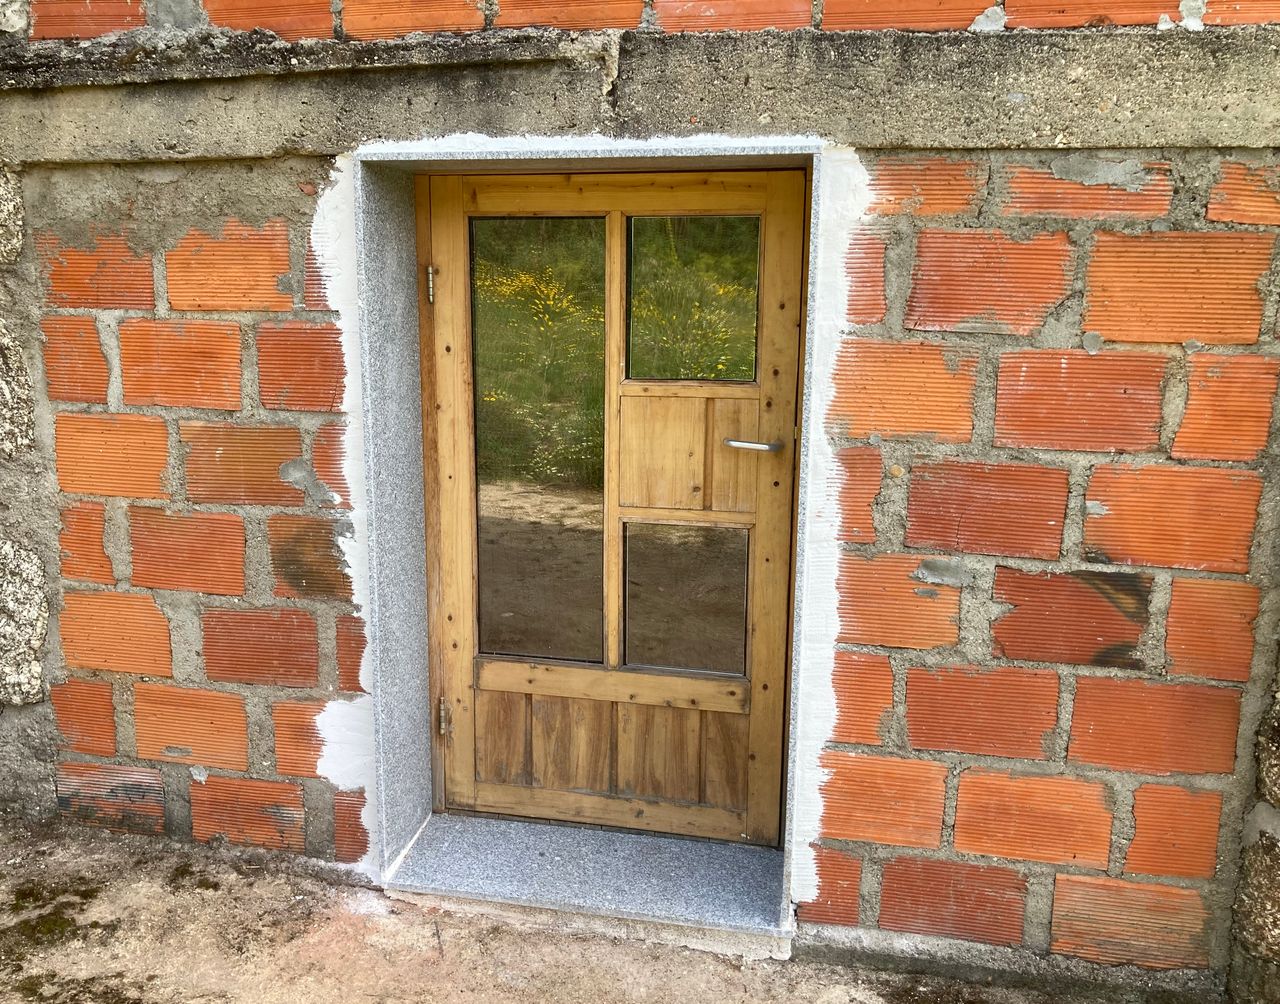
The door was constructed from red cedar and 3 double pane windows. the door measurements are 83 x 153 cm.
Watch the video on the renovation here: https://youtu.be/u4bw1mrEFVo
19
Finishing the bottom room
Published 2yPublished about 2 years ago
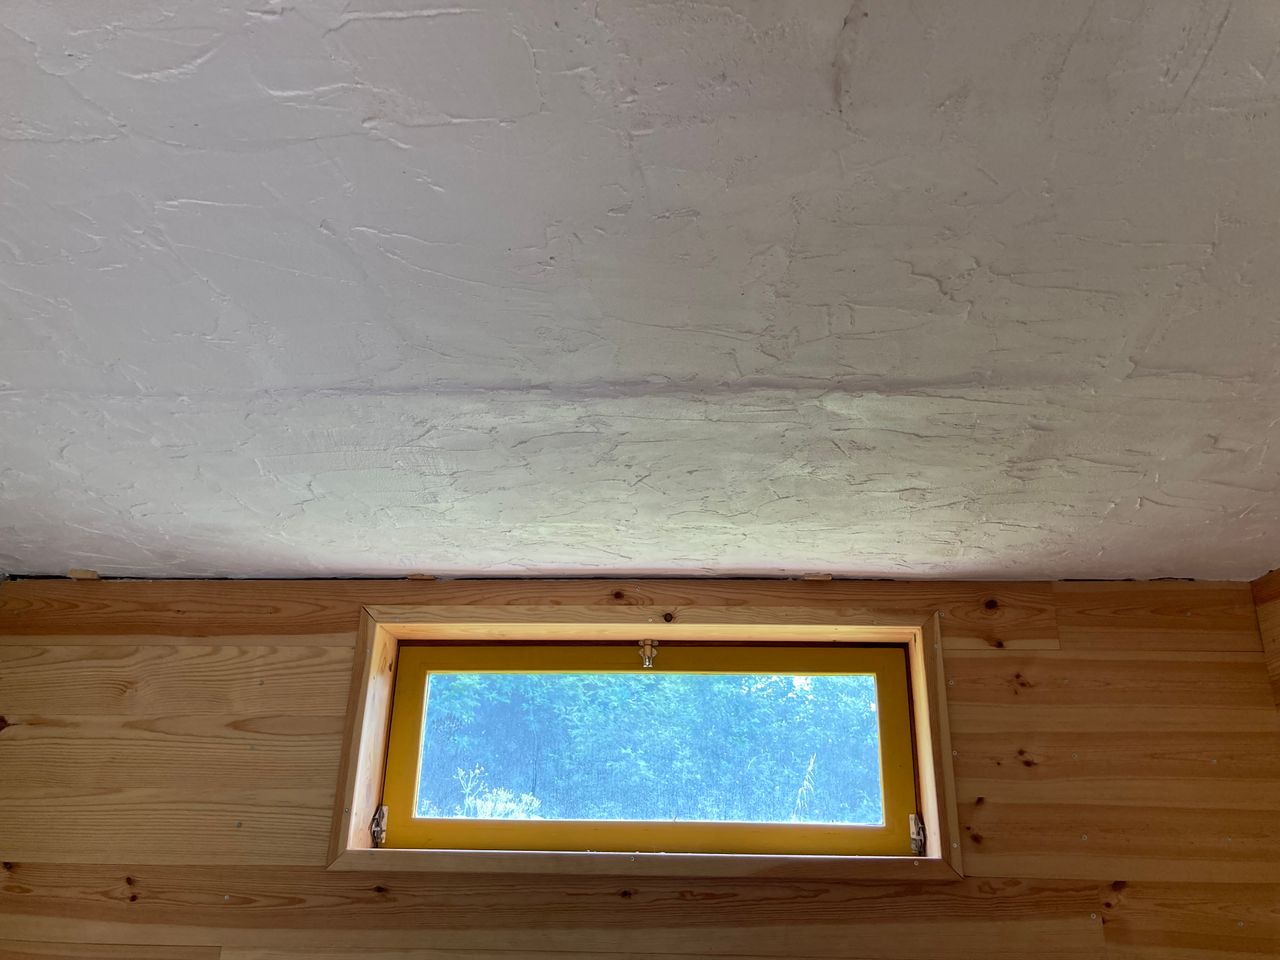
To finish the room, the ceiling was plastered and the entrance was protected.
For the ceiling, we used a ‘bio plaster’ that is composed of lime and cement. We wanted to use a natural plaster with only lime, water and sand, but we had leftovers of this material.
Finally, we had to protect the door from rainwater and enclose the open sides of the bricks. Granite was chosen because it is locally harvested and processed, weather resistant, easy to place and we love the aesthetics.
We made the slabs 30cm wide. There is very little space above the door, so we couldn’t make the top slab thicker than 1,5cm. The material is surprisingly flexible and we would advise to go for more thickness (2-2,5cm).
For the bottom slab, a thickness of 3cm is advised. It needs to be placed at an angle to help rainwater flow away. Because the supplier couldn’t do custom angles, we needed to fill some space with plaster.
Watch the video here: https://youtu.be/j-LlMW_p4_s

20
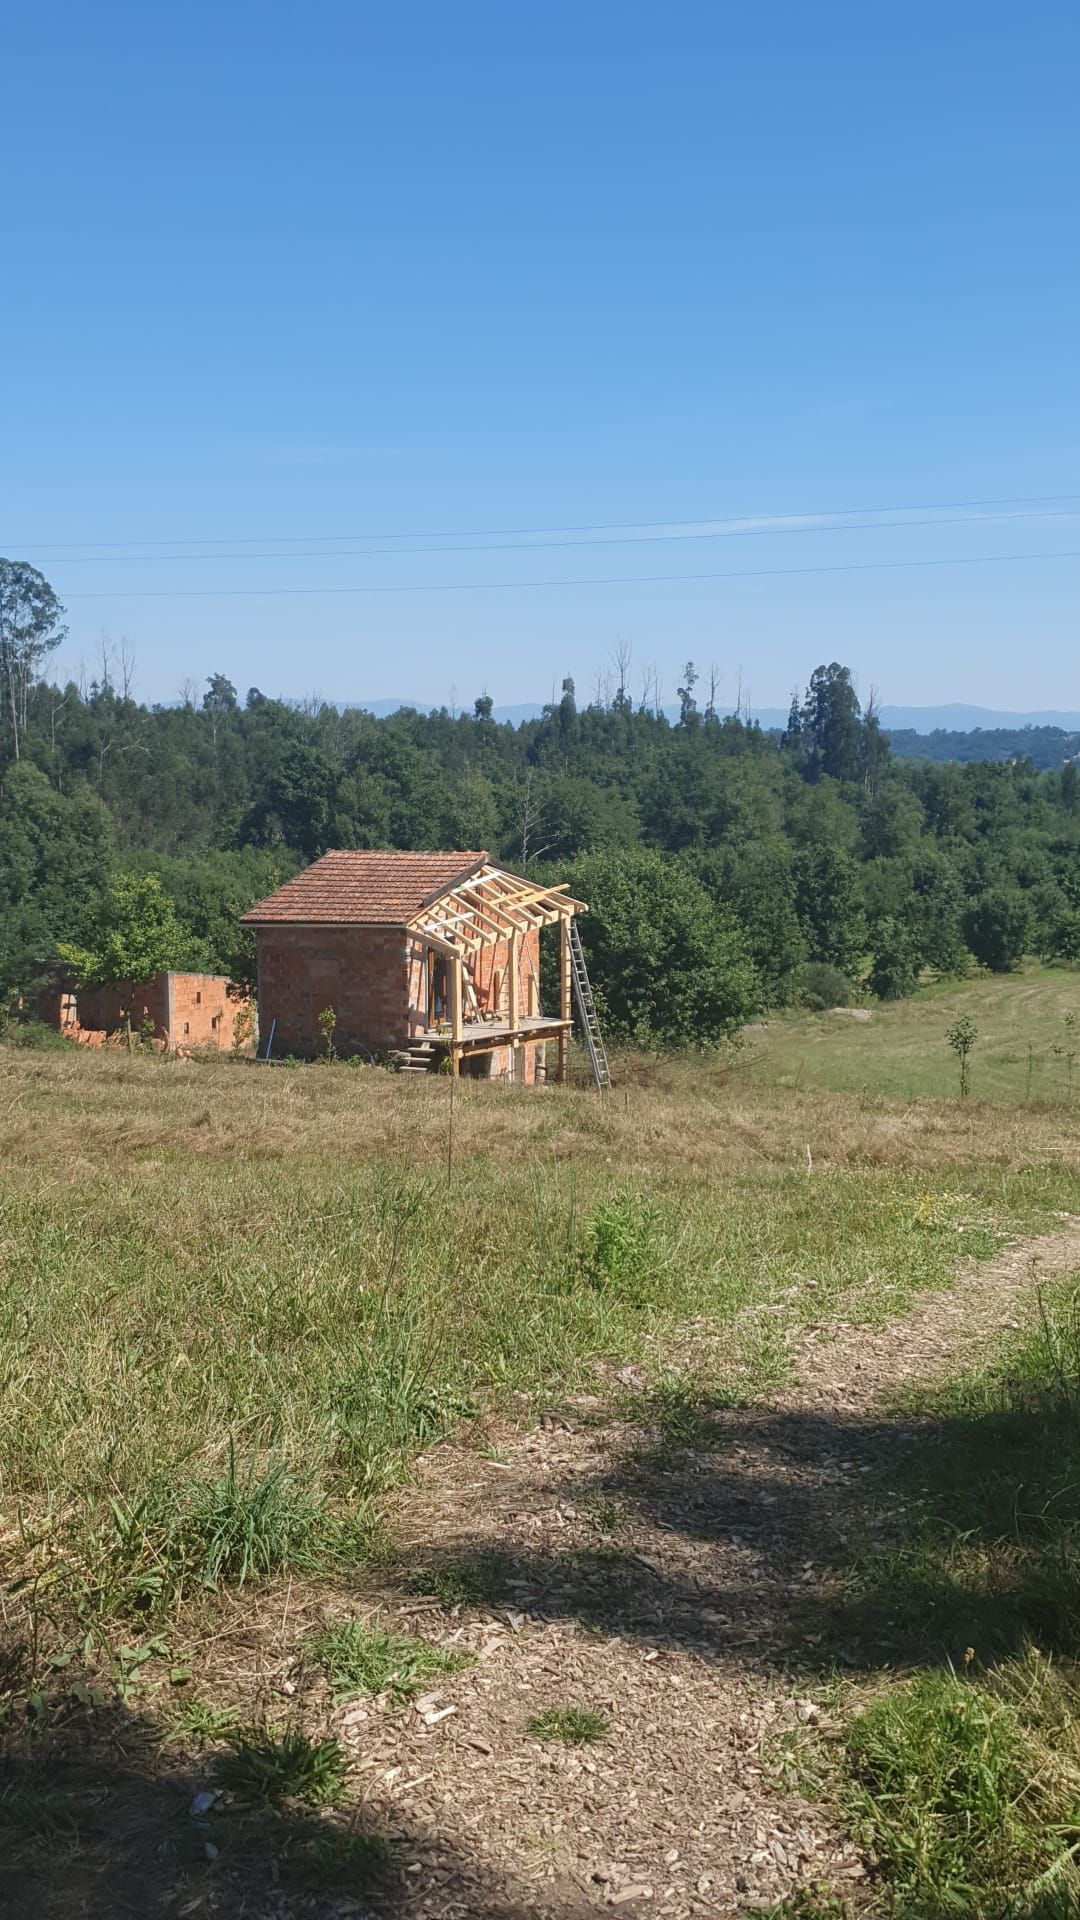
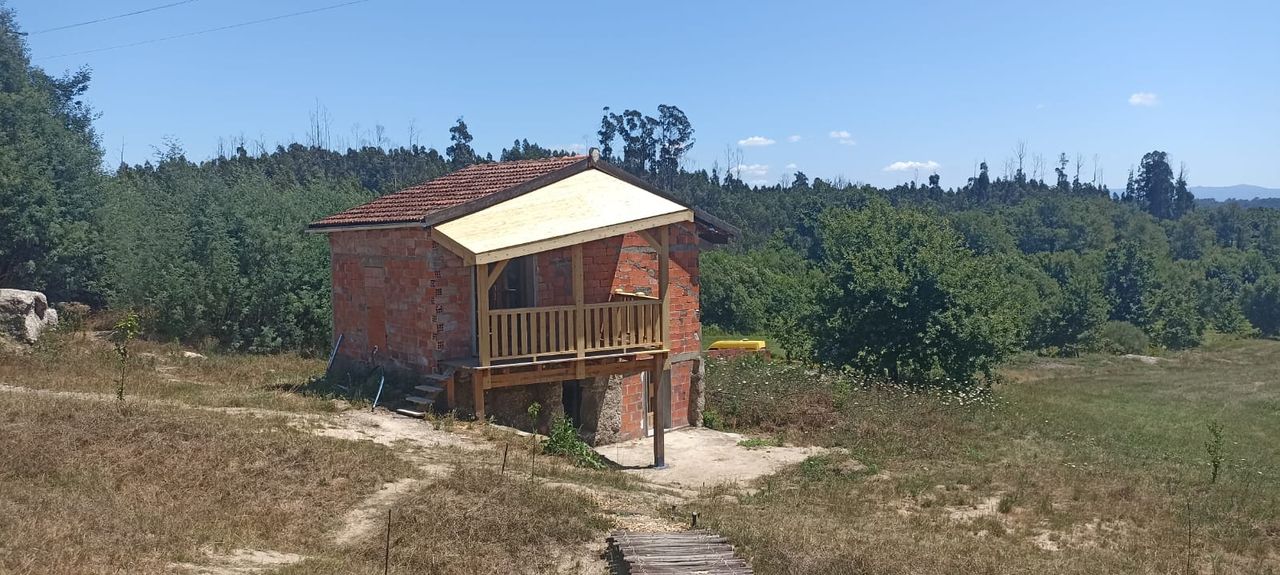
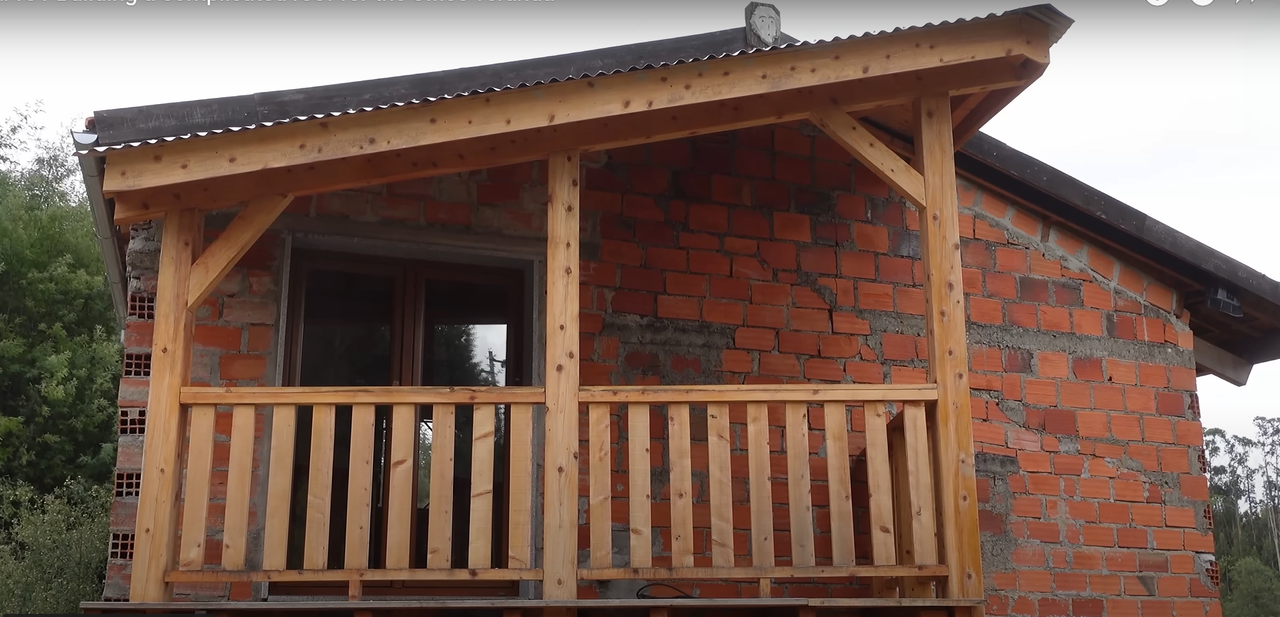
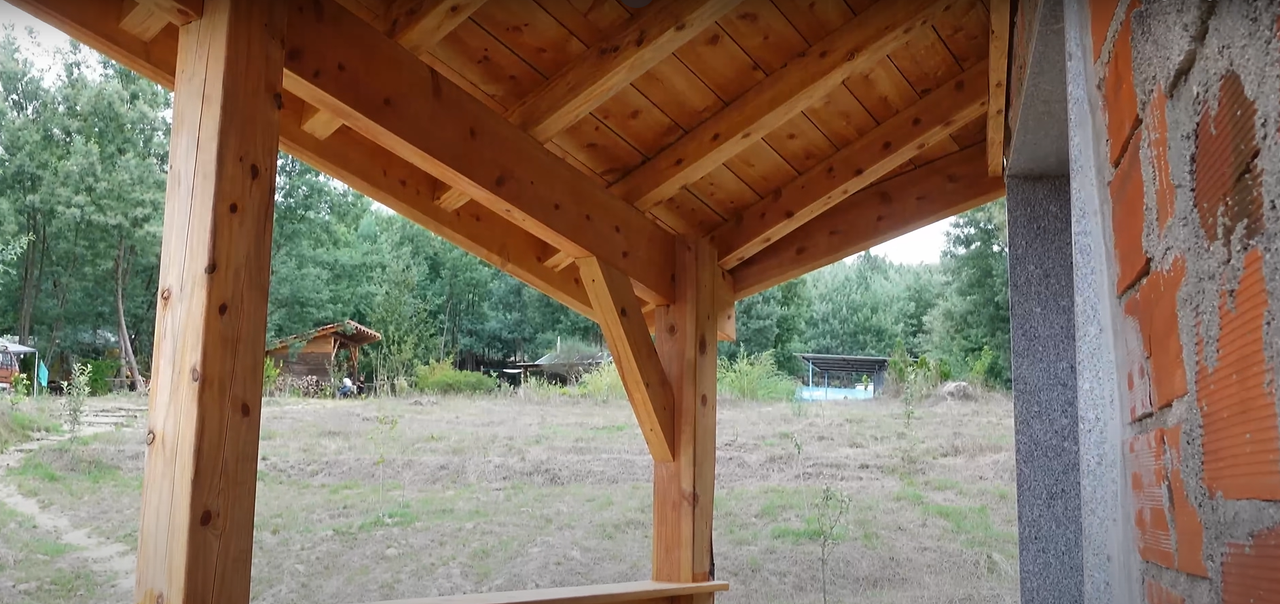
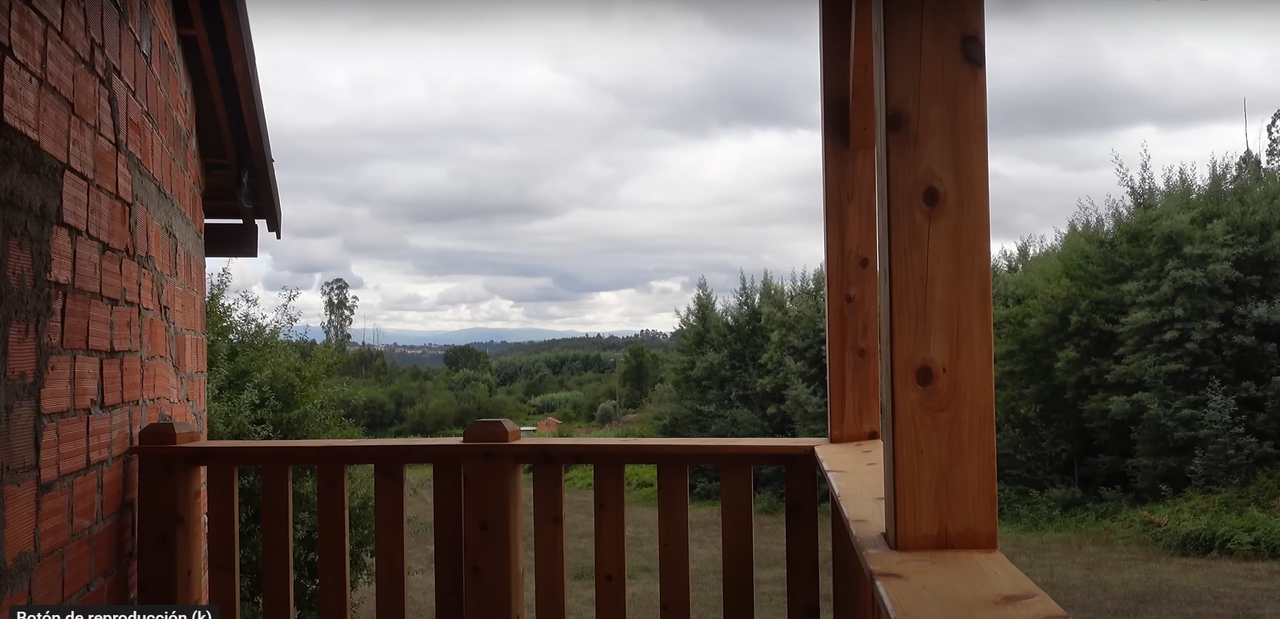
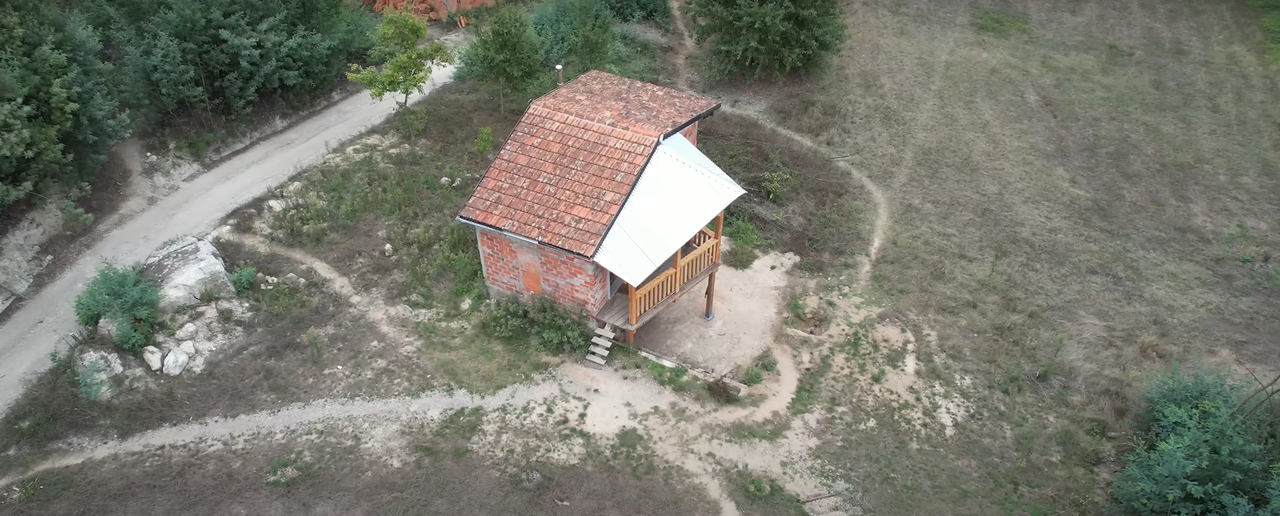
Veranda roof
Published 1y. Edited 1yPublished about 1 year ago. Last edit about 1 year ago
We have built a roof over the wooden veranda on the entrance.
This veranda help us in many different ways:
- Creating a dry space before entering in the building. Preventing dirt and humidity inside and making more pleasent to go inside in rainy days
- Creating shade in the west façade of the building. Making the place a bit more cool at the end of the day.
- Adding a fence makes the place way more safe because it was quite dangerous
- Creates a new place protected from sun and rain
Regarding design and materials we wanted to keep the theme and the core of "the sketchy ruin". For this we had asked Martijn to help us with the design, he originally design the rest of the building. To keep the crooked look we went for non straight angles and funky surfaces, which makes the look coherent but made us face some new challenges:
- The cuts and the building was not easy at all due to the amount of different angles that this design involved. To be able to build such a veranda you need to be an experienced carpenter to solve all the angle-challenges.
- Make this surfaces waterproof was not easy due to the different pitches. We had different options to make it water proof. Tradicional tiles are designed to be waterproof just in one direction and in our case each surface of the roof had a bit more complicated shape, so installing rooftiles would have been a very difficult mission. So we had to find a coverage that can work in more than one angle to avoid leak problems.
Regarding materials we went for the original sizes of the wood used for the platform to keep the look as one and not a patch work. 150x150 poles and 225x100 beams. For the coverage surface we choose corrugated metal, a very durable material that keeps the sketchy essence and gives us the caracteristics to easy install it and make our veranda completely water proof, at the same time that it is classic design that can last for decades being stylish.
%20--%3e%3csvg%20version='1.1'%20id='Layer_1'%20xmlns='http://www.w3.org/2000/svg'%20xmlns:xlink='http://www.w3.org/1999/xlink'%20x='0px'%20y='0px'%20viewBox='0%200%2064%2063'%20style='enable-background:new%200%200%2064%2063;'%20xml:space='preserve'%3e%3cstyle%20type='text/css'%3e%20.st0{fill:%2320B7EB;}%20.st1{fill:%23E9475A;}%20.st2{fill:%23FECE4E;}%20%3c/style%3e%3cdesc%3eCreated%20with%20Sketch.%3c/desc%3e%3cg%20id='Page-1'%3e%3cg%20id='OA-Logo-Black-Background'%3e%3cpath%20id='Shape'%20class='st0'%20d='M14.1,30.1c-1.5-0.8-8.6-3.8-14.1-7.8c1.8-3.4,3.1-5.6,5-9.1c2.7,1.1,1.9,0.5,4.6,1.7%20c0.8,0.4,10.1,4.5,13.8,6.2c2.4,1.1,4.7,2.2,7,3.3L43,30.5l8.1,3.9c4,2,7.2,3.5,11.3,5.5c0.5,0.3-3.7,9.4-3.7,9.4%20c-1.7-0.6-3.9-1.8-5.5-2.5c-4.7-2.1-9-3.9-13.7-6c-4-1.8-6.7-2.9-10.8-4.5C25,34.9,17.1,31.6,14.1,30.1z'/%3e%3cpath%20id='Shape_1_'%20class='st1'%20d='M12.1,54.9c-0.8,0.6-1.6,1.2-2.5,1.6c-0.4-0.5-0.9-1-1.3-1.5c-0.3-1.2-2.3-4.9-2.7-6.2%20c-0.1-0.4-0.7-2.2-0.8-2.6c0,0,5-3.4,8.2-5.9c3.2-2.6,6.2-5,9.3-7.5c1.4-1.1,3.9-2.5,5.3-3.5c2.5-1.7,13-9.1,15.6-10.5%20c5.4-3.3,11.1-6.3,16.8-9c1.7,3.5,1.8,3,3.8,6.9c0,0-17.8,13.5-22.7,17.1c-3.8,2.8-7.5,5.7-11.3,8.5c-1.7,1.3-3.5,2.4-5.2,3.7'/%3e%3cpath%20id='Shape_2_'%20class='st2'%20d='M20.8,2.9l-0.2-0.8C25,0,31.2-0.3,31.4,0.2c0.4,1.1,0.9,2.2,1.2,3.4c1.4,4.4,2.7,8.7,4,13.1%20c0.4,1.4,2.8,10,2.9,10.5c0.5,2.8,1.2,5.6,1.6,8.4c0.8,4.7,1.4,8.6,2.3,13.3c0.6,3.1,1.3,6.3,2.3,11.3c0,0-5.8,1.4-7.5,1.8%20c-0.8,0.2-1.5,0.4-2.4,0.6c-0.3-1.1-0.2-1.2-0.5-2.1c-0.9-3.7-1.8-7.3-2.6-11c-1.5-6.4-3-12.9-4.4-19.3%20c-1.2-5.4-2.6-10.7-4.4-15.9c-1-3.1-1.8-6.3-2.7-9.5C21.1,3.8,21,3.8,20.8,2.9z'/%3e%3c/g%3e%3c/g%3e%3c/svg%3e)