

Can we renovate a 3 rooms old brick ruin?
Started 2y. Edited 2wStarted about 2 years ago. Last edit 19 days ago
Construction
In Progress
RenovationBuilding
More Information


%20--%3e%3csvg%20version='1.1'%20id='Layer_1'%20xmlns='http://www.w3.org/2000/svg'%20xmlns:xlink='http://www.w3.org/1999/xlink'%20x='0px'%20y='0px'%20viewBox='0%200%2064%2063'%20style='enable-background:new%200%200%2064%2063;'%20xml:space='preserve'%3e%3cstyle%20type='text/css'%3e%20.st0{fill:%23231F20;}%20%3c/style%3e%3cdesc%3eCreated%20with%20Sketch.%3c/desc%3e%3cg%20id='Page-1'%3e%3cg%20id='OA-Logo-Black-Background'%3e%3cpath%20id='Shape'%20class='st0'%20d='M14.1,30.1c-1.5-0.8-8.6-3.8-14.1-7.8c1.8-3.4,3.1-5.6,5-9.1c2.7,1.1,1.9,0.5,4.6,1.7%20c0.8,0.4,10.1,4.5,13.8,6.2c2.4,1.1,4.7,2.2,7,3.3L43,30.5l8.1,3.9c4,2,7.2,3.5,11.3,5.5c0.5,0.3-3.7,9.4-3.7,9.4%20c-1.7-0.6-3.9-1.8-5.5-2.5c-4.7-2.1-9-3.9-13.7-6c-4-1.8-6.7-2.9-10.8-4.5C25,34.9,17.1,31.6,14.1,30.1z'/%3e%3cpath%20id='Shape_1_'%20class='st0'%20d='M12.1,54.9c-0.8,0.6-1.6,1.2-2.5,1.6c-0.4-0.5-0.9-1-1.3-1.5c-0.3-1.2-2.3-4.9-2.7-6.2%20c-0.1-0.4-0.7-2.2-0.8-2.6c0,0,5-3.4,8.2-5.9c3.2-2.6,6.2-5,9.3-7.5c1.4-1.1,3.9-2.5,5.3-3.5c2.5-1.7,13-9.1,15.6-10.5%20c5.4-3.3,11.1-6.3,16.8-9c1.7,3.5,1.8,3,3.8,6.9c0,0-17.8,13.5-22.7,17.1c-3.8,2.8-7.5,5.7-11.3,8.5c-1.7,1.3-3.5,2.4-5.2,3.7'/%3e%3cpath%20id='Shape_2_'%20class='st0'%20d='M20.8,2.9l-0.2-0.8C25,0,31.2-0.3,31.4,0.2c0.4,1.1,0.9,2.2,1.2,3.4c1.4,4.4,2.7,8.7,4,13.1%20c0.4,1.4,2.8,10,2.9,10.5c0.5,2.8,1.2,5.6,1.6,8.4c0.8,4.7,1.4,8.6,2.3,13.3c0.6,3.1,1.3,6.3,2.3,11.3c0,0-5.8,1.4-7.5,1.8%20c-0.8,0.2-1.5,0.4-2.4,0.6c-0.3-1.1-0.2-1.2-0.5-2.1c-0.9-3.7-1.8-7.3-2.6-11c-1.5-6.4-3-12.9-4.4-19.3%20c-1.2-5.4-2.6-10.7-4.4-15.9c-1-3.1-1.8-6.3-2.7-9.5C21.1,3.8,21,3.8,20.8,2.9z'/%3e%3c/g%3e%3c/g%3e%3c/svg%3e)


1
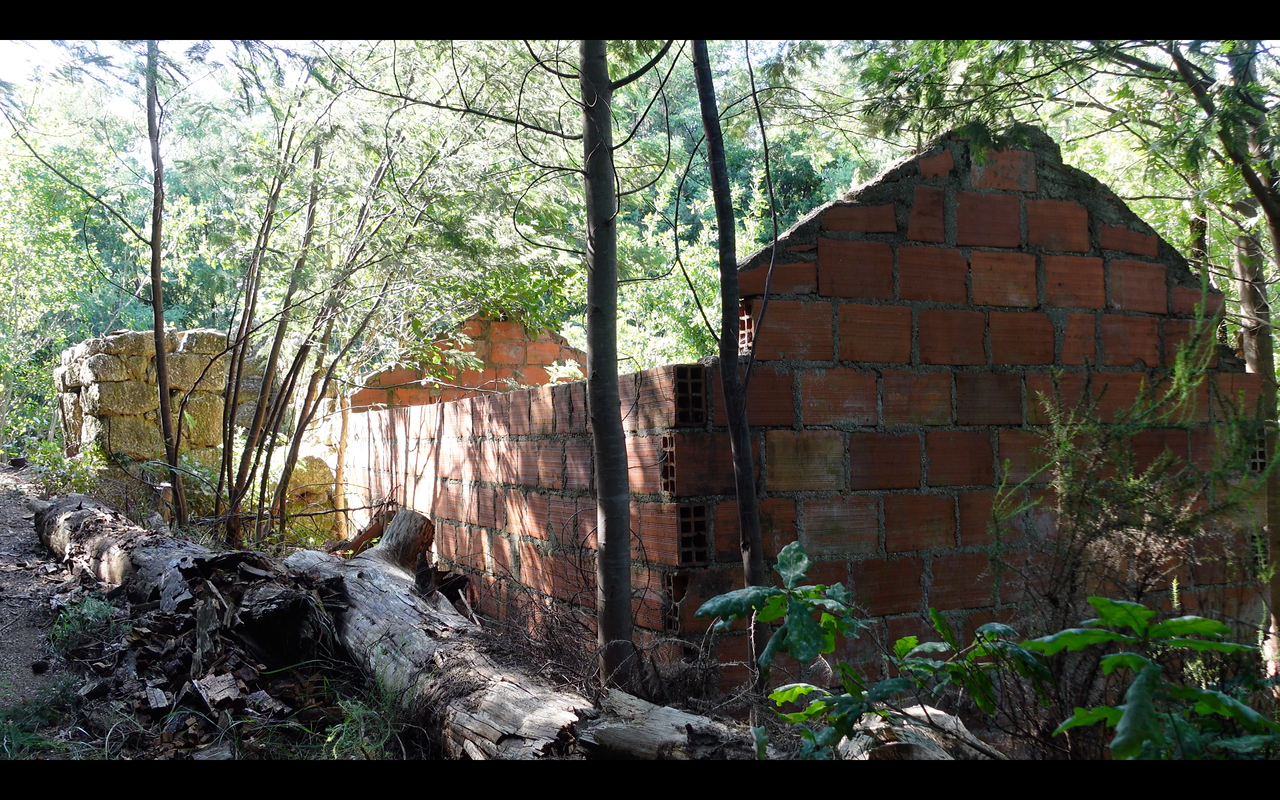
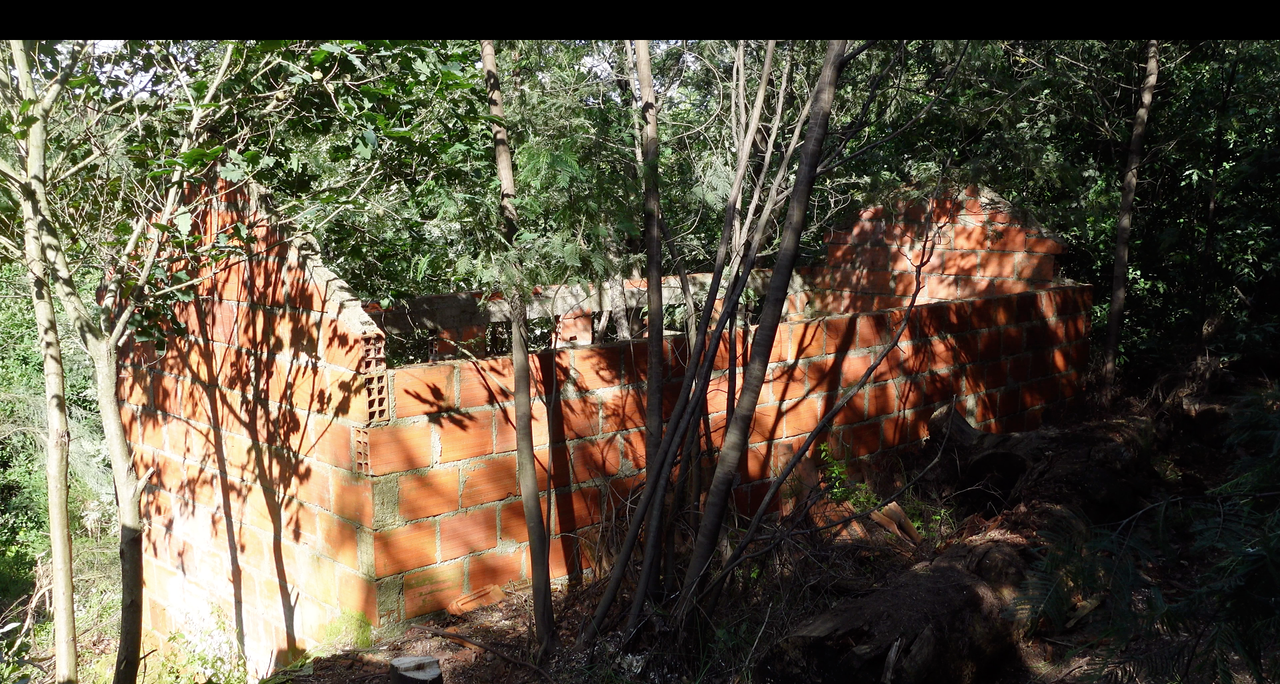
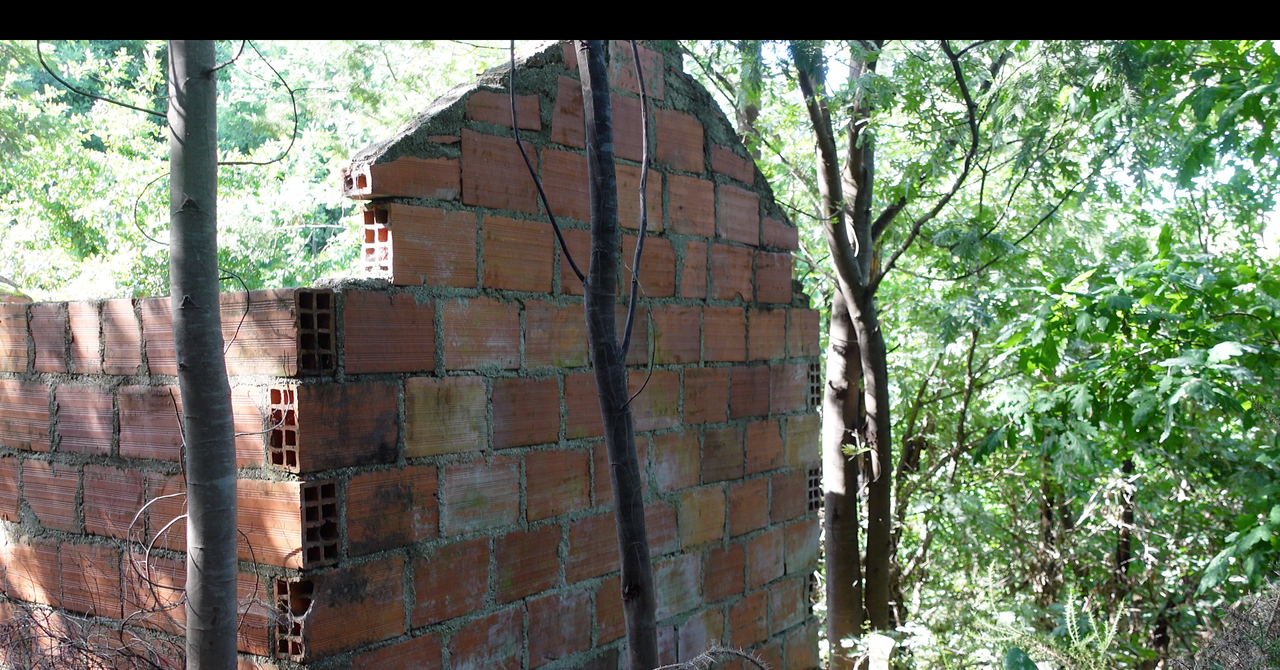
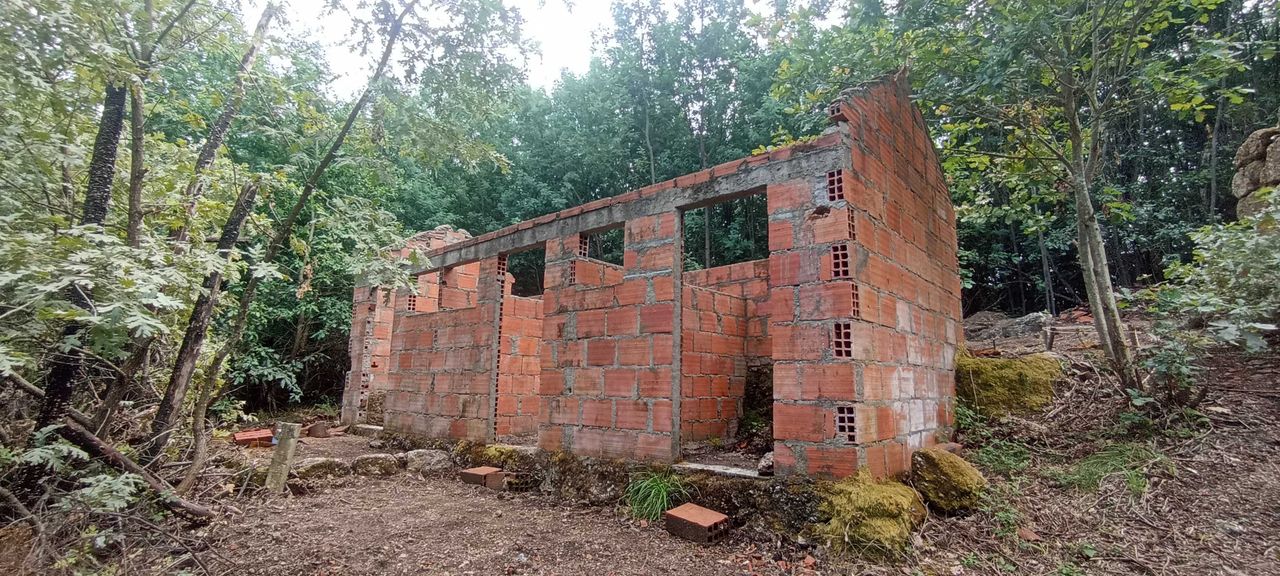
Actual state of the ruin
Published 2y. Edited 2yPublished about 2 years ago. Last edit about 2 years ago
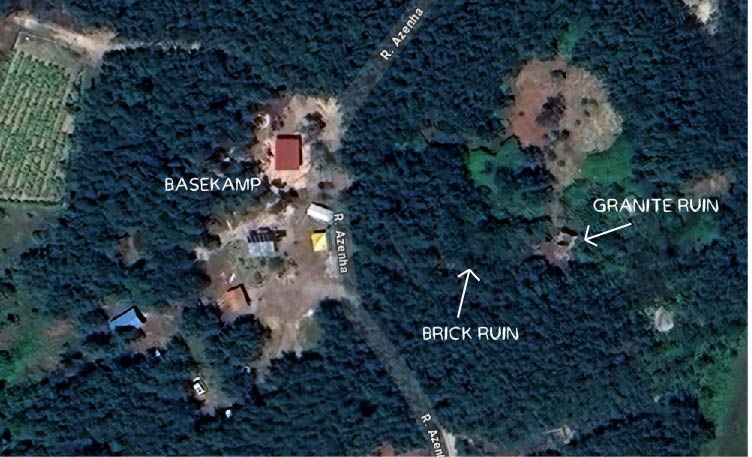
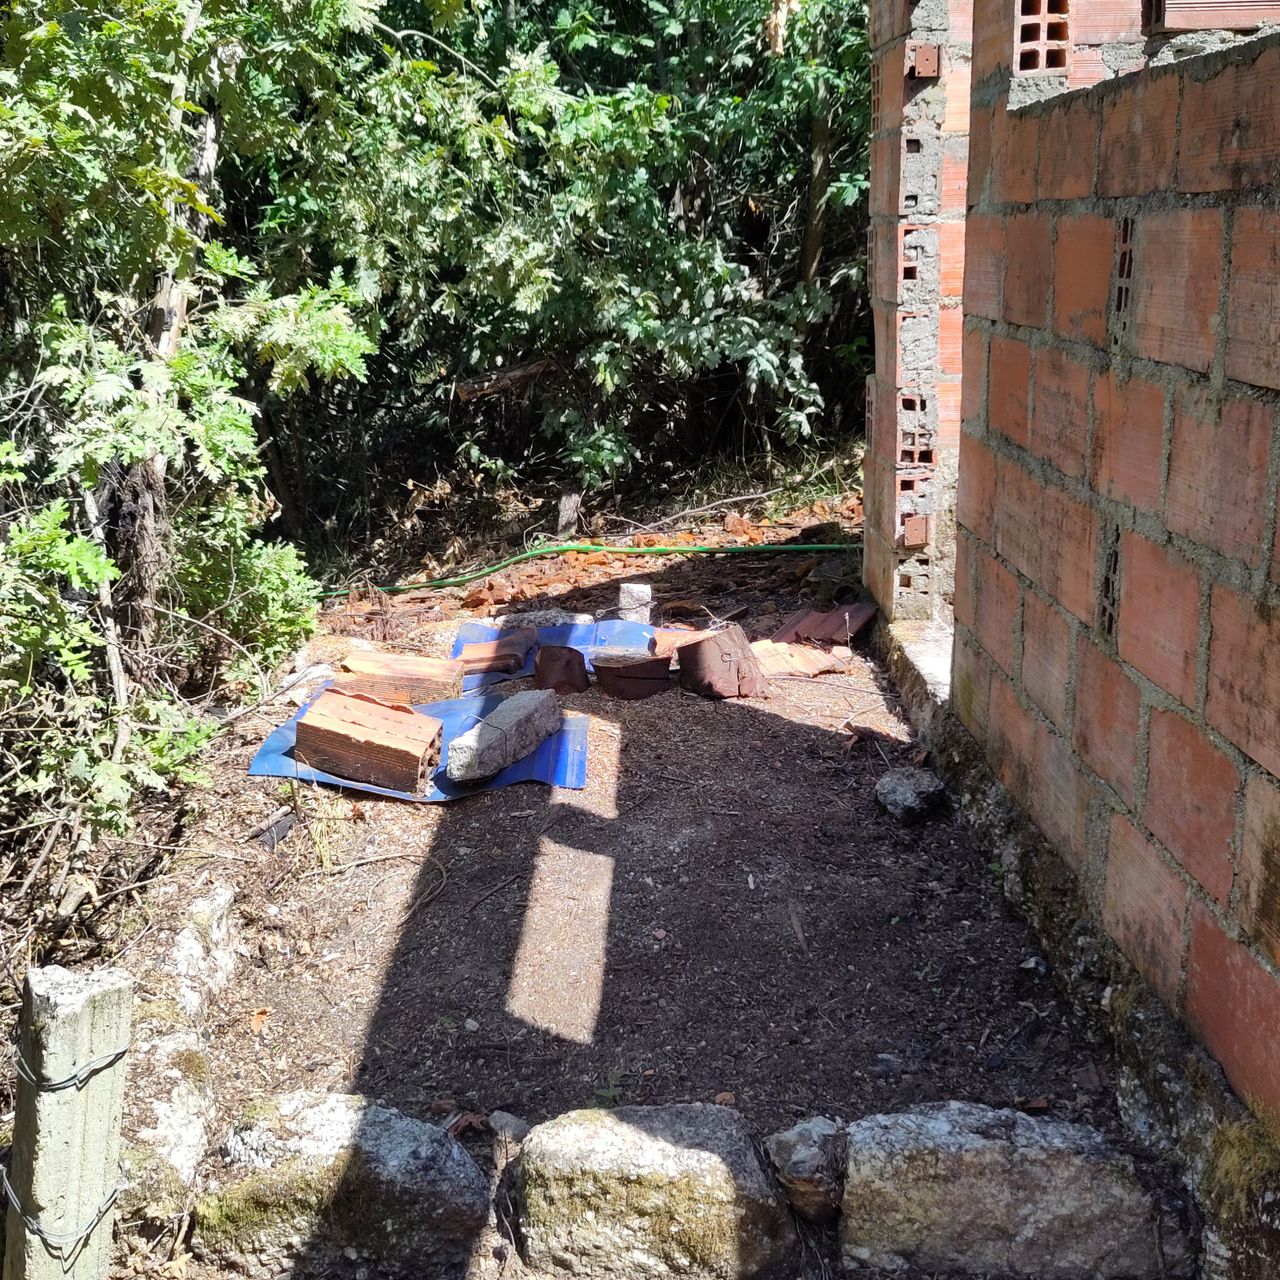
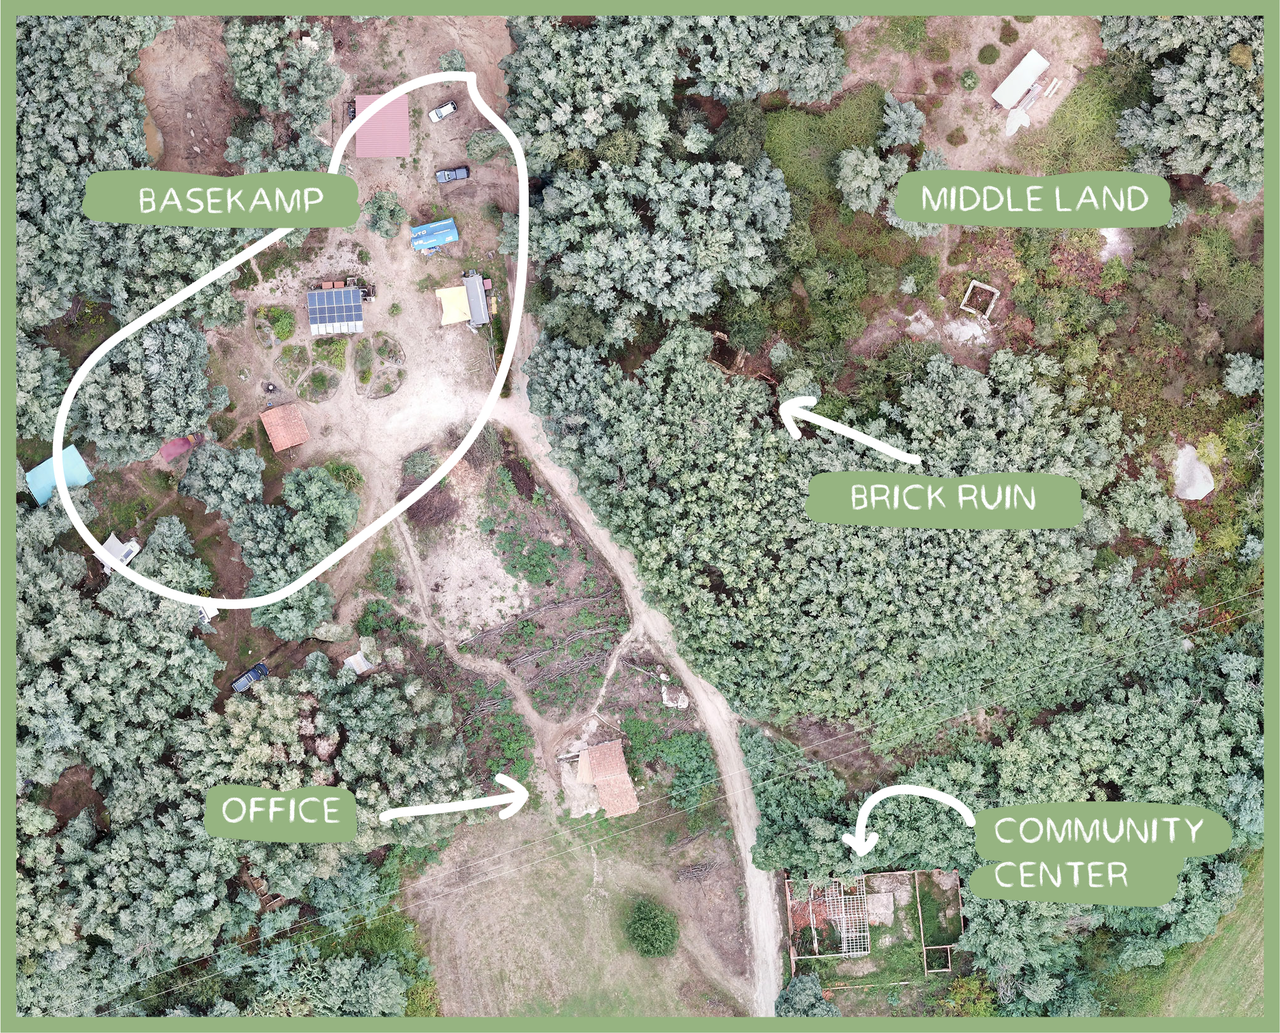
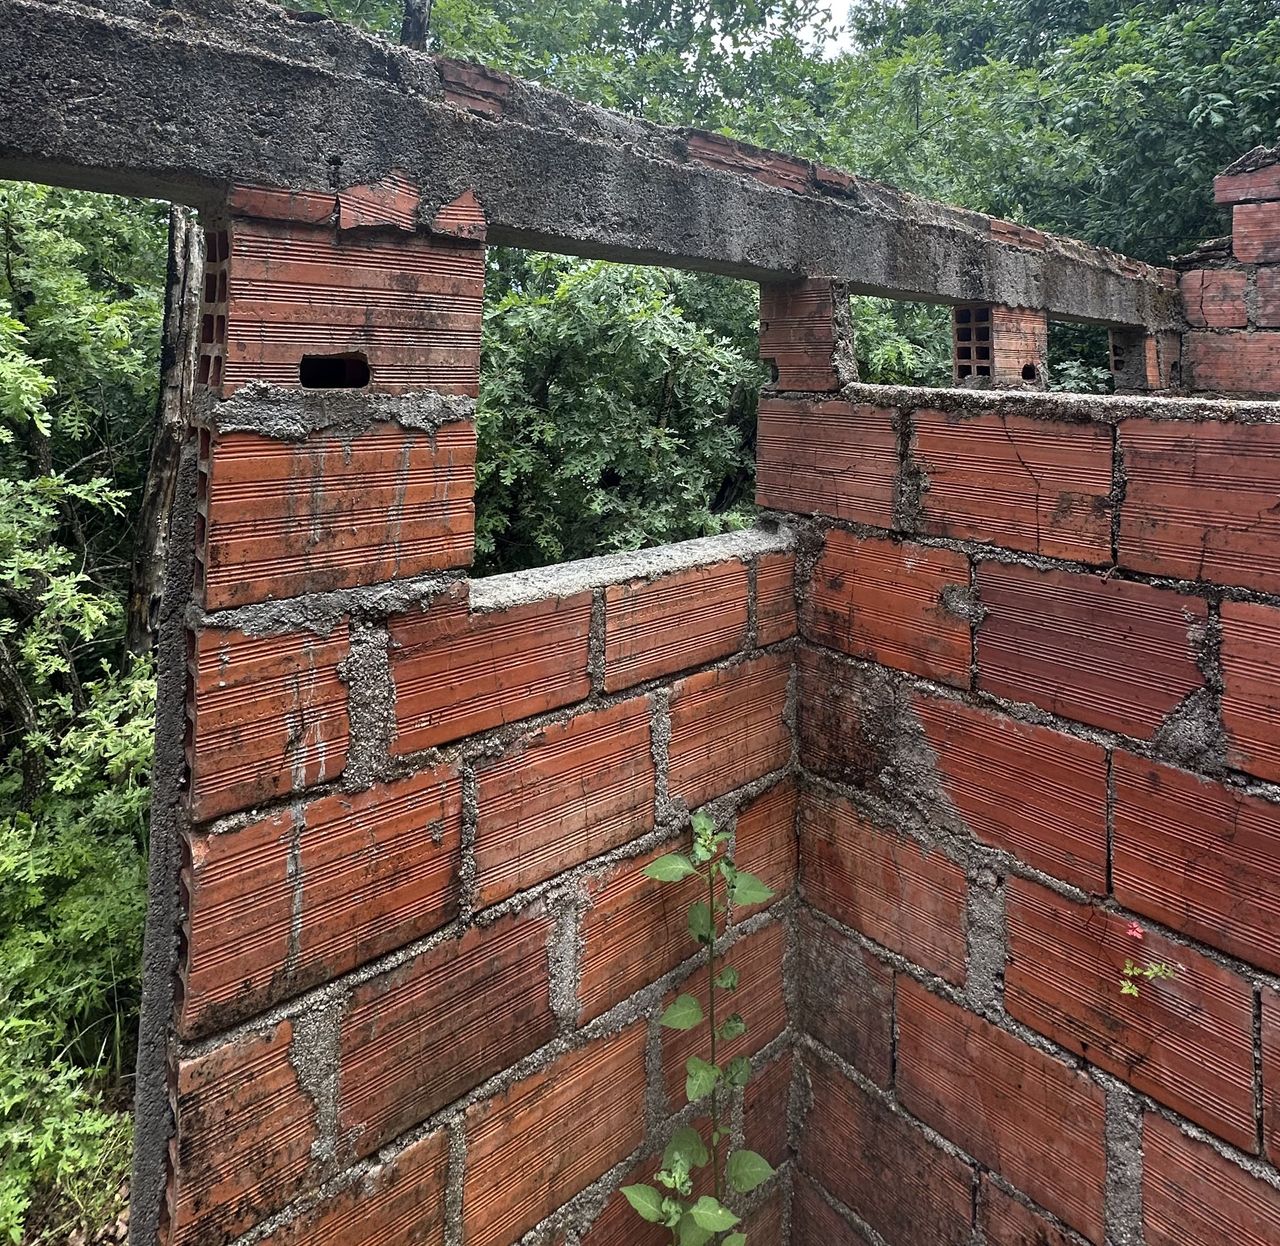
The ruin is located in the middle land. In between mimosa and oak trees. It is abandoned for many years now so it is a bit "hidden".
2
Cleaning inside and surroundings
Published 2yPublished about 2 years ago
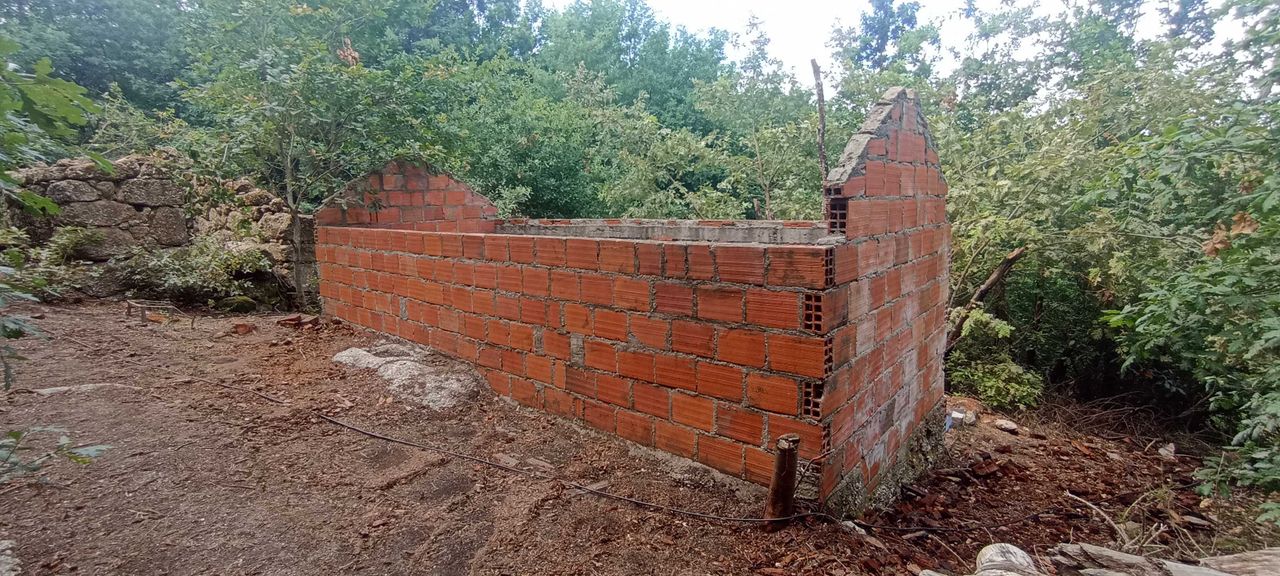
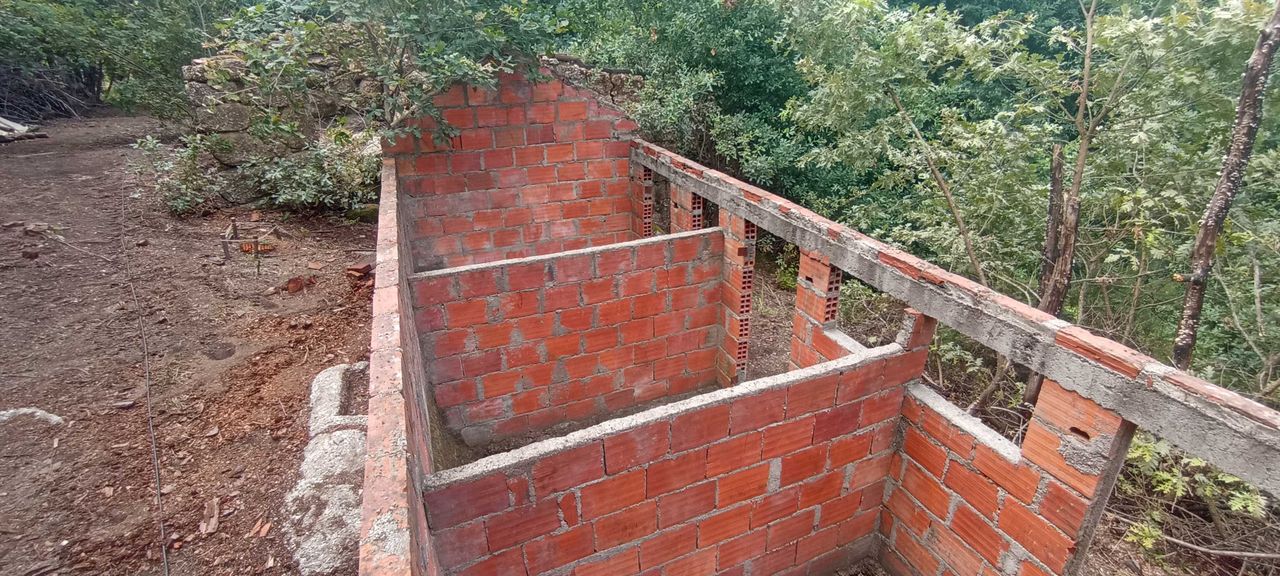
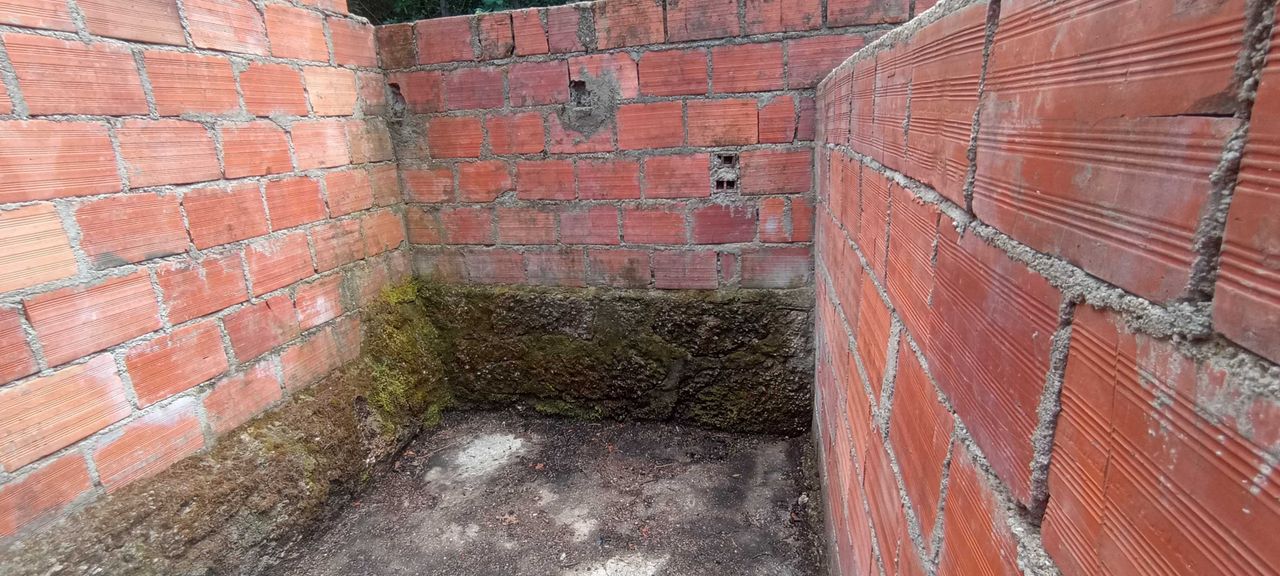
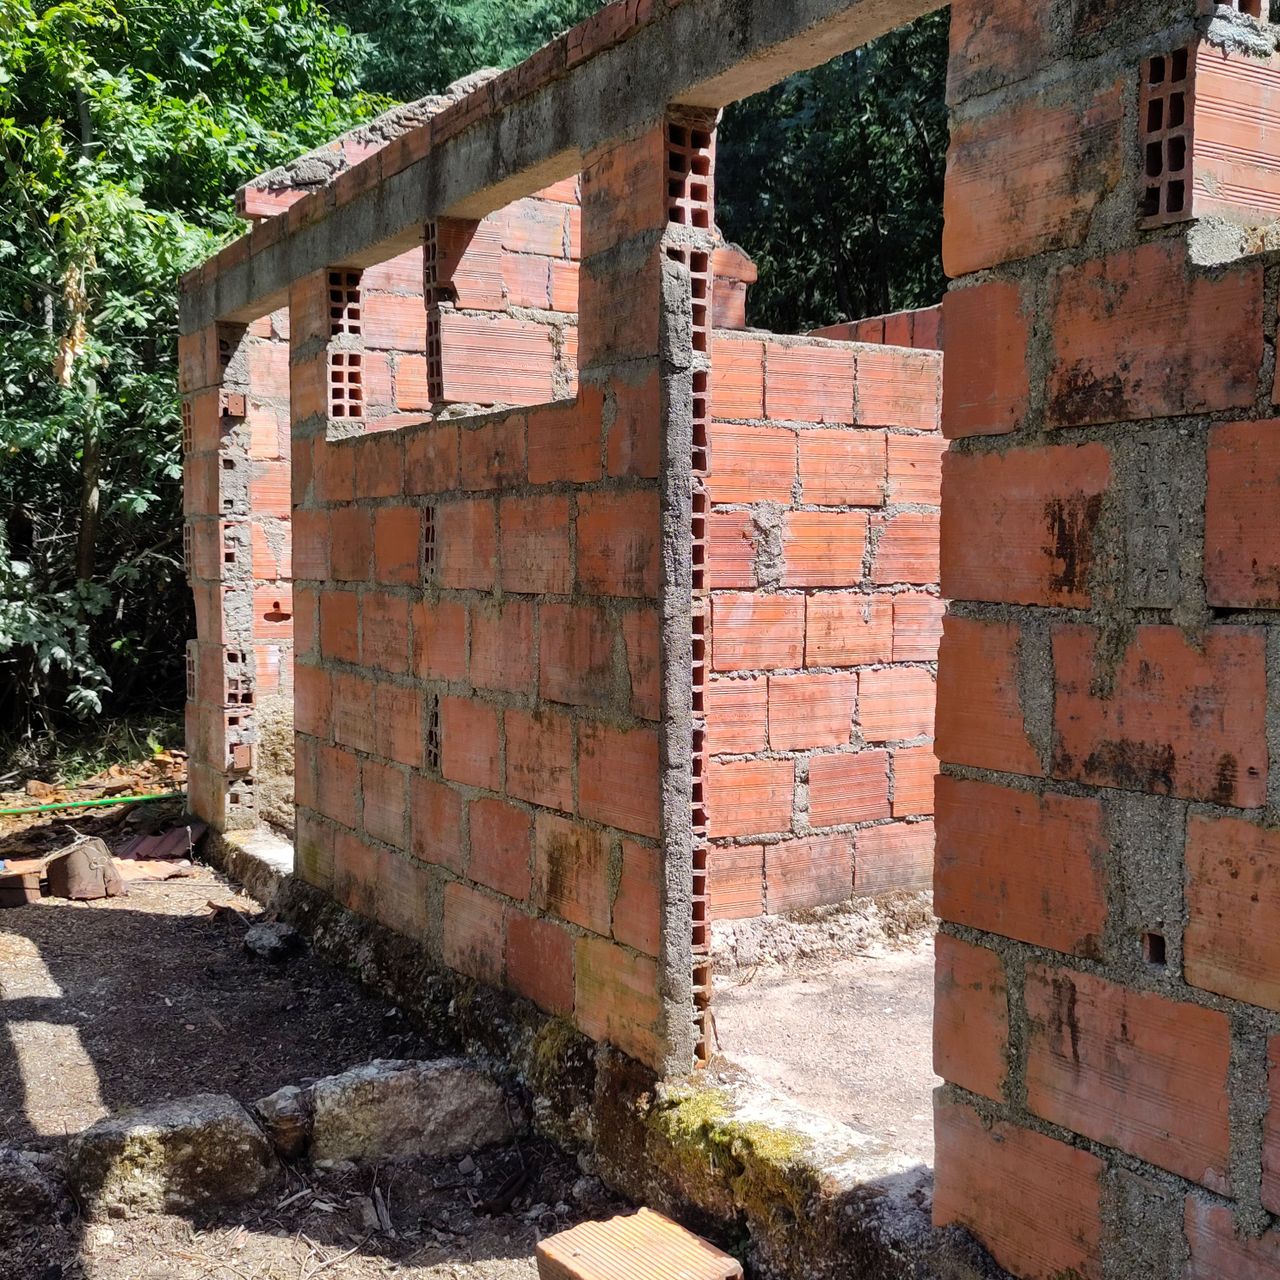
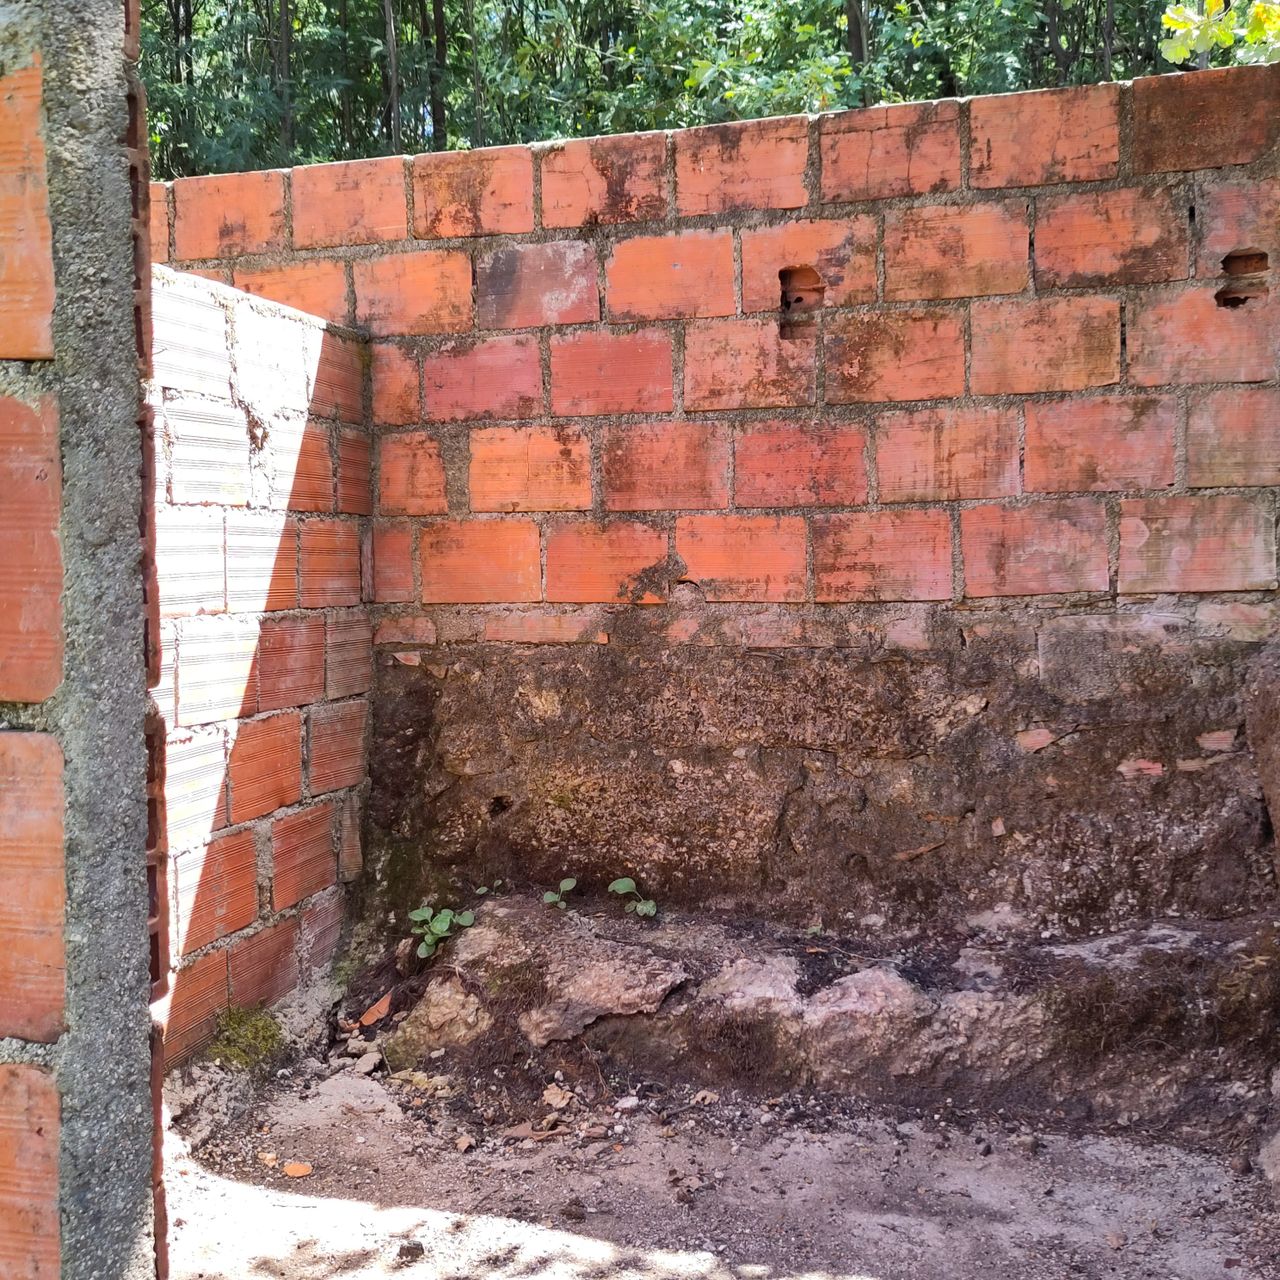
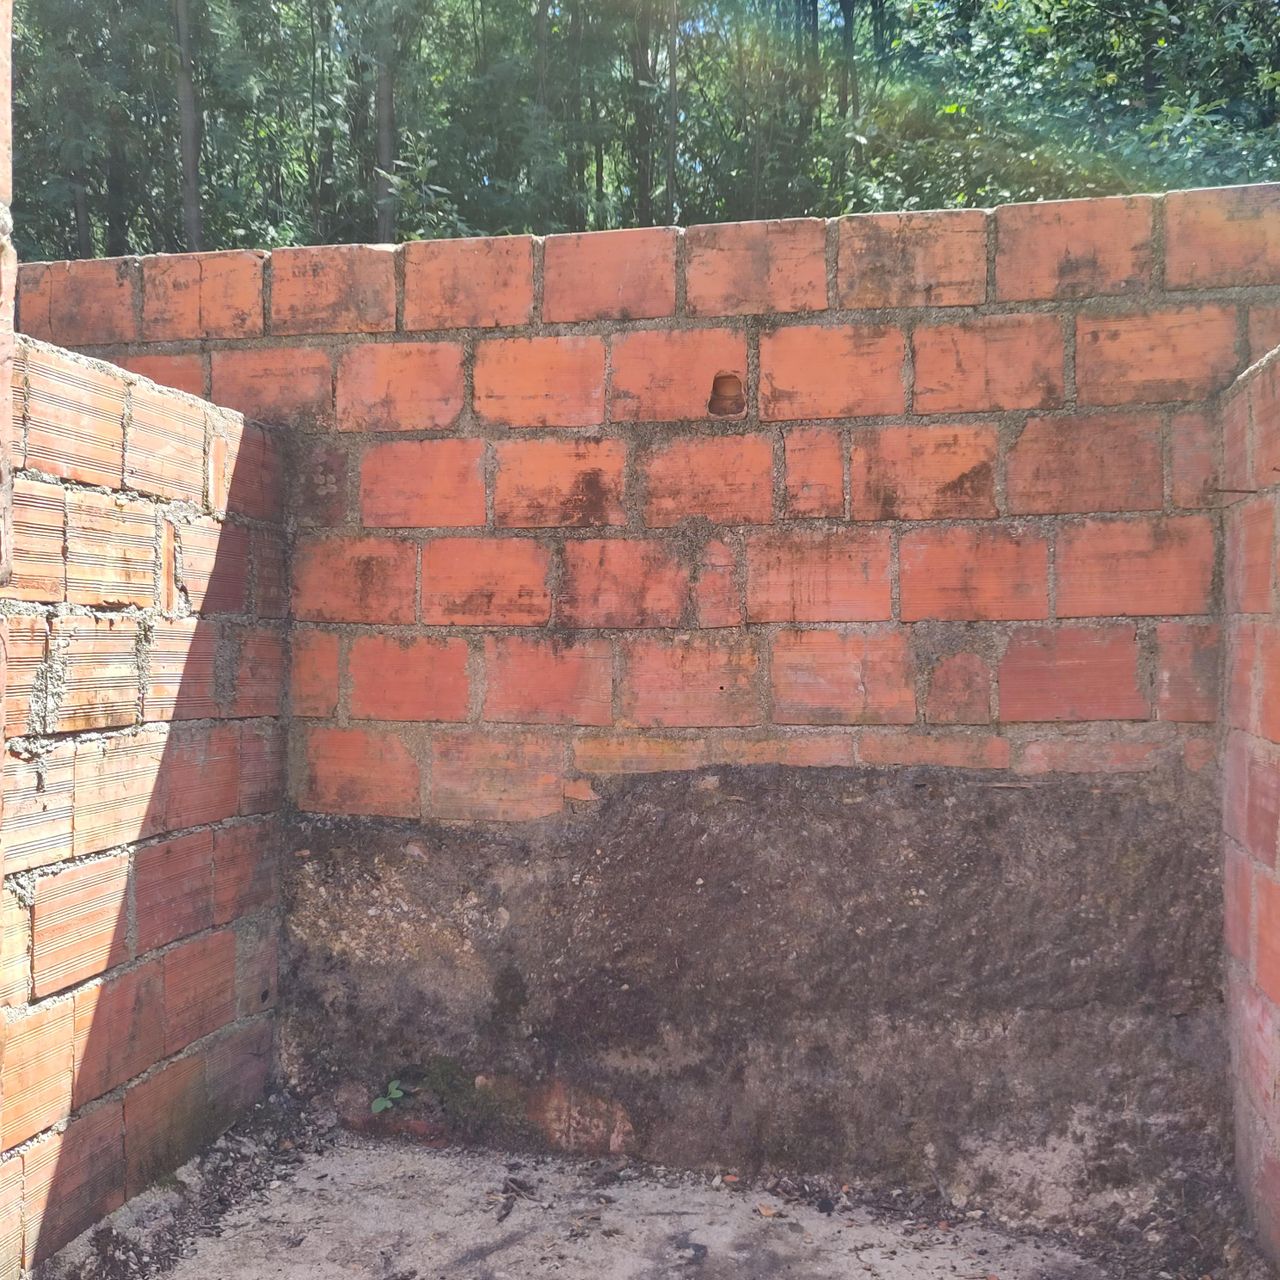
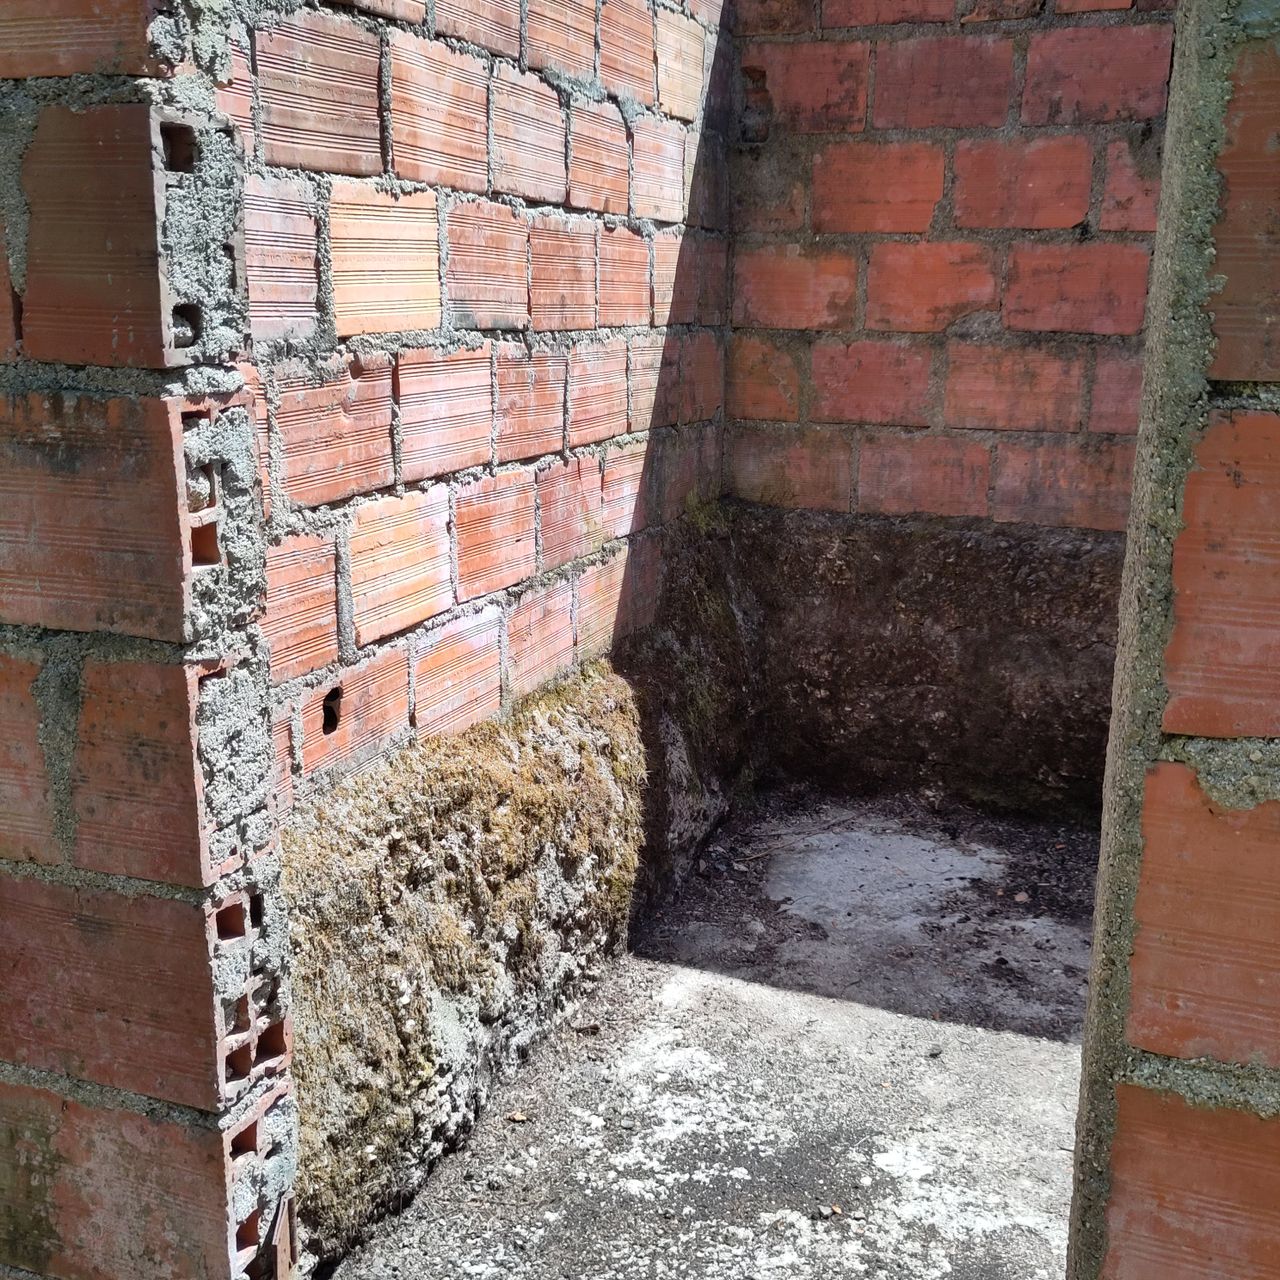
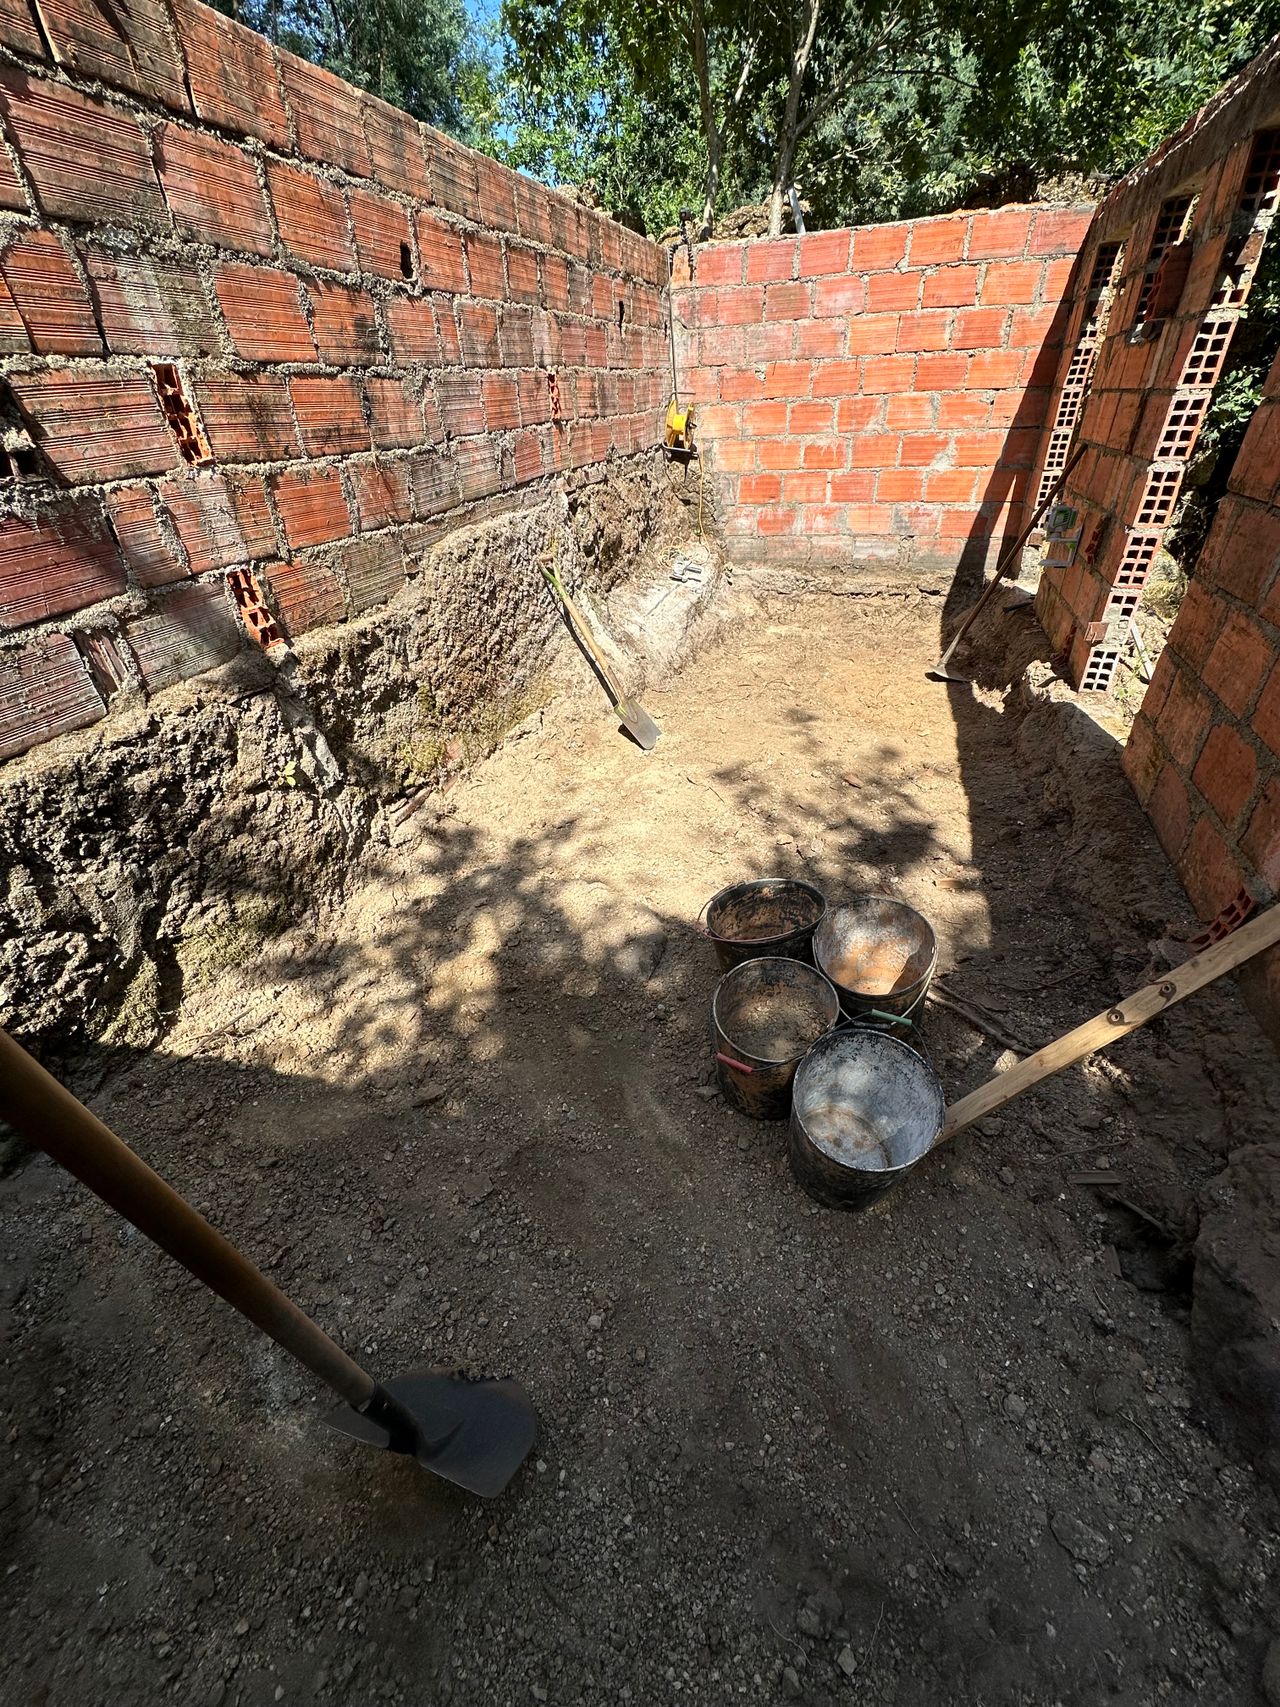
In order to check more in depth the state of the ruin, first step after discovering was to clean the surrounding vegetation and the inside of the walls of our ruin. After this we have a more clear image of what is the state of it, dimensions, state of the walls or depth of the floor.
The space is divided by very weak brick walls in 3 different rooms which have openings/doors to the northeast face. Every room has door and a little window.
The walls seems to be built on top of an old granite structure.
Original roof seems to run as a gable roof trough the 3 rooms.
You can see how we cleaned it in the update #119 on youtube
3
Want to help us think on what to do with the ruin?
Published 1y. Edited 1yPublished almost 2 years ago. Last edit almost 2 years ago
We now have this ruin cleared, but we are not sure what we will do with the space.
Maybe you want to help us think about an interesting new space for next year?
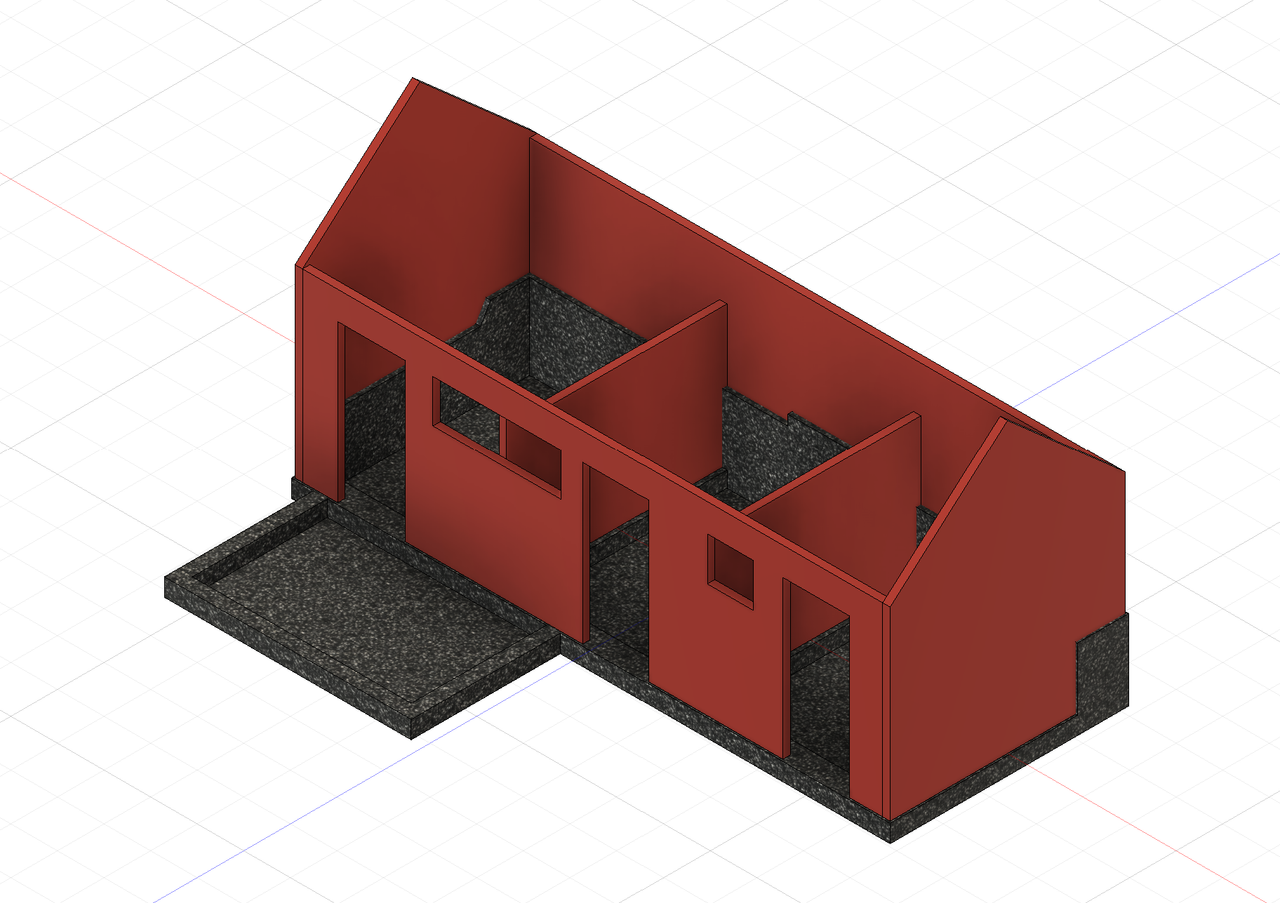
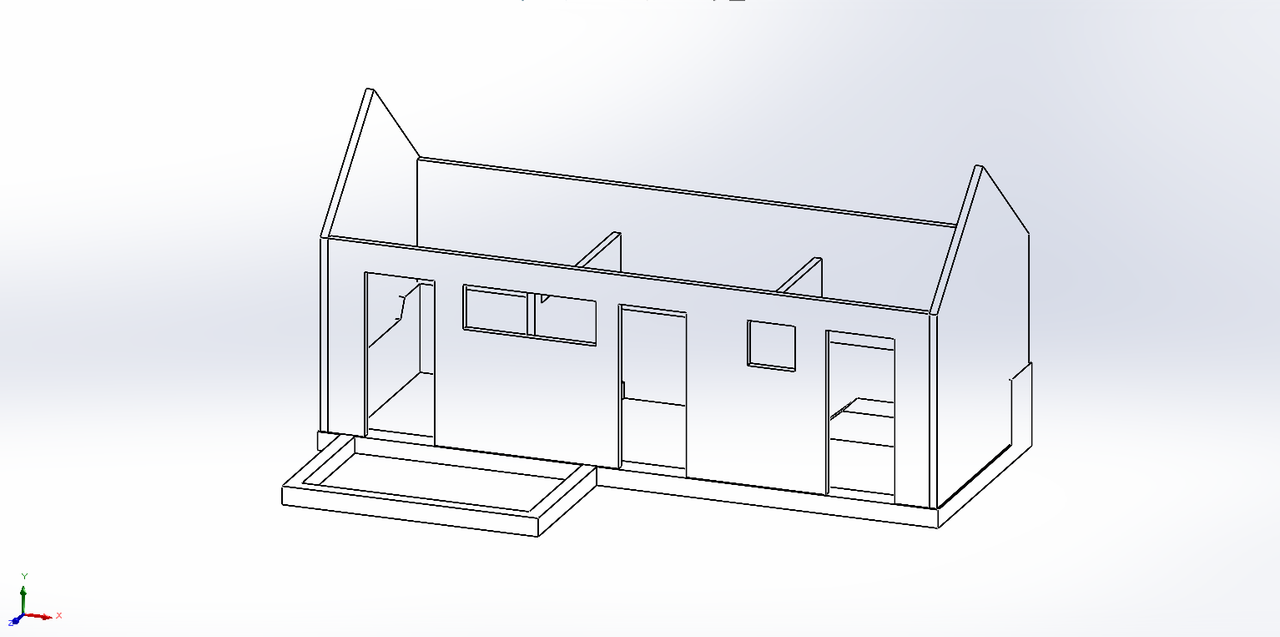
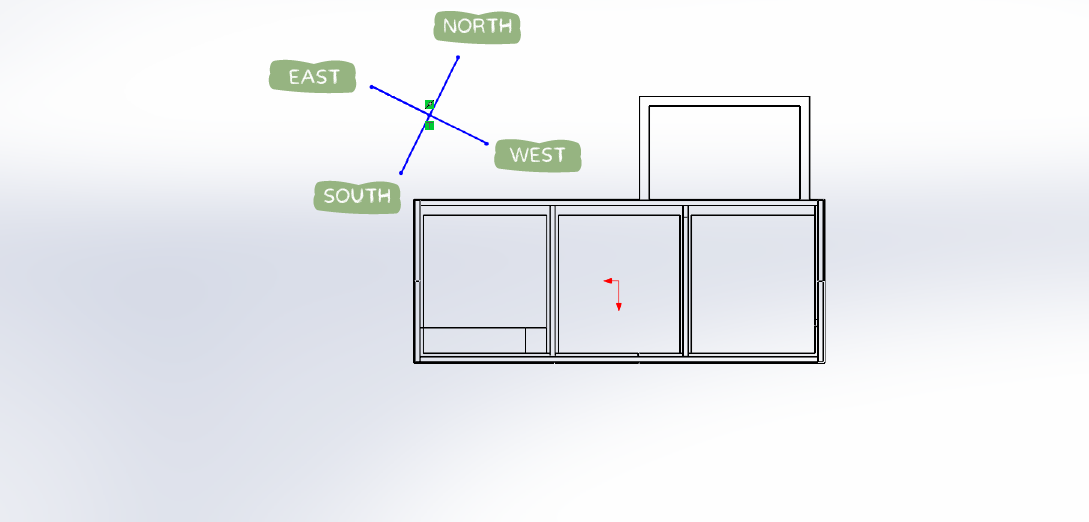
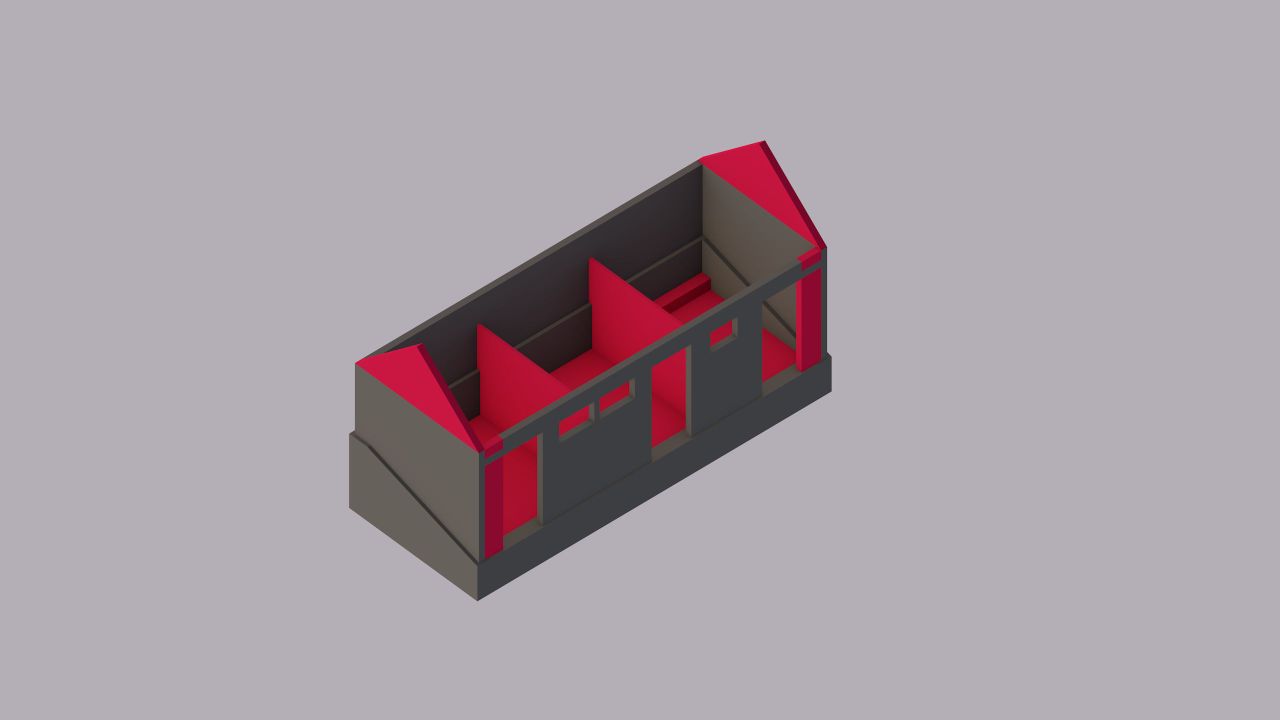
We have been measuring this ruin and created a 3d model for you guys.
You can find different options of files for the 3d model, and a pdf with a drawing with general measurements.
You will see in the drawings a difference between the brick structure and the granite one. That will make it easier for designing!
Feel free to try out ideas and let us know what do you imagine this space could become!
%20--%3e%3csvg%20version='1.1'%20id='Calque_1'%20xmlns='http://www.w3.org/2000/svg'%20xmlns:xlink='http://www.w3.org/1999/xlink'%20x='0px'%20y='0px'%20viewBox='0%200%2027.2%2027.8'%20style='enable-background:new%200%200%2027.2%2027.8;'%20xml:space='preserve'%3e%3ctitle%3eicon%20redirect%20new%3c/title%3e%3cg%3e%3cpath%20d='M27.2,26.5c-0.1-5-0.3-10-0.4-15c0-0.7-0.6-1.2-1.2-1.2s-1.2,0.6-1.2,1.2c0.1,4.6,0.3,9.1,0.4,13.7%20c-3.9-0.2-7.7-0.6-11.6-0.4c-3.3,0.2-6.7,0.5-10,0.4C2.8,19.5,2.7,13.7,2.5,8c2.9-0.1,5.8-0.8,8.6-0.7c1.6,0.1,1.6-2.4,0-2.5%20C7.8,4.6,4.5,5.7,1.2,5.5c-0.6,0-1,0.3-1.1,0.7C0,6.3,0,6.4,0,6.6c0,0,0,0.1,0,0.1c0,0,0,0,0,0.1c0.2,6.6,0.4,13.2,0.5,19.7%20c0,0.6,0.4,1.3,1.2,1.4c3.8,0.1,7.5-0.2,11.3-0.4c4.4-0.3,8.6,0.2,12.9,0.4c0.6,0,1-0.3,1.1-0.7C27.1,26.9,27.2,26.7,27.2,26.5z'/%3e%3cpath%20d='M12,12.6c-0.2,0.7,0.2,1.4,0.9,1.5c0.7,0.2,1.4-0.2,1.5-0.9v0c0.6-2.2,1.4-4.5,3.1-6c1.3-1.2,3-1.9,4.7-2.7%20c-0.4,1.3-0.8,2.6-1.4,3.8c-0.6,1.5,1.8,2.1,2.4,0.7c0.8-1.9,1.5-3.9,2-5.9c0-0.1,0-0.2,0-0.3c0.3-0.6,0.1-1.5-0.7-1.8%20C22.3,0.4,20,0,17.7,0c-0.7,0-1.2,0.6-1.2,1.2s0.6,1.2,1.2,1.2c0.9,0,1.7,0.1,2.6,0.2c-1.7,0.8-3.4,1.7-4.8,3%20C13.6,7.6,12.7,10.1,12,12.6z'/%3e%3c/g%3e%3c/svg%3e)
4
Usage of the ruin
Published 1y. Edited 1yPublished almost 2 years ago. Last edit almost 2 years ago
Thanks for the input in the last post to everyone! So far main ideas are:
- Bathroom by @grunwalder
- Showers by @primalekk
- Goats by @bostrychia
- Rooms by @enzanity @martinka24 @pouschkin @vidar @winteplynn @watermonkey @joanvb
Even tho, some concerns have been raised around the animals being there before and what could that mean for human health if this becomes rooms for human use. Seems like the best option so far to make this brick ruin into bedrooms for the people who stay during the season in Project Kamp.
Bathrooms and showers will probably go to the Community Center building in the future. Community Center will be quite close to this ruin so to not overlap these facilities doesn't seem the best option to put effort now to build something that might change in the near future.
5
Call for design brick ruin
Published 1y. Edited 1yPublished almost 2 years ago. Last edit almost 2 years ago
Looking at the options it seems that bedrooms could be the most useful option at the moment. To build a place that can host in better conditions the people that come to help us.
The needs of these people are usually a place to sleep and a place to store clothes and personal objects for a full season.
This said, for this project we would like to collect ideas and open a process where the online community can participate in the design process for this building. Opening the possibility to add designs and ideas to implement in our offline space in Project Kamp.
For this you can find a basic model to work on in a previous post and below a link to a drive folder to drop your designs.
Keep in mind this is not set in stone since the team still needs to come together around it. But for the sake of testing let's give it a try and see what the online community brings!
👇Drop you files here👇
https://drive.google.com/drive/folders/1fQaZxnikGZlIZUZeJYZfBABdTSMQ2MYn?usp=sharing
6
Survey
Published 11mo. Edited 11moPublished 12 months ago. Last edit 11 months ago
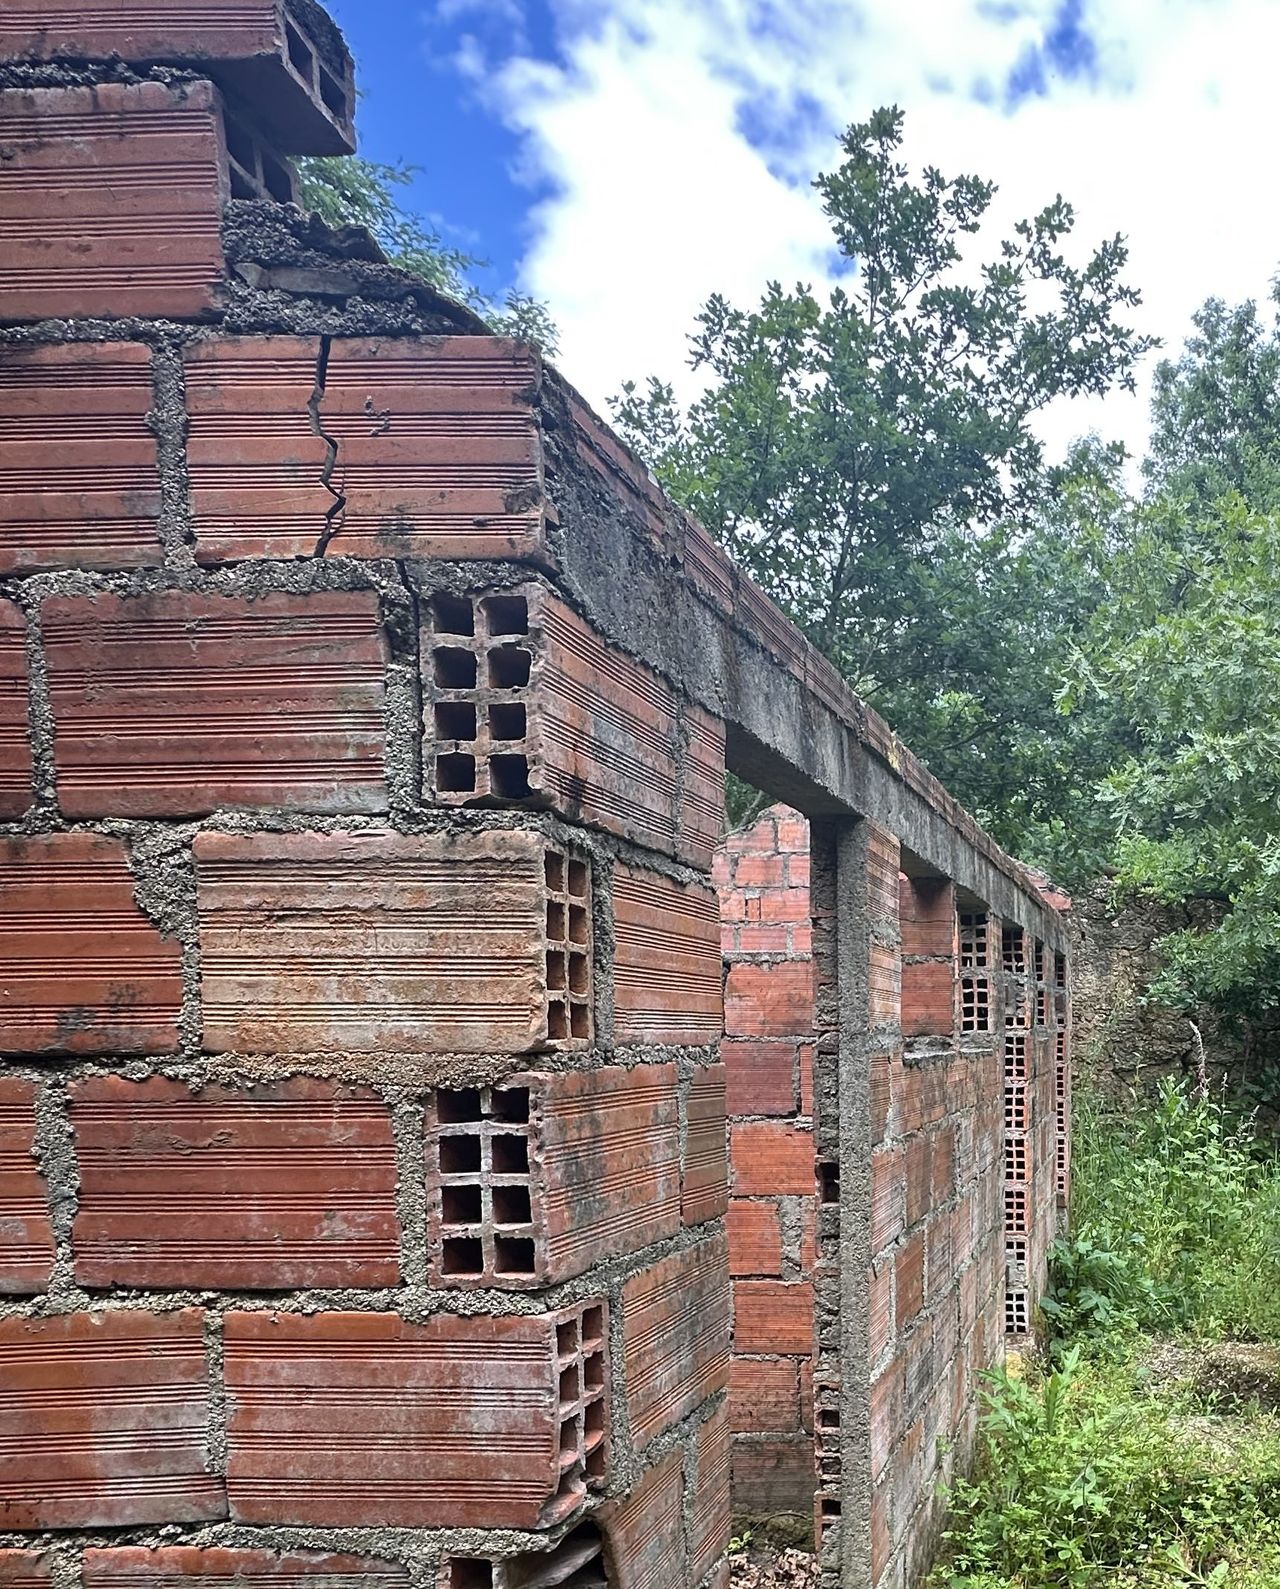
In order to start a renovation design, we have to assess the existing situation. The Brick Ruin was built some time ago with a certain use in mind and according to the standards of that time. It was made to house chickens therefore was not intended to be durable or qualitative. Moreover, the building went through a big forest fire back in 2017 after which it was abandoned for years. All of this means that the current state of the Brick Ruin is in its name: a ruin. The structure as is will thus be treated as a ruin. We carried out a survey of the walls, foundation, floor, soil and other potential problems.
This is what we concluded from our survey:
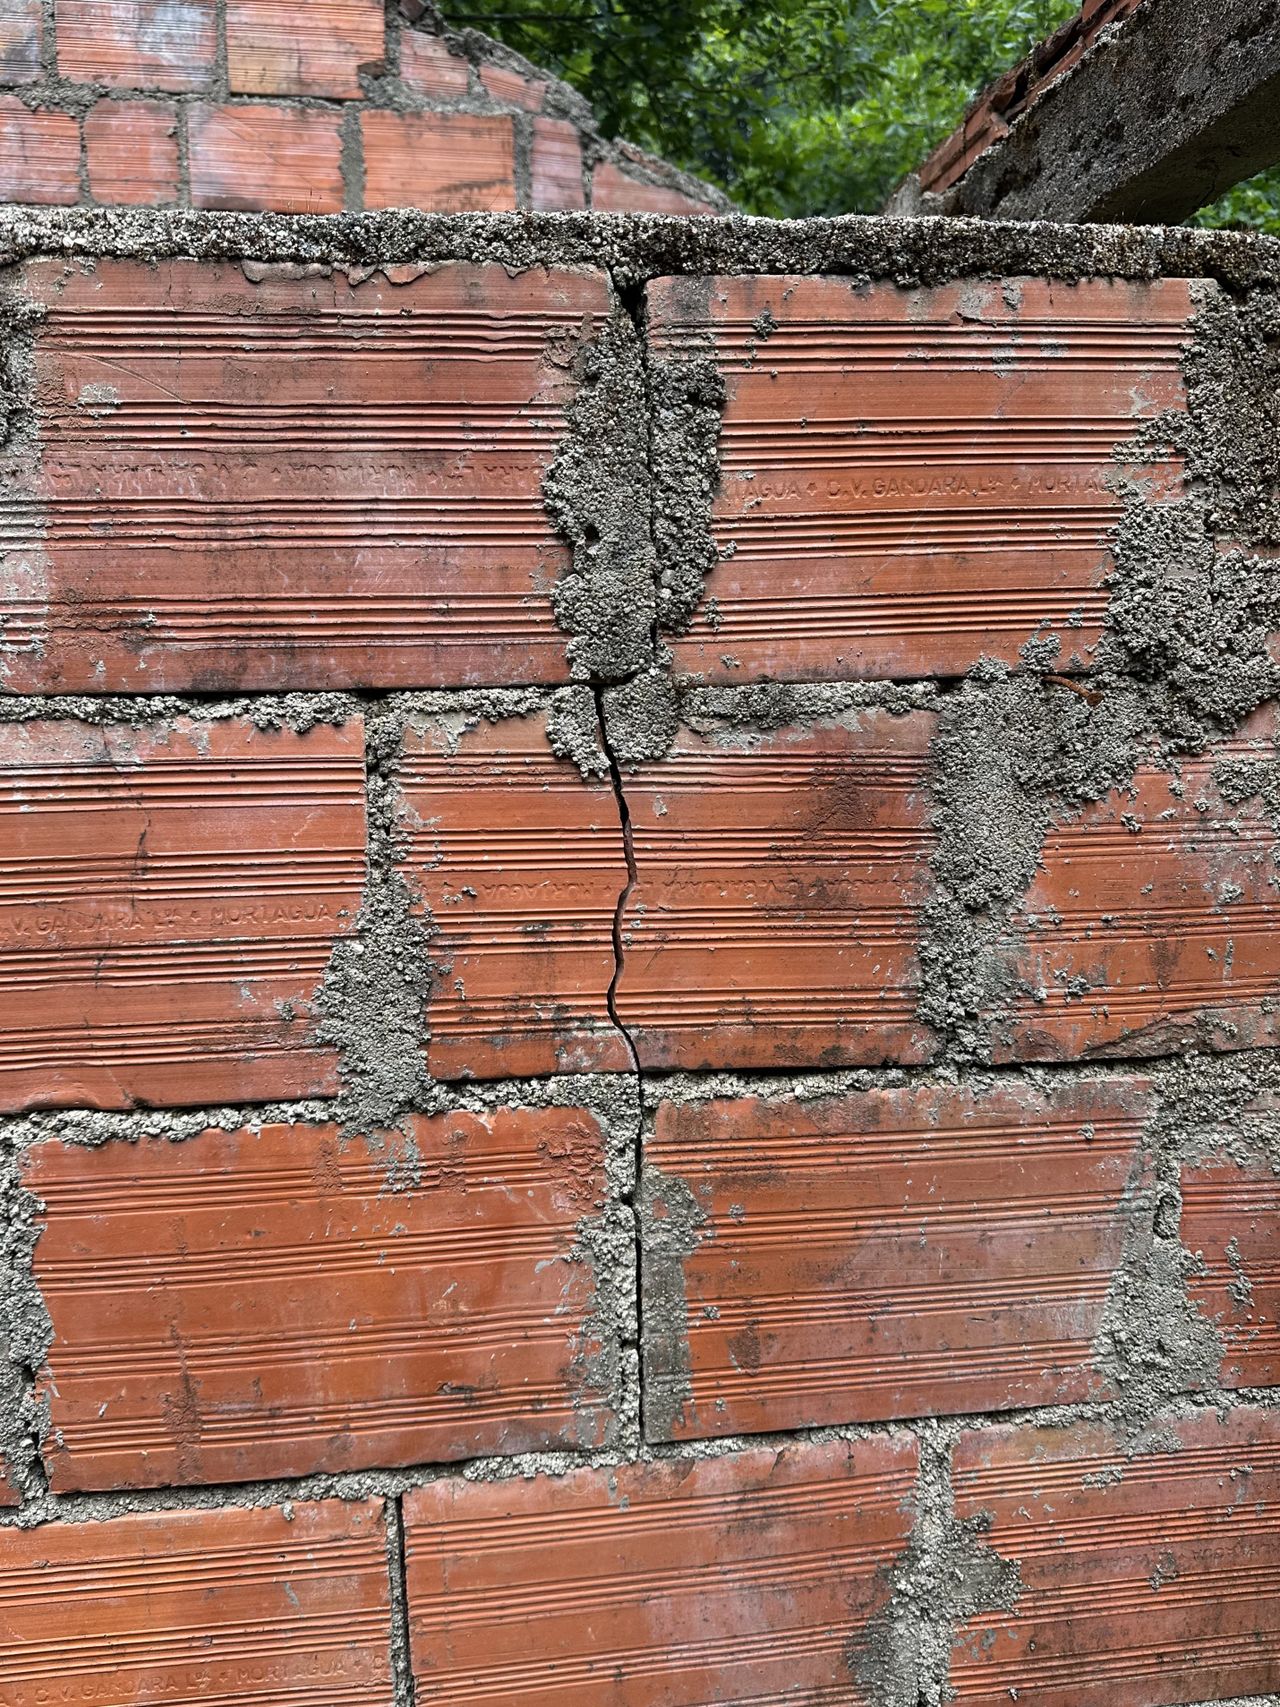
Walls
The walls are in a rough condition and are not to be relied on as a loadbearing structure. They should either be removed where necessary or supported by an additional stable structure.
Foundation
The foundation is intact all around and seems reliable for the existing structure. Adding more load to it might be okay but should be avoided.
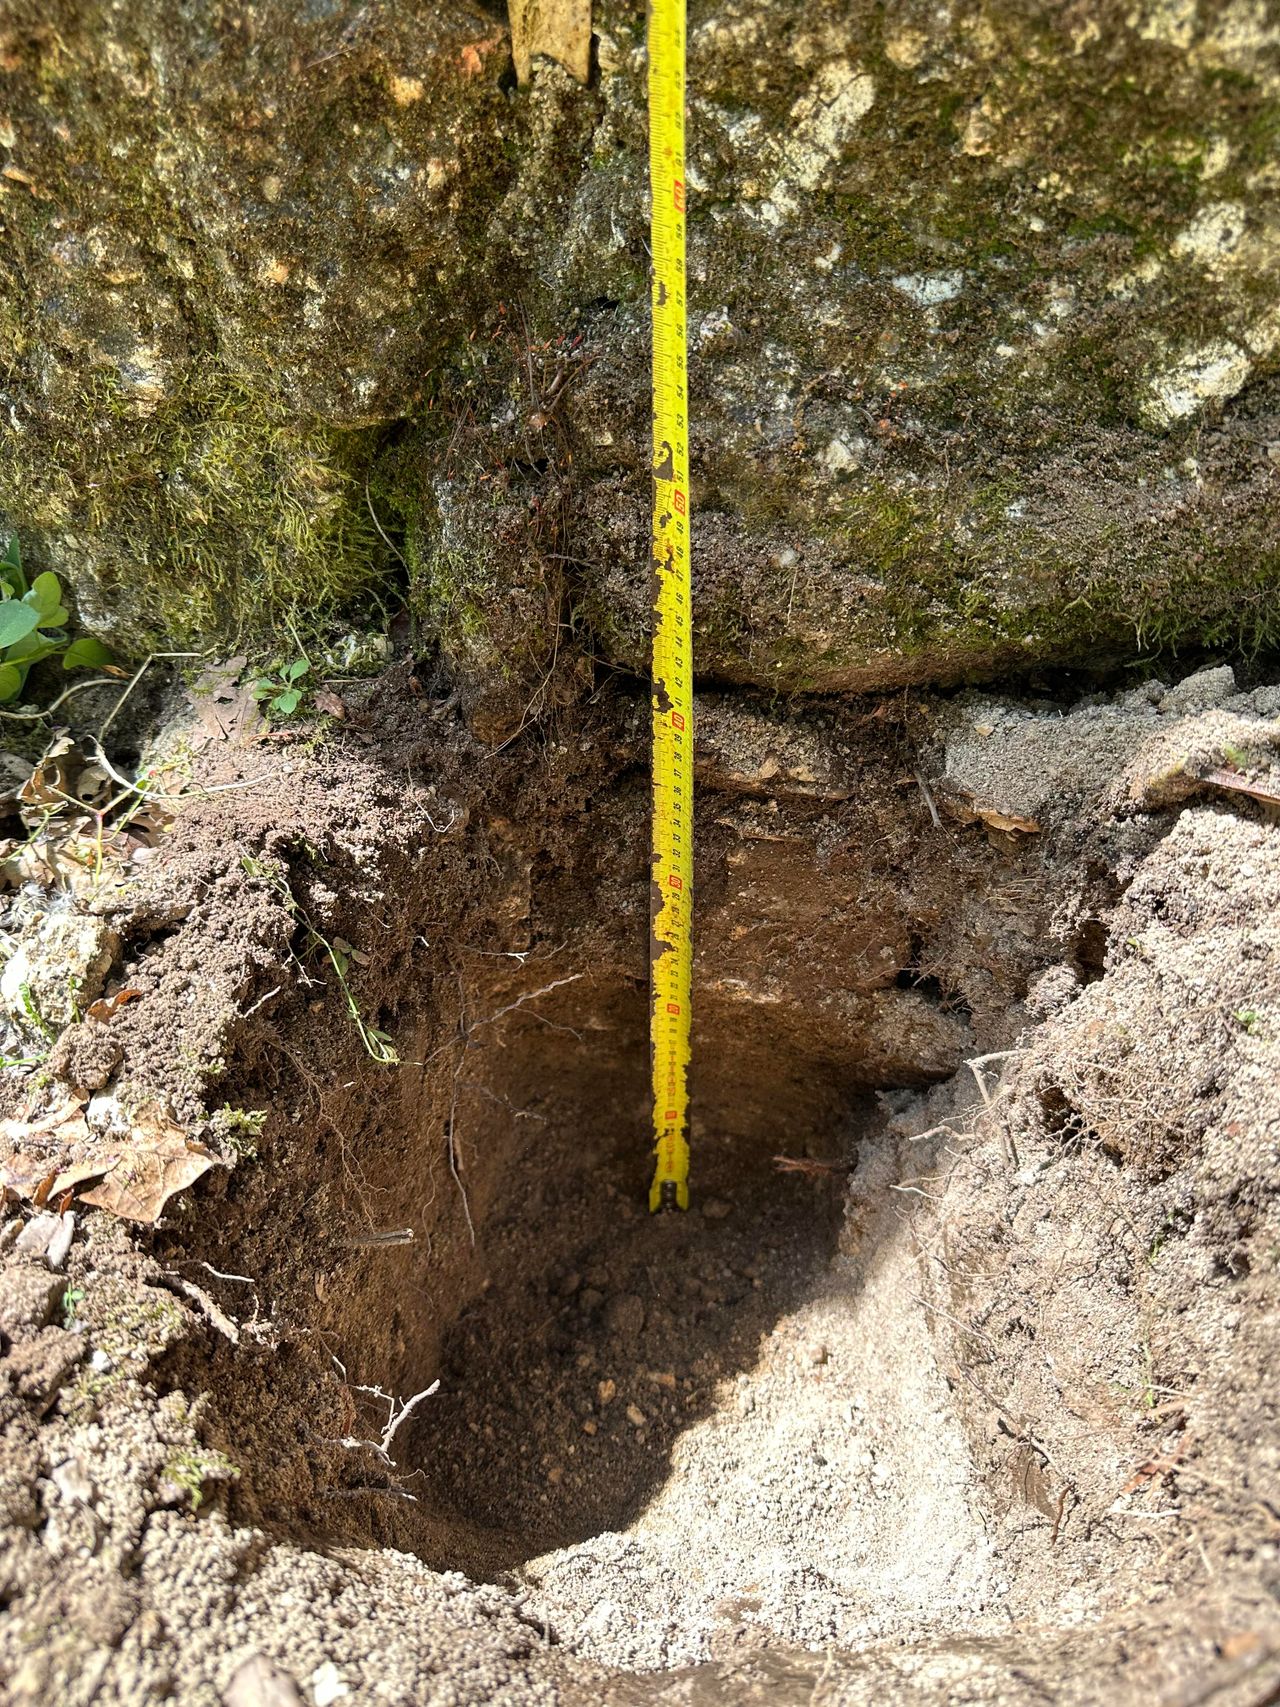
Soil
The soil is ideal for building.Roots of trees and plants should be considered.
Although, at first glance, the structure seems like it reached the end of its lifetime, with the mindset of conservation, it can still be useful in some ways. We are not ready to retire (all of) the bricks yet!
7
Design: Brief and constraints
Published 10mo. Edited 10moPublished 10 months ago. Last edit 10 months ago
After a thorough evaluation of our needs and the future of the project, we decided the purpose of the brick ruin to be accommodation. More specifically, two bedrooms with a shared heating system, electricity and ample storage. To start off, the building will be used mainly during the season but will later also be used of season, when the temperatures drop. The materials and construction methods we chose to use with are based on availability within the region and the skills we have got here at Kamp. This means wood that’s available in the local sawmill, natural materials, used materials that are available in the area like ceramic roof tiles, used windows and doors.
Some expected challenges include:
• General state of the structure
• Delivery time and availability dry wood
• Used roof tiles can take time to find and work to get them
• Back wall underground, possible moisture problems
• Young oaks near the ruin
• Using second hand doors and windows
Moreover, we want to keep as much of the original structure as possible, not only for environmental reasons but also for architectural reasons. We value the history of the land that we are so lucky to inhabit. This means even the wonkiest of the walls, the ugliest of the bricks and the sketchiest of the ruins will be appreciated as our local heritage. As John Ruskin once said: “Better a crutch than a lost limb.” The new design will protect, reinforce and secure the existing structure turning it into a palimpsest with many layers and a complex history.
And of course, we make sure the building is safe and healthy to live in. :)

8
Construction method/Materials
Published 10mo. Edited 9moPublished 10 months ago. Last edit 10 months ago
As mentioned earlier, the aim is to keep as much of the structure as possible but after having surveyed the building, we decided to remove some parts that would not meet our durability, health and safety requirements. These parts include the gables, interior walls and floor (see demolition plan).
We went for a timber structure based on the available wood (dimensions) of the sawmill. The two options we were presented with were to either use local cedar wood that could be cut to almost to any dimension we wanted but was only available as green wood (freshly cut with a high moisture content) or we could go for dry Nordic pine based on a standard dimension of 225x75 mm. We eventually chose for the Nordic pine for the following reasons:
Though perfectly possible, building with green timber is hard and requires proper expertise. If not taken into account, the movement of the wood after shrinking could jeopardize the longevity and even the stability of the entire structure. Considering we don’t have the necessary experience with building with green timber, we chose to go for the safer option that we believe will ensure the longevity and safety of the building. We used contemporary post and beam structure which was not only dictated by the lumber dimensions but also by our need to have flexibility. With a post and beam construction, large spans are possible which makes it more flexible in terms of design choices in the future (for example: place and size of windows).
Traditionally, the walls in a post and beam building were filled with filler material like bricks, stone and cob (adobe, waddle and daub,…) We decided to use a different material that would serve not only as an infill but also as the insulation layer and the finish layer of the building. It consists of hemp fibers and limecrete and is formed in blocks of varying sizes. Hemp blocks are carbon sequestering, meaning they have a negative carbon footprint. They insulate well, are breathable, fire resistant, pest and mould resistant and a good acoustic insulator. The blocks are produced by a Portuguese company and is located not so far from Kamp. Considering their willingness to provide us technical support, we were confident with this choice. Also, it is a good experiment for us to share with the world.
To keep the rest of the insulation (roof and floor) light and simple, we went for the tried and tested cork panels.
The rooftiles, windows, doors and other finishing layers would be provided by the local used market.

9
Insulation
Published 10moPublished 10 months ago
Insulation
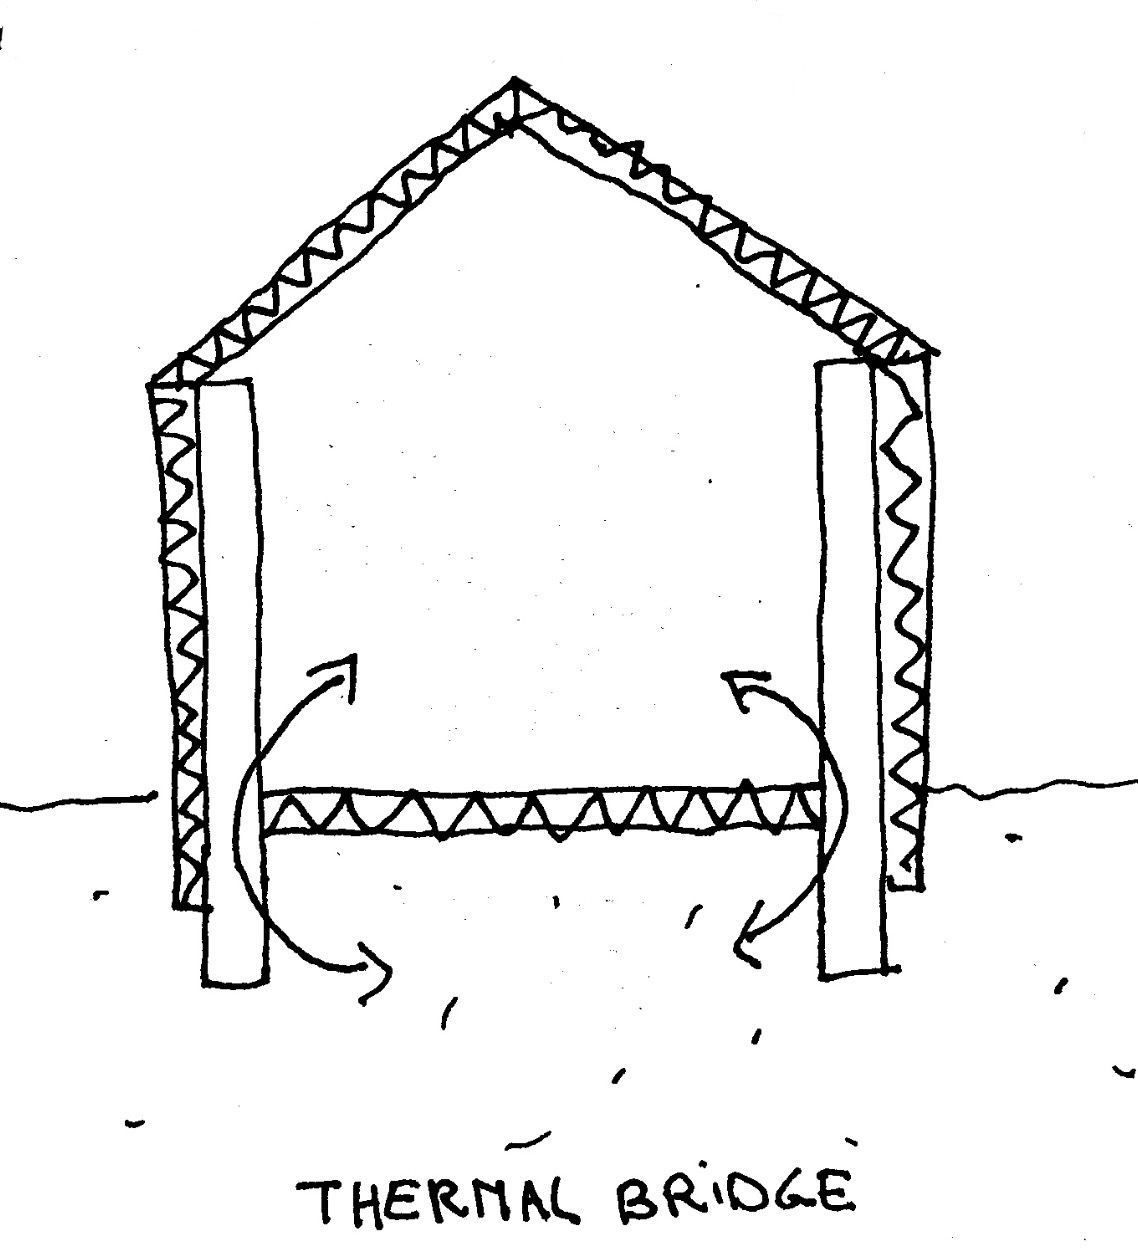
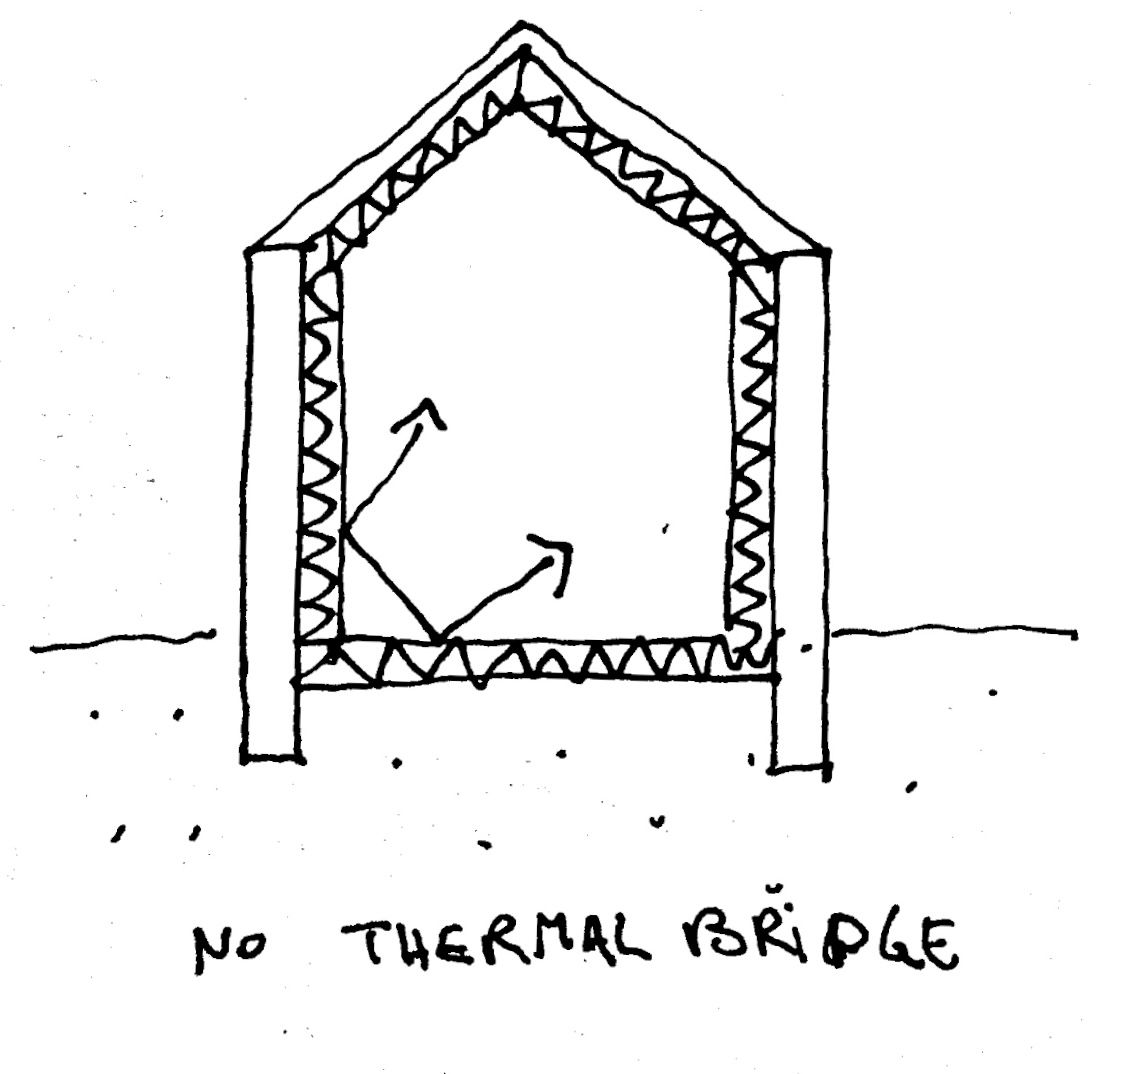
The decision of whether to insulate inside the existing structure and outside was made after carefully analyzing the following options:
Insulation outside:
+ more floor space
+ thermal mass
+ ease of construction
- south wall needs to be dug to foundation (large rock impossible to dig out
- south wall needs drainage
- risk of moisture transfer
- thermal bridges
insulation inside
+ thermal continuity (better insulation)
+ easier solution against moisture (disconnect with soil)
+ keeps original brick structure visible
- less floor space
- less thermal mass
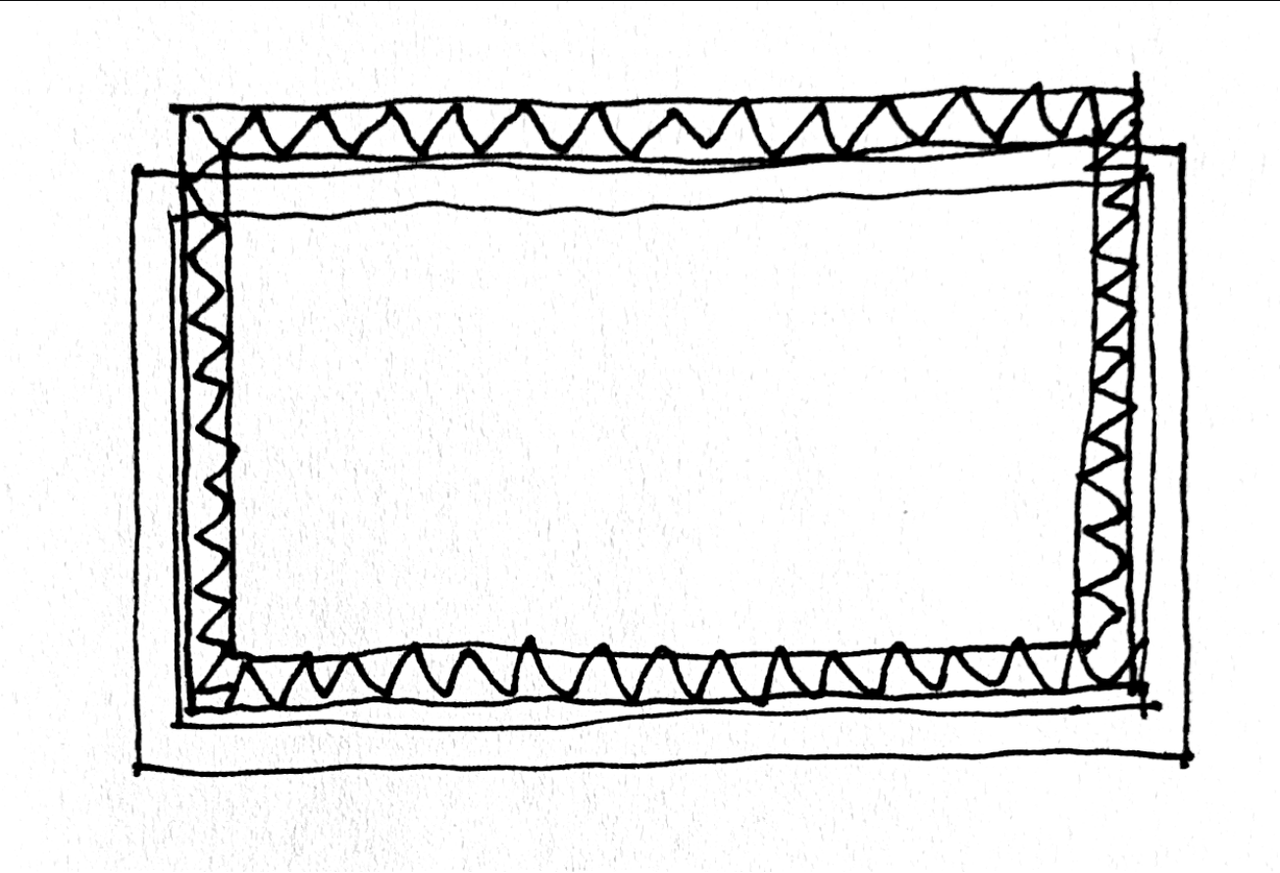
Placing the insulation inside the existing walls seems to have more benefits than placing it outside. It insulated better, allows easier solutions against moisture while keeping the brick visible. We can decrease the negative aspects by choosing for a hybrid of the two options. By including one of the walls within the insulated structure, we increase the usable floor area and the thermal mass. This solution gives us the best of two worlds.
10
Plans
Published 9mo. Edited 9moPublished 10 months ago. Last edit 10 months ago
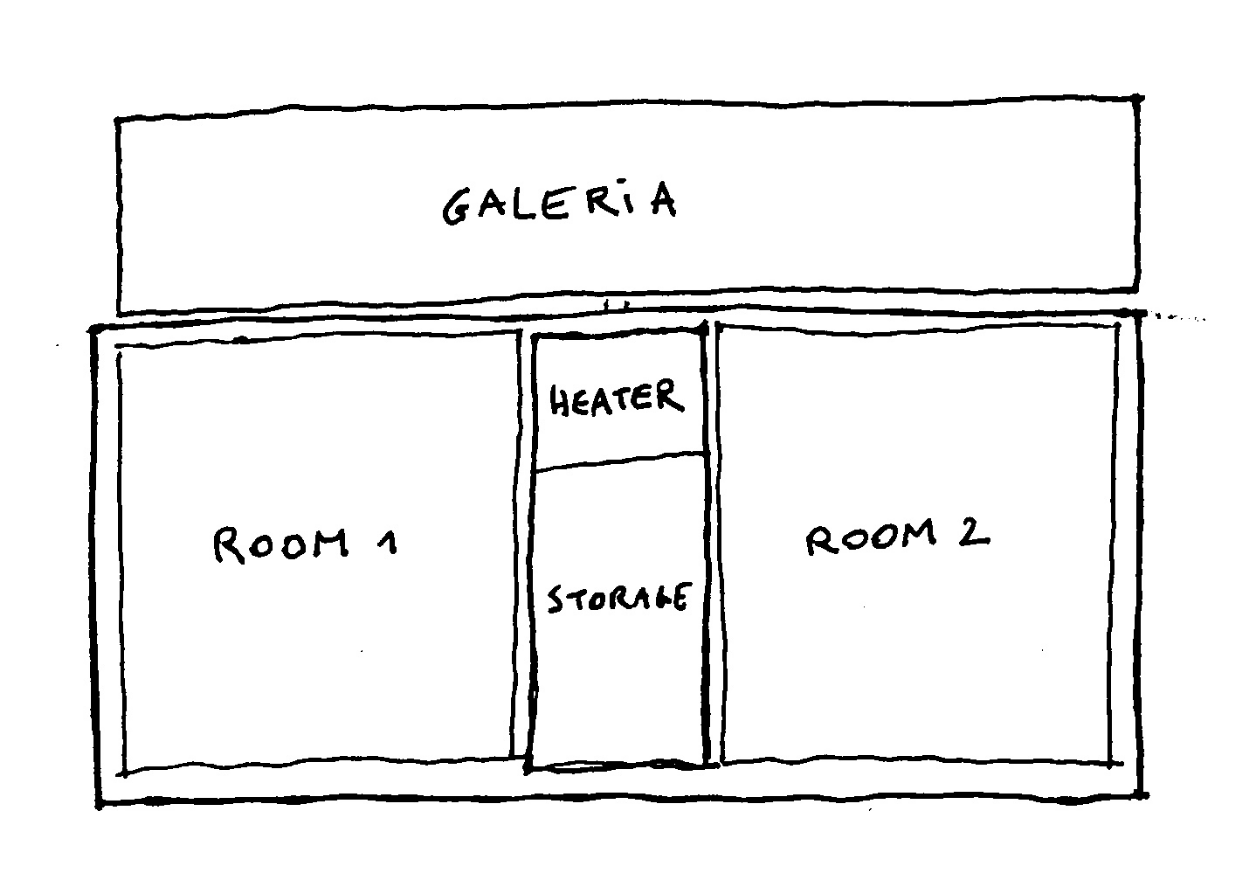
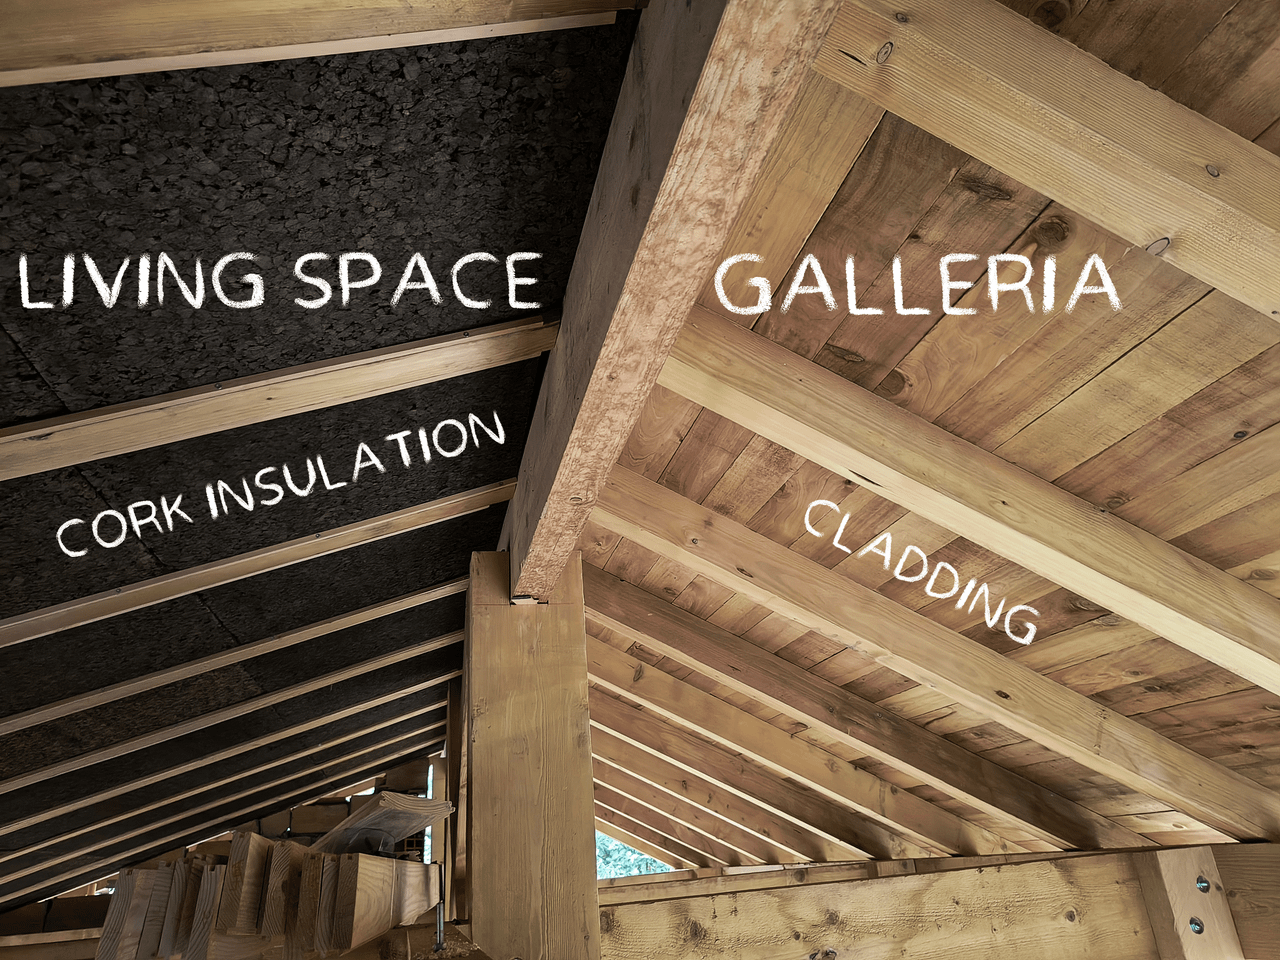
Conceptually, the design consists of two rooms separated by a heating and storage unit in the middle. Additionally, the usable space is extended towards the outside of the ruin with a galeria. The premise of this room is to provide a shared space for the two inhabitants. It will act as a ‘porch’ with space to take off shoes, store smaller items like umbrellas and a chair/bench to chill, and have a cup of tea. The inspiration for this space came from the traditional Portuguese ‘galeria’ which is described as a “glazed porch” that is protected from the elements. (Simões et al., 2019) (see images)
The roof profile is determined by the minimum height of the lowest point inside and the minimum angle the rooftiles could sit at without compromising the roofs ability to shed the water.
With the these parameters, the overall volume of the building was settled.
Simões, R. N., Cabral, I., Barros, F. C., Carlos, G., Correia, M., Marques, B., & Guedes, M. C. (2019). Vernacular architecture in Portugal: regional variations. In Innovative renewable energy (pp. 55–91). https://doi.org/10.1007/978-3-030-06185-2_4

11
Demolition
Published 9moPublished 10 months ago
Before we started demolition works, we considered the following things:
• Where do we stray away from the demolition plan?
• What materials can we save?
• How do we ensure the stability of the remaining structure?
Starting with the gables, we realized that recuperating the bricks is not as easy as we thought. The bricks are brittle, the mortar had been pushed in the cavities and most of them were cracked anyway. We quickly decided that we wouldn’t waste a lot of time on saving the bricks that showed any sign of instability. Despite that, we kept a few that seemed reasonably strong. Also, we found out that some of the bricks are not adhered to the surrounding bricks. We decided to deviate from the plan and to remove these loose bricks as well.
The inner walls went down quick. As the bricks for the inner walls were thinner, they were beyond saving.
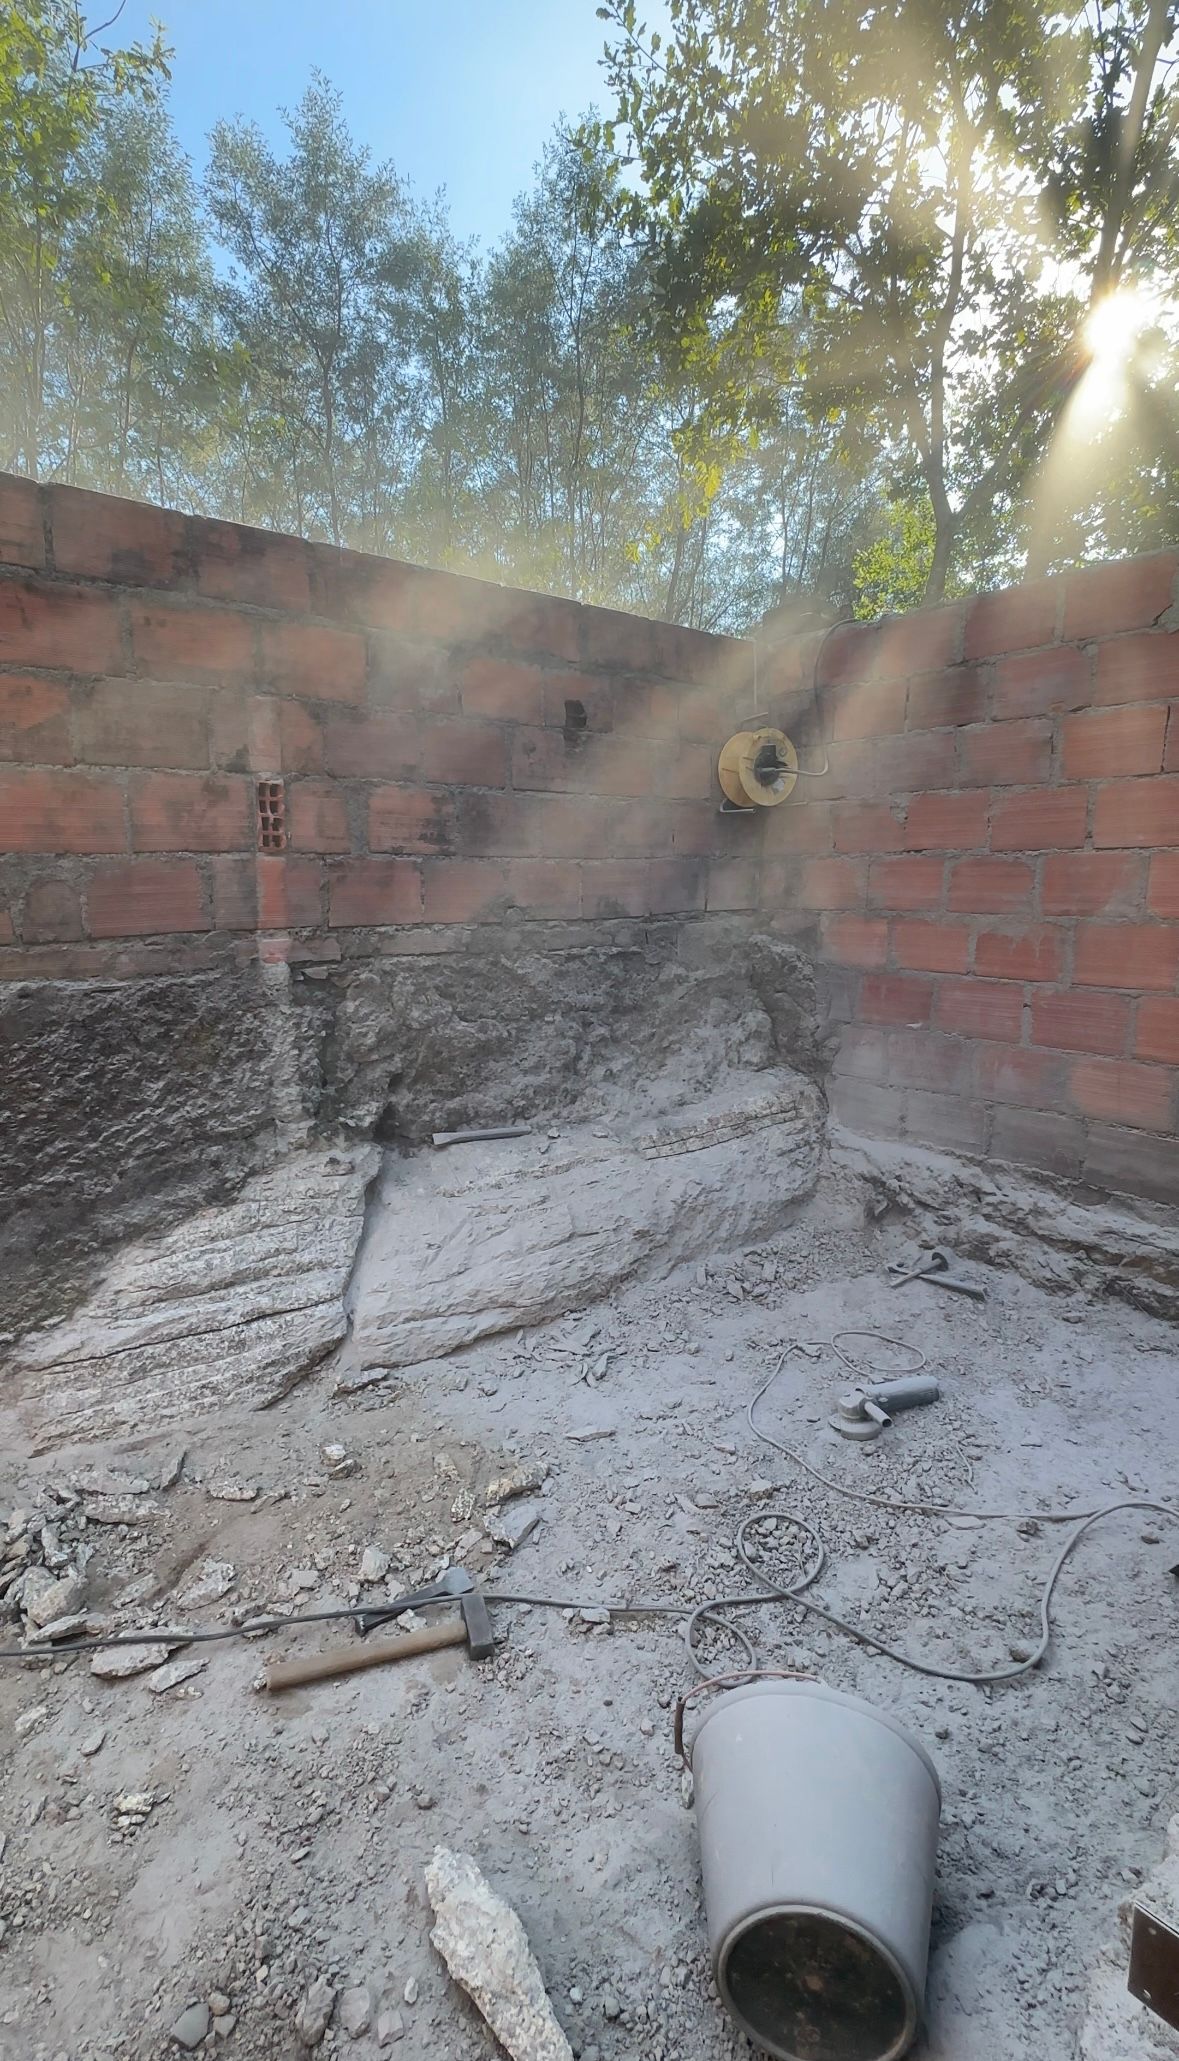
As expected, the floor was easy to remove because of how thin and brittle it was. We dug a few centimeters deeper according to the plans.
One thing we underestimated was how difficult it was to remove the bit of rock sticking out from the back wall. We had a limited amount of tools and the heat was unbearable at times. A jackhammer would have made the process faster and easier but we did not have one at the time. Regardless of the difficulty, splitting of large chunks of granite is pretty satisfying.
We decided to remove a small section of the north facing wall in order to eliminate (most of) the thermal bridge this section would cause. (see images) The lintel, which was already barely holding on, had to be secured to the side walls to ensure safety and stability.
Now the building was ready for some new materials!

12
Digger vs brick wall
Published 9mo. Edited 9moPublished 10 months ago. Last edit 10 months ago
Before we start with the foundation, a few roots that were in our way had to be removed. Since we have a digger, using it was a no brainer. It saved us a lot of time and back pain. However, as the digger was rolling to the roots in question, a little incident took place involving the bricks of the ruin and the blade of the digger. One of the corners of the ruin got pulled by the blade and shifted a few centimetres. The walls stayed upright and luckily no one got hurt. We removed the loose bricks from the corner and we were left by an interesting view through the corner. We (except the digger operator) were very excited about the opportunity to come up with an interesting way of filling in this corner. Some on the spot improvisations included: putting in a corner window, rebuilding with adobe, rebuilding with glass blocks and of course Menno’s genius idea of fixing it with duct tape. We are not sure about which option we will go for but it will be a fun addition to the design.
For now though, we secured the remaining walls with some bracing. Later, the walls will be connected with the wooden structure to ensure the stability of the facade.


13
Foundation
Published 9mo. Edited 9moPublished 10 months ago. Last edit 10 months ago
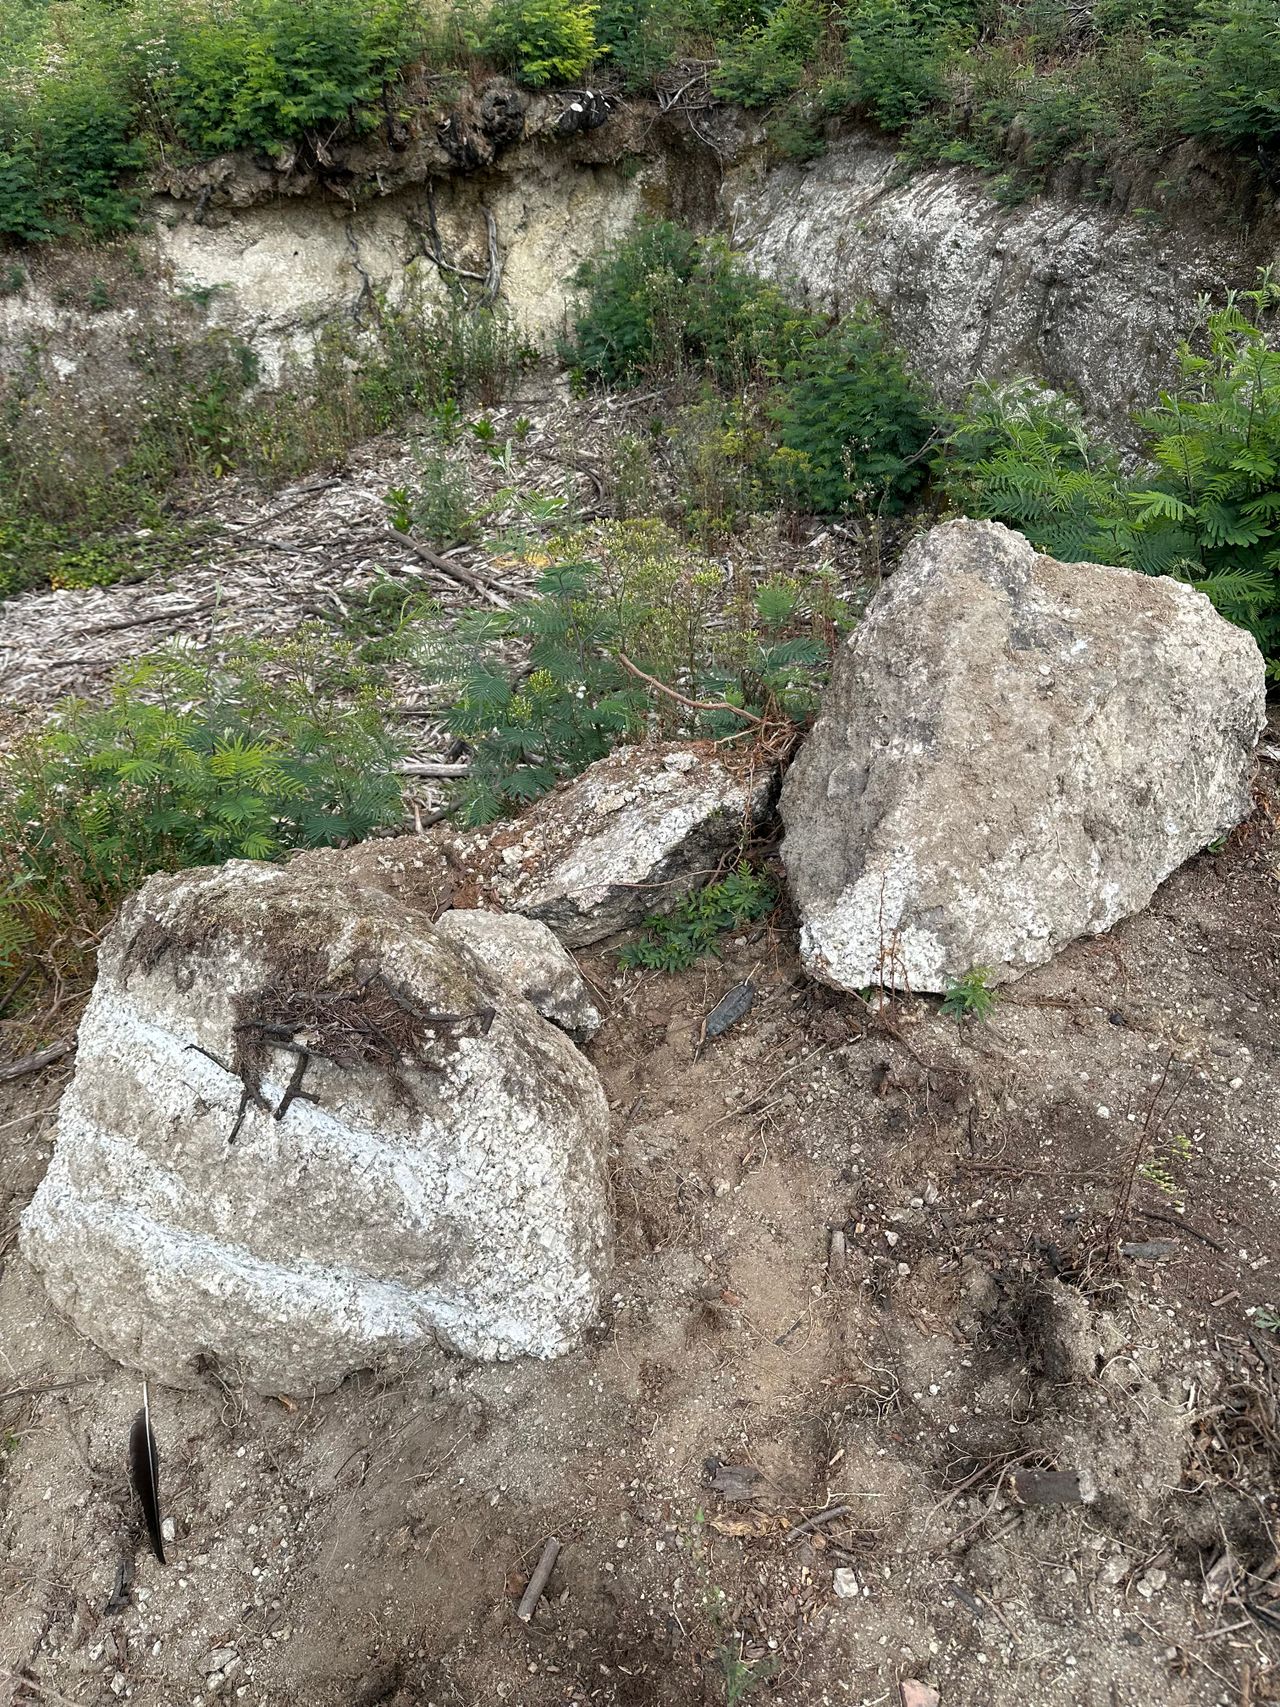
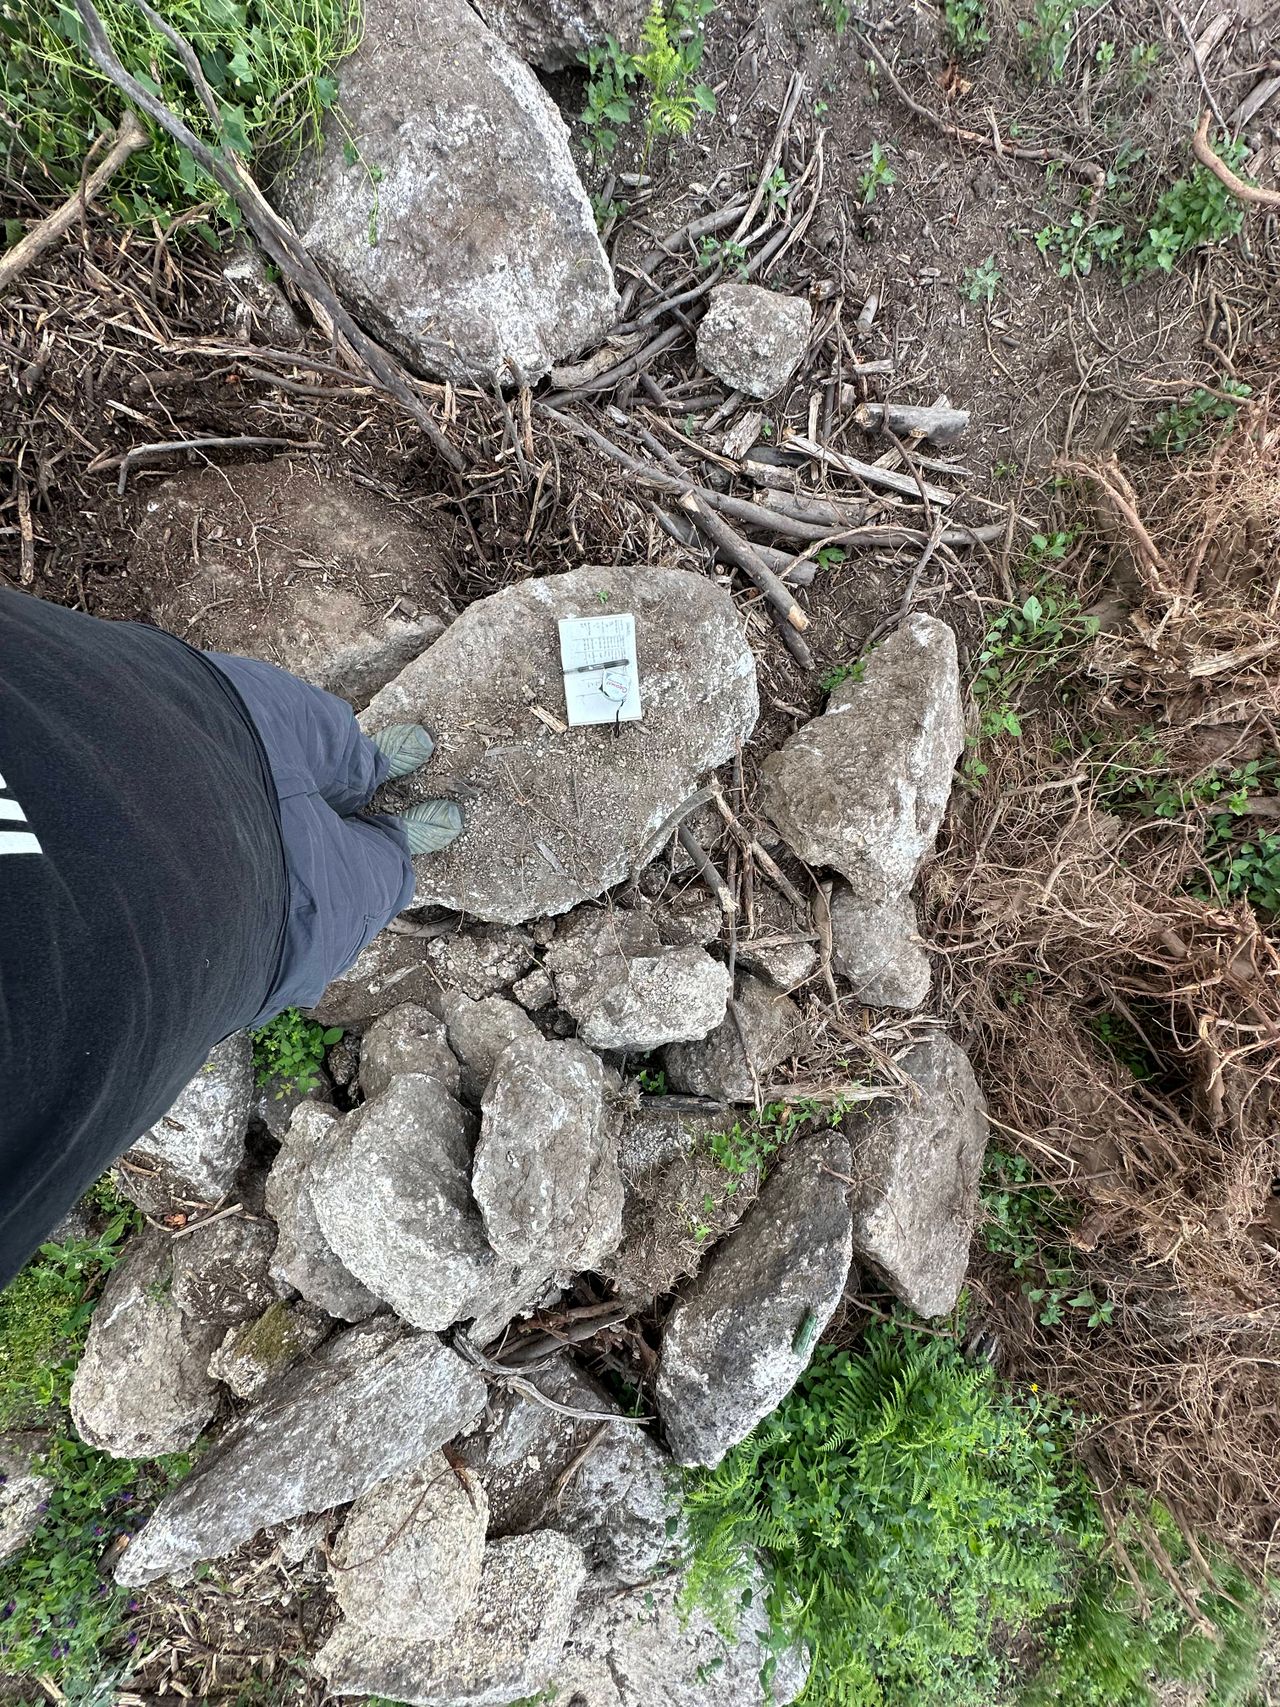
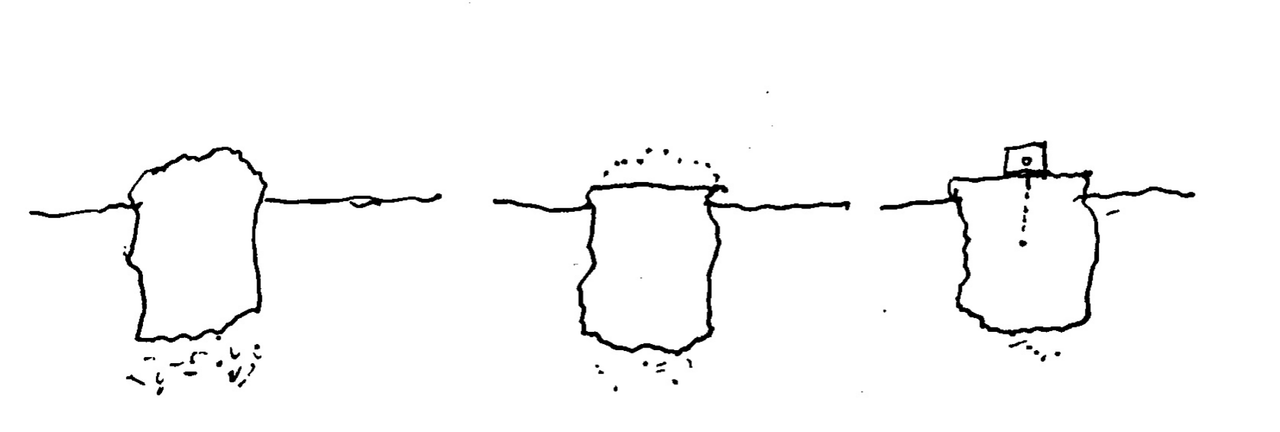
For the foundation, we wanted to experiment with the locally available granite. Considering how the local vernacular architecture successfully made use of this granite for the past hundreds, if not thousands, of years, we were convinced that we could successfully make use of this material. Even with the optimism we had after observing ancient granite structures in the area, we wanted to proceed with caution and be reasonable when picking the stones. We noticed, not every stone is as stable as others. Some show considerable signs of decomposing and cracks. We made a selection of stones that we had lying around Kamp and collected them near the brick ruin to be further shaped.
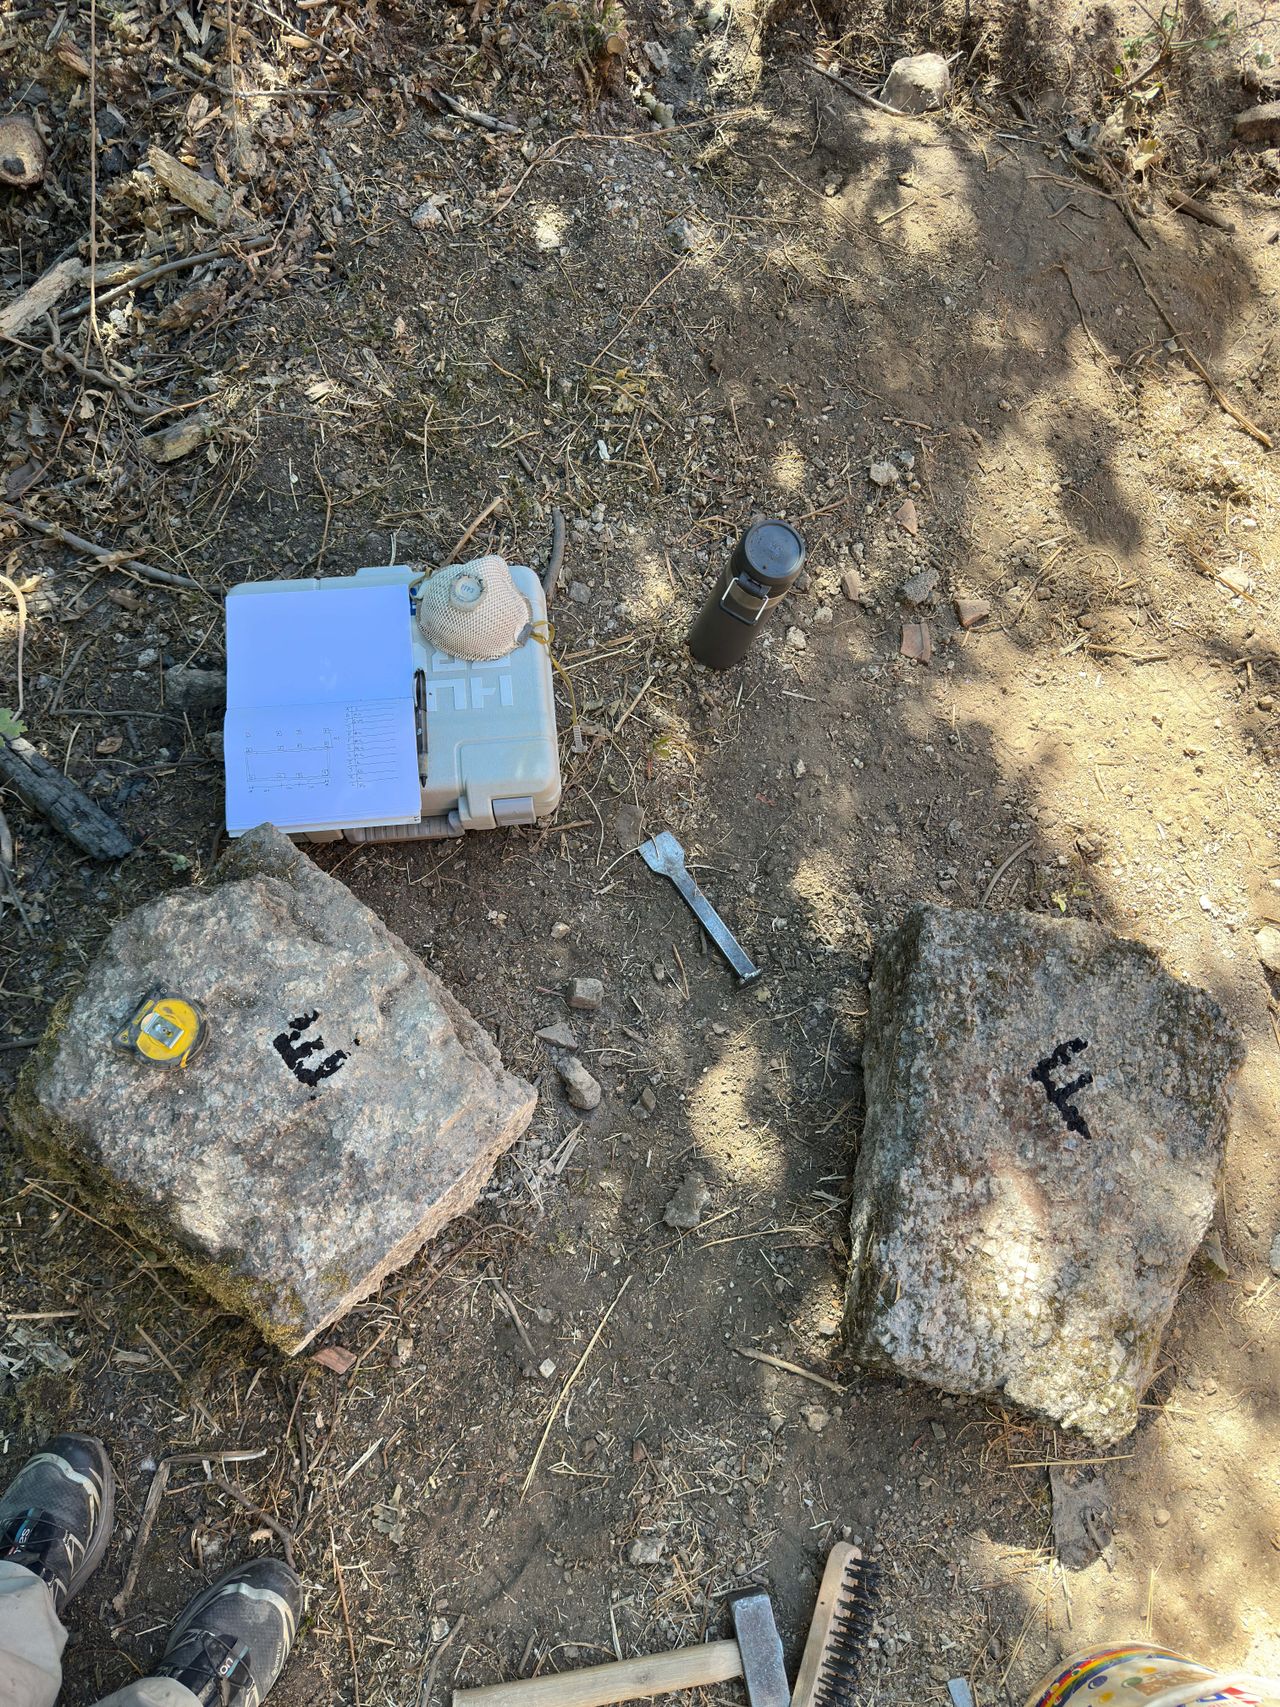
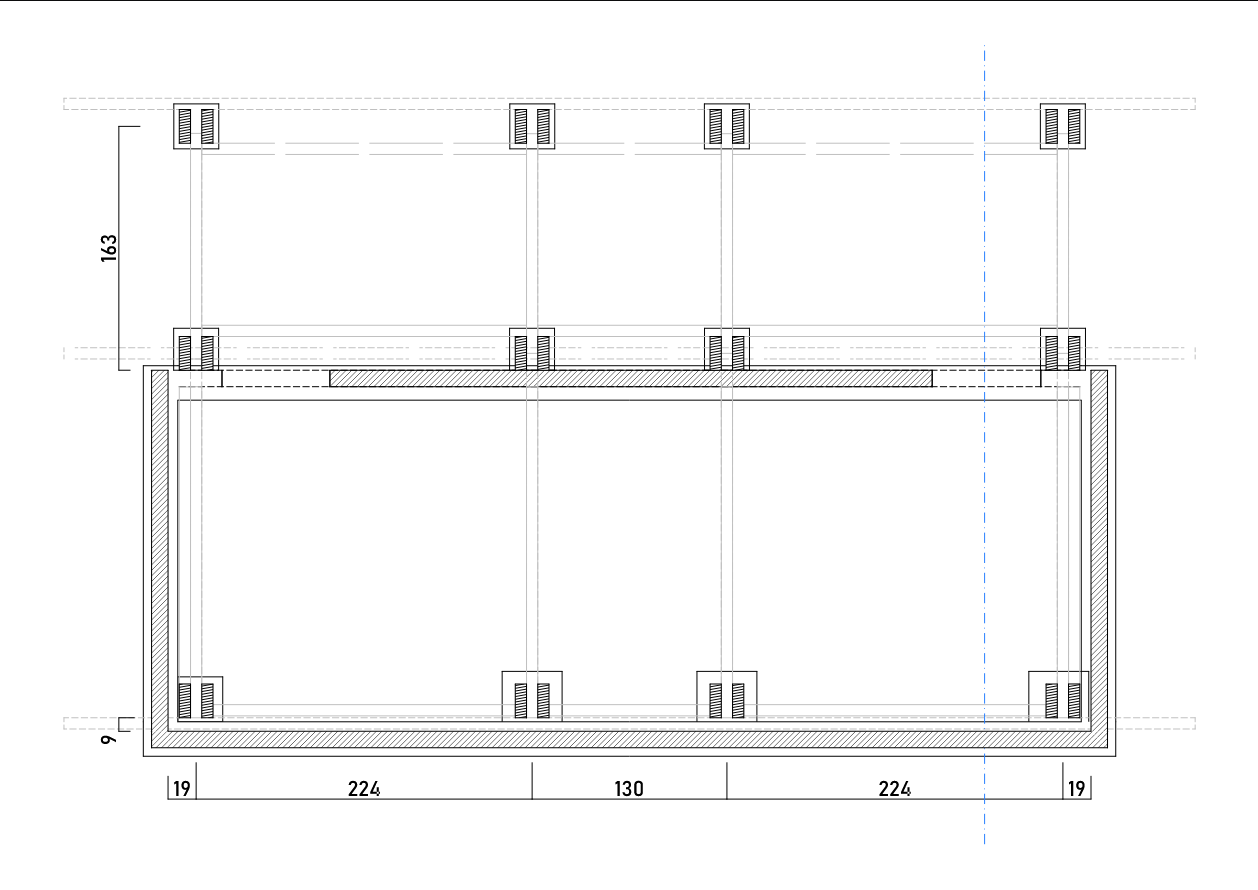
After having an inventory of stones we got to assign each stone to a specific column on the plan. We needed 12 stones in total. Four of them inside along the back wall where the soil is very compact. Here we could use smaller stones as they didn’t have to be dug deep into the ground to hit stable soil. For the other eight, we opted for larger stones that had to be dug deeper.
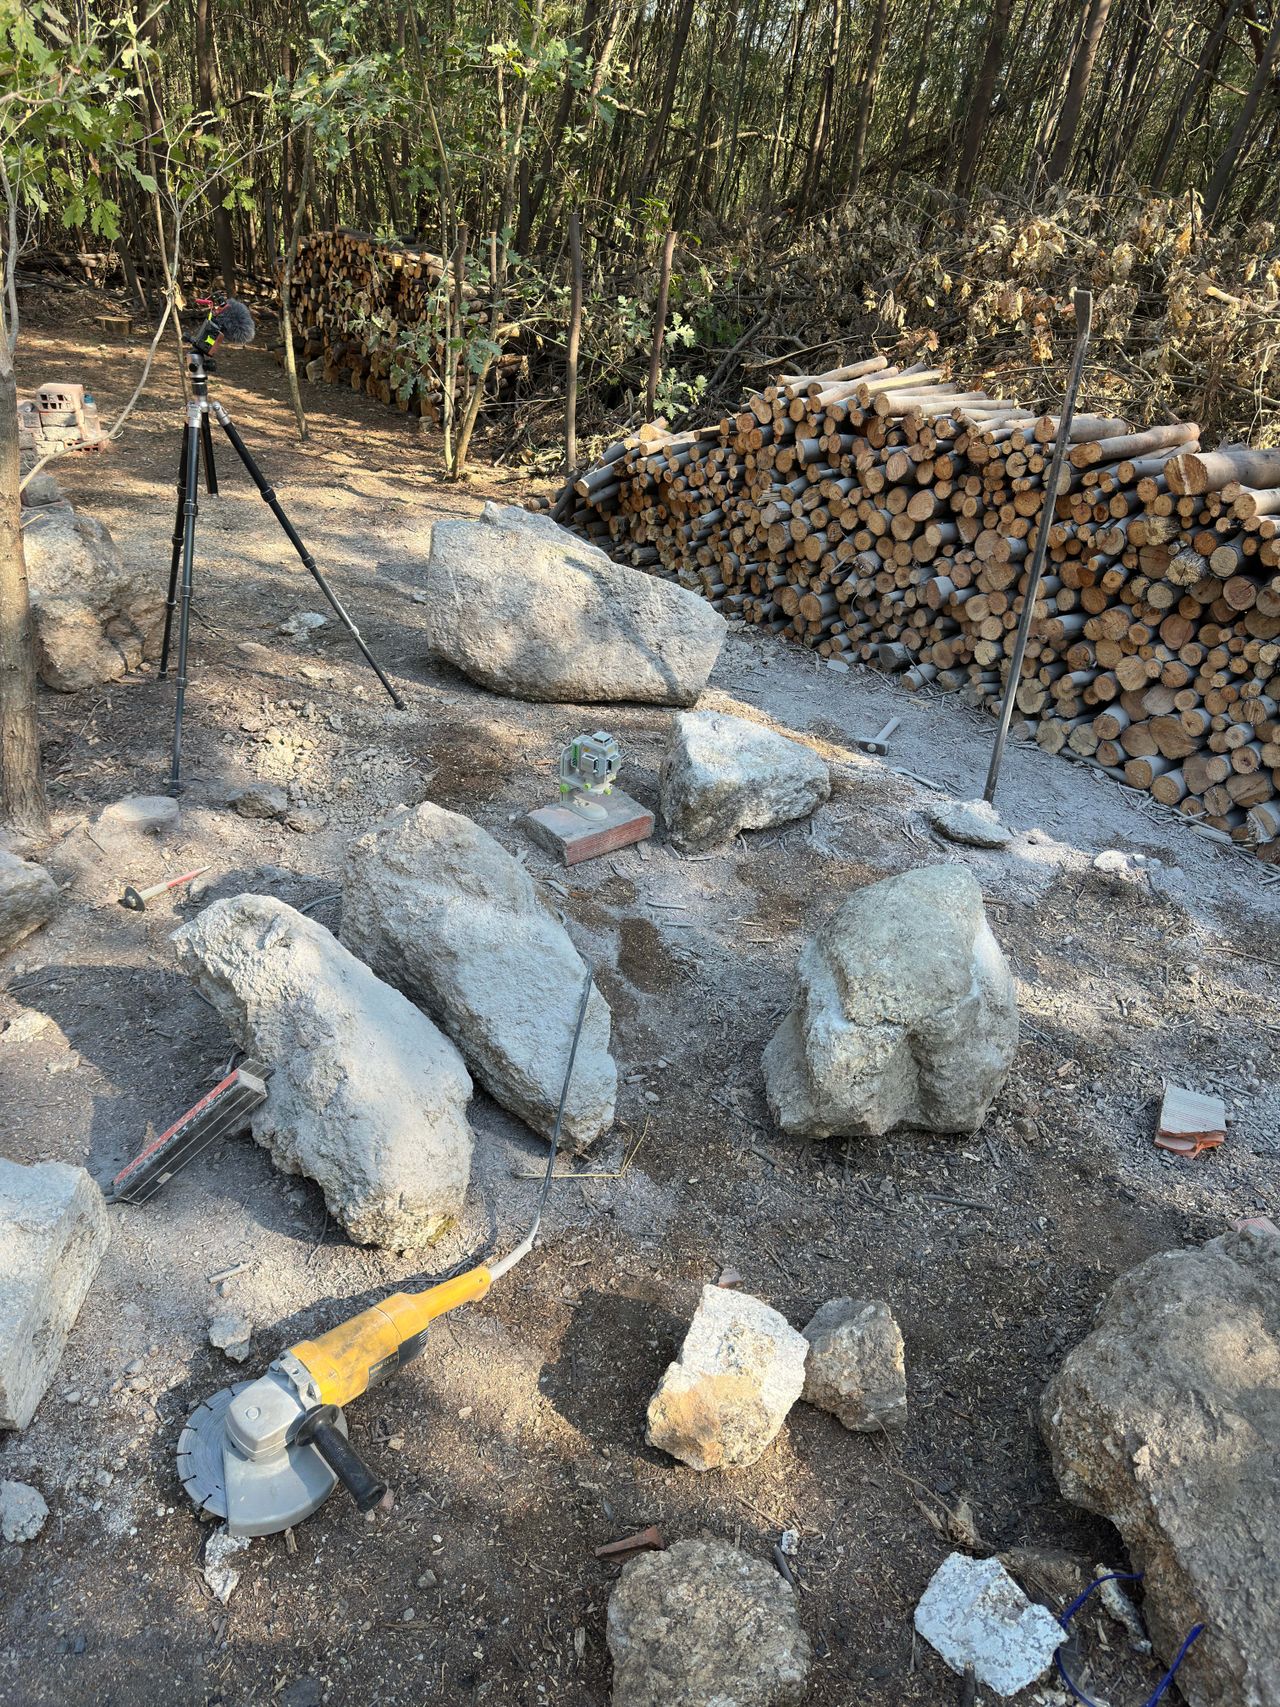
After digging the holes, we installed a root barrier to protect the stones from roots digging into any cracks that might form later. We somewhat levelled the stones on a gravel bed and used a laser to check the level of each stone. After placing the stones in the holes, we added gravel and soil around them to secure their position.
Next step was to level them precisely using the grinder, chisels and the jackhammer to ensure the posts would all end up on the same level. Since we did not use an adjustable base plate and did not want to cut every post at a different length, we opted to start level at the foundation. They ended up being within a 2 mm margin. Pretty impressive if you ask me.
After a dusty day, it was time to layout the centre of the posts on the stones. This was done very accurately using a laser and years of experience building boat interiors.
The stones were now ready for the brackets.
14
Brackets
Published 9moPublished 10 months ago
The purpose of these brackets are to connect the wooden structure to the stones mainly during the building process. Theoretically, the building does not need to be connected to the foundation since the only forces acting on the foundation are going straight down. The dead load (the mass of the entire building after its built) is enough to resist any lateral or upward forces caused by the wind. Having the columns connected to each other down at the base also helps to prevent lateral movement of the posts individually. However, during construction, we need the columns to stay in place until all the critical elements are in ensuring a safe and accurate structure. Hence the use of the brackets.

15
Framing: primary structure
Published 9mo. Edited 9moPublished 10 months ago. Last edit 10 months ago
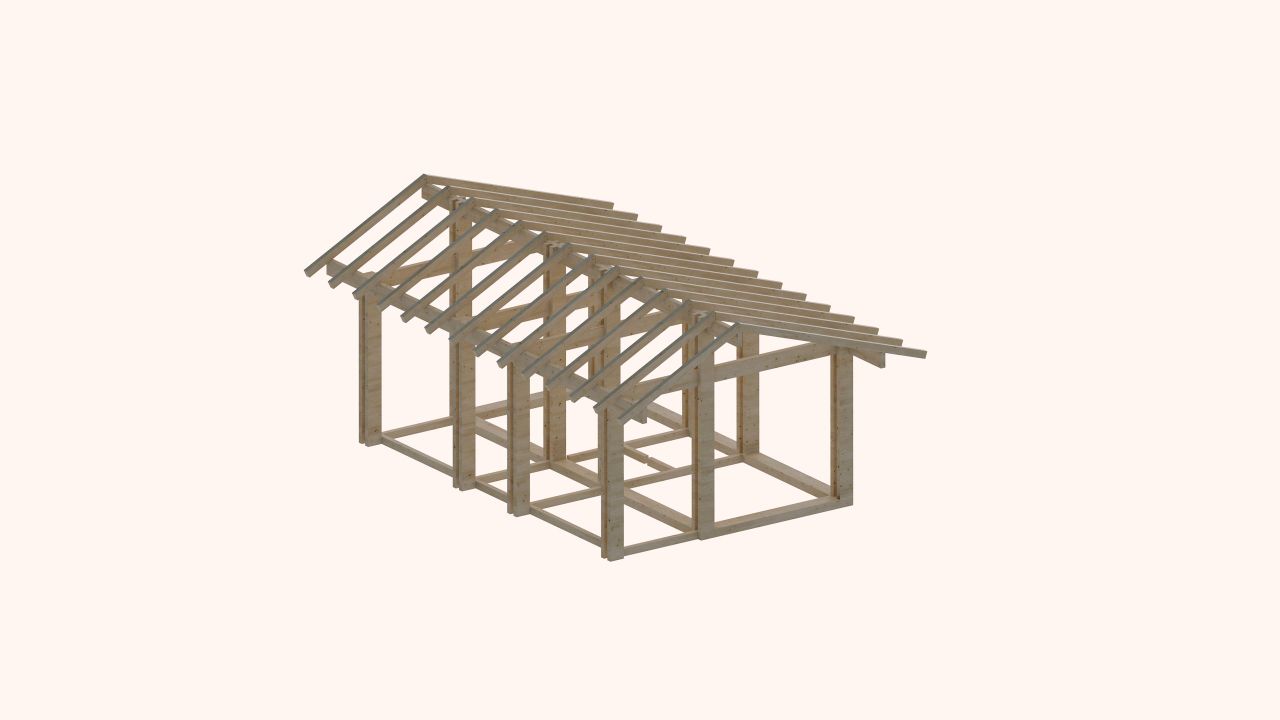
Framing consists of three steps: first we cut everything to length, next we apply treatment and finally we install. The primary structure is made up of the biggest beams of the building and carries most of the loads down to the footings.
Cutting the beams to length was a breeze since the footings were levelled. We repeated the same cuts for most of the beams and cut out joinery where necessary. We also pre drilled the holes where it made sense to do so. Some of the beams were left oversized to be trimmed once everything was in place.
After the all the cuts were made we treated the wood with a non-toxic product called Wood Bliss by Galtane. This product prevents the wood from being eaten by bugs like house longhorn beetle, which is very common in our area, and fungi. After applying the product to the wood, it changes the chemical structure of it and makes it uninteresting for bugs and fungi. This chemical process is also found in nature and is known as biodegradation. Organic matter gets broken down into inorganic compounds. Usually, bacteria and fungi take care of this process but in our case, it is done in a controlled manner by the product. This way, we ensure the longevity of the building.
Assembly of the primary structure went quick as most of the work in framing consists of preparing the wood. We started with the columns and connected these with each other using the cross beams and the two long girders on the outer edges of the building. Finally we set the ridge beam in place and completed the primary structure.
Before we could move on though, we needed bracing for lateral loads. These consist of three crosses in total, one in each row of columns.


16
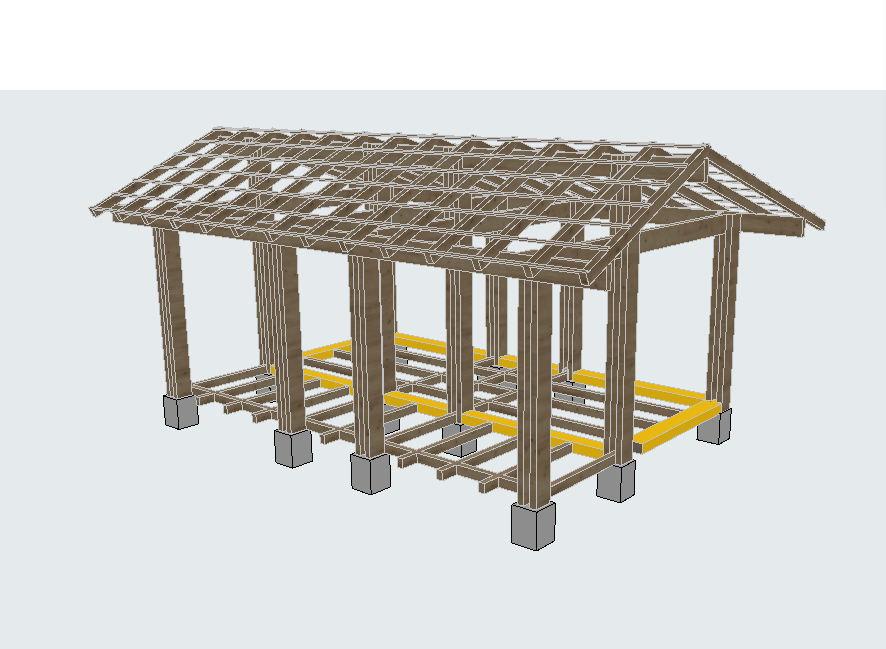
Railway sleepers
Published 9mo. Edited 9moPublished 10 months ago. Last edit 10 months ago
For a while we have been storing a few railway sleepers that we had acquired some time ago. These beams were treated using chemicals to increase their lifespan. Though it makes the wood very resistant to rot and bugs, it also causes harm to anything it comes into contact with. For this reason, we wanted to make sure these beams would end up somewhere where they are harmless instead of ending up in a garbage dump or the incinerator. In this project, it made sense to use them around the perimeter of the floor, in between the columns, as part of the primary structure (yellow beams in image below). These beams are crucial in the stability and durability of the building, hence the need for stable and long lasting timber. The beams will redirect the load from the walls into the foundation so strength is also important. The sleepers have an almost ideal dimension for this purpose so processing can also be kept to a minimum. Since these beams wont come into contact with the soil, there is no chance of leaching harmful chemicals into nature and contact with humans is also avoided since the beams are covered by the walls and floor. We made sure that during the process of cutting the wood, the sawdust and off cuts were collected and disposed of accordingly and the people handling the wood wore proper PPE.

17
Framing: secondary structure
Published 9mo. Edited 9moPublished 10 months ago. Last edit 10 months ago
The secondary structure is an additional structural layer that provides support for the shell of the building. The shell consists of the floor, walls and the roof.
We started off with the roof so that we would have shade while working on the rest of the shell. The secondary structure of the roof consists of rafters that span from the ridge beam to the outer girders. The spacing of the rafters is based on the standard dimension of the cork panels that we decided to use as insulation. This resulted in a centre to centre spacing of 575mm. We cut birds mouths to make sure the rafters sit securely on the ridge beam and girders and screwed from the top down. Later, we continued building the roof before moving to the floor but we will cover this in the next update.
Just like the roof, the floor consists of beams (joists) that are spaced according to the cork insulation. Some of the beams are attached using joist hangers to make life easier and some are fastened from the other side of the beam or even toe nailed. We also provided support for the cork insulation with the off cuts of battens by fastening these on the underside of the joists. This ensures that the cork panels will not fall through.


18
The Roof
Published 8moPublished 9 months ago
For the roof, we used second-hand tiles, as we have done in several previous projects. We placed the underlayment on the rafters using staples, then screwed the battens on top. This creates an air gap between the tiles and the underlayment.
To ensure proper airflow, we used a new material on the ridge called ridge roll. It has aluminum edges and a breathable fabric in the middle, which guarantees ventilation. The ridge roll is fixed with butyl adhesive on the sides and staples on the top. We chose this new material instead of cement because we believe it is more environmentally friendly.
The ridge tiles are placed on a ridge batten, which is fixed with special adjustable brackets. To secure the ridge tiles, we used ridge clips.
One side of the roof is insulated with 100 mm thick cork panels, a natural material we have also used in other projects. The other side is not insulated, as it covers the galleria, which is not intended to be heated.


19
The Walls (so far)
Published 7moPublished 8 months ago
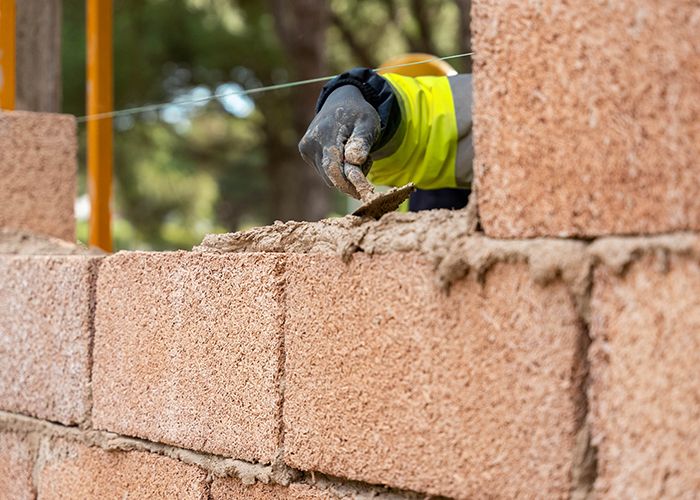
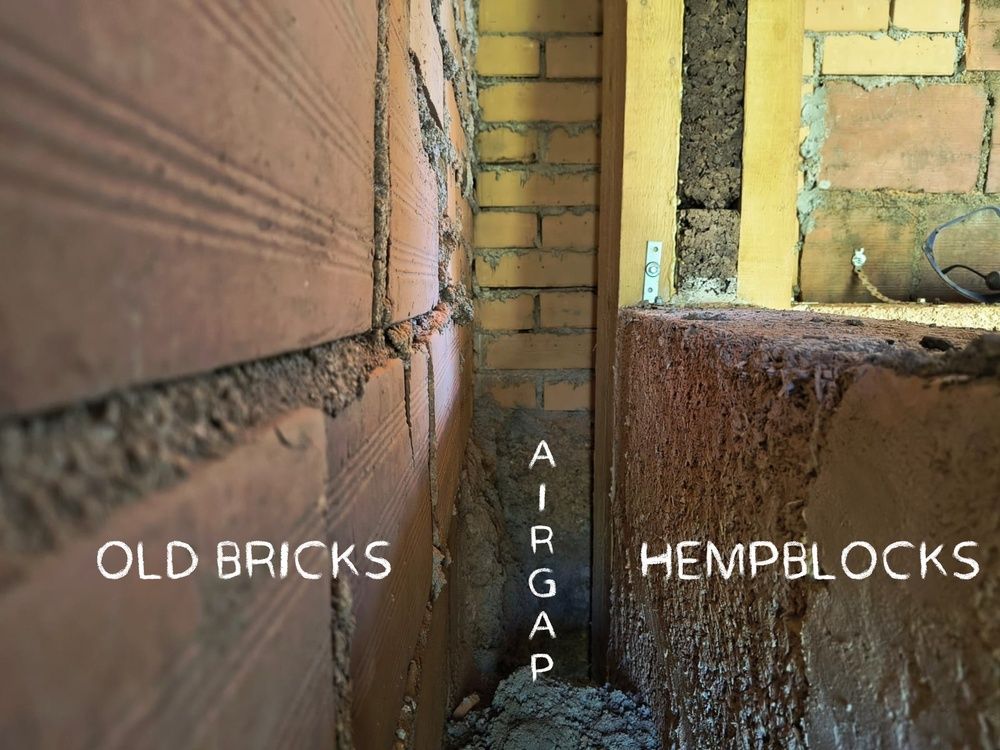
The walls of the granite ruin are made from two different materials. The outer shell consists of the original bricks of the building, while the inner walls are built with hemp blocks, which are a new natural material.
Between the two walls we left an air gap. The air inside can circulate; to ensure this, we will add ventilation holes in the stones and install grids on top to prevent insects from getting inside.
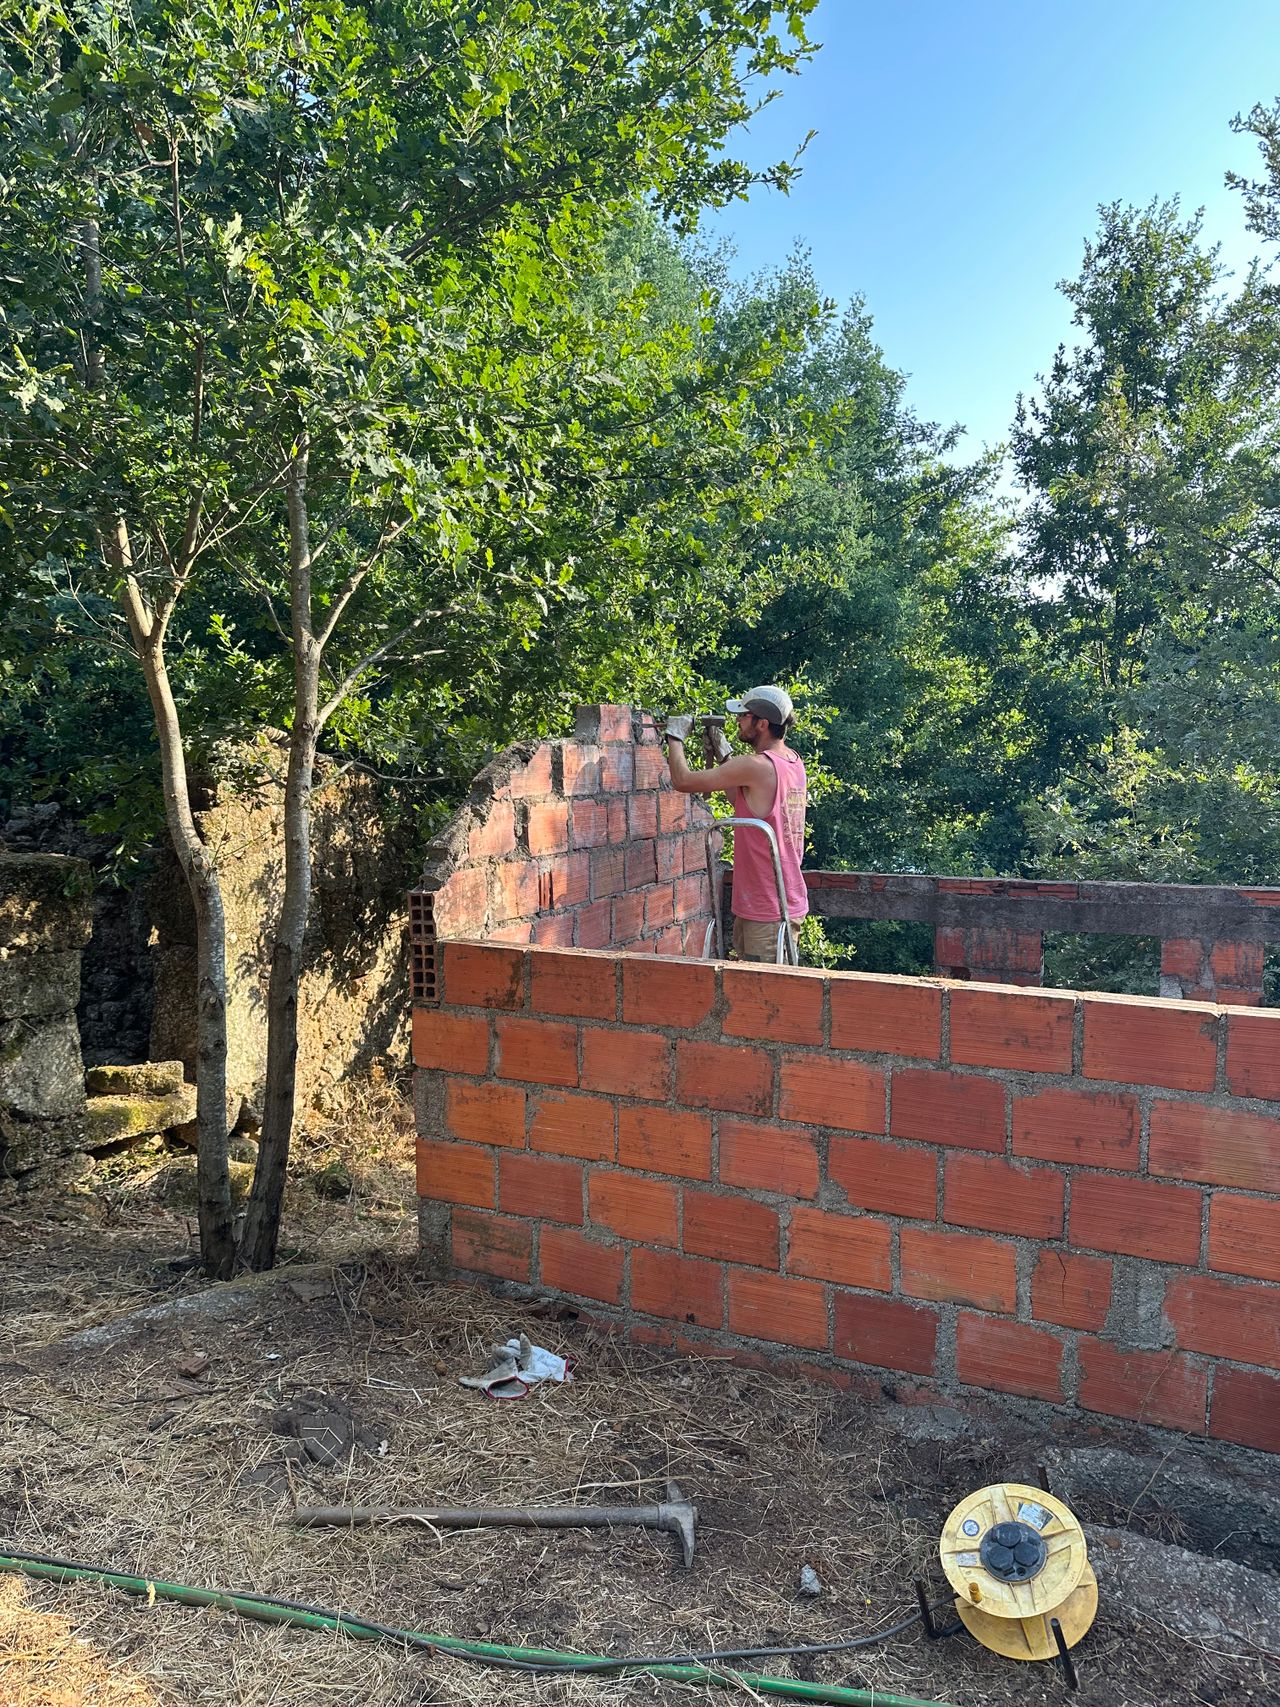
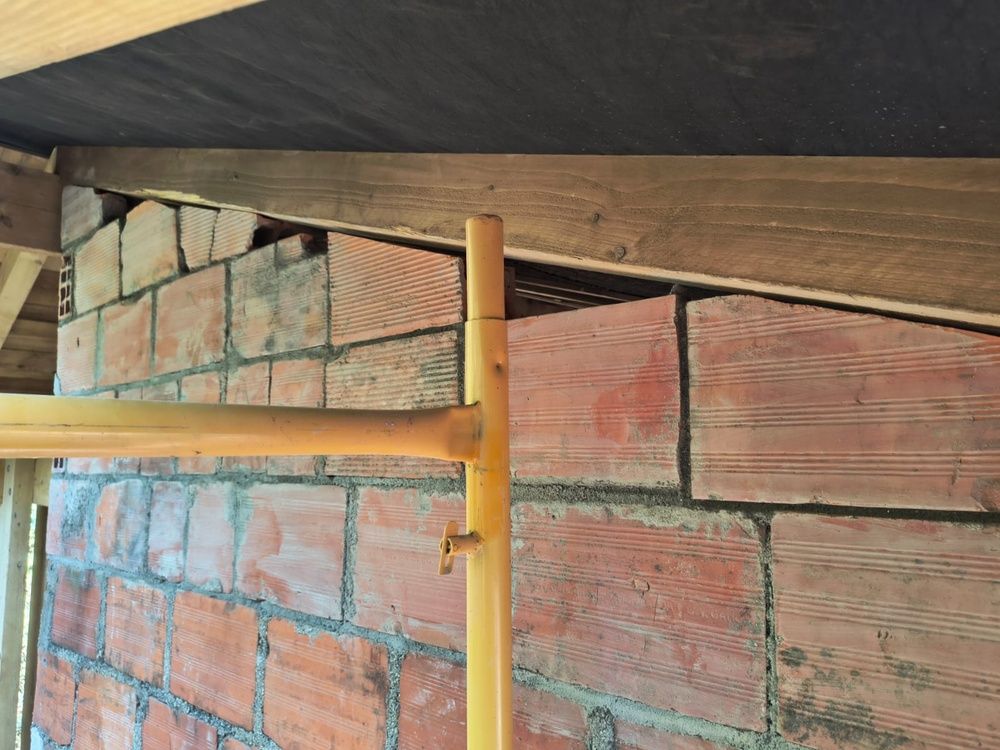
Parts of the original outer walls were still intact. We rebuilt the missing sections using bricks from the window and door cut-outs as well as from the inner walls of the ruin. Cleaning the old bricks from mortar was quite time-consuming; we used an angle grinder with diamond cutting and grinding discs for the job.
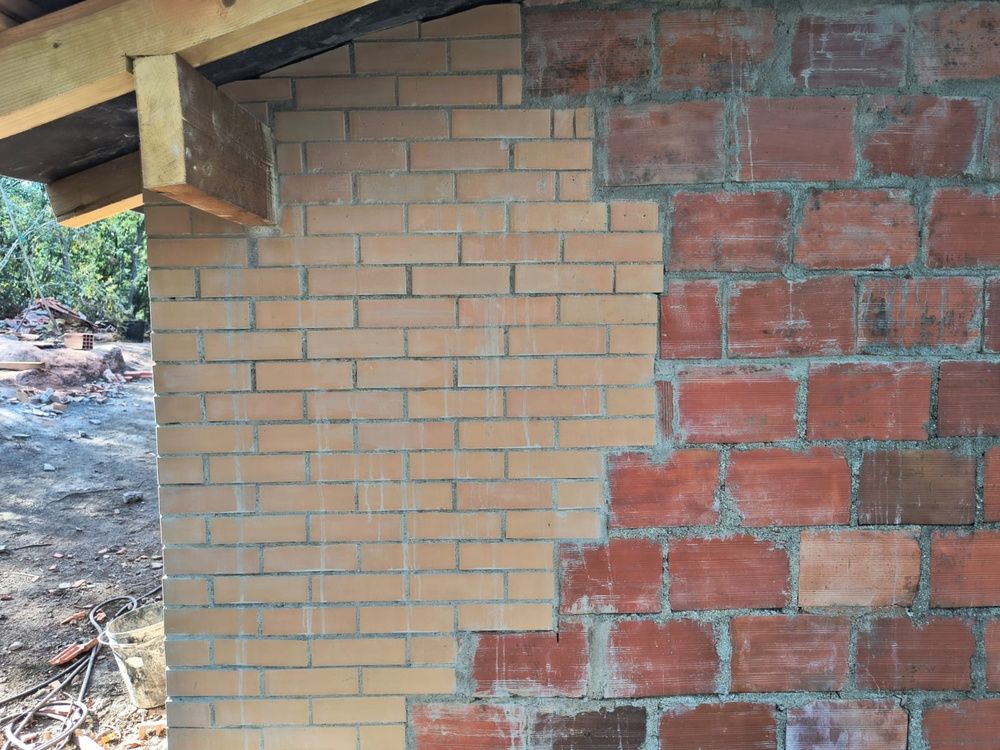
For the corner of the wall that was destroyed by the digger, we used new yellow bricks to highlight this “patch.”
Building the walls was quite a challenge, since none of us had laid bricks before. Nevertheless, we are very happy with the result, and the walls seem much more stable than they were before.
The inner walls are made from hemp blocks. They are composed of hemp fibres bound together with lime. The blocks are 20 cm thick and provide good insulation. They should not get wet, as they can crumble, which is why they are protected by the outer brick wall.
The mortar used for the construction is lime, and we will also use the same product to plaster the walls.
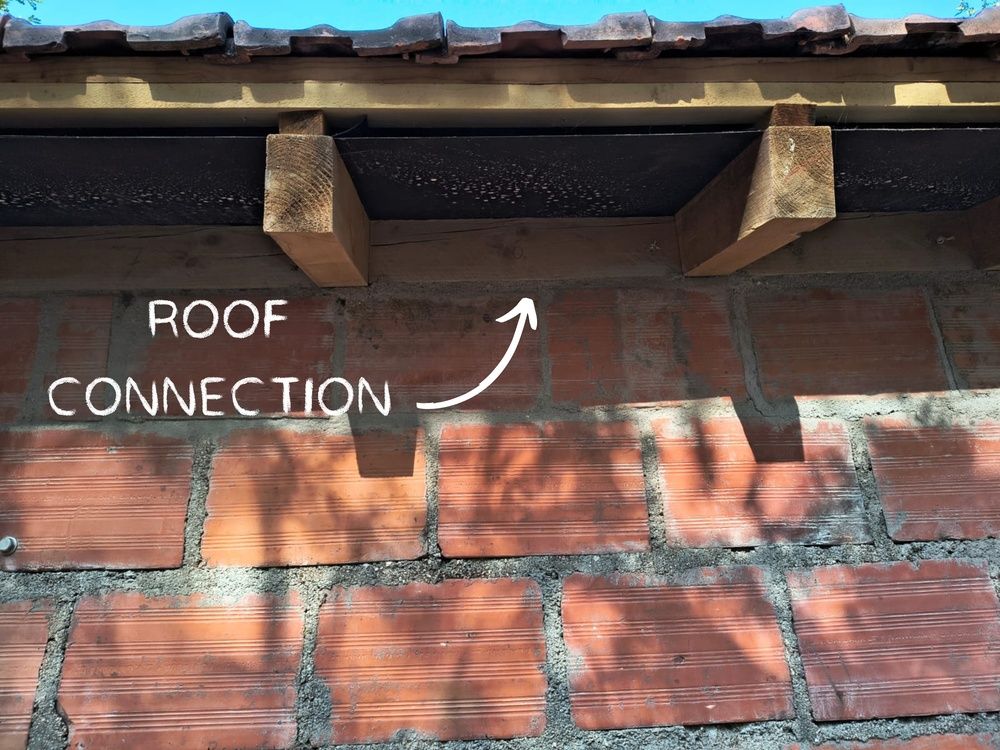
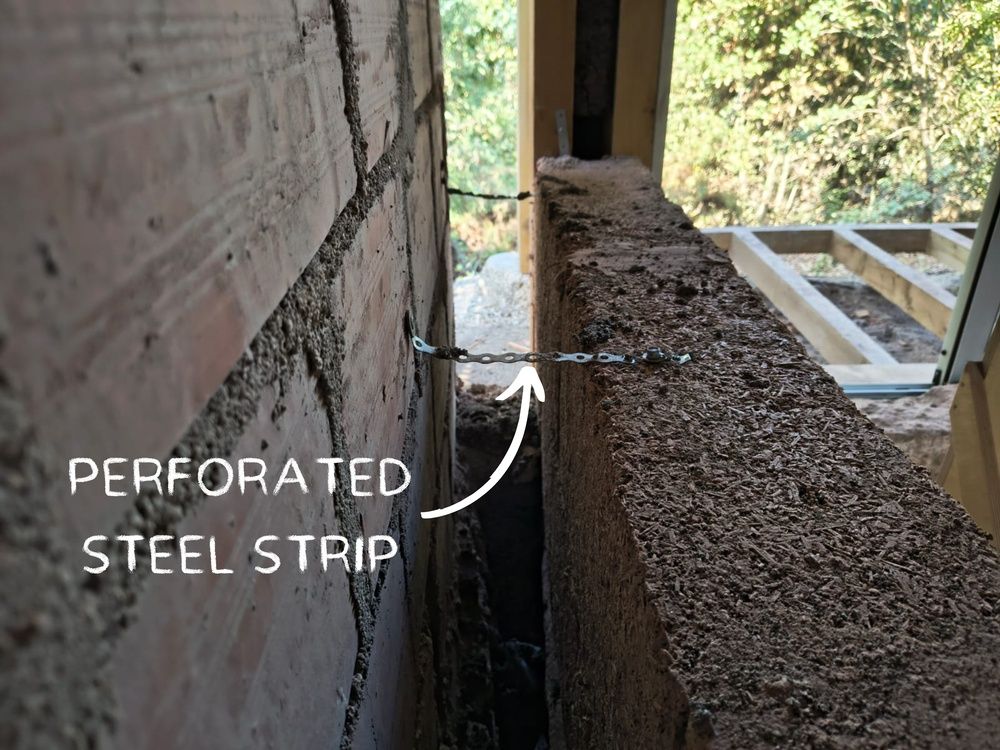
We connected the hemp blocks to the wooden structure with brackets, and to the outer wall using perforated steel strips to increase stability.
The outside hemp block walls are still missing and will be build next season.
20
Doors
Published 7mo. Edited 7moPublished 7 months ago. Last edit 7 months ago
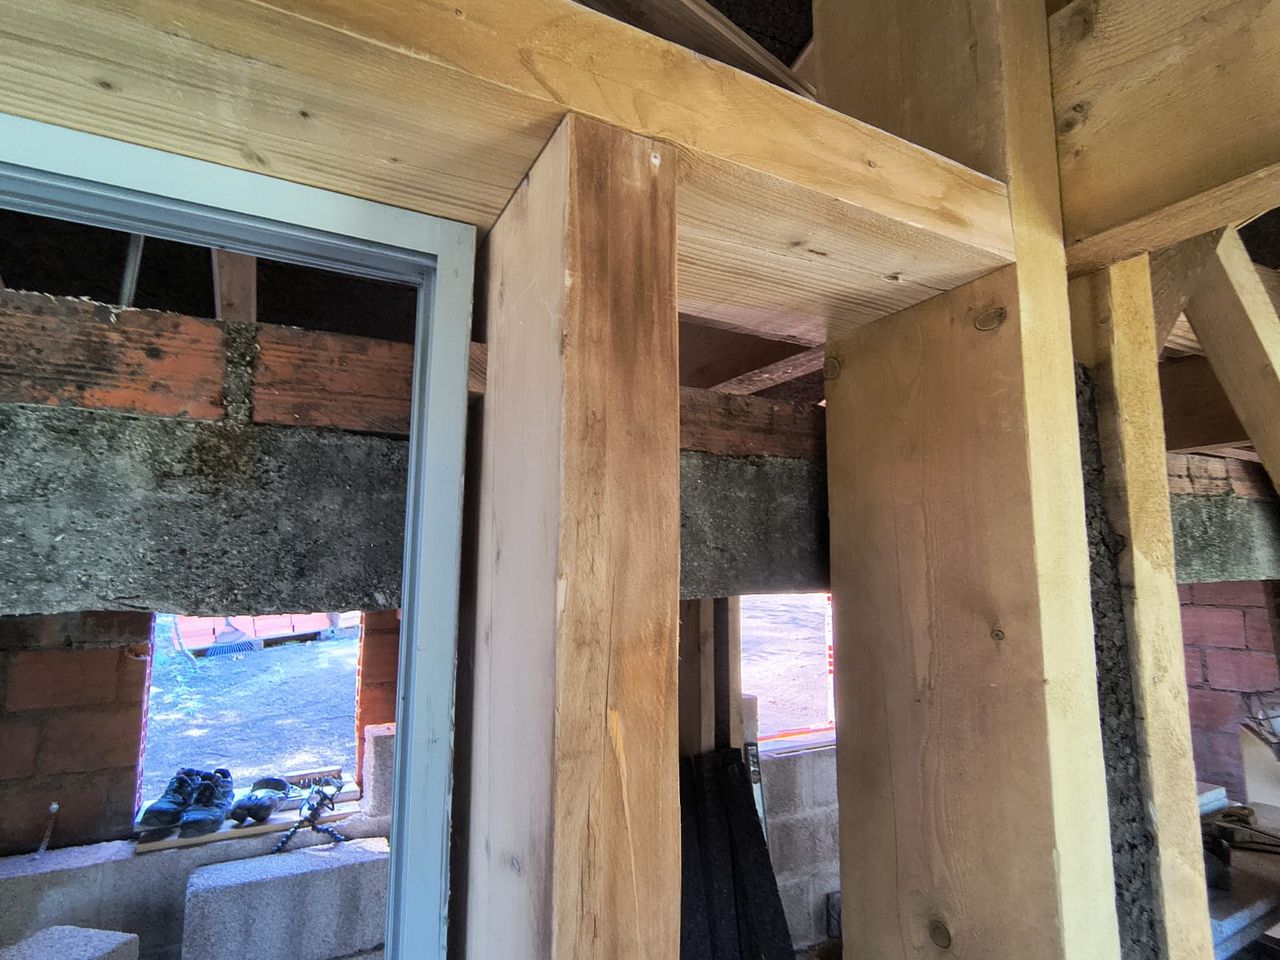
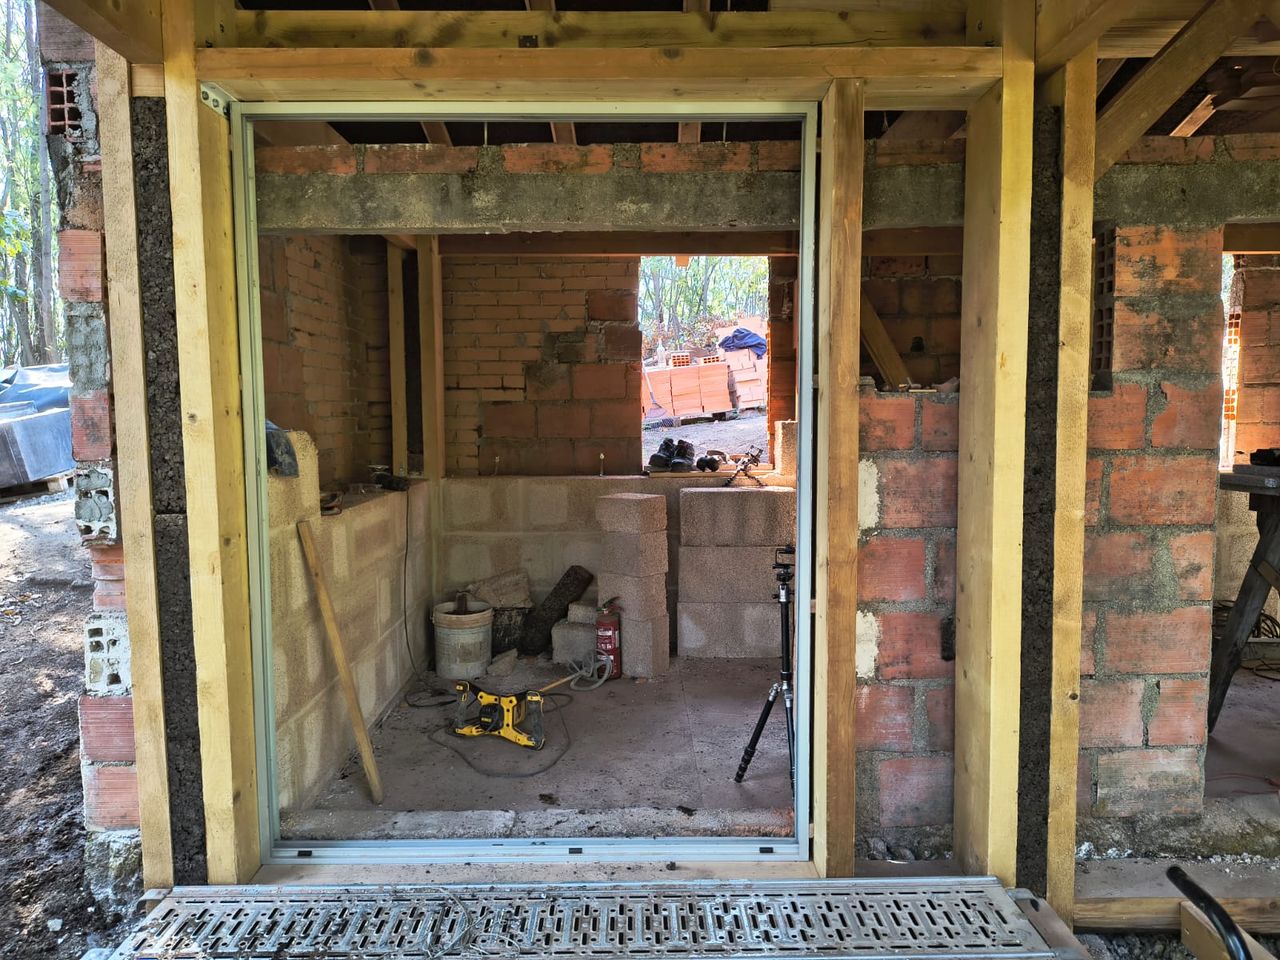
The ruin will be divided into two rooms, which can be accessed from the galleria. To enter the rooms, we installed two doors.
We obtained the doors second-hand. They are glass sliding doors, two meters high and 1.5 meters wide. They are double-glazed and therefore provide insulation between the heated rooms and the unheated galleria. The door frames are made of aluminum.
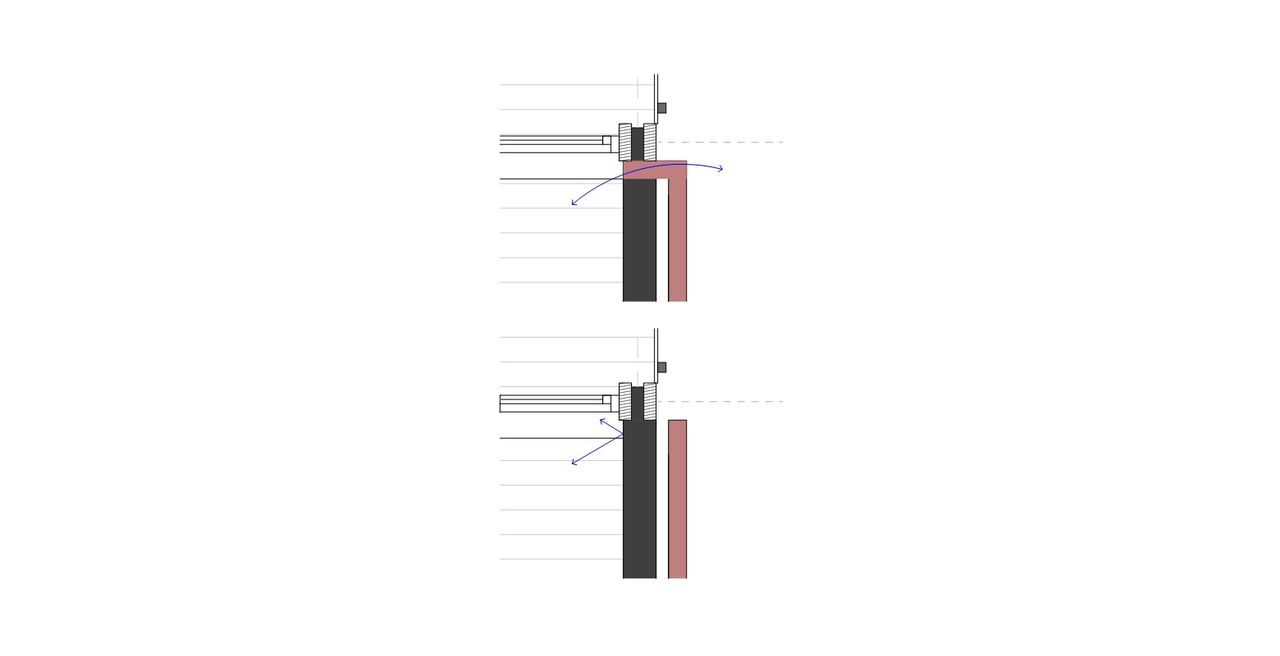
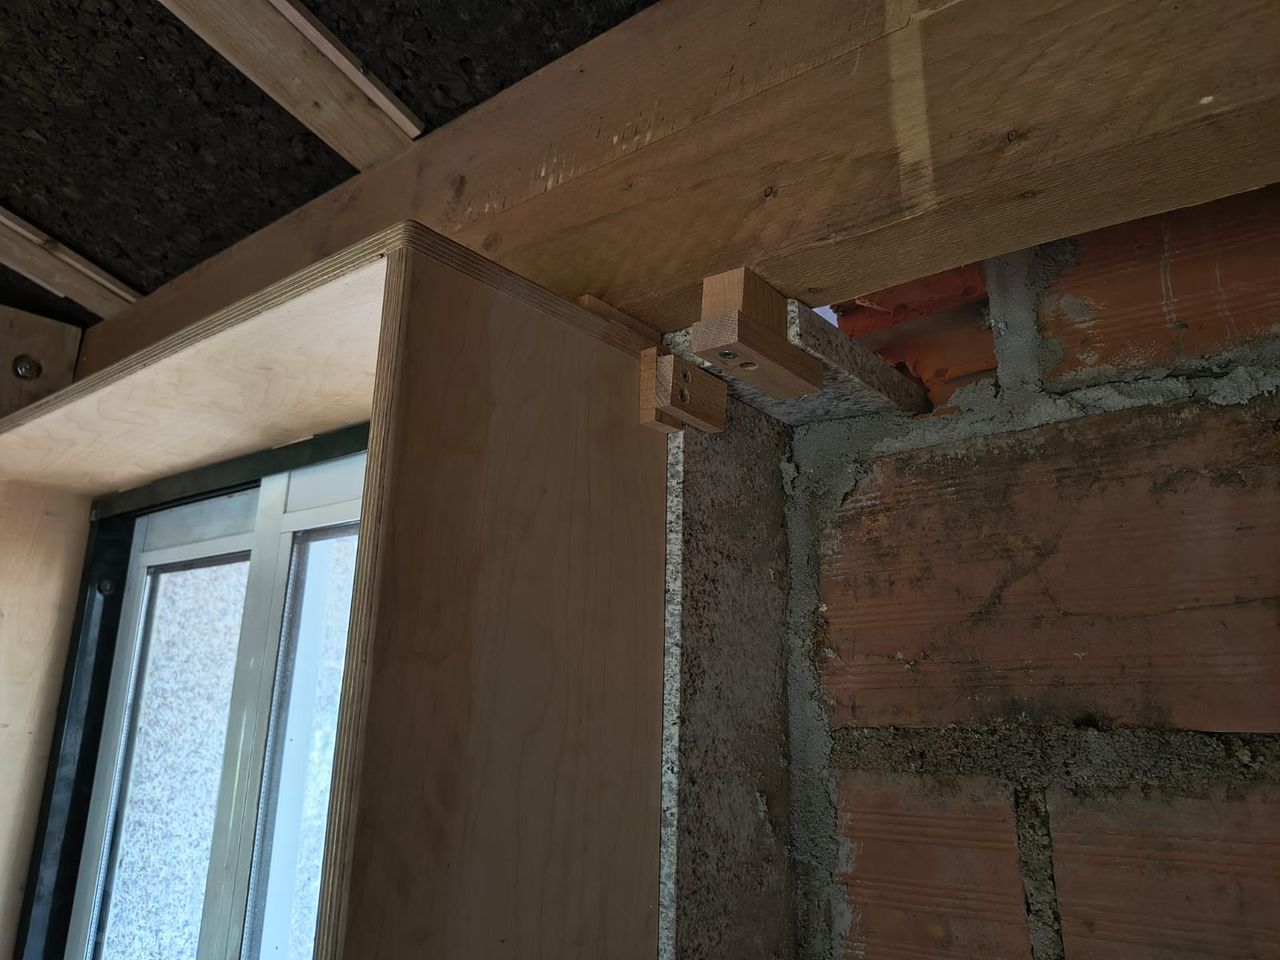
When installing the doors, we first had to decide which parts of the original wall we wanted to keep and which parts we needed to remove. One of the project’s goals was to preserve as much of the original structure as possible. However, the new doors were much larger than the original ones, so we decided to enlarge the openings to bring more light inside. At some point, there was not much of the wall left, and we considered tearing it down completely. In the end, we agreed to keep the central section of the wall as well as the concrete lintel, which is required to support it. Removing the entire wall would have made the design concept feel inconsistent. There were many different opinions on this, but we eventually agreed on this approach.
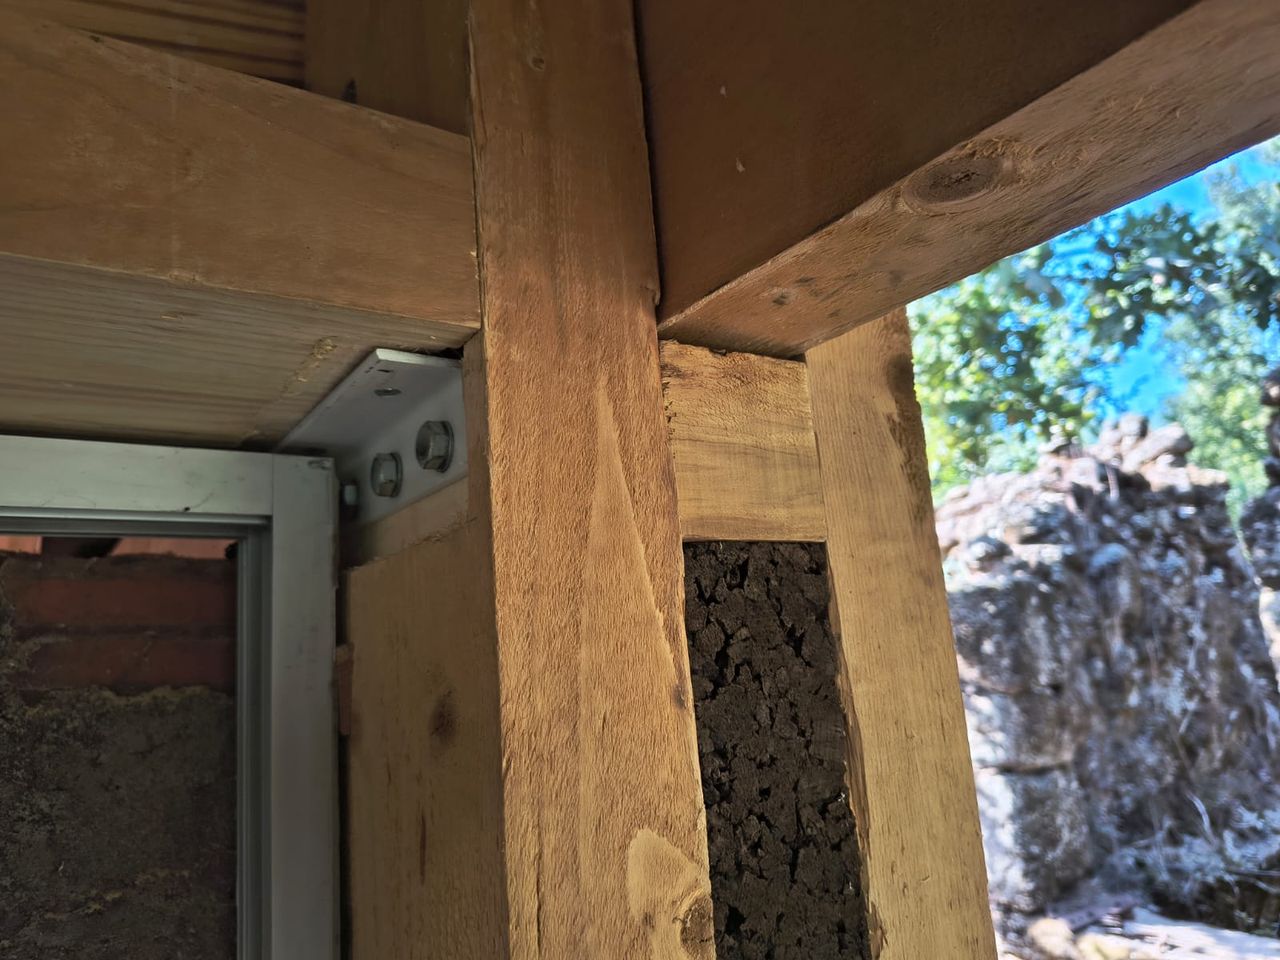
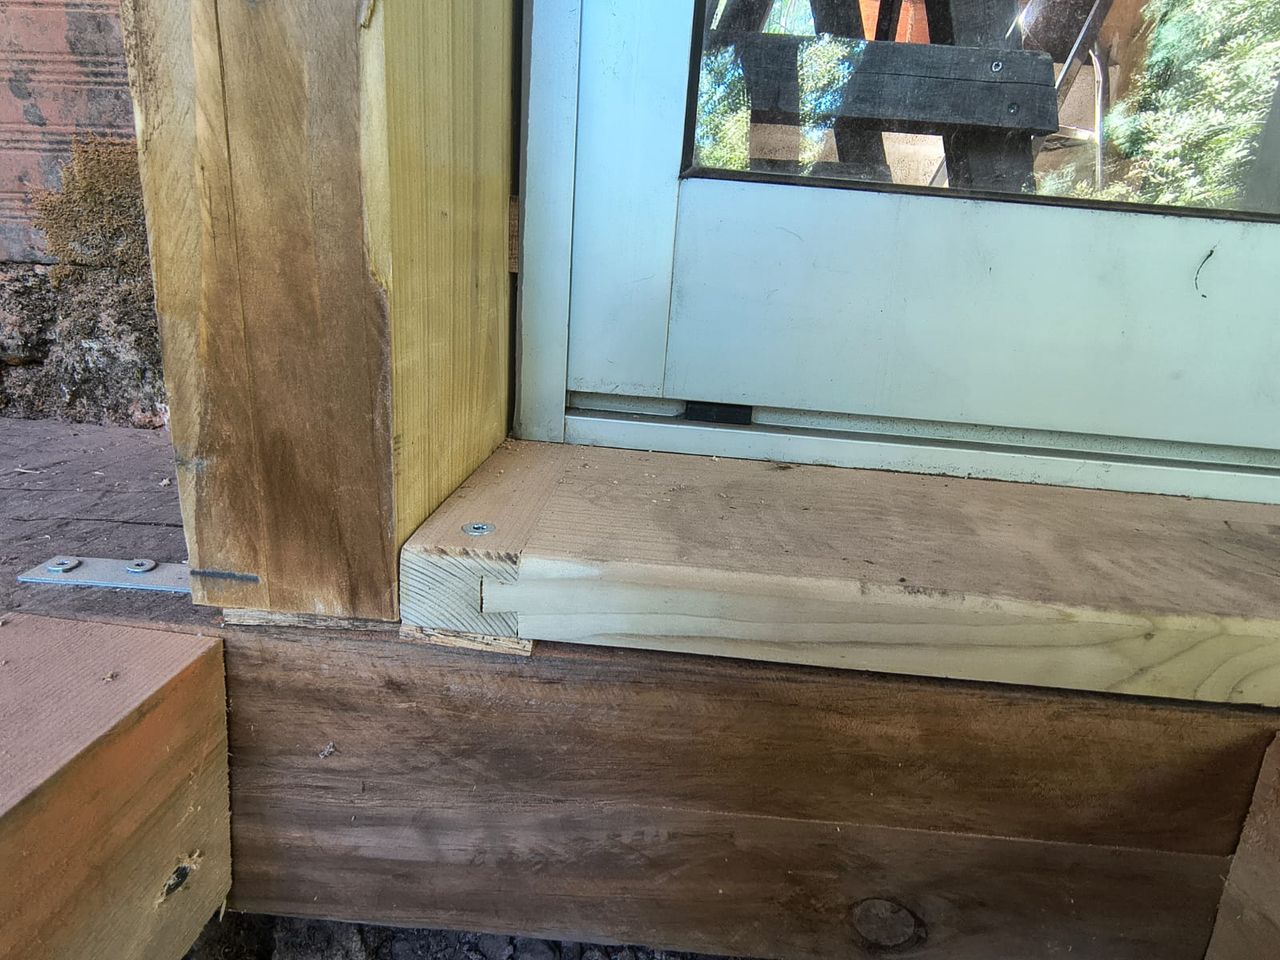
To support the concrete lintel, we installed two new beams. The frames for the doors were built using the same timber as the rest of the structure. The walls will later be closed using hemp blocks. We also added two wooden sills.
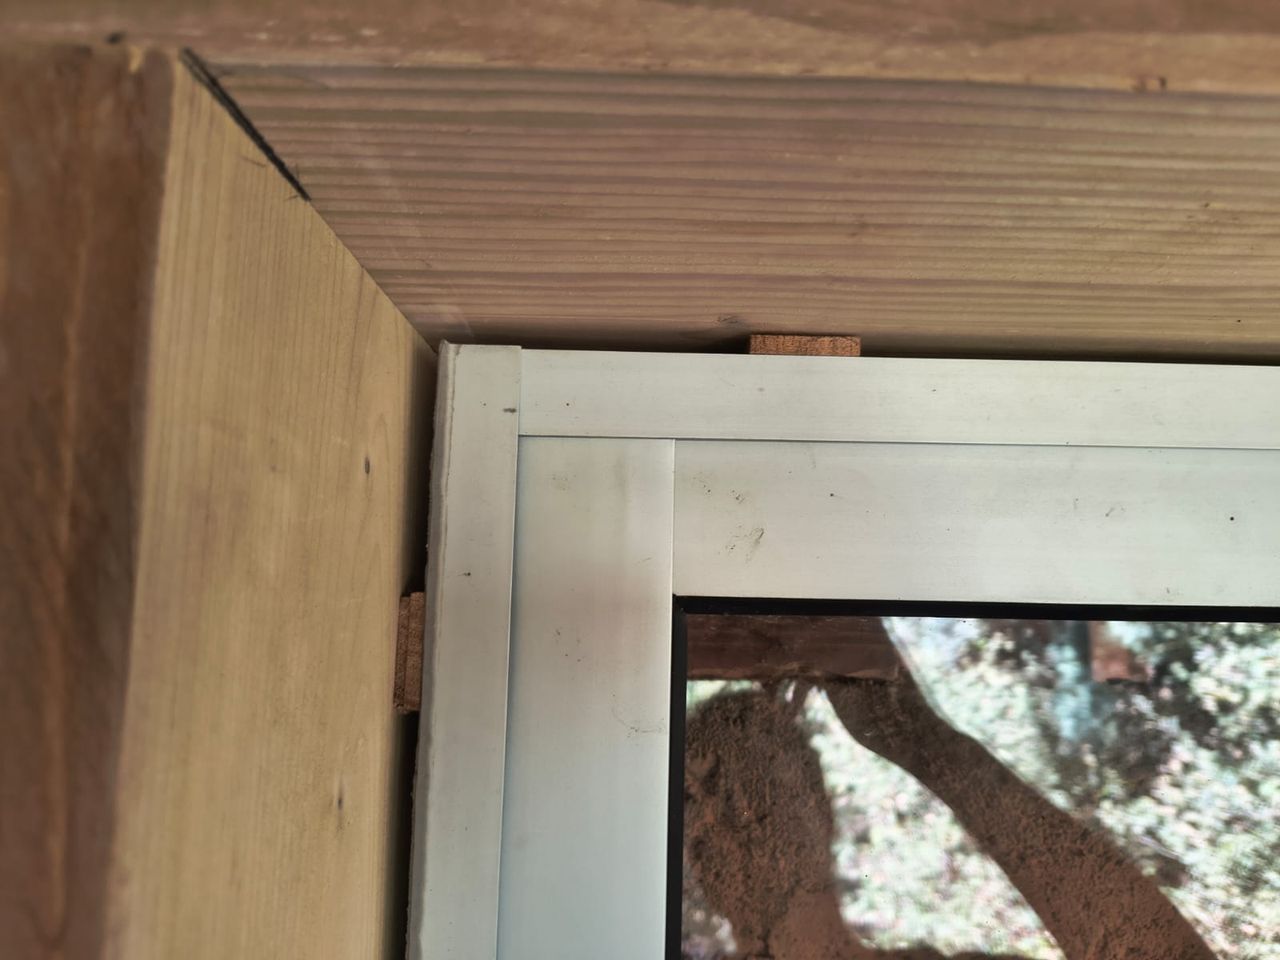
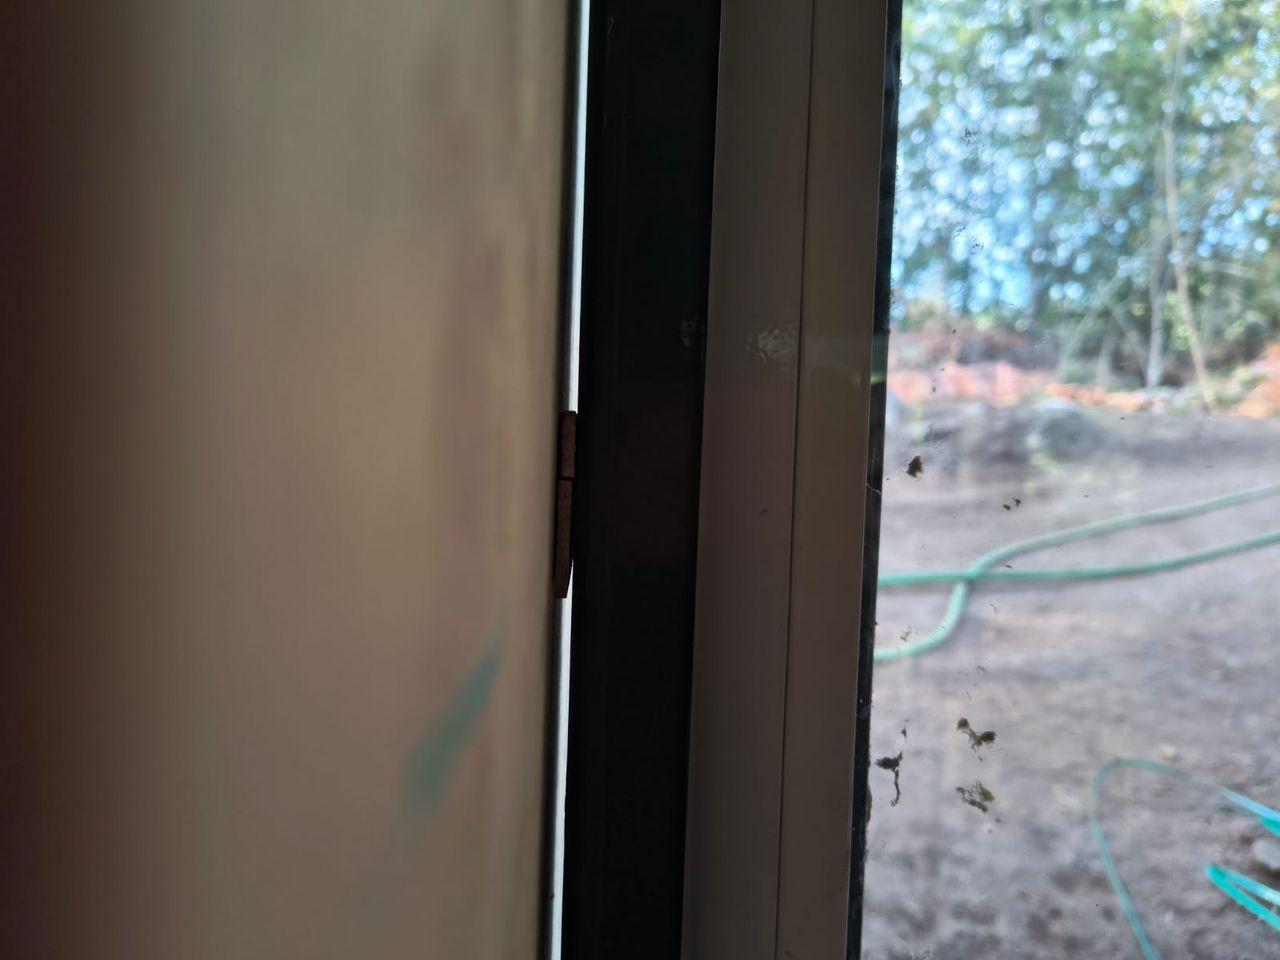
To fix the door frames to the wooden structure, we used screws and small hardwood blocks to level everything. Then we installed the sliding doors, which work very well. The gaps between the door frame and the timber will be covered with wooden strips. We still need to add an exterior handle, since these are balcony doors designed to open only from the inside. We also need to remove the locking mechanism so that no one can accidentally lock themselves out.
21
Windows
Published 7moPublished 7 months ago
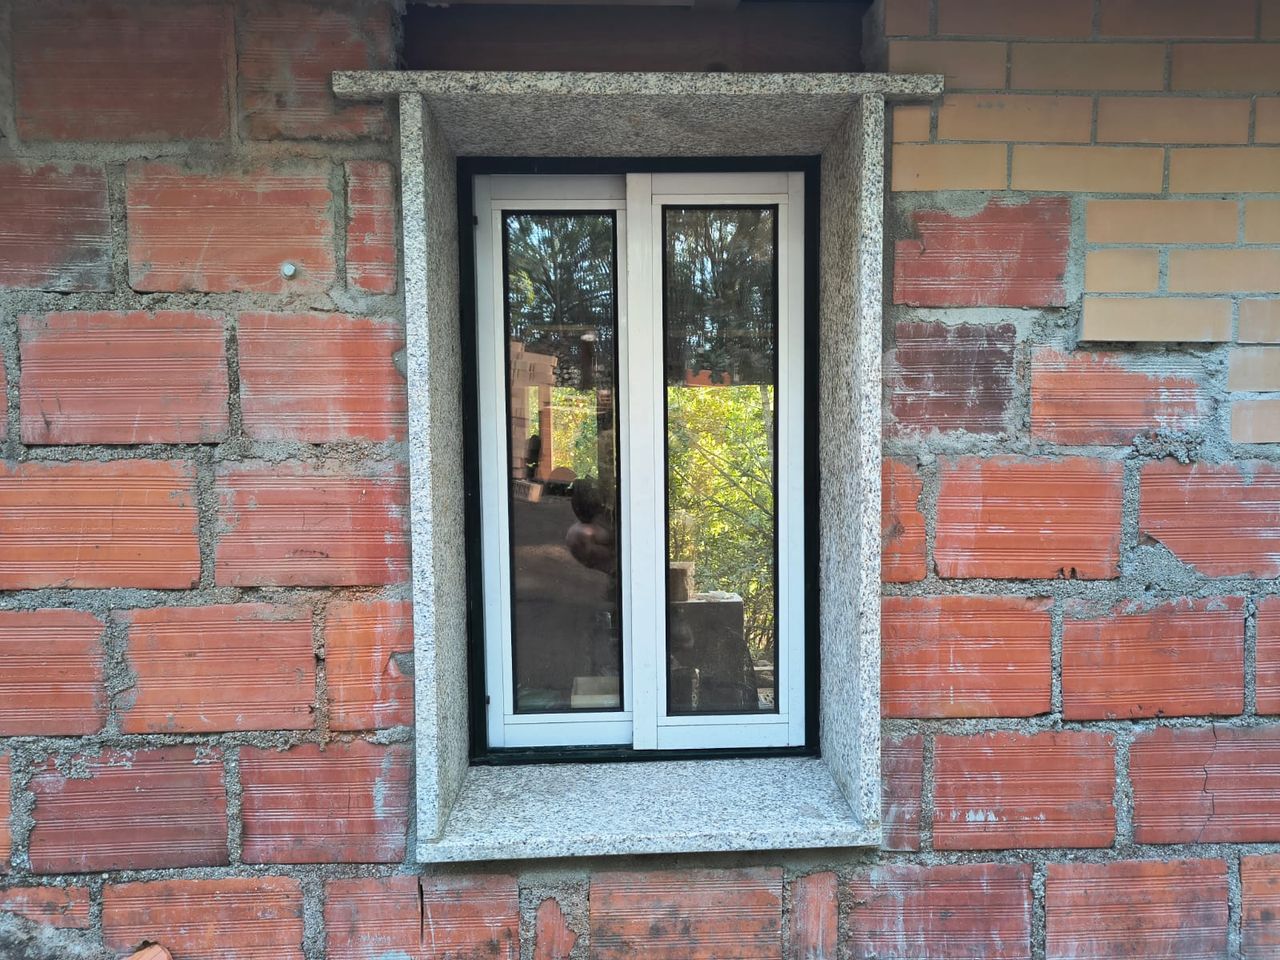
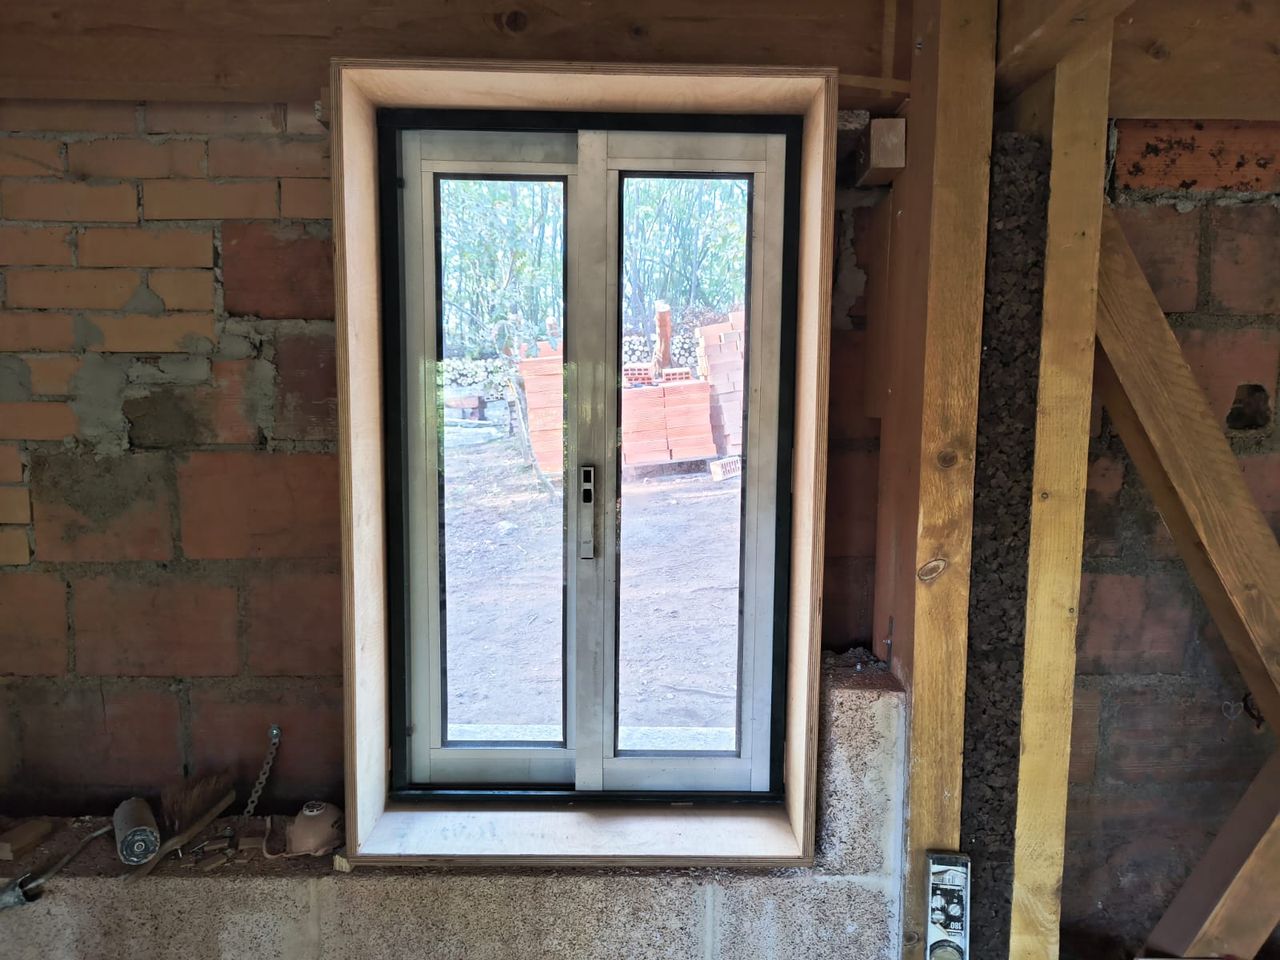
The ruin also received two new south-facing windows. They were added to bring more daylight into the rooms and to allow cross ventilation.
We cut two large openings in the wall, and the bricks we removed were used to rebuild the old walls.
We obtained two second-hand windows. They are made of aluminum and are sliding windows, just like the doors. This type of window is quite common here in Portugal. They are double-glazed and therefore provide good insulation.
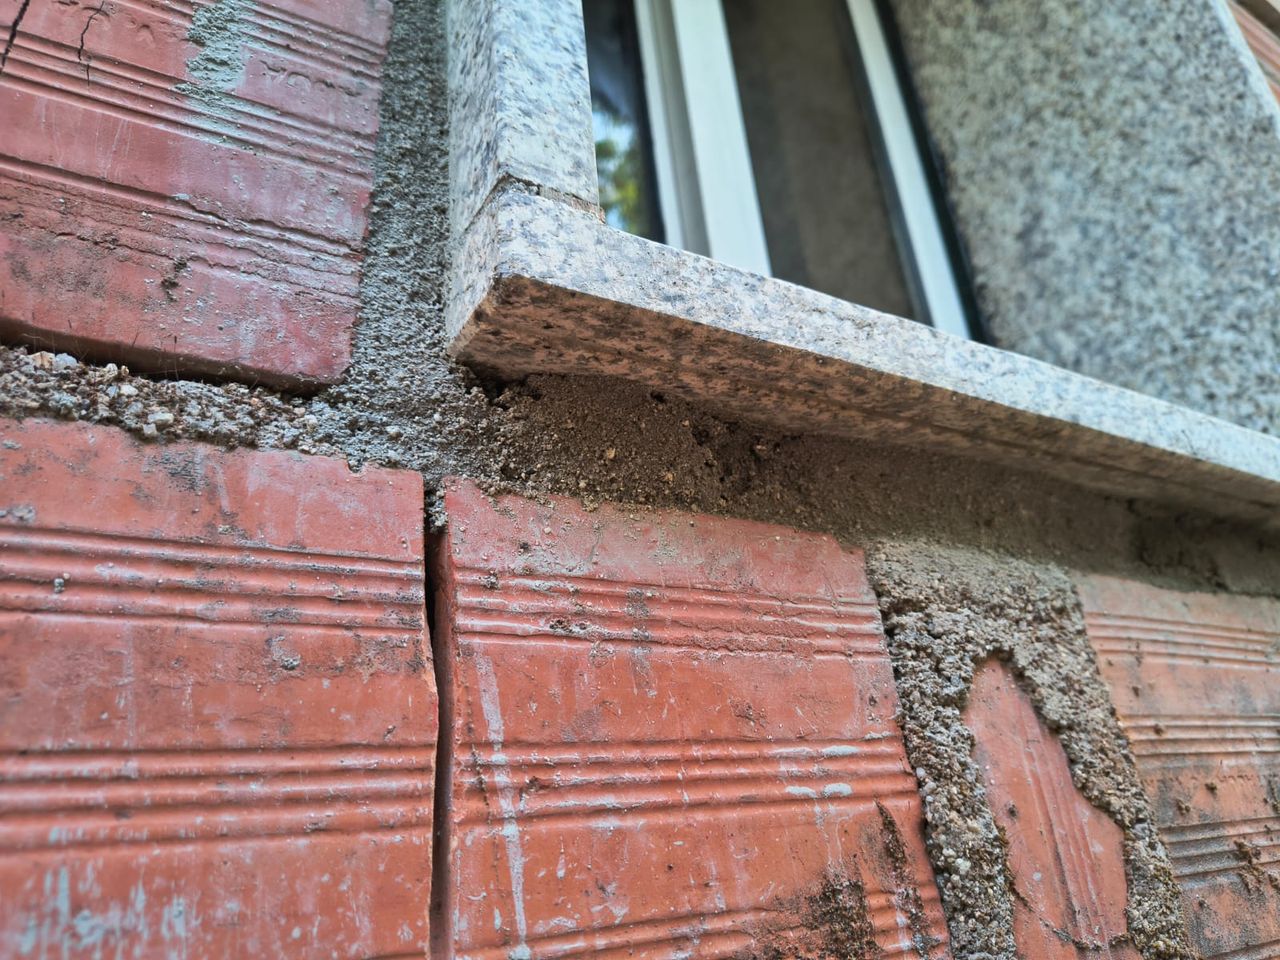
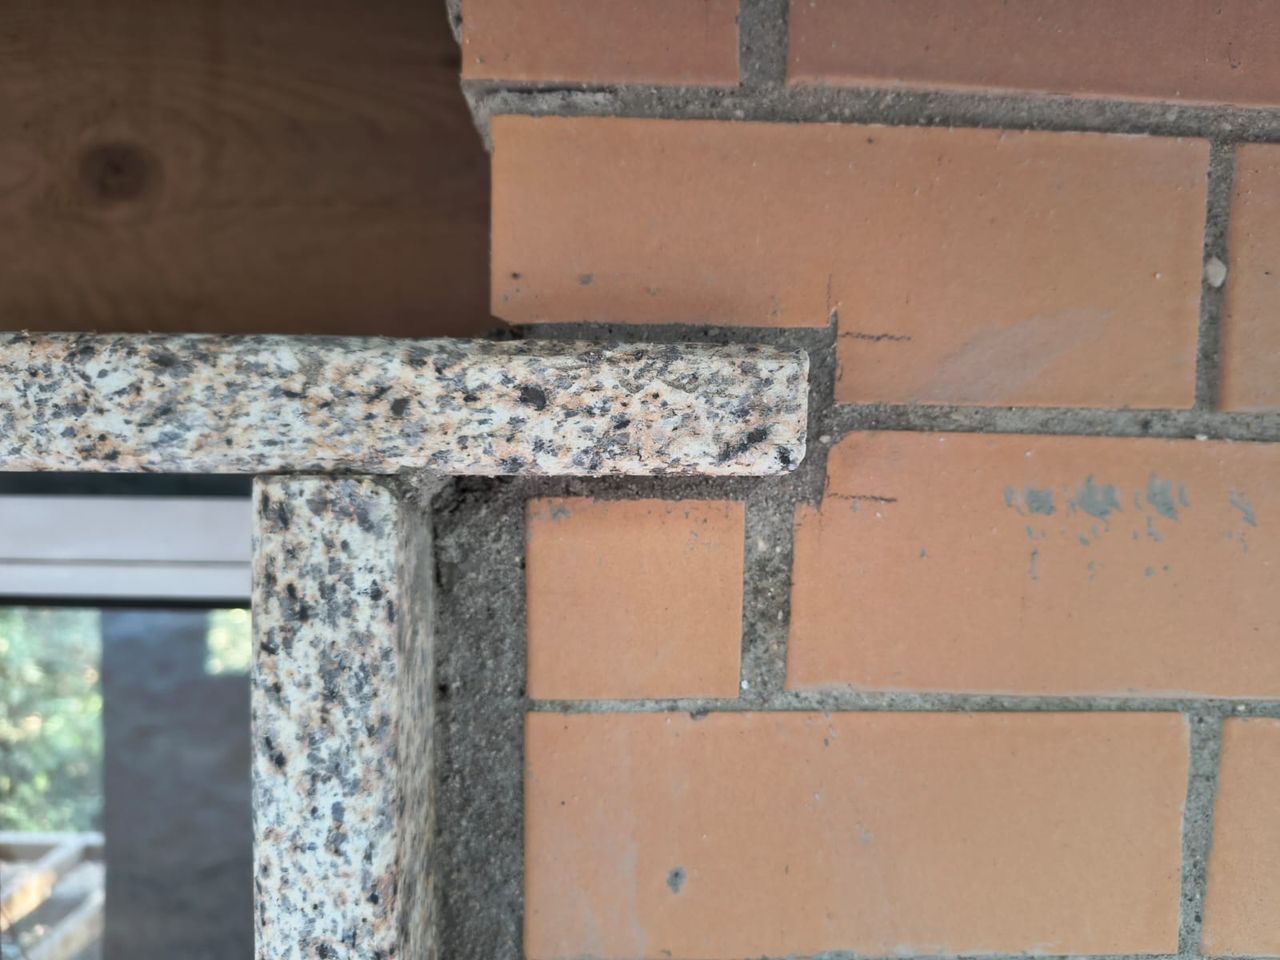
To surround the windows, we built two different frames. The outside frame is made of granite slabs, which were custom-made by a local stonemason. The lower slab is slightly angled so that water can run off, and it also has a drip notch at the bottom to stop water from running back. The granite slabs are surrounded by the outer brick wall.
The inside frame is made of plywood and is surrounded by the inner hemp block wall. The aluminum window frame overlaps both frames and is fixed to the plywood. We again used hardwood blocks to level everything properly.
The windows sit quite far back within the granite frame and are not too large, so they shouldn’t heat up the space too much in summer, even though they face south.
We sealed the gap on the outside using silicone. We also considered using expanding foam tape but did not have it available. If you know of a more environmentally friendly material for this application, please leave a comment.
The gap on the inside will be covered with wooden strips.
We are very happy with the result. The windows bring plenty of light into the rooms, and the granite frames look particularly beautiful.
22
Heater options
Published 2mo. Edited 3wPublished 2 months ago. Last edit 27 days ago
What kind of heating system are we gonna use in our Brick Ruin?
The Brick Ruin consists of two separate rooms ( 5.3 m2 each) with a dividing wall in the middle and a shared galleria. The rooms are not considered as living places but as a storage for personal belongings and as a place to sleep during the season.
We made a list of the options for heating systems that are available:
- rocket mass heater
- masonry stove
- wood stove
- bailarina
- electric heater
- gas bottle heater
- biodigester heater
- flower pot heater
- compost stove
We considered these options the most suitable for our wishes:
1. wood stove
2. masonry stove
Option 1: wood stove
Second hand wood stoves can be sourced locally. The mimosas provide us with plenty of fire wood. A woodstove gives direct warmth and is a perfect heatsource to come home to. Optionally we could build a thermal mass around the woodstove to store some of the heat during the night. Because the room is tiny we could do with a small woodstove of about 30x30 cm. Preferably a round one so it fits nicely into the corner.
Option 2: masonry stove
A masonry stove quickly burns a small amount of wood in the burning chamber and stores the heat in its thermal mass to radiate warmth slowly over time. For the Brick Ruin we thought of a masonry stove that connects both the inside rooms and the galleria. The feed for the burning chamber would be from the galleria. And a masonry chimney (part of the middle wall) and two potential benches made out of masonry covered with cob would store the heat. We got really excited about this idea. Also because it would look really cool architecturally.
Are we going for option one or two?
A masonry stove is highly efficient, but for the Brick Ruin it would make sense to use a wood stove to quickly heat the room for a short period of time.
We also lack experience in building a masonry stove and it might get dangerous if it is not executed correctly.
But what if we combine the two and we build a masonry - wood stove - hybrid? Read more about this in the next module!
Reasons for not considering the other options:
- bailarina > the building doesn't have access to water and there's no sewage
- electric heater > during winter we are often low on solar energy
- gas bottle heater > we prefer not to use gas
- biodigester heater > we are not experienced enough in storing the biogas
- flower pot heater > fun to try out but probably not enough heat for the entire space
- compost stove > fun! maybe something for a future research module


23
Heating system: masonry - wood stove - hybrid
Published 2w. Edited 2wPublished 19 days ago. Last edit 19 days ago
We came to the conclusion that we want to try and build a masonry - wood stove - hybrid heater.
We will install a wood stove that is fed from the galleria and that sits inside a masonry thermal mass. We hope that this design will radiate the heat slowly and is just enough for both of the small spaces.
We chose to elevate the wood stove so it's easier to feed. We're gonna build a solid base with a top layer of heat bricks for the stove to sit on. Our sourced heater has an exhaust on the top en we will install a stainless steel chimney through the roof. The masonry on top of the heater we will taper from two sides. We still have to come up with a structural solution for the part above the opening for the stove. Perhaps this part will be a separate brick wall with its own lintel build in to it. If you have any thoughts on that, please let us know!
The wall around the stove will have vents to let the cold air in, the vents in the brick chimney will hopefully create a nice draft.


%20--%3e%3csvg%20version='1.1'%20id='Layer_1'%20xmlns='http://www.w3.org/2000/svg'%20xmlns:xlink='http://www.w3.org/1999/xlink'%20x='0px'%20y='0px'%20viewBox='0%200%2064%2063'%20style='enable-background:new%200%200%2064%2063;'%20xml:space='preserve'%3e%3cstyle%20type='text/css'%3e%20.st0{fill:%2320B7EB;}%20.st1{fill:%23E9475A;}%20.st2{fill:%23FECE4E;}%20%3c/style%3e%3cdesc%3eCreated%20with%20Sketch.%3c/desc%3e%3cg%20id='Page-1'%3e%3cg%20id='OA-Logo-Black-Background'%3e%3cpath%20id='Shape'%20class='st0'%20d='M14.1,30.1c-1.5-0.8-8.6-3.8-14.1-7.8c1.8-3.4,3.1-5.6,5-9.1c2.7,1.1,1.9,0.5,4.6,1.7%20c0.8,0.4,10.1,4.5,13.8,6.2c2.4,1.1,4.7,2.2,7,3.3L43,30.5l8.1,3.9c4,2,7.2,3.5,11.3,5.5c0.5,0.3-3.7,9.4-3.7,9.4%20c-1.7-0.6-3.9-1.8-5.5-2.5c-4.7-2.1-9-3.9-13.7-6c-4-1.8-6.7-2.9-10.8-4.5C25,34.9,17.1,31.6,14.1,30.1z'/%3e%3cpath%20id='Shape_1_'%20class='st1'%20d='M12.1,54.9c-0.8,0.6-1.6,1.2-2.5,1.6c-0.4-0.5-0.9-1-1.3-1.5c-0.3-1.2-2.3-4.9-2.7-6.2%20c-0.1-0.4-0.7-2.2-0.8-2.6c0,0,5-3.4,8.2-5.9c3.2-2.6,6.2-5,9.3-7.5c1.4-1.1,3.9-2.5,5.3-3.5c2.5-1.7,13-9.1,15.6-10.5%20c5.4-3.3,11.1-6.3,16.8-9c1.7,3.5,1.8,3,3.8,6.9c0,0-17.8,13.5-22.7,17.1c-3.8,2.8-7.5,5.7-11.3,8.5c-1.7,1.3-3.5,2.4-5.2,3.7'/%3e%3cpath%20id='Shape_2_'%20class='st2'%20d='M20.8,2.9l-0.2-0.8C25,0,31.2-0.3,31.4,0.2c0.4,1.1,0.9,2.2,1.2,3.4c1.4,4.4,2.7,8.7,4,13.1%20c0.4,1.4,2.8,10,2.9,10.5c0.5,2.8,1.2,5.6,1.6,8.4c0.8,4.7,1.4,8.6,2.3,13.3c0.6,3.1,1.3,6.3,2.3,11.3c0,0-5.8,1.4-7.5,1.8%20c-0.8,0.2-1.5,0.4-2.4,0.6c-0.3-1.1-0.2-1.2-0.5-2.1c-0.9-3.7-1.8-7.3-2.6-11c-1.5-6.4-3-12.9-4.4-19.3%20c-1.2-5.4-2.6-10.7-4.4-15.9c-1-3.1-1.8-6.3-2.7-9.5C21.1,3.8,21,3.8,20.8,2.9z'/%3e%3c/g%3e%3c/g%3e%3c/svg%3e)