

Building a house in an old fridge box
Started 2y. Edited 7moStarted about 2 years ago. Last edit 7 months ago
Construction
In Progress
RenovationBuildingRecycled
More Information


%20--%3e%3csvg%20version='1.1'%20id='Layer_1'%20xmlns='http://www.w3.org/2000/svg'%20xmlns:xlink='http://www.w3.org/1999/xlink'%20x='0px'%20y='0px'%20viewBox='0%200%2064%2063'%20style='enable-background:new%200%200%2064%2063;'%20xml:space='preserve'%3e%3cstyle%20type='text/css'%3e%20.st0{fill:%23231F20;}%20%3c/style%3e%3cdesc%3eCreated%20with%20Sketch.%3c/desc%3e%3cg%20id='Page-1'%3e%3cg%20id='OA-Logo-Black-Background'%3e%3cpath%20id='Shape'%20class='st0'%20d='M14.1,30.1c-1.5-0.8-8.6-3.8-14.1-7.8c1.8-3.4,3.1-5.6,5-9.1c2.7,1.1,1.9,0.5,4.6,1.7%20c0.8,0.4,10.1,4.5,13.8,6.2c2.4,1.1,4.7,2.2,7,3.3L43,30.5l8.1,3.9c4,2,7.2,3.5,11.3,5.5c0.5,0.3-3.7,9.4-3.7,9.4%20c-1.7-0.6-3.9-1.8-5.5-2.5c-4.7-2.1-9-3.9-13.7-6c-4-1.8-6.7-2.9-10.8-4.5C25,34.9,17.1,31.6,14.1,30.1z'/%3e%3cpath%20id='Shape_1_'%20class='st0'%20d='M12.1,54.9c-0.8,0.6-1.6,1.2-2.5,1.6c-0.4-0.5-0.9-1-1.3-1.5c-0.3-1.2-2.3-4.9-2.7-6.2%20c-0.1-0.4-0.7-2.2-0.8-2.6c0,0,5-3.4,8.2-5.9c3.2-2.6,6.2-5,9.3-7.5c1.4-1.1,3.9-2.5,5.3-3.5c2.5-1.7,13-9.1,15.6-10.5%20c5.4-3.3,11.1-6.3,16.8-9c1.7,3.5,1.8,3,3.8,6.9c0,0-17.8,13.5-22.7,17.1c-3.8,2.8-7.5,5.7-11.3,8.5c-1.7,1.3-3.5,2.4-5.2,3.7'/%3e%3cpath%20id='Shape_2_'%20class='st0'%20d='M20.8,2.9l-0.2-0.8C25,0,31.2-0.3,31.4,0.2c0.4,1.1,0.9,2.2,1.2,3.4c1.4,4.4,2.7,8.7,4,13.1%20c0.4,1.4,2.8,10,2.9,10.5c0.5,2.8,1.2,5.6,1.6,8.4c0.8,4.7,1.4,8.6,2.3,13.3c0.6,3.1,1.3,6.3,2.3,11.3c0,0-5.8,1.4-7.5,1.8%20c-0.8,0.2-1.5,0.4-2.4,0.6c-0.3-1.1-0.2-1.2-0.5-2.1c-0.9-3.7-1.8-7.3-2.6-11c-1.5-6.4-3-12.9-4.4-19.3%20c-1.2-5.4-2.6-10.7-4.4-15.9c-1-3.1-1.8-6.3-2.7-9.5C21.1,3.8,21,3.8,20.8,2.9z'/%3e%3c/g%3e%3c/g%3e%3c/svg%3e)


1
Looking for a base
Published 2y. Edited 2yPublished about 2 years ago. Last edit about 2 years ago
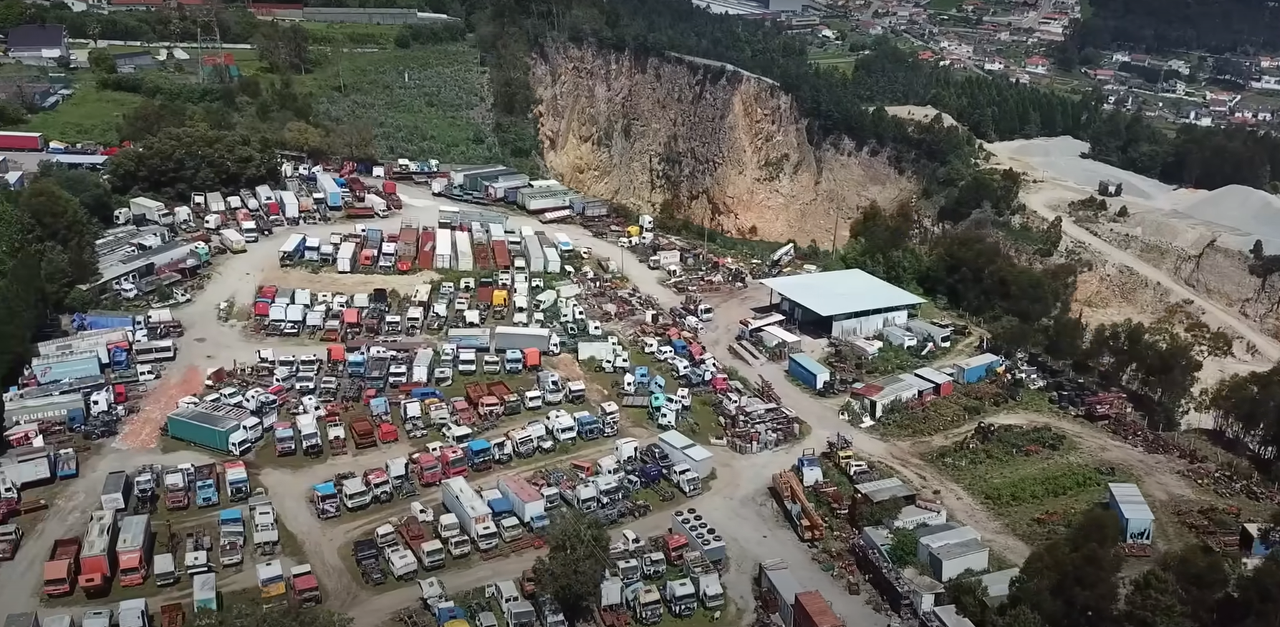
We went back to the scrapyard to look for a good base for our new house. This time we have already more knowledge than with the Pig Trailer so we kind of had an idea of what we were looking for, but anyway we still wanted to explore different options. This scrapyard is full of treasures but we ended up with the fridge box we didn´t got one year before. This kind of trailers have some upsides and downsides.
Upsides:
- Isolated
- Sturdy
- Square
- Waterproof
Downsides:
- Not breathable
- Not natural materials, so difficult to work in a natural environment
- Industrial look
- Hard to work with the mix of different materials
They are also barely recycled, standard and spread all over the world, so we thought we can create a good example for others. Also will save a lot of work and materials that it is already a box isolated. So this time we made the choice in one go. Just went there, choose and buy our new fridge box
2
Preparing the box in the scrapyard
Published 2y. Edited 2yPublished about 2 years ago. Last edit about 2 years ago
In this step the useless elements for a house got removed from the box and we clean it in the scrapyard garage.
Cleaning is quite important here since afterwards in the land will be way more difficult for us to take care of all the residues leftover from the clean up.
This box used to be a meat transport unit so it has some elements specifically to make this job.
- Hanging rails:
They use to be there to hang the meat pieces for transport. This meat pieces are very heavy so the box might have a framing system inside the isolation to be able to bolt this rails.
- Cooling unit:
Meat is transported refrigerated so it needs a motor to cool down inside the box.


3
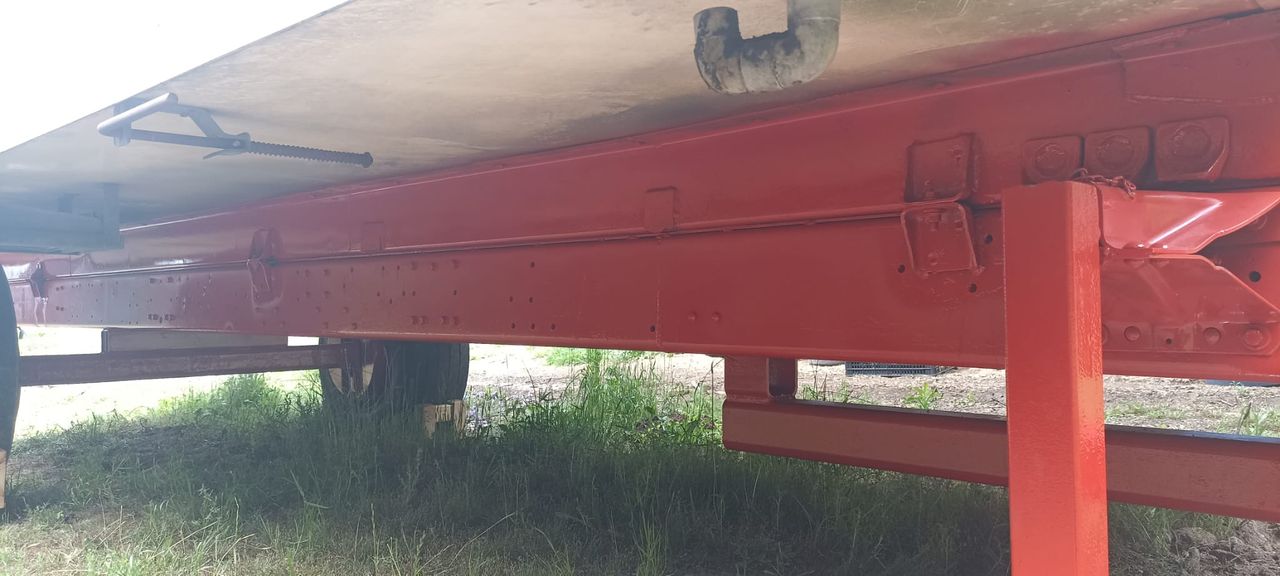
Building the chassis
Published 2y. Edited 2yPublished about 2 years ago. Last edit about 2 years ago
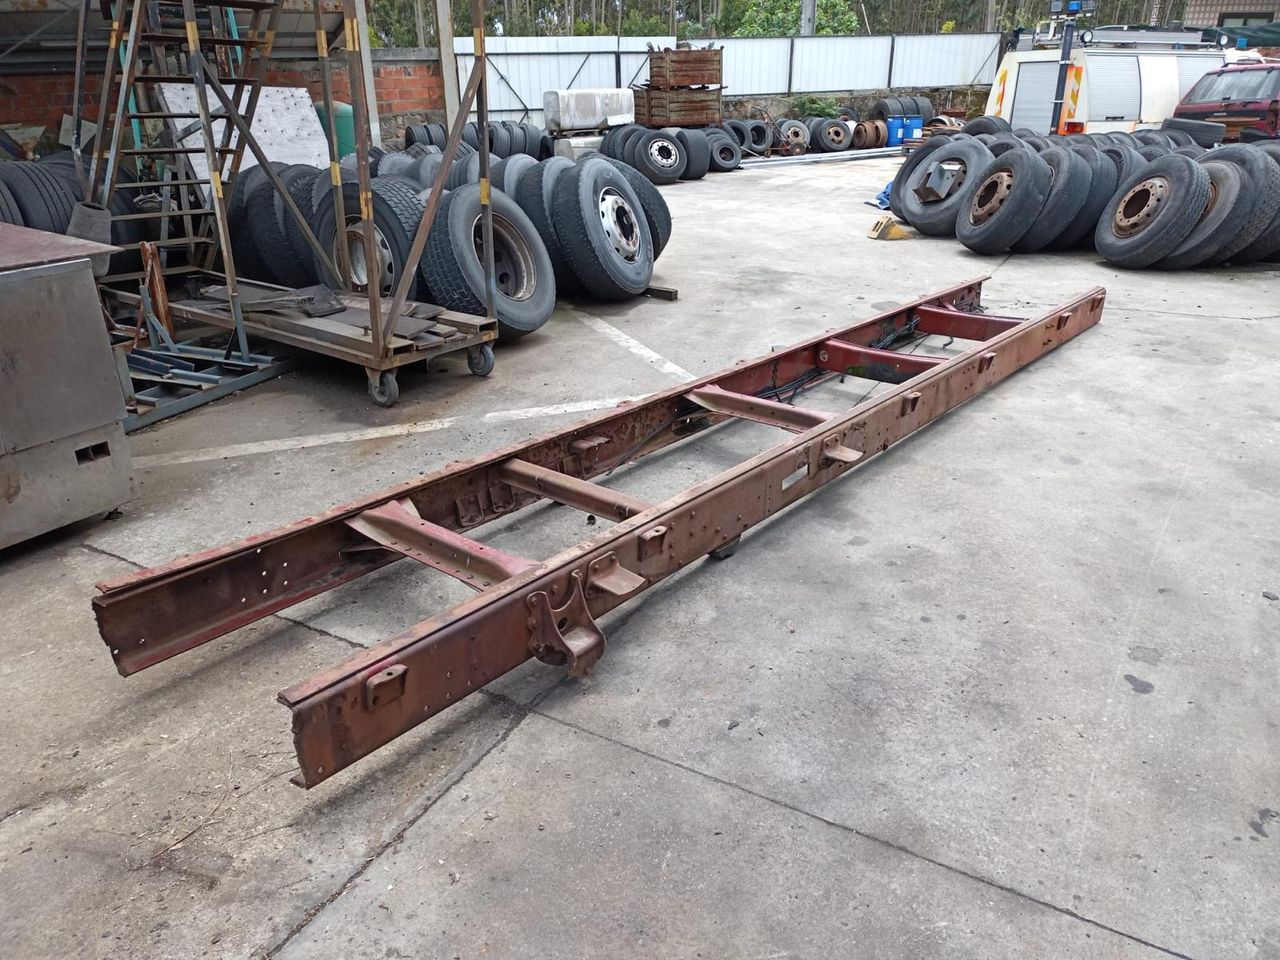
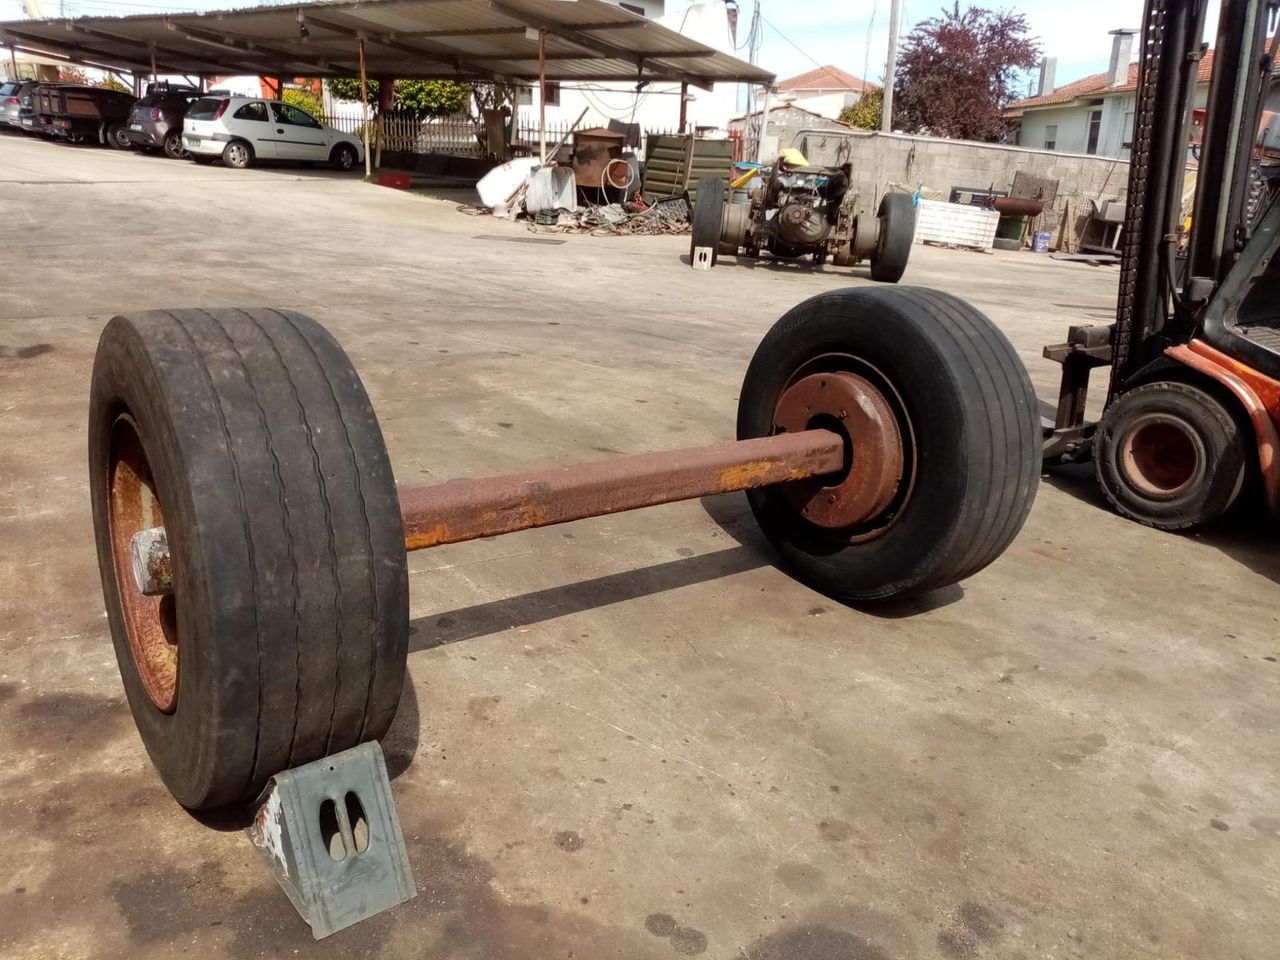
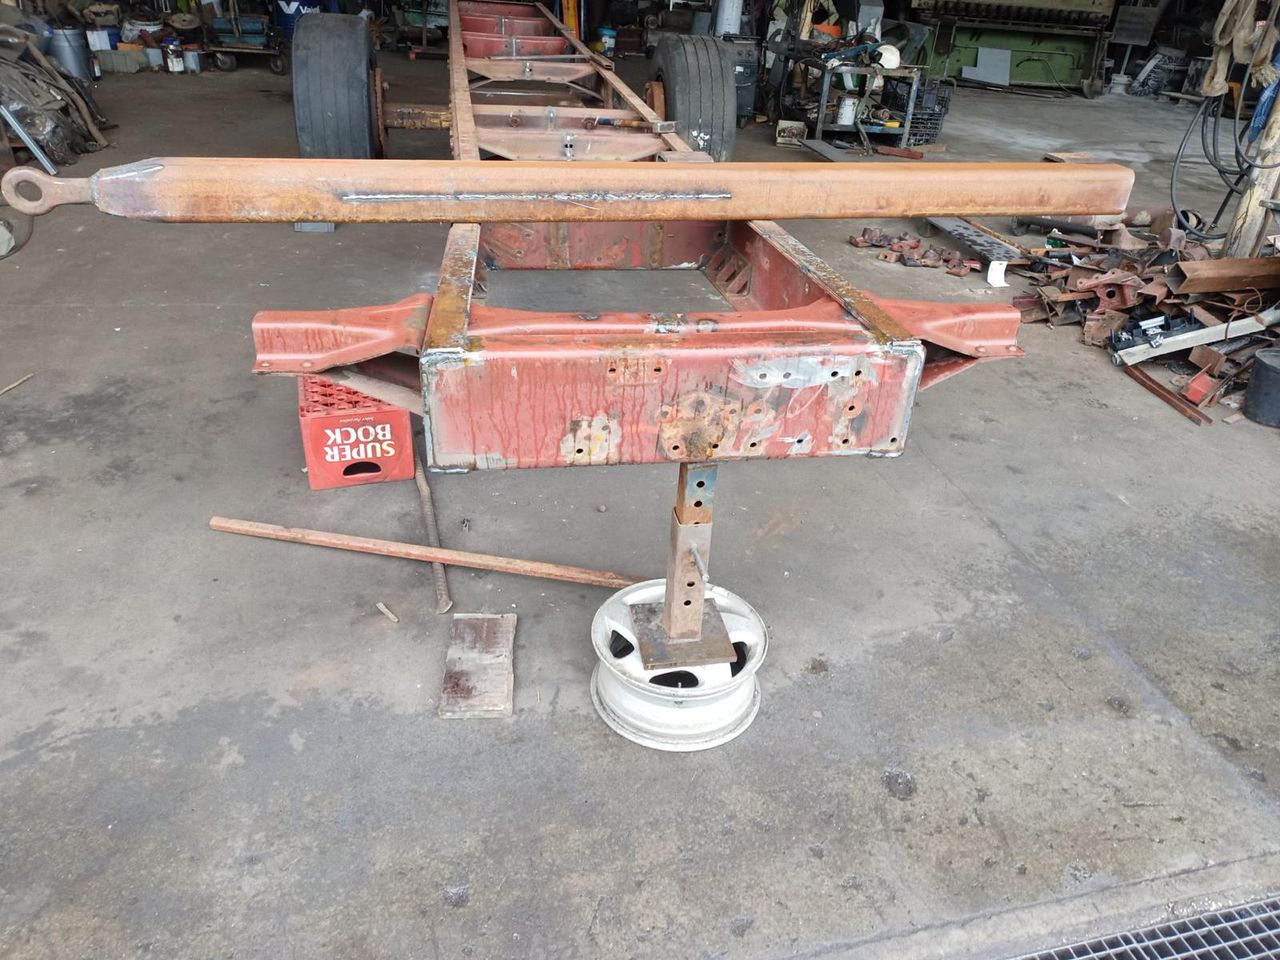
For this project they have prepared an specific chassis for us in the scrapyard.
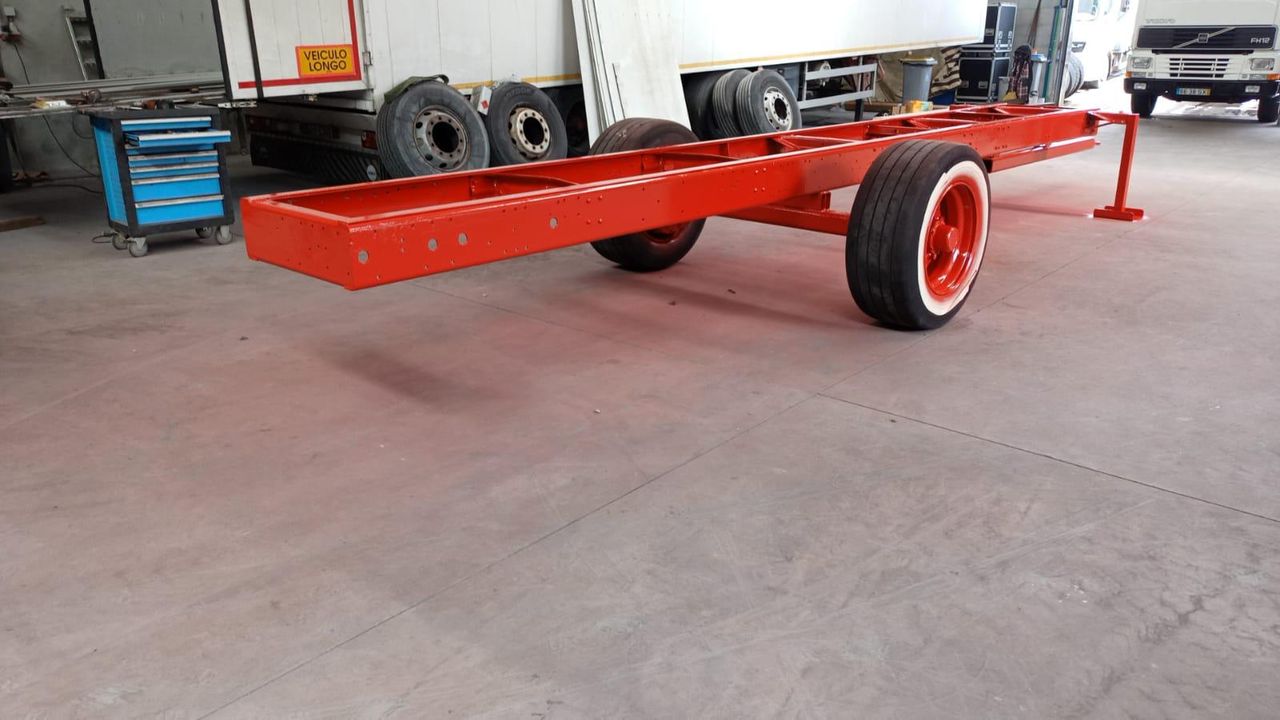
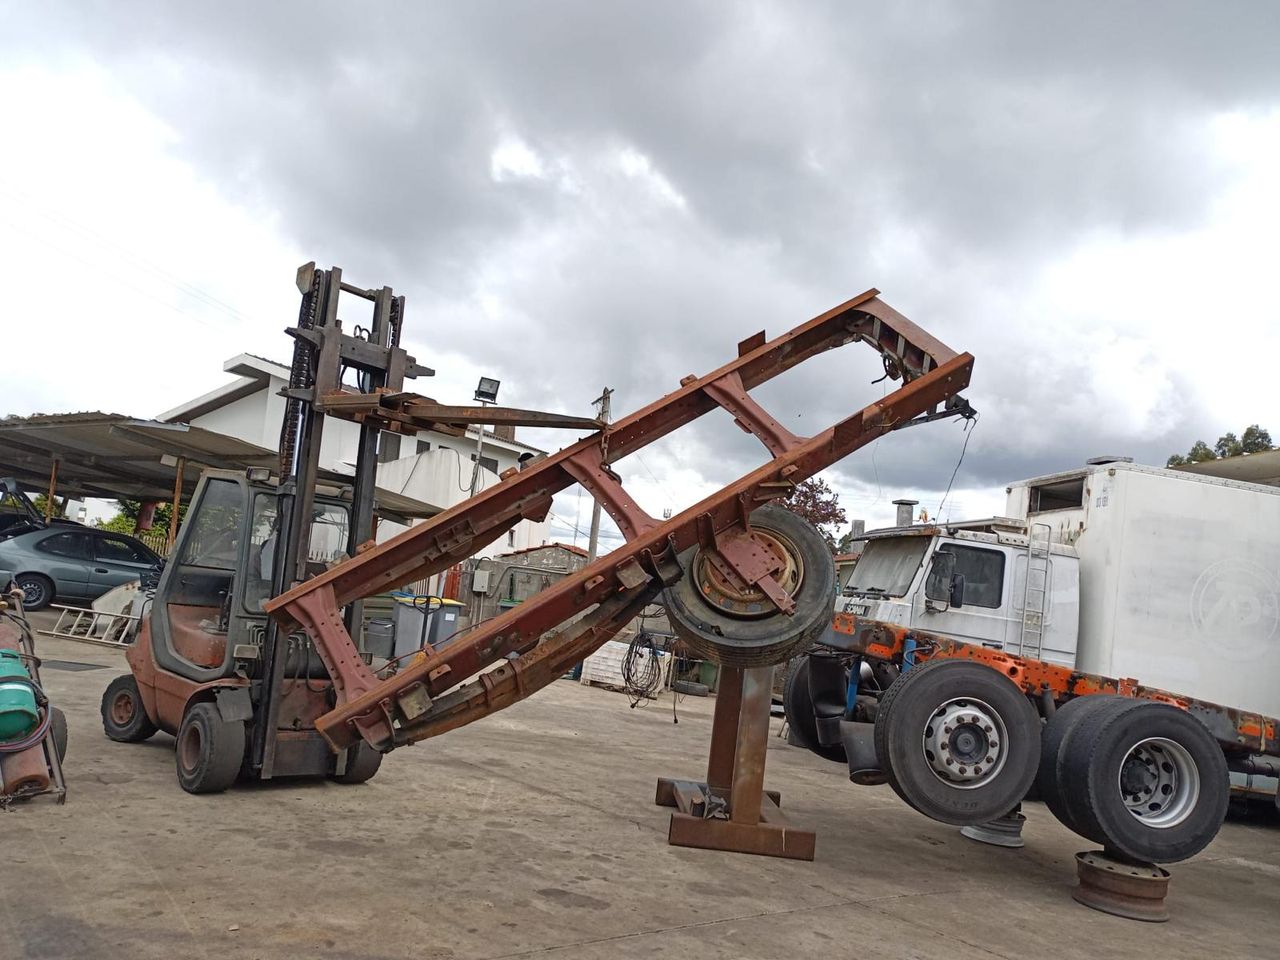
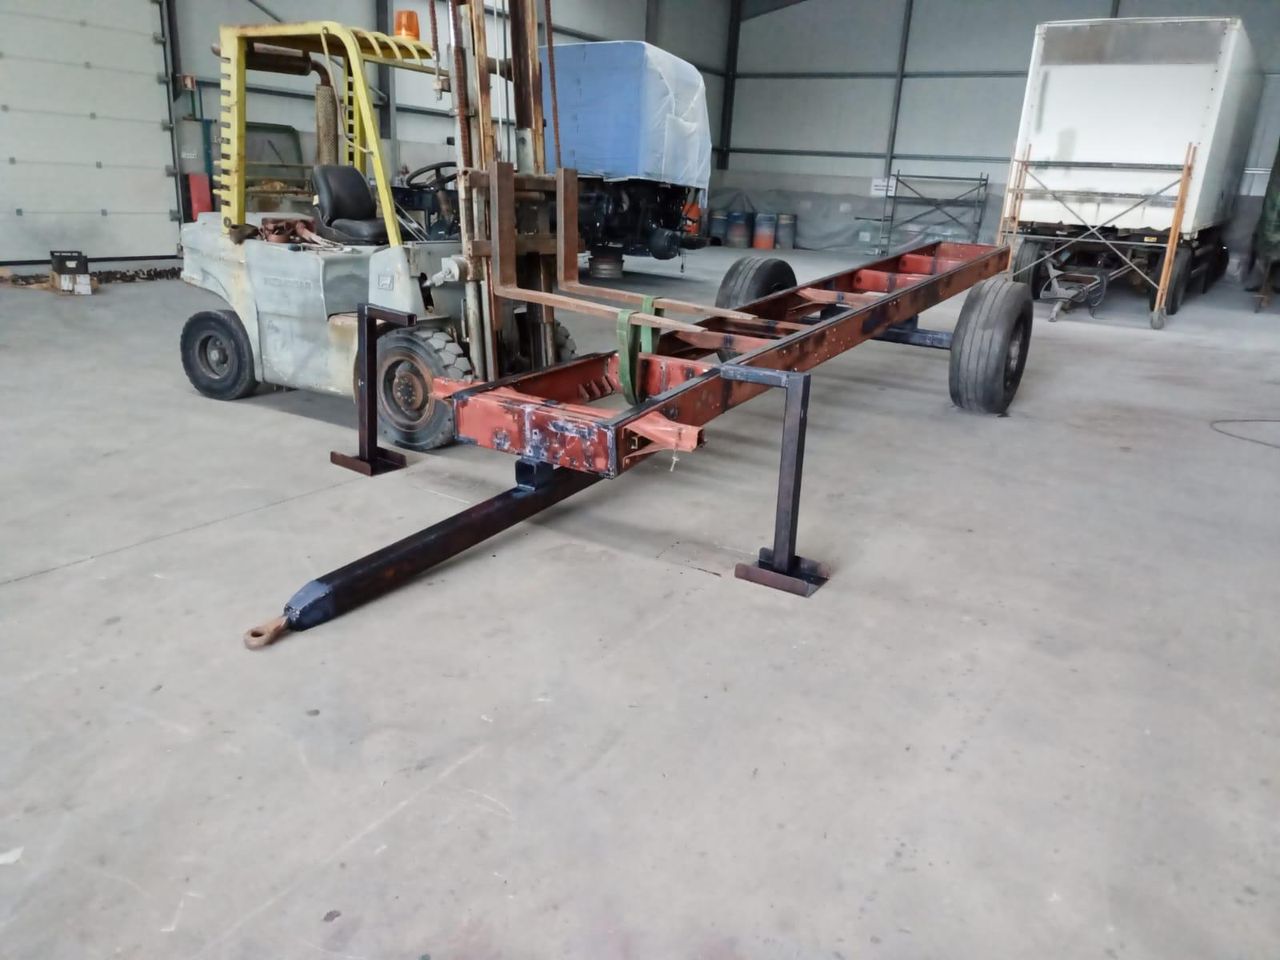
They have used different old elements from other trucks and weld them together to create our chassis. Since we are not gonna go in the road again they had simplify all the elements to the max.
No breaks, no hidraulics, no lights, no cables, no movable parts besides the wheels. It is just a big metal piece with a shaft and wheels that can be towed.
A bit of a Frankenstein piece but with a shiny red color


4
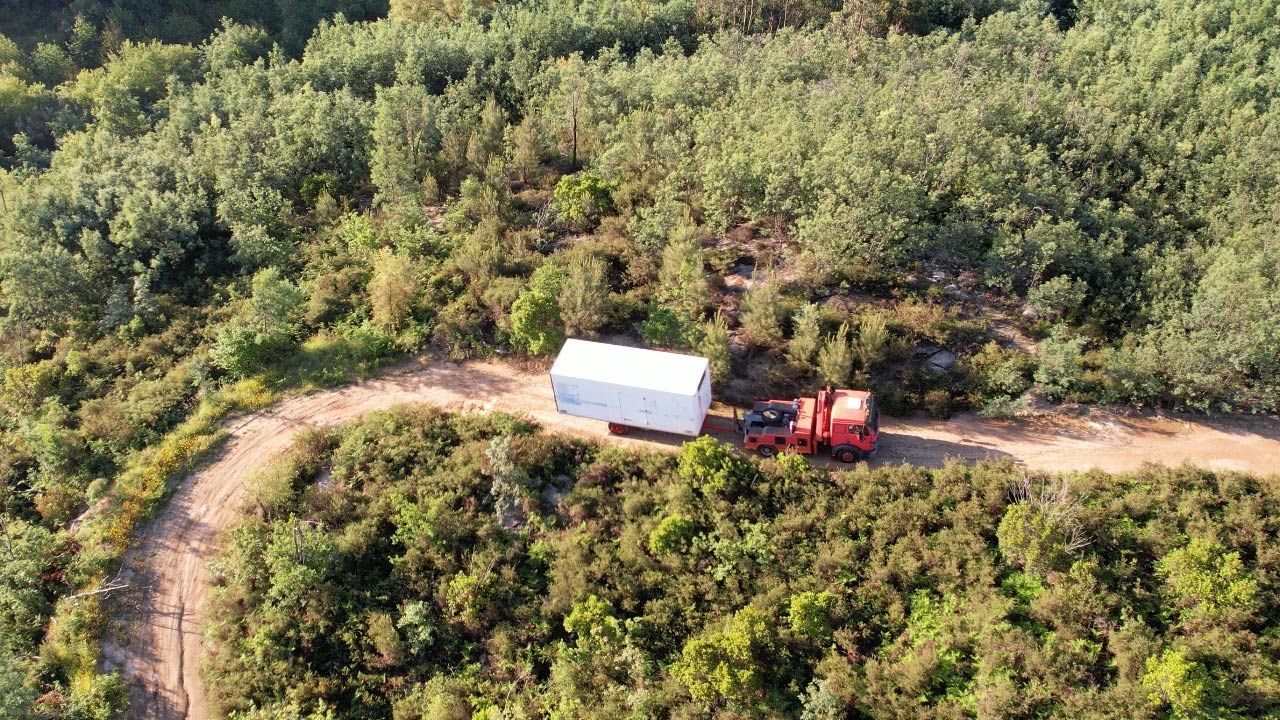
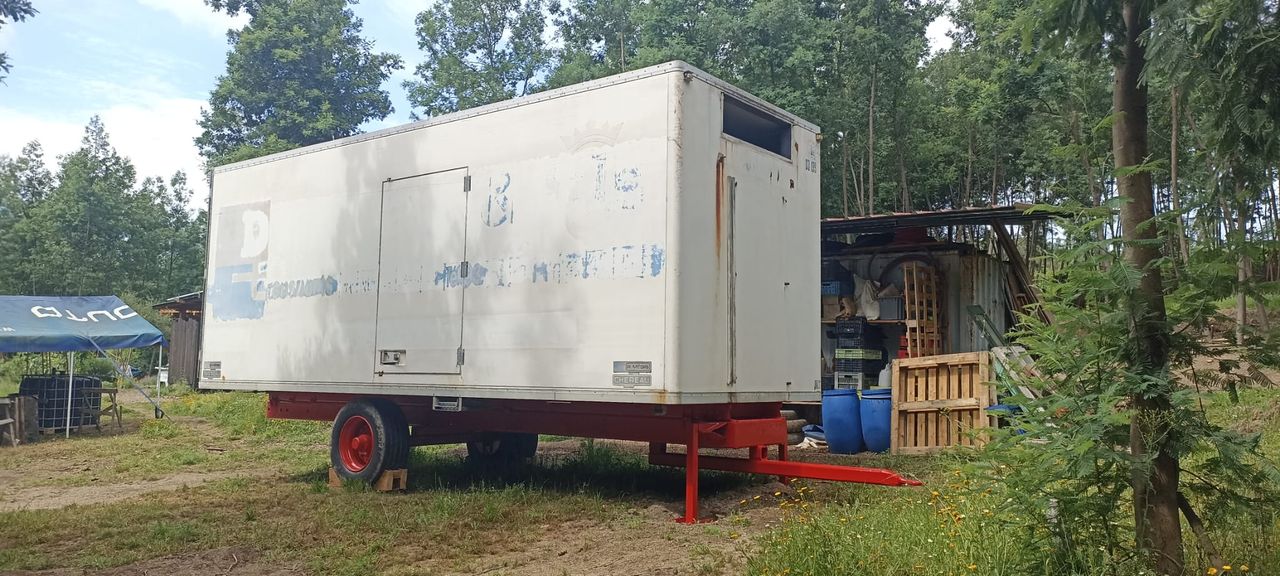
Trailer and box together on the land
Published 2y. Edited 1yPublished about 2 years ago. Last edit over 1 year ago
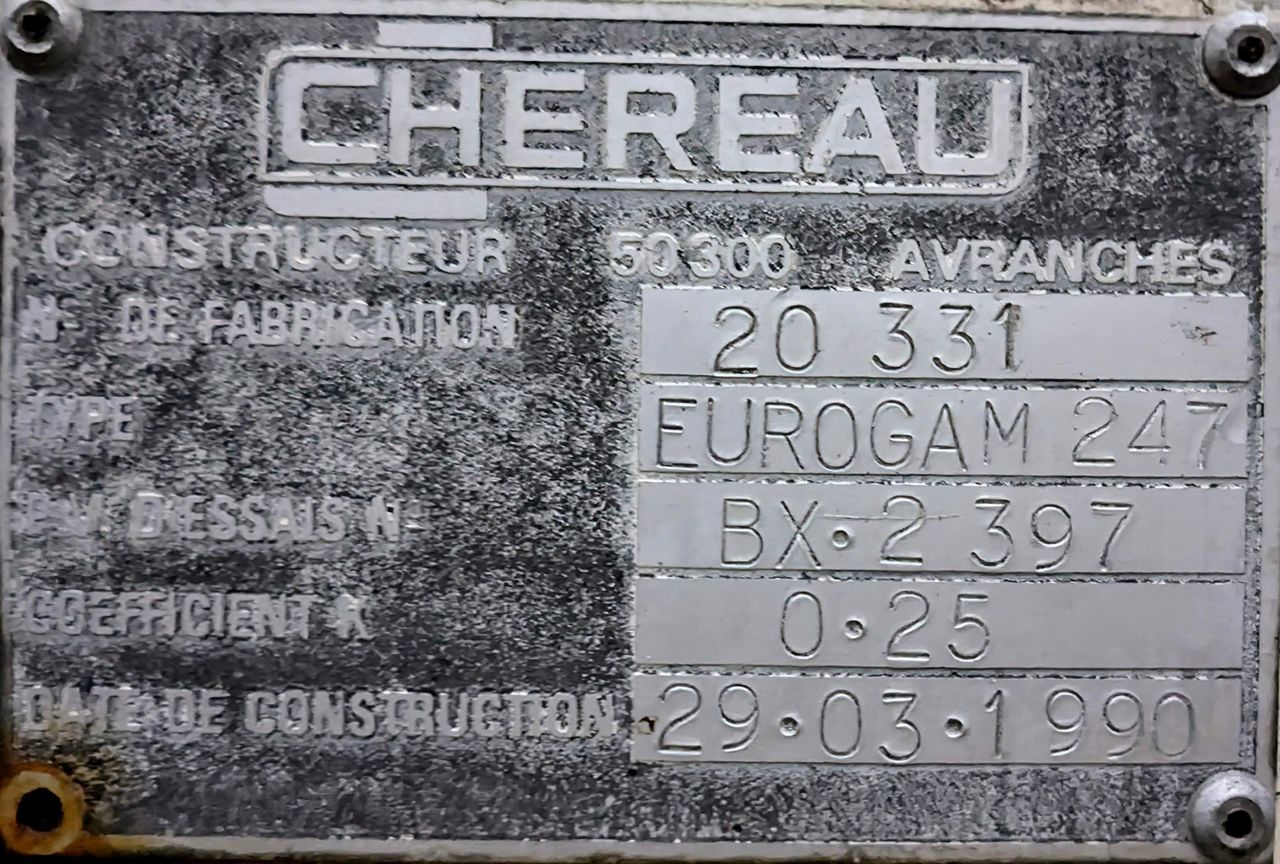
Finally the box has been attached to the chassis. The fridge box is from the brand Chereau, model Eurogam 247 made in the 90's (technical plate in the picture). Have been towed to the land and it is ready to start the design work.

5
Preparations on side and measurements
Published 1yPublished almost 2 years ago
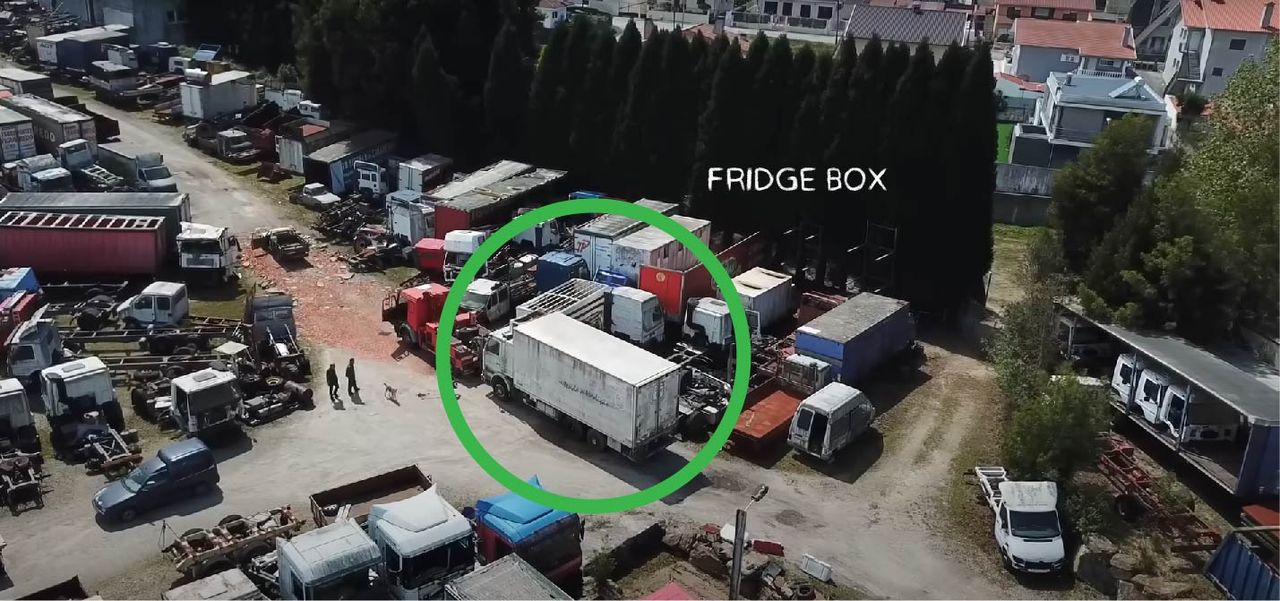
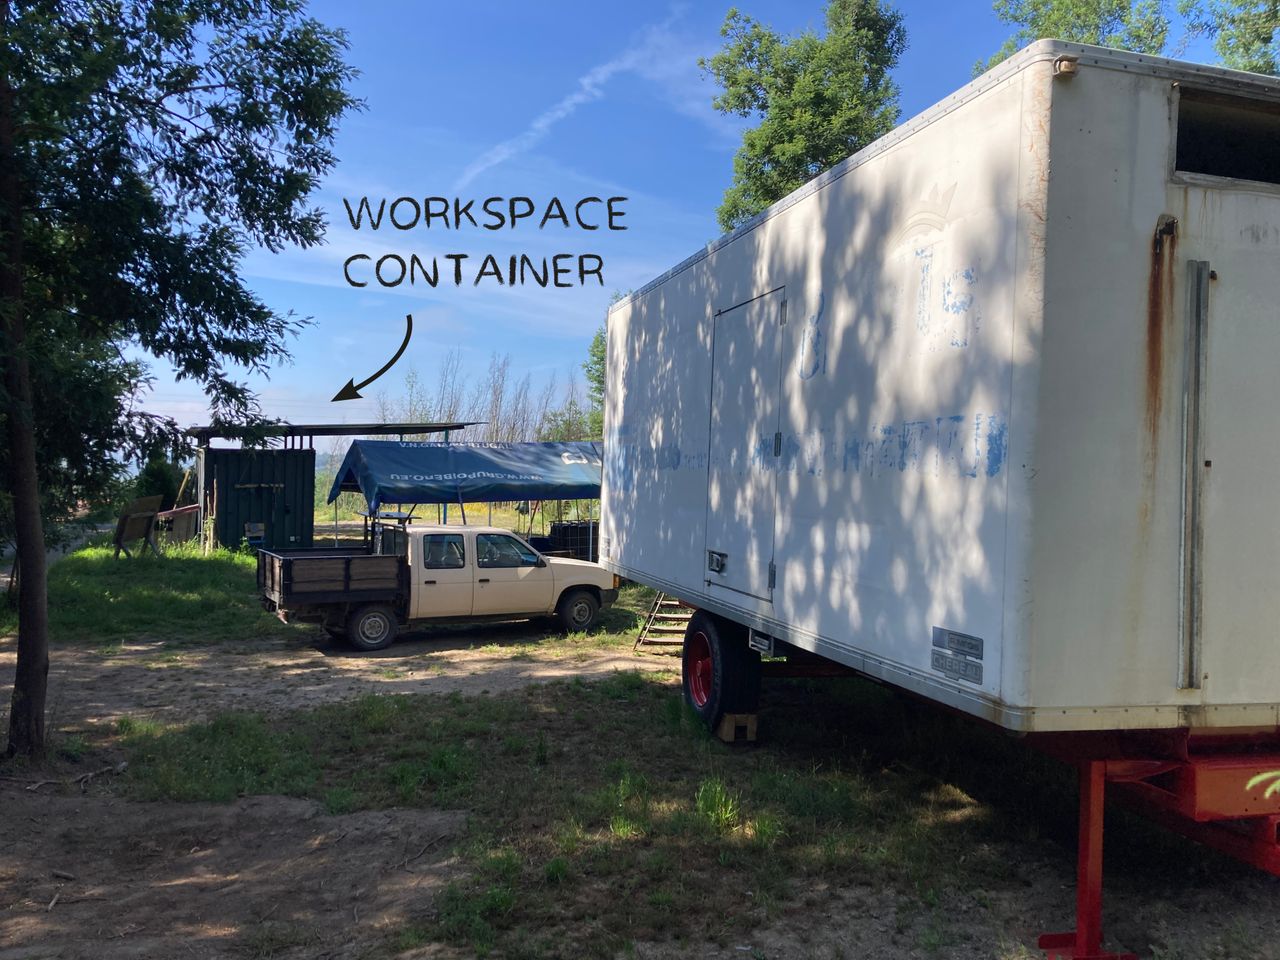
The trailer and Fridge Box have been placed as close as possible to our workspace container. This makes it easier for us to work on the Fridge Box without having to walk long distances. After the work is finished and the Fridge Box is transformed, it will be moved to its final position in the middle land.
Before we could start with the design work, we had to get the trailer level, fix the wheels so we can safely work in it (trailer has no brakes) and take all the necessary measurements.


6
First ideas for the layout of the furniture and rooms
Published 1y. Edited 1yPublished almost 2 years ago. Last edit almost 2 years ago
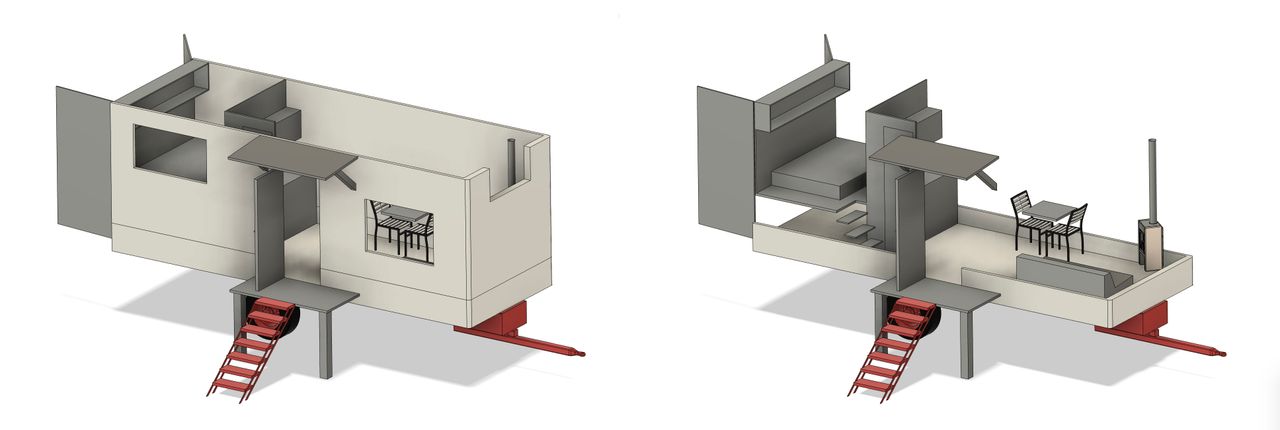
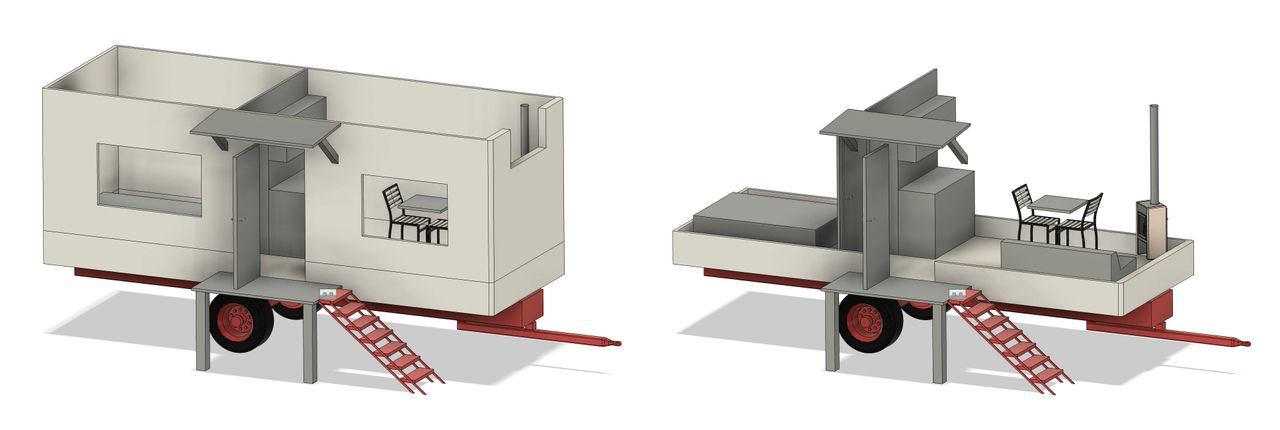
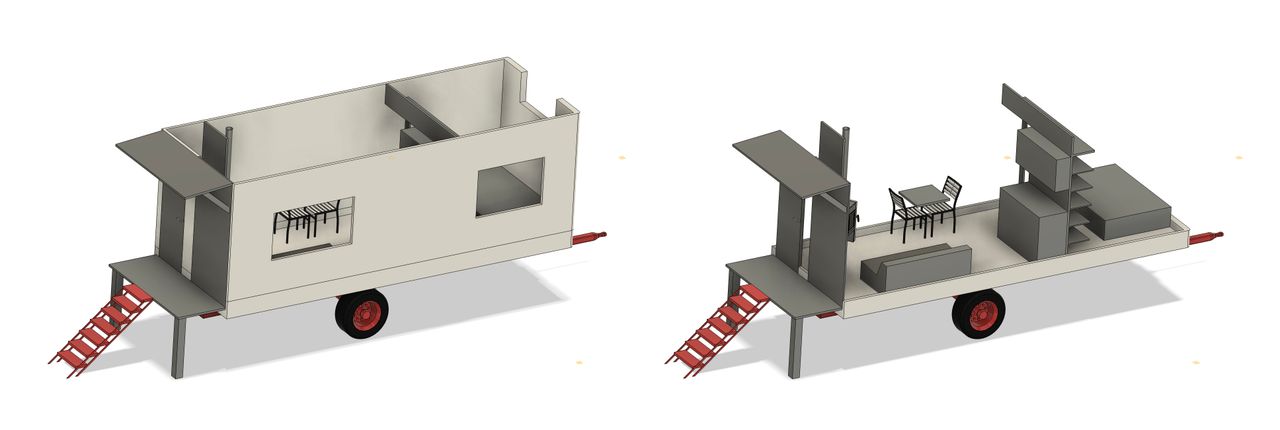
The aim is to create two rooms: A separate bedroom and a living space for two people including space for eating/drinking, storage and a place to relax.
The Fridge Box already has four features that we are trying to utilise in our design.
1: the cutout of the former cooling unit
2: the side door
3: the rear doors
4: the stair in the back
The following three designs were developed and all have their own pros (+) and cons (-).
Design 1:
+ Utilises all 4 features of the fridge box
- Raised bed doesn't feel like a real room of its own
Design 2:
+ Two well-separated rooms
- Canopy and terrace on the side make it harder to move the trailer
Design 3:
+ Canopy and terrace in the rear makes it easy to move
+ A high window in the bedroom (old cooling unit) is useful for hot summer days
- Side door is locked and not used
Design 3 convinced us the most. The next step is to fine-tune the exact layout of the furniture and partition wall as well as the positioning of the windows.
7
Stripping and moisture problems
Published 1y. Edited 1yPublished almost 2 years ago. Last edit almost 2 years ago
Before we can start building the Fridge Box, it must be prepared.
In our case
- Remove bolts and old lamps
- Fill the 4 holes in the floor that were used as drains
On closer inspection of the 4 holes, however, we noticed that the plywood was wet and rotten both on the top and partly on the underside.
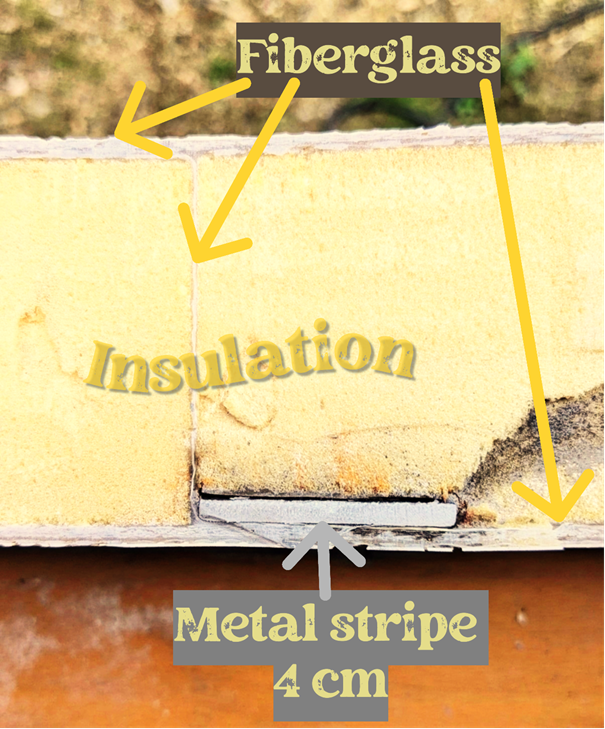
Most floors of Fridge Boxes are constructed in a sandwitch process (see photo). Any water that makes it through the first (normally waterproof) layer of fibreglass remains trapped there forever.
As our floor is slightly curved, the water flows to the two sides and therefore was trapped there.
On top of that, the insulation on the lower part of the front wall is wet as well.
Our solution:
- Remove the fibreglass around the walls and allow the floor to dry
- Saw small holes in the lower parts of the walls to check whether the insulation is wet
If you have any ideas on how to speed up the drying process besides opening all three doors, please write them in the comments.


8
Finding materials
Published 1yPublished almost 2 years ago
Because the trailer is recycled we also want to use as many recycled materials for the construction as possible.
For this reason, we took a day and travelled to one of the largest scrap yards/second hand shops in Portugal.
Here you can find everything from individual screws to entire structures.
What we found:
- Outer door
- Interior door
- Substructure for the terrace
- Wood for the panelling
In addition, we decided to use the old basketball floor already used in the Pig Trailer in this project as well. We obtained this from our local sawmill.
All parts need some love and preparation, but in the end the Fridge Box is a unique composition of recycled materials.


9
Floor, ceiling and partition wall construction
Published 1yPublished almost 2 years ago
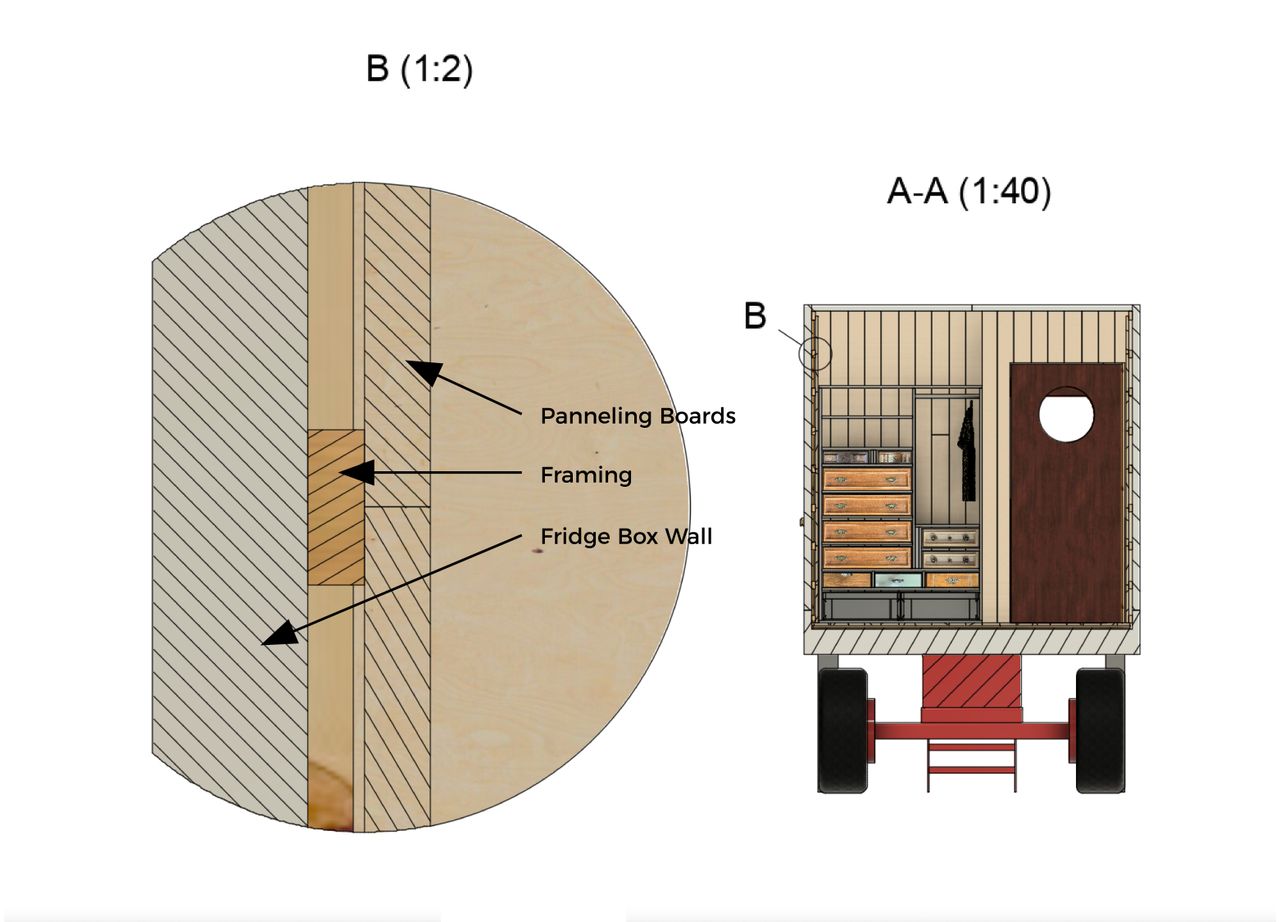
As the Fridge Box is already insulated, the walls, ceiling and floor do not require a thick substructure before the walls are paneled.
The structure therefore consists of a thin 22 mm thick framing material onto which the panels are screwed.
We use recycled basketball flooring for the floor, ceiling and dividing wall.
For the walls, we use the multiplex panels found in the second-hand/scrapyard.
Installing the framing slats is very easy thanks to the Fridge Boxes construction:
- Ceiling: There are already holes in the ceiling with an M8 thread from the old rail system.
- Floor: There is a 28 mm multiplex board under the 5 mm fibreglass layer.
- Walls: There is a metal strip about every 30 cm vertically behind the fibreglass layer. This can also be simply screwed in with self-tapping screws.


10
Making a hole in a fridge box wall
Published 1y. Edited 1yPublished over 1 year ago. Last edit over 1 year ago
In the last update, we see how the paneling was screwed to the fiberglass.
I realize after the self-tapping screw can be screw only on the fiberglass and tight really well the battens so I can avoid every long and hard screwing in the vertical metal stripes.
The next challenge was to cut some pieces of wall for the window.
I first try with the angle grinder, it’s easy to cut with but has lot bad side, create lot of small particles of fiberglass and insulation, hard to cut perpendicular, the machine is really heavy if I want to cut through the wall and cause of the circular blade not cut properly each corners
So I decided to use the jigsaw with a long blade special for sandwiches panel, I need to prepare the cut by cutting the metal stripes with the angles grinder before. (Update 133, timecode 25:10 to 26:10)
/!\Be careful it create lot of sparkle who can put fire in the insulation /!\
I discover later for every metal stripes there is a thin layer of fiberglass who connect each side of the wall.
Which makes it more resistant but also harder to cut a hole properly in one piece.
Then I cut the inside layer of fiberglass and insulation it going to leave a space for the chestnut structure who can be glue against the outside layer of fiberglass and screw in the side to the battens. (Update 133, timecode 28:10 to 29:45)
When all the structure is installed it is possible to screw it the windows frame.
It is almost done, only need to seal with silicone the junction between the fiberglass and the structure.
%20--%3e%3csvg%20version='1.1'%20id='Calque_1'%20xmlns='http://www.w3.org/2000/svg'%20xmlns:xlink='http://www.w3.org/1999/xlink'%20x='0px'%20y='0px'%20viewBox='0%200%2027.2%2027.8'%20style='enable-background:new%200%200%2027.2%2027.8;'%20xml:space='preserve'%3e%3ctitle%3eicon%20redirect%20new%3c/title%3e%3cg%3e%3cpath%20d='M27.2,26.5c-0.1-5-0.3-10-0.4-15c0-0.7-0.6-1.2-1.2-1.2s-1.2,0.6-1.2,1.2c0.1,4.6,0.3,9.1,0.4,13.7%20c-3.9-0.2-7.7-0.6-11.6-0.4c-3.3,0.2-6.7,0.5-10,0.4C2.8,19.5,2.7,13.7,2.5,8c2.9-0.1,5.8-0.8,8.6-0.7c1.6,0.1,1.6-2.4,0-2.5%20C7.8,4.6,4.5,5.7,1.2,5.5c-0.6,0-1,0.3-1.1,0.7C0,6.3,0,6.4,0,6.6c0,0,0,0.1,0,0.1c0,0,0,0,0,0.1c0.2,6.6,0.4,13.2,0.5,19.7%20c0,0.6,0.4,1.3,1.2,1.4c3.8,0.1,7.5-0.2,11.3-0.4c4.4-0.3,8.6,0.2,12.9,0.4c0.6,0,1-0.3,1.1-0.7C27.1,26.9,27.2,26.7,27.2,26.5z'/%3e%3cpath%20d='M12,12.6c-0.2,0.7,0.2,1.4,0.9,1.5c0.7,0.2,1.4-0.2,1.5-0.9v0c0.6-2.2,1.4-4.5,3.1-6c1.3-1.2,3-1.9,4.7-2.7%20c-0.4,1.3-0.8,2.6-1.4,3.8c-0.6,1.5,1.8,2.1,2.4,0.7c0.8-1.9,1.5-3.9,2-5.9c0-0.1,0-0.2,0-0.3c0.3-0.6,0.1-1.5-0.7-1.8%20C22.3,0.4,20,0,17.7,0c-0.7,0-1.2,0.6-1.2,1.2s0.6,1.2,1.2,1.2c0.9,0,1.7,0.1,2.6,0.2c-1.7,0.8-3.4,1.7-4.8,3%20C13.6,7.6,12.7,10.1,12,12.6z'/%3e%3c/g%3e%3c/svg%3e)
11
Making a proper window frame with minimum of tools
Published 1y. Edited 10moPublished over 1 year ago. Last edit 10 months ago
When the holes were open, it was time to build three window frames fitting with reclaimed windows.
After examining the windows, which come from the same batch, I realized the profile were the same, only the measurement of the glass changes. (Timecode 0:46)
There are two main ways to make a windows frame. The first is with a big router under a table and specific router bit, the other way is with a thickness planer to make laminated wood and glue them together in a way to copy the profile.
I decided to use the planer technic, because this tool is much less specific than the router and going to be much more useful for all the coming projects, especially for reusing old wood!
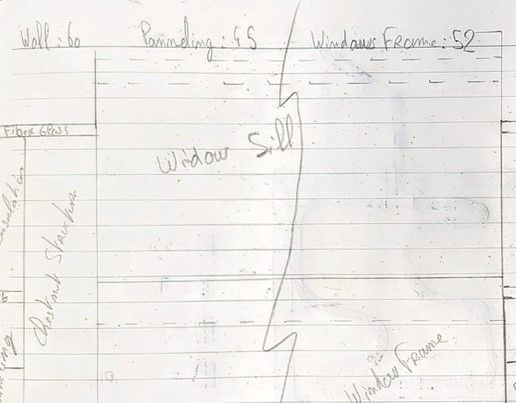
For preparing this project I needed to make some detailed plan (you can find it below) because of the complexity of the drawings and need for precision. For this I used Fusion 360 and used the parameter variable feature, so that this plan can be easily modifiable for future window frames (we have a big batch of the same kind of windows!)
Now that I know how much wood I need, we went to the sawmill and chose to use chestnut because it’s a wood that copes well outside, is resistant to the bugs and it’s grown locally (also because they have a lot at the sawmill of every thickness).
Next came the classic woodwork, which is:
1. Sort wood to avoid knots and cracks
2. Cut the raw board in width and length (+3cm)
3. Plane them at the right precise thickness
4. Cut one edge with the saw, to make it perpendicular or with 45° angle
5. Hand plane this edge (hardly doable with the planer)
6. Cut the in between piece of wood to the right length
7. Put all the pieces from one side in the right position
8. Drill through all these pieces to put dowels and avoid any movement during gluing (Timecode 5:27)
9. Glue (polyurethane D4) the pieces together
10. Repeat step 4 to 9 for each side of the frame (4 times in total)
11. Make a 4mm groove for the seal on each side with a template and the track saw (Timecode 6:36)
12. Glue each side together (be careful with keeping the frame square)
13. Cut the raw outside edge at the dimension of the hole
14. Carve to fit the hinges
15. Sanding
16. Finishing (Bondex), 2 or 3 layers with a smooth sanding between
17. Install the hinges and adjust the window to the frame
18. Screw the frame to the structure previously installed on the hole
19. Put the rubber seal in the groove
That’s it, the window frame is finally installed, now you just need to seal the frame with silicone to the structure.
12
Making a fixed window from double glazed sheets
Published 1y. Edited 10moPublished over 1 year ago. Last edit 10 months ago
Compared to the last update, this one is going to show you how I made a long fix window from scratch. I make it much easier, quick and fun to do! (Timecode 21:39 to 27:54)
1. Just take the measurement of the double glass sheet
2. Design the window (I add 1mm gap between the frame and the glass sheet because I used a 2mm thick compression seal)
3. During the design consider the water drainage and make sure no drops are going to go inside or stay stuck somewhere, that
is why I did all this 45° edge, it’s look nice and make the window ready to fight the rain drops (you can find bellow the detailed plan)
4. Take a coffee (optional)
5. Make the frame (same steps than the previous update) and glue it (take care of keeping the right space for fitting the glass sheet)
6. I used the offcut of the 45° edge to make the glazing bead
7. Sanding + finishing
8. Install the frame with glue and seal it to the fiber glass with silicone
9. Clean the double glass sheets (optional but better to do)
10. Put the sheets in the frame
11. Fix them with the glazing bead nailed to the frame (it is going to apply pressure to the compression seal)
The fridge is completely close now and this fix window allows plenty of light to enter while giving an original and stylish look!
13
Restoring the roof
Published 7moPublished 7 months ago
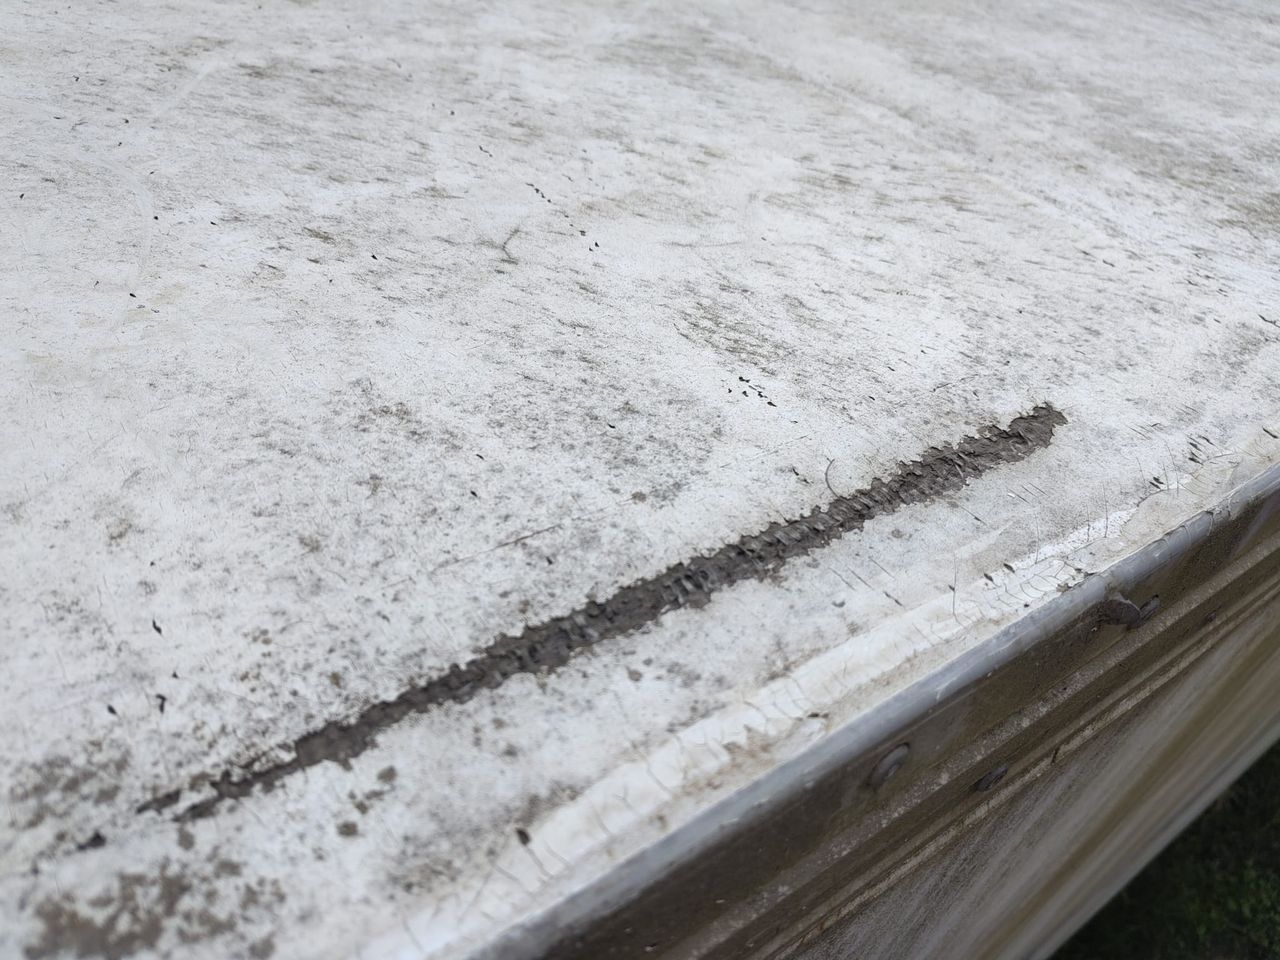
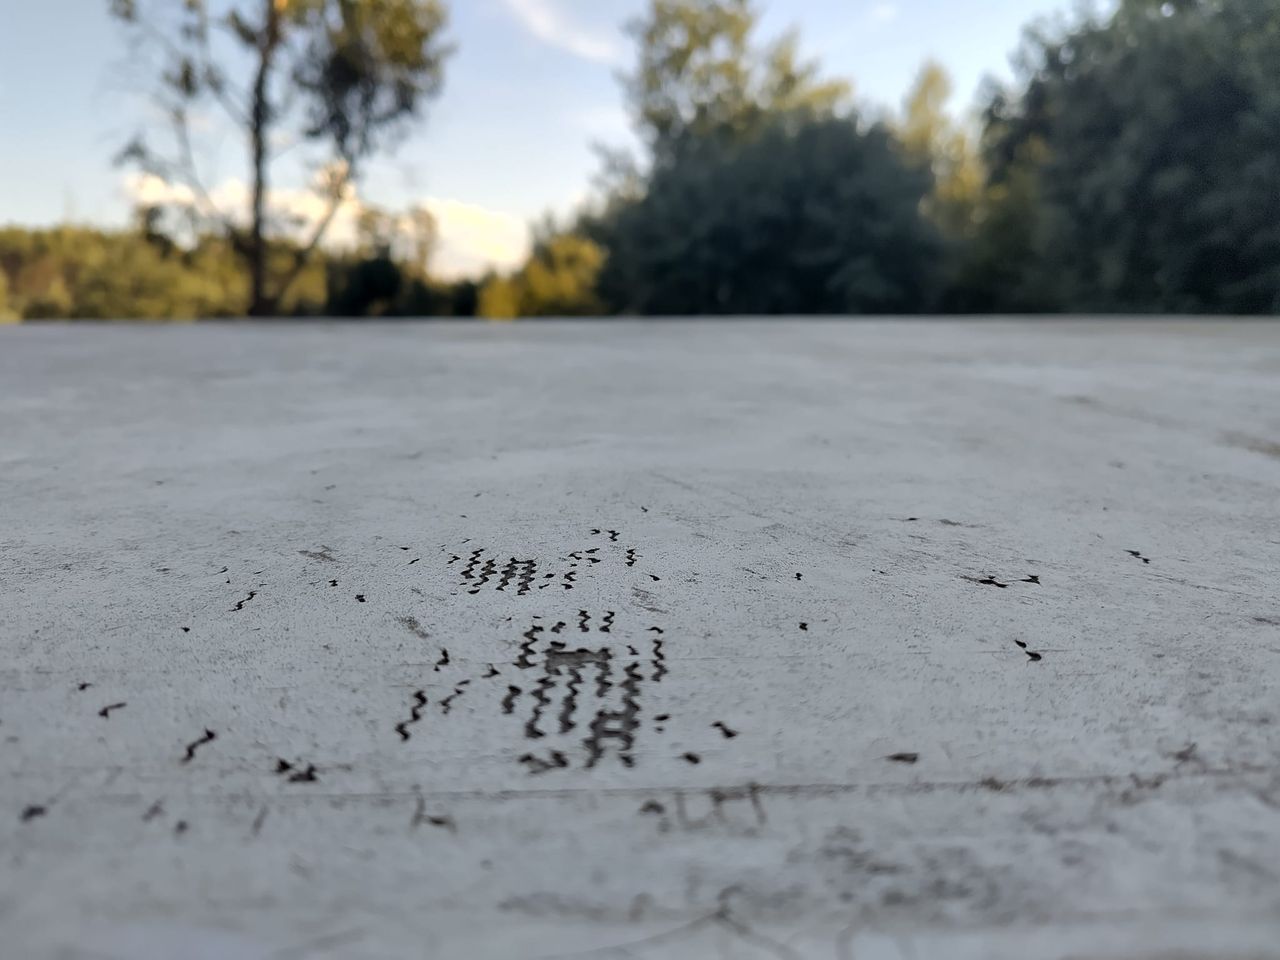
The box has several layers as we have seen before like PU insulation, fiber glass and a last layer of paint and other components that makes it waterproof. This last layer is specially important in the roof since the fridge box stands balance and the roof is flat, water tends to acumulate on it. This can easily lead to future water leakages and rotening of the roof as soon as the water starts to penetrate the fiberglass and the next layers. In the photos can be appreciated how this last layer starts to wear out leaving the fiberglass exposed.
We have decided to give it a good clean with a pressure washer before painting, after almost 2 years of the last clean up in the scrapyard it was already very very dirty.
Next we let it dry for a day in the sun
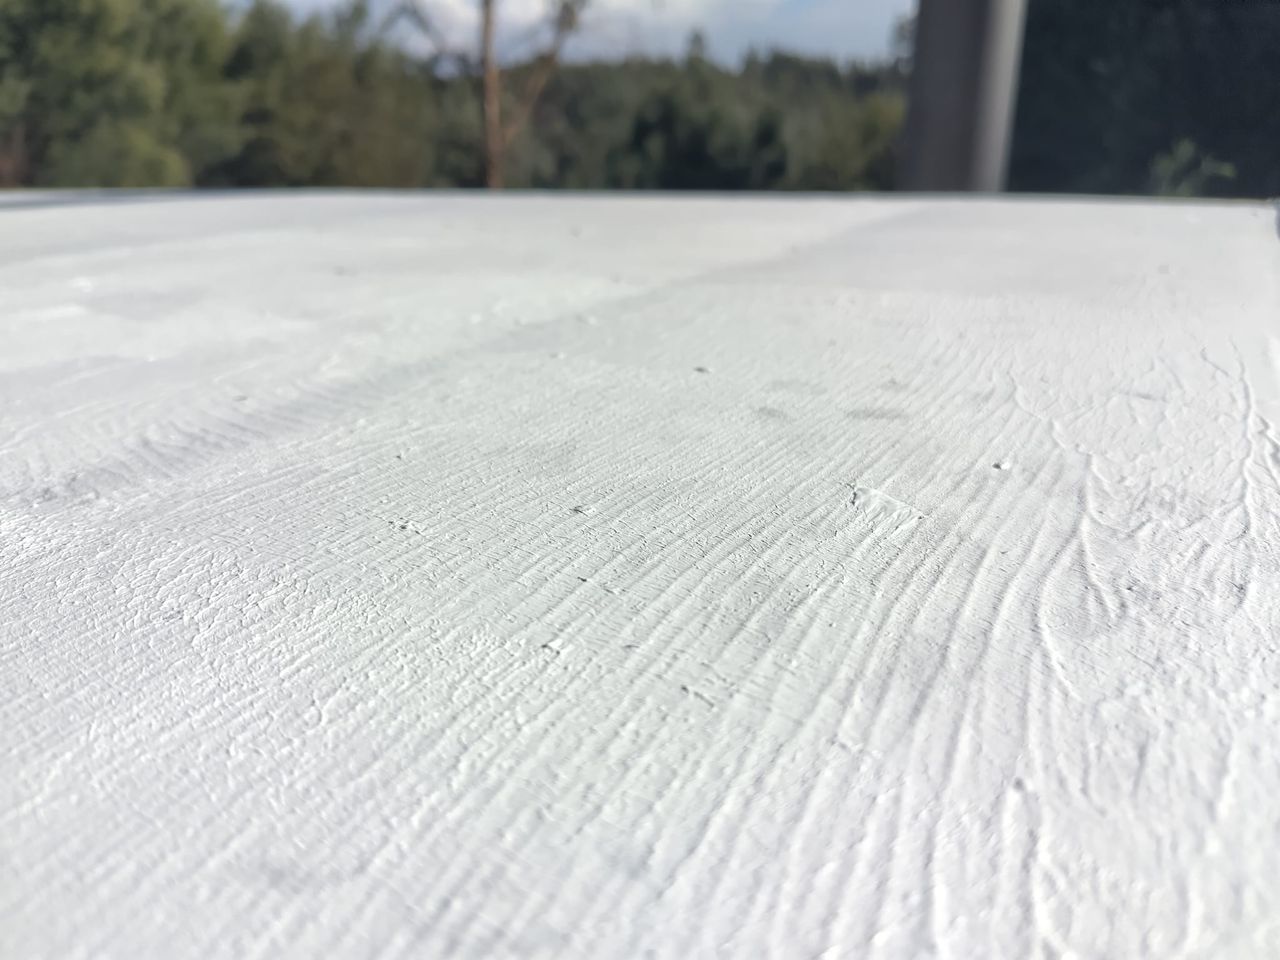
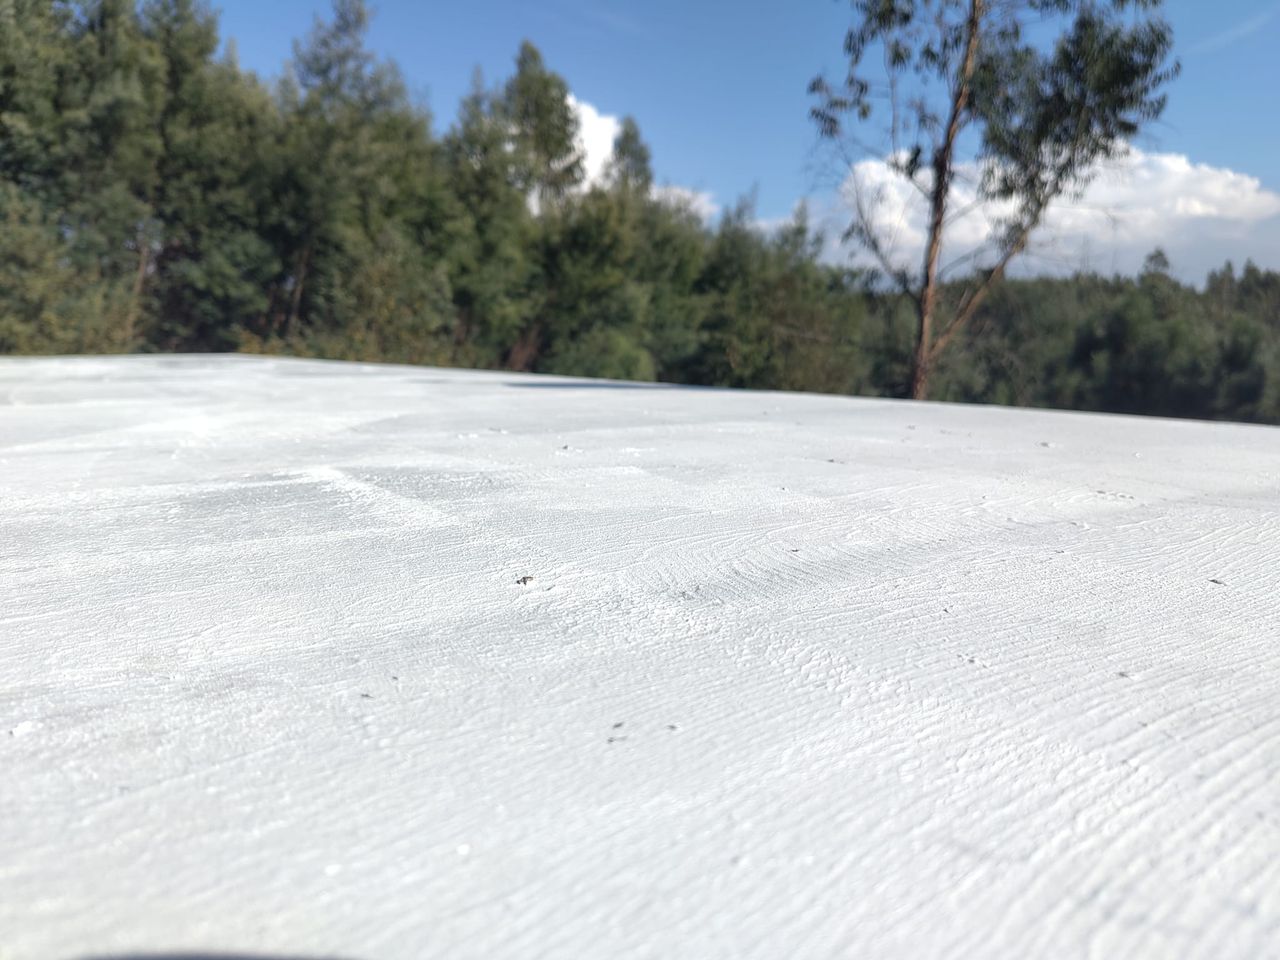
After we paint it. We have gone for a rubber waterproof wait paint. This paints is slightly elastic and made to waterproof rooftop terraces. The elasticity helps in such a structure that still moves every now and then. We applied to coats of this paint, one in each direction to maximize the waterproof qualities of the product.

%20--%3e%3csvg%20version='1.1'%20id='Layer_1'%20xmlns='http://www.w3.org/2000/svg'%20xmlns:xlink='http://www.w3.org/1999/xlink'%20x='0px'%20y='0px'%20viewBox='0%200%2064%2063'%20style='enable-background:new%200%200%2064%2063;'%20xml:space='preserve'%3e%3cstyle%20type='text/css'%3e%20.st0{fill:%2320B7EB;}%20.st1{fill:%23E9475A;}%20.st2{fill:%23FECE4E;}%20%3c/style%3e%3cdesc%3eCreated%20with%20Sketch.%3c/desc%3e%3cg%20id='Page-1'%3e%3cg%20id='OA-Logo-Black-Background'%3e%3cpath%20id='Shape'%20class='st0'%20d='M14.1,30.1c-1.5-0.8-8.6-3.8-14.1-7.8c1.8-3.4,3.1-5.6,5-9.1c2.7,1.1,1.9,0.5,4.6,1.7%20c0.8,0.4,10.1,4.5,13.8,6.2c2.4,1.1,4.7,2.2,7,3.3L43,30.5l8.1,3.9c4,2,7.2,3.5,11.3,5.5c0.5,0.3-3.7,9.4-3.7,9.4%20c-1.7-0.6-3.9-1.8-5.5-2.5c-4.7-2.1-9-3.9-13.7-6c-4-1.8-6.7-2.9-10.8-4.5C25,34.9,17.1,31.6,14.1,30.1z'/%3e%3cpath%20id='Shape_1_'%20class='st1'%20d='M12.1,54.9c-0.8,0.6-1.6,1.2-2.5,1.6c-0.4-0.5-0.9-1-1.3-1.5c-0.3-1.2-2.3-4.9-2.7-6.2%20c-0.1-0.4-0.7-2.2-0.8-2.6c0,0,5-3.4,8.2-5.9c3.2-2.6,6.2-5,9.3-7.5c1.4-1.1,3.9-2.5,5.3-3.5c2.5-1.7,13-9.1,15.6-10.5%20c5.4-3.3,11.1-6.3,16.8-9c1.7,3.5,1.8,3,3.8,6.9c0,0-17.8,13.5-22.7,17.1c-3.8,2.8-7.5,5.7-11.3,8.5c-1.7,1.3-3.5,2.4-5.2,3.7'/%3e%3cpath%20id='Shape_2_'%20class='st2'%20d='M20.8,2.9l-0.2-0.8C25,0,31.2-0.3,31.4,0.2c0.4,1.1,0.9,2.2,1.2,3.4c1.4,4.4,2.7,8.7,4,13.1%20c0.4,1.4,2.8,10,2.9,10.5c0.5,2.8,1.2,5.6,1.6,8.4c0.8,4.7,1.4,8.6,2.3,13.3c0.6,3.1,1.3,6.3,2.3,11.3c0,0-5.8,1.4-7.5,1.8%20c-0.8,0.2-1.5,0.4-2.4,0.6c-0.3-1.1-0.2-1.2-0.5-2.1c-0.9-3.7-1.8-7.3-2.6-11c-1.5-6.4-3-12.9-4.4-19.3%20c-1.2-5.4-2.6-10.7-4.4-15.9c-1-3.1-1.8-6.3-2.7-9.5C21.1,3.8,21,3.8,20.8,2.9z'/%3e%3c/g%3e%3c/g%3e%3c/svg%3e)