

Our offgrid solar setup for Basekamp
Started 2y. Edited 9moStarted almost 3 years ago. Last edit 10 months ago
Construction
In Progress
ElectronicsBuilding
More Information


%20--%3e%3csvg%20version='1.1'%20id='Layer_1'%20xmlns='http://www.w3.org/2000/svg'%20xmlns:xlink='http://www.w3.org/1999/xlink'%20x='0px'%20y='0px'%20viewBox='0%200%2064%2063'%20style='enable-background:new%200%200%2064%2063;'%20xml:space='preserve'%3e%3cstyle%20type='text/css'%3e%20.st0{fill:%23231F20;}%20%3c/style%3e%3cdesc%3eCreated%20with%20Sketch.%3c/desc%3e%3cg%20id='Page-1'%3e%3cg%20id='OA-Logo-Black-Background'%3e%3cpath%20id='Shape'%20class='st0'%20d='M14.1,30.1c-1.5-0.8-8.6-3.8-14.1-7.8c1.8-3.4,3.1-5.6,5-9.1c2.7,1.1,1.9,0.5,4.6,1.7%20c0.8,0.4,10.1,4.5,13.8,6.2c2.4,1.1,4.7,2.2,7,3.3L43,30.5l8.1,3.9c4,2,7.2,3.5,11.3,5.5c0.5,0.3-3.7,9.4-3.7,9.4%20c-1.7-0.6-3.9-1.8-5.5-2.5c-4.7-2.1-9-3.9-13.7-6c-4-1.8-6.7-2.9-10.8-4.5C25,34.9,17.1,31.6,14.1,30.1z'/%3e%3cpath%20id='Shape_1_'%20class='st0'%20d='M12.1,54.9c-0.8,0.6-1.6,1.2-2.5,1.6c-0.4-0.5-0.9-1-1.3-1.5c-0.3-1.2-2.3-4.9-2.7-6.2%20c-0.1-0.4-0.7-2.2-0.8-2.6c0,0,5-3.4,8.2-5.9c3.2-2.6,6.2-5,9.3-7.5c1.4-1.1,3.9-2.5,5.3-3.5c2.5-1.7,13-9.1,15.6-10.5%20c5.4-3.3,11.1-6.3,16.8-9c1.7,3.5,1.8,3,3.8,6.9c0,0-17.8,13.5-22.7,17.1c-3.8,2.8-7.5,5.7-11.3,8.5c-1.7,1.3-3.5,2.4-5.2,3.7'/%3e%3cpath%20id='Shape_2_'%20class='st0'%20d='M20.8,2.9l-0.2-0.8C25,0,31.2-0.3,31.4,0.2c0.4,1.1,0.9,2.2,1.2,3.4c1.4,4.4,2.7,8.7,4,13.1%20c0.4,1.4,2.8,10,2.9,10.5c0.5,2.8,1.2,5.6,1.6,8.4c0.8,4.7,1.4,8.6,2.3,13.3c0.6,3.1,1.3,6.3,2.3,11.3c0,0-5.8,1.4-7.5,1.8%20c-0.8,0.2-1.5,0.4-2.4,0.6c-0.3-1.1-0.2-1.2-0.5-2.1c-0.9-3.7-1.8-7.3-2.6-11c-1.5-6.4-3-12.9-4.4-19.3%20c-1.2-5.4-2.6-10.7-4.4-15.9c-1-3.1-1.8-6.3-2.7-9.5C21.1,3.8,21,3.8,20.8,2.9z'/%3e%3c/g%3e%3c/g%3e%3c/svg%3e)


1
Why off grid solar and not on the grid?
Published 2yPublished almost 3 years ago
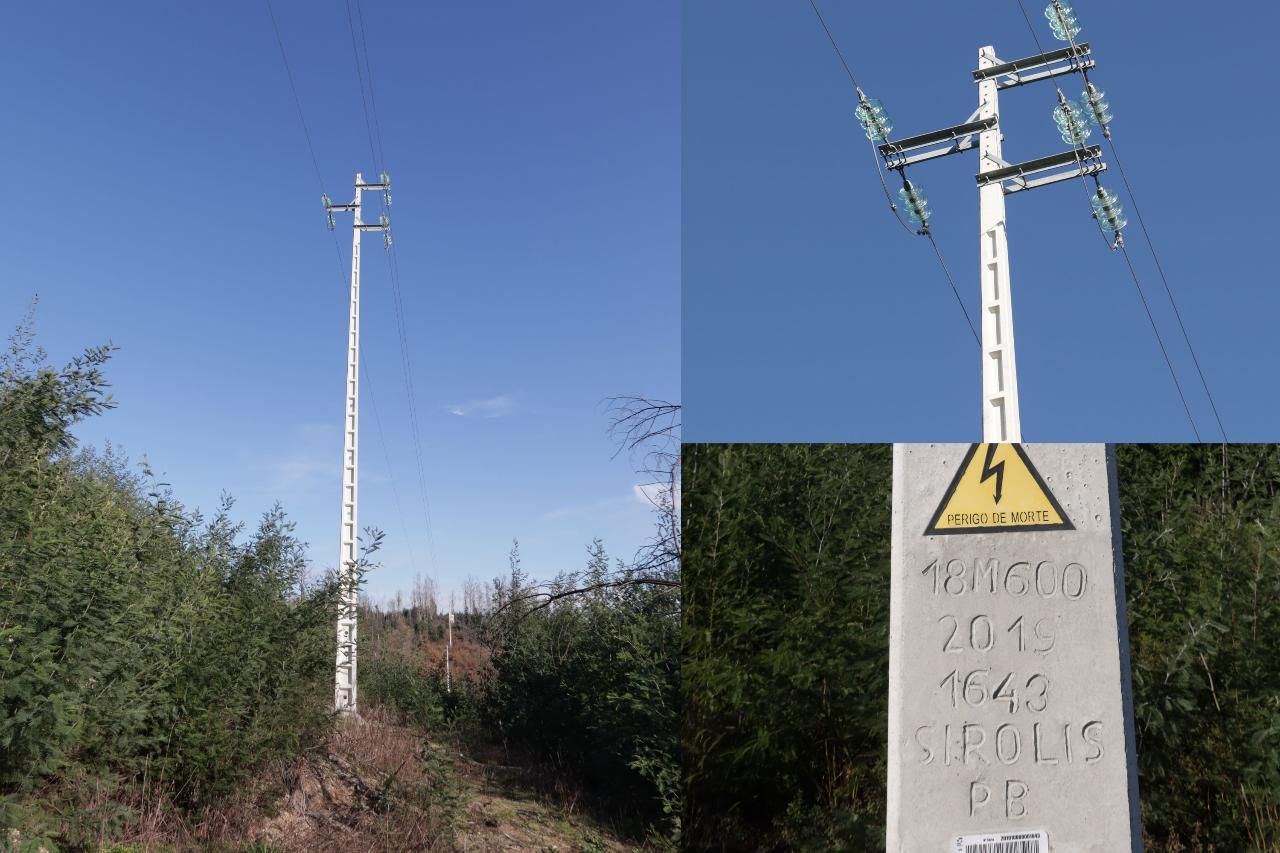
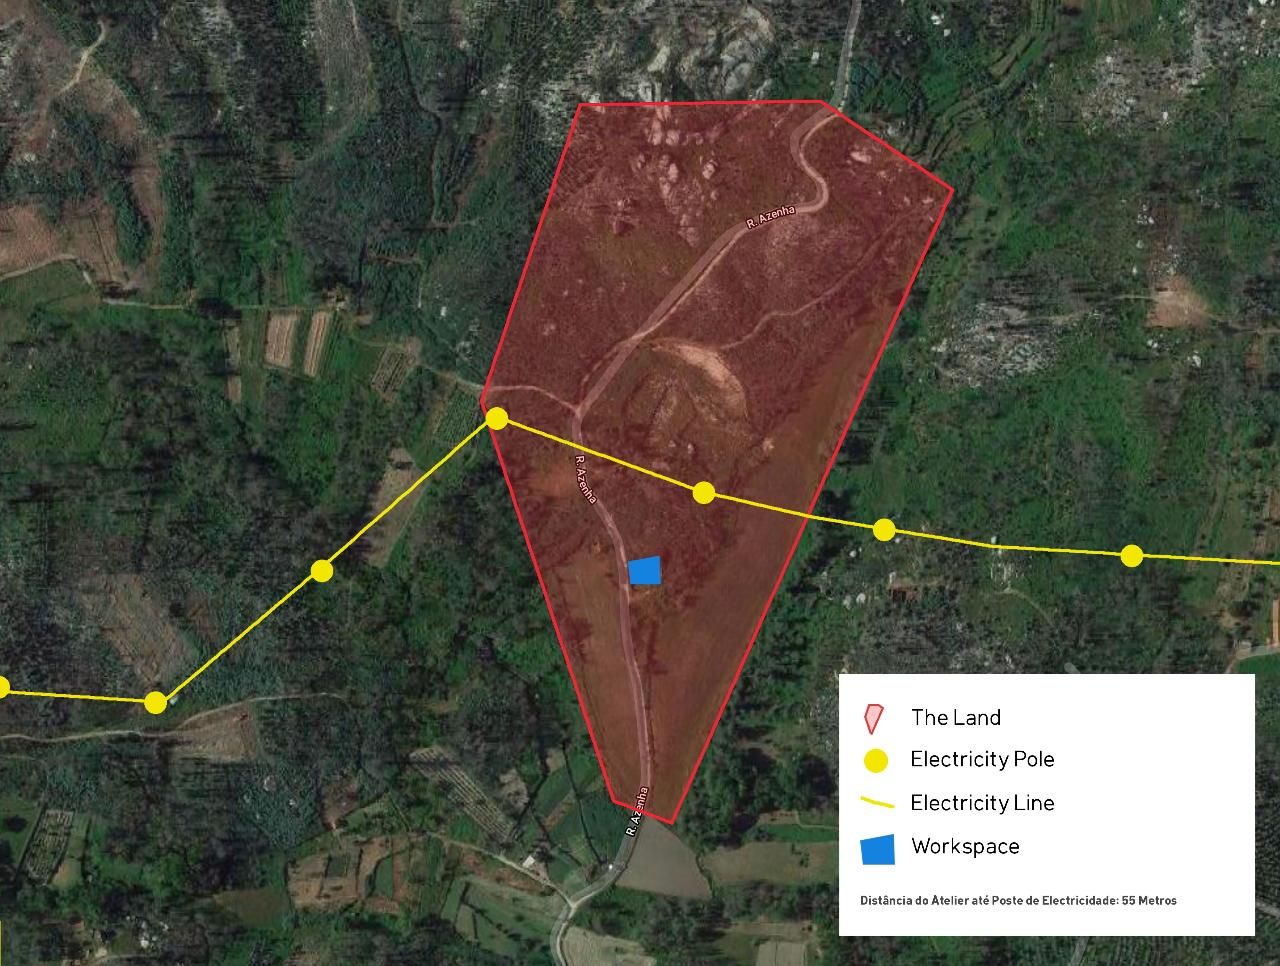
When we were looking for the land we actually wanted a land that is close to the grid, because it would allow us to use our large machines in the future that run on 380V and we could give back surplus energy if we’d ever had a solar setup. The land has a few powerlines (image below) going straight over it. So it seemed possible to connect to the grid. But after buying and further exploring we realised it would require an alternator to convert those high voltage lines into usable current for us. This would involve a clear project plan, around €15K for the alternator, a licensed electrician + min six month waiting. A heavy investment in time and money. We decided to skip it and go straight for solar.
2
The first plan
Published 2yPublished almost 3 years ago
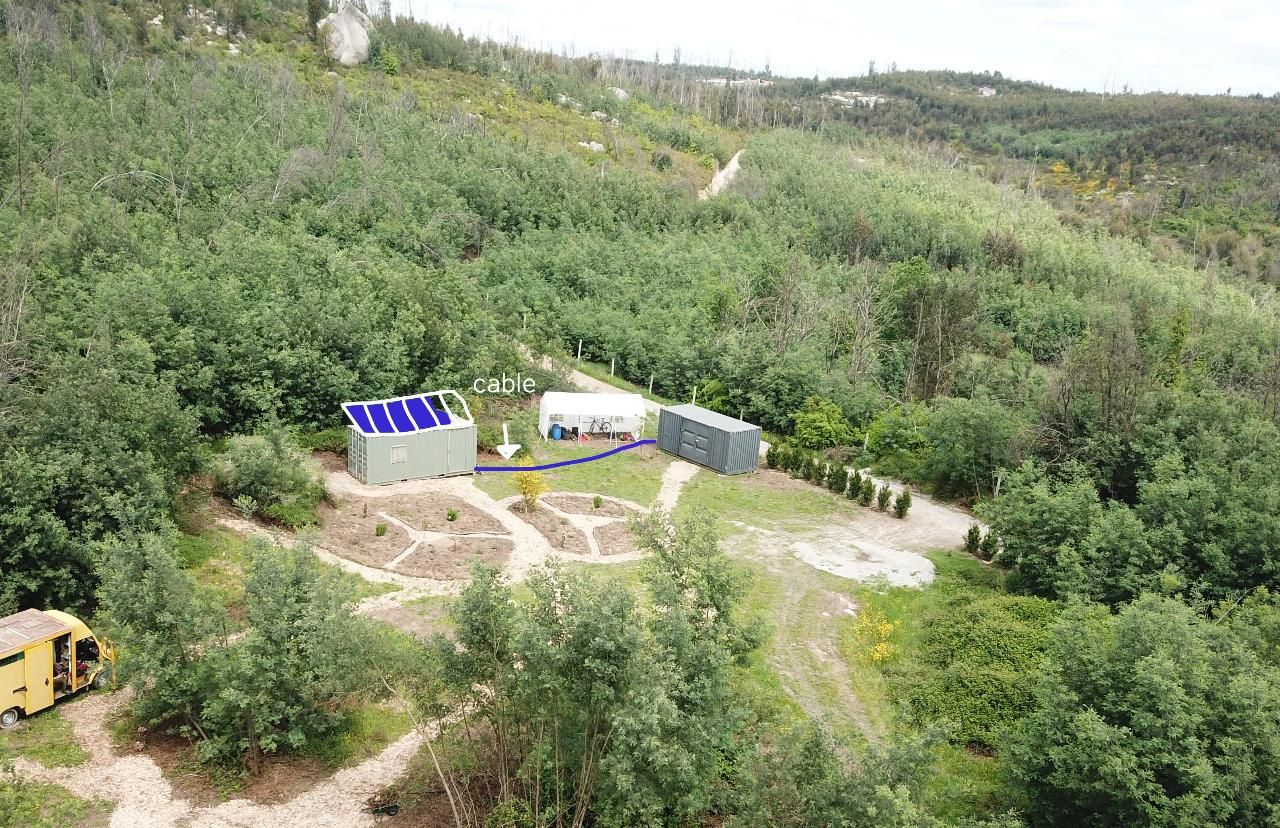
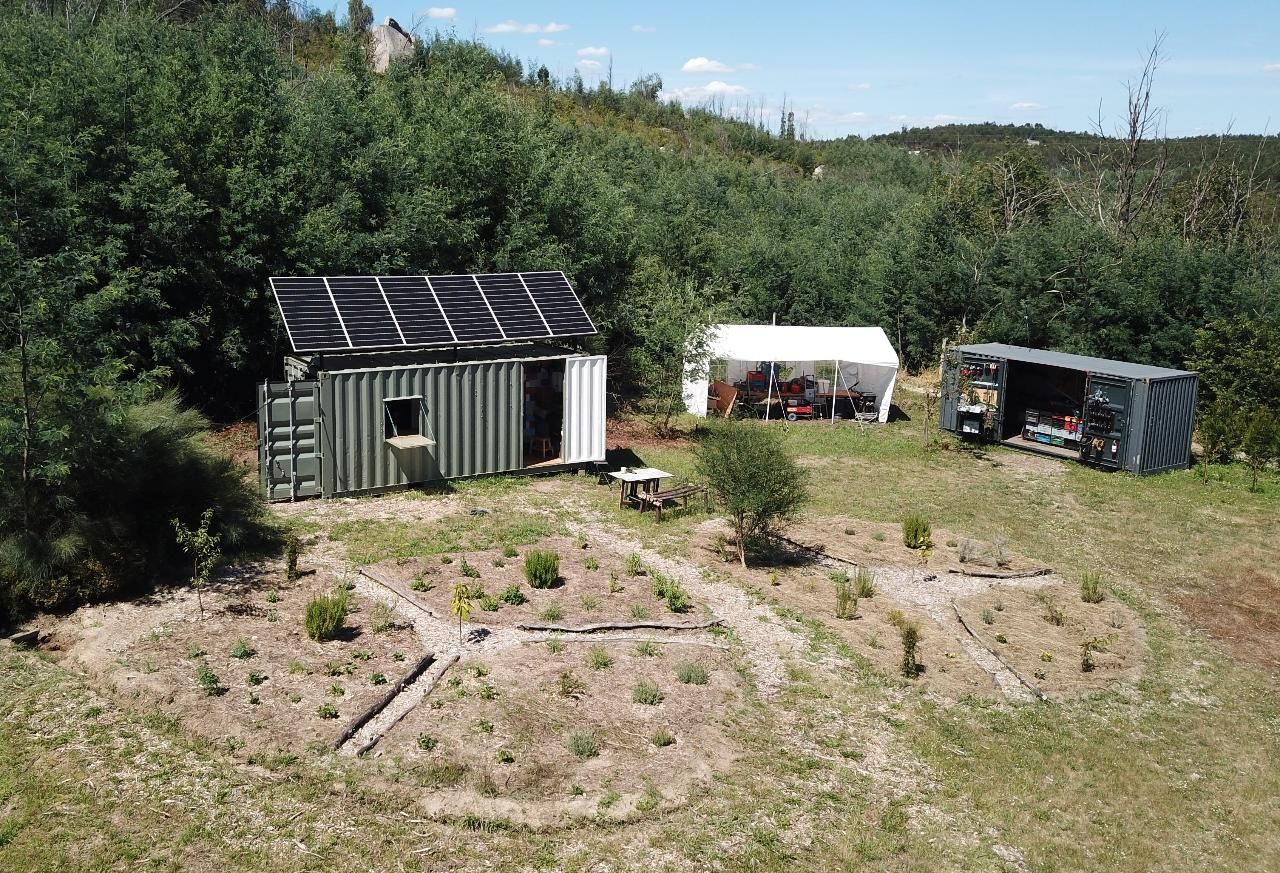
When we arrived we had two shipping containers with electrical equipment but no electricity. The goal was to setup an offgrid solar system that will make sure we can run all devices and appliances. But we knew we wouldn't stay in this place with just two people, which made it quite hard to anticipate the size we needed and understand how much it would grow and needed to scale. Plus we had zero experience of what our usage would be living offgrid, including things we didn't use back home like a water pump. So aimed for a system that could host 15 people with the option to double our battery pack in case we need to upgrade it. 6 panels on the roof with a 10.5 KW battery pack

3
Design and Materials to make it
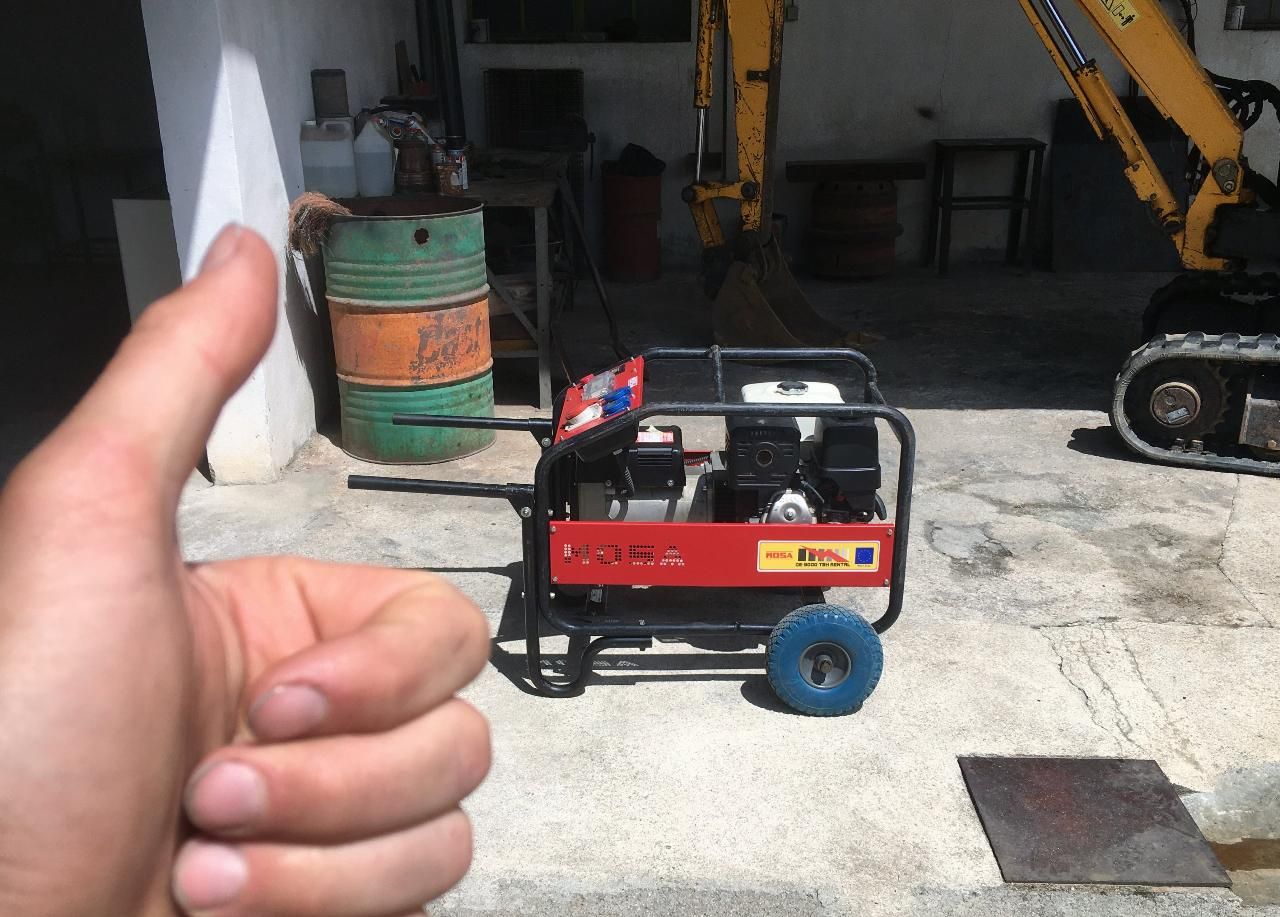
Published 2yPublished almost 3 years ago
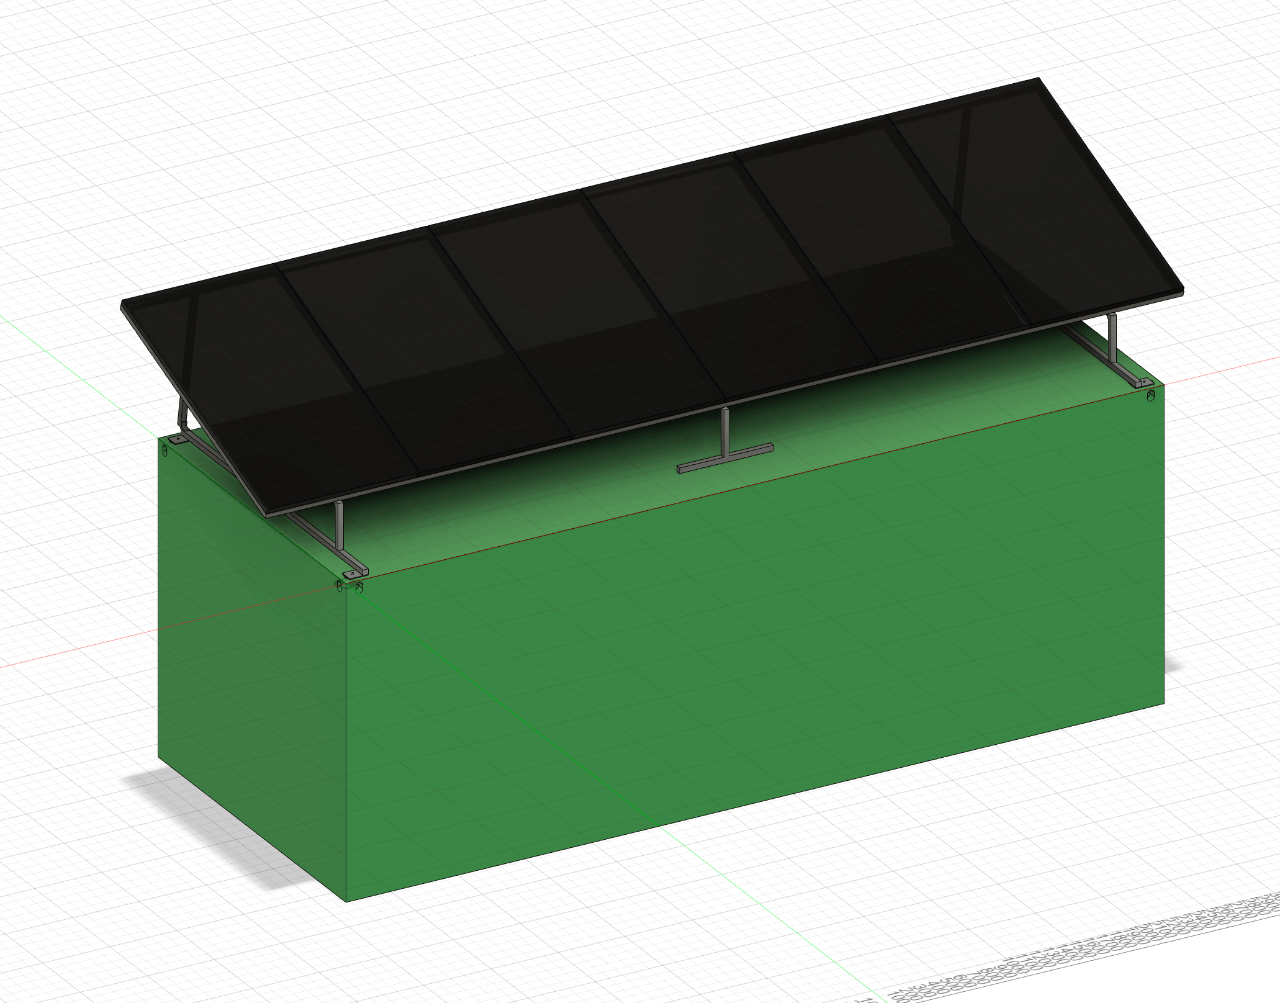
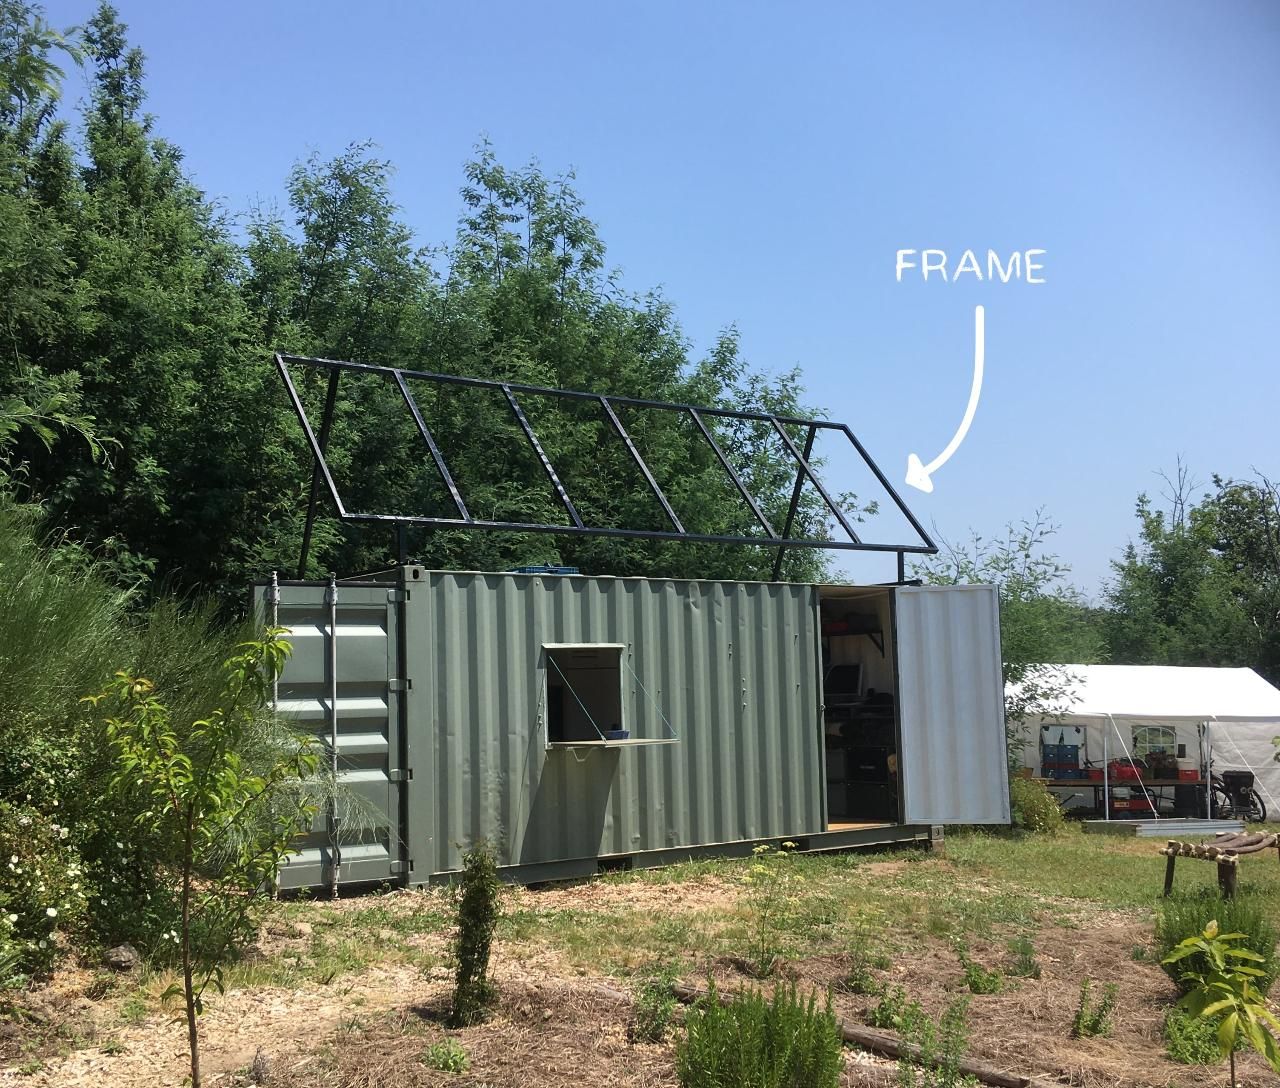
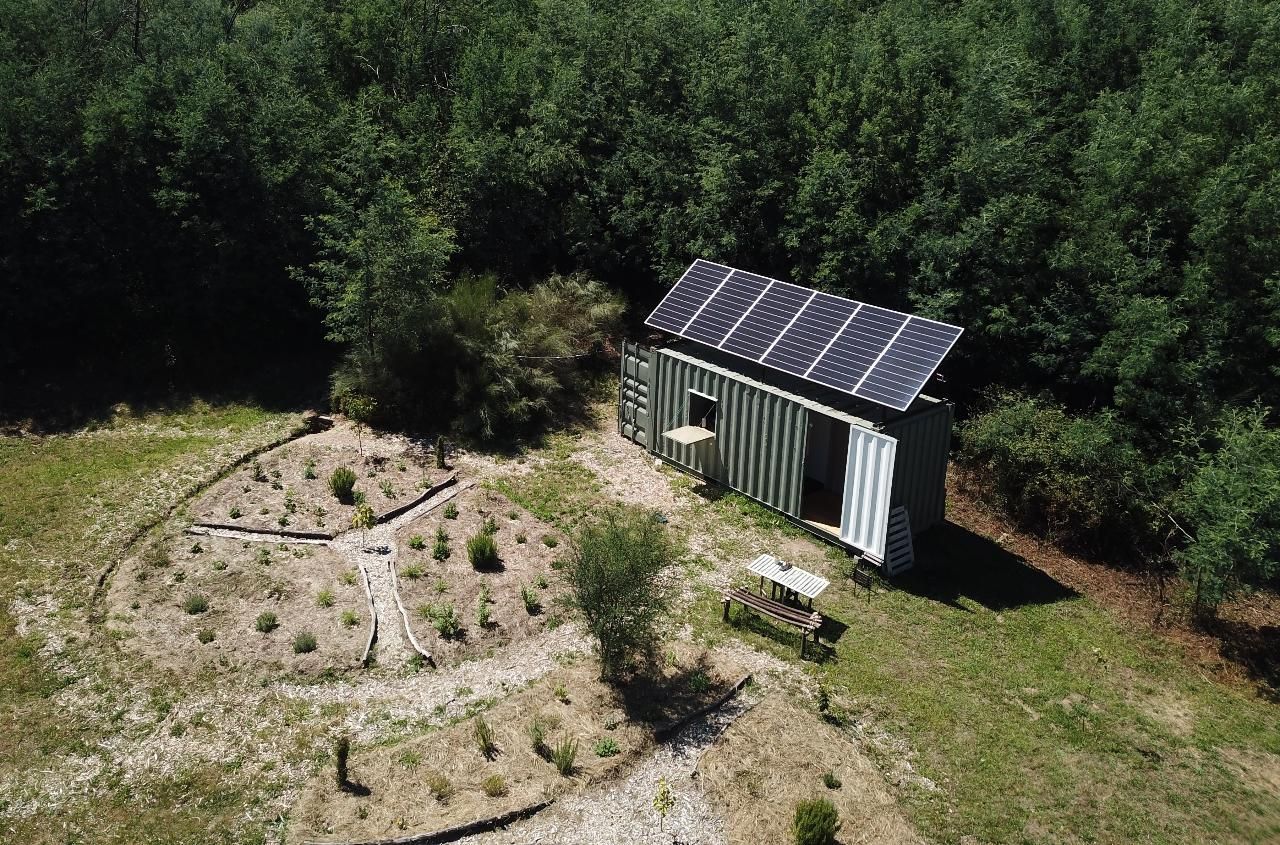
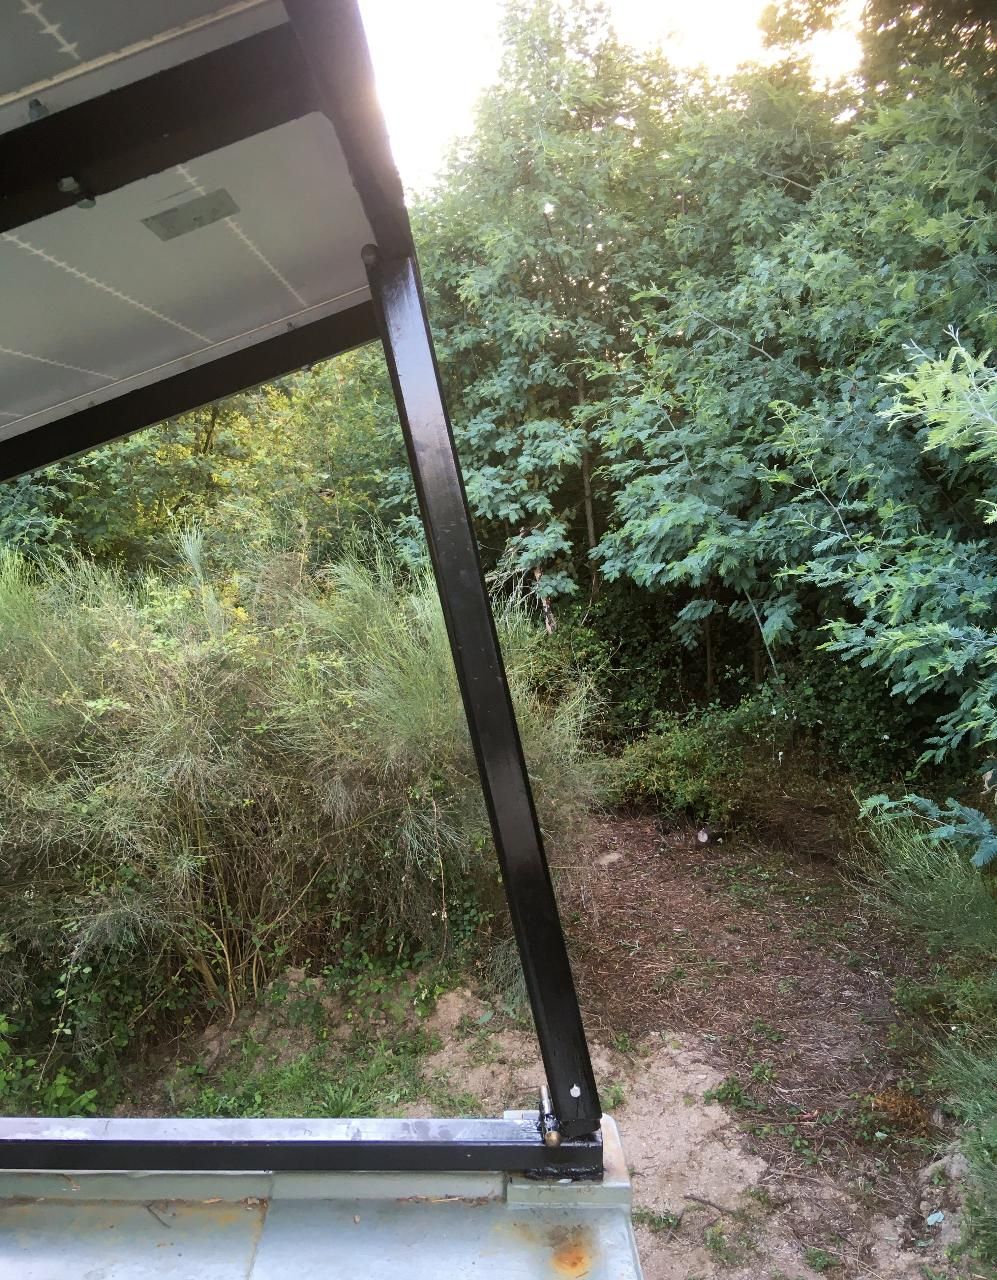
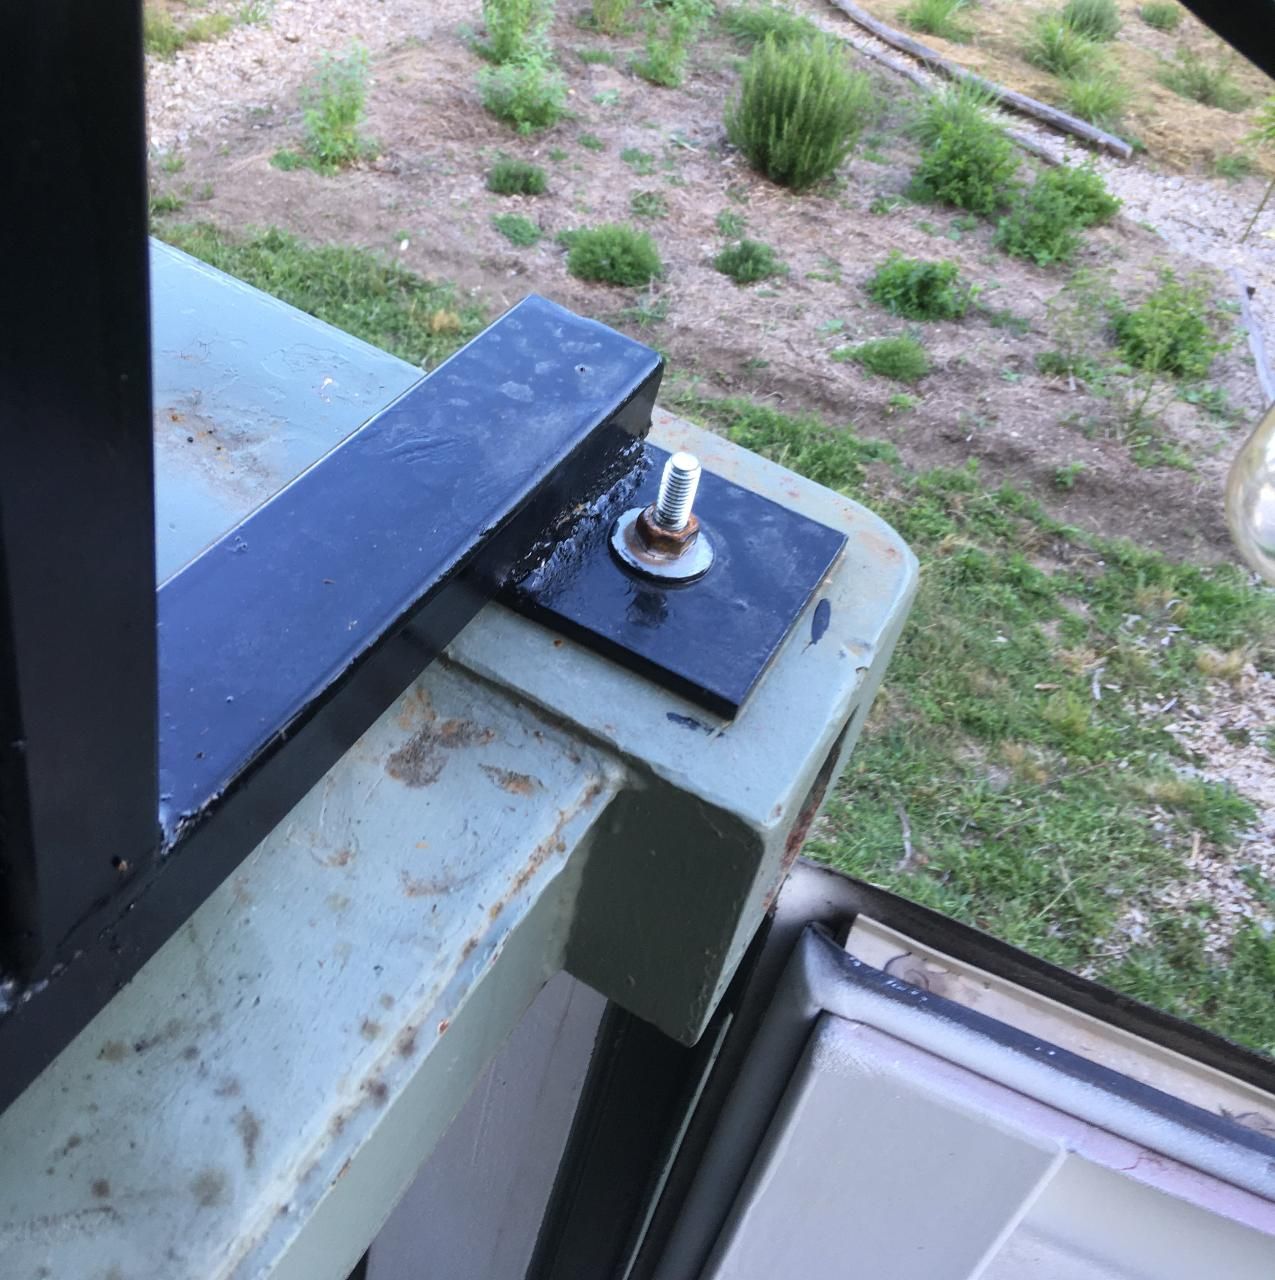
We had limited dry space available since all we had was 2 stuffed shipping containers. So to install all the components and batteries we had to make an external box on the outside. We build an adjustable metal frame on top to hold the panels. In this way we could change the angle a few degrees for the winter and summer time. (upsight of writing retroactive is that I can give you feedback: We never used the option to turn the panels and always left it in its original position). And finally we had to buy a generator to make sure we have the tools to build it, main reason was to power a stick welder from the neighbour.
4
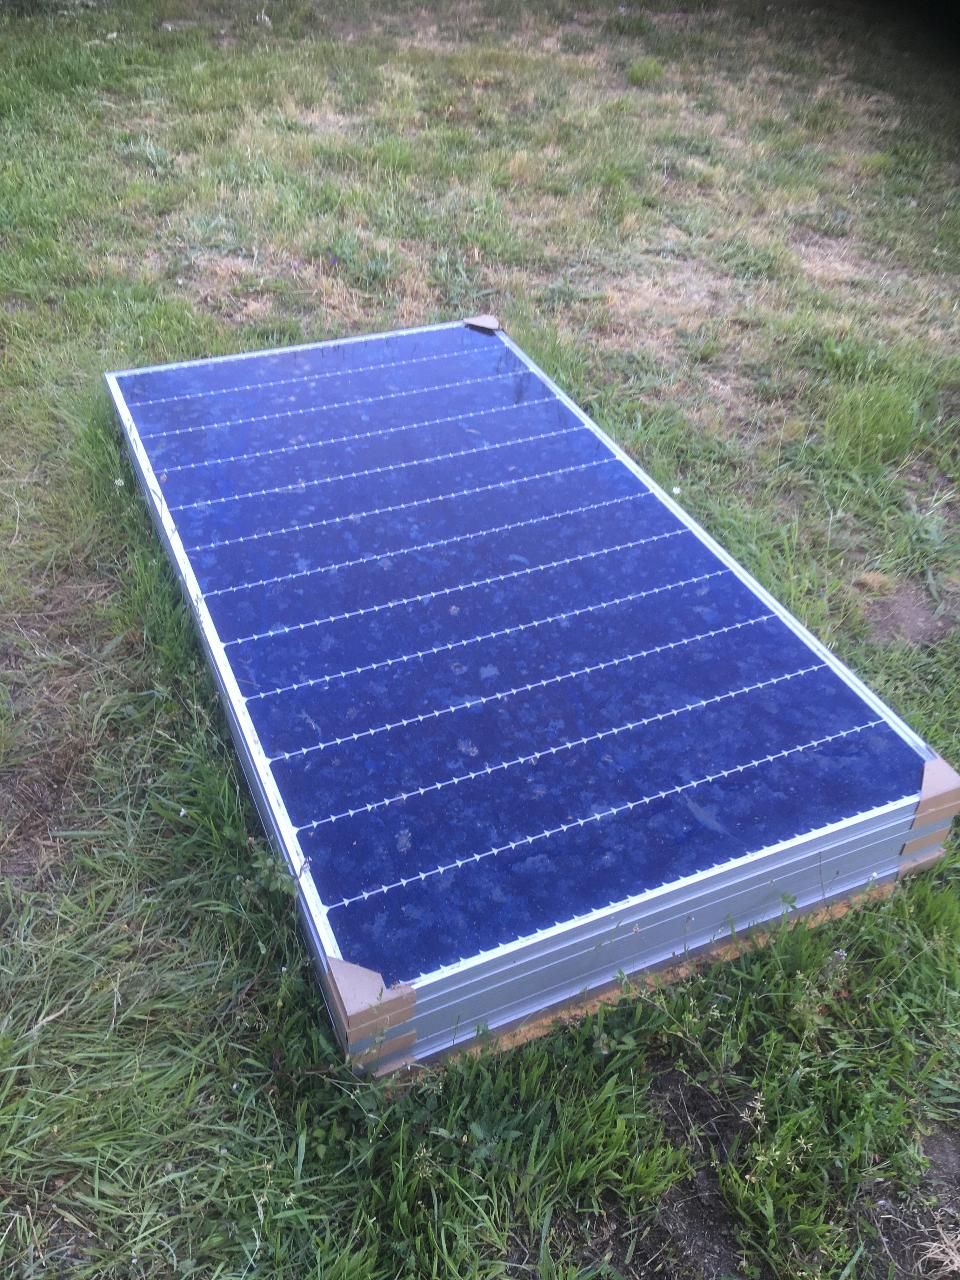
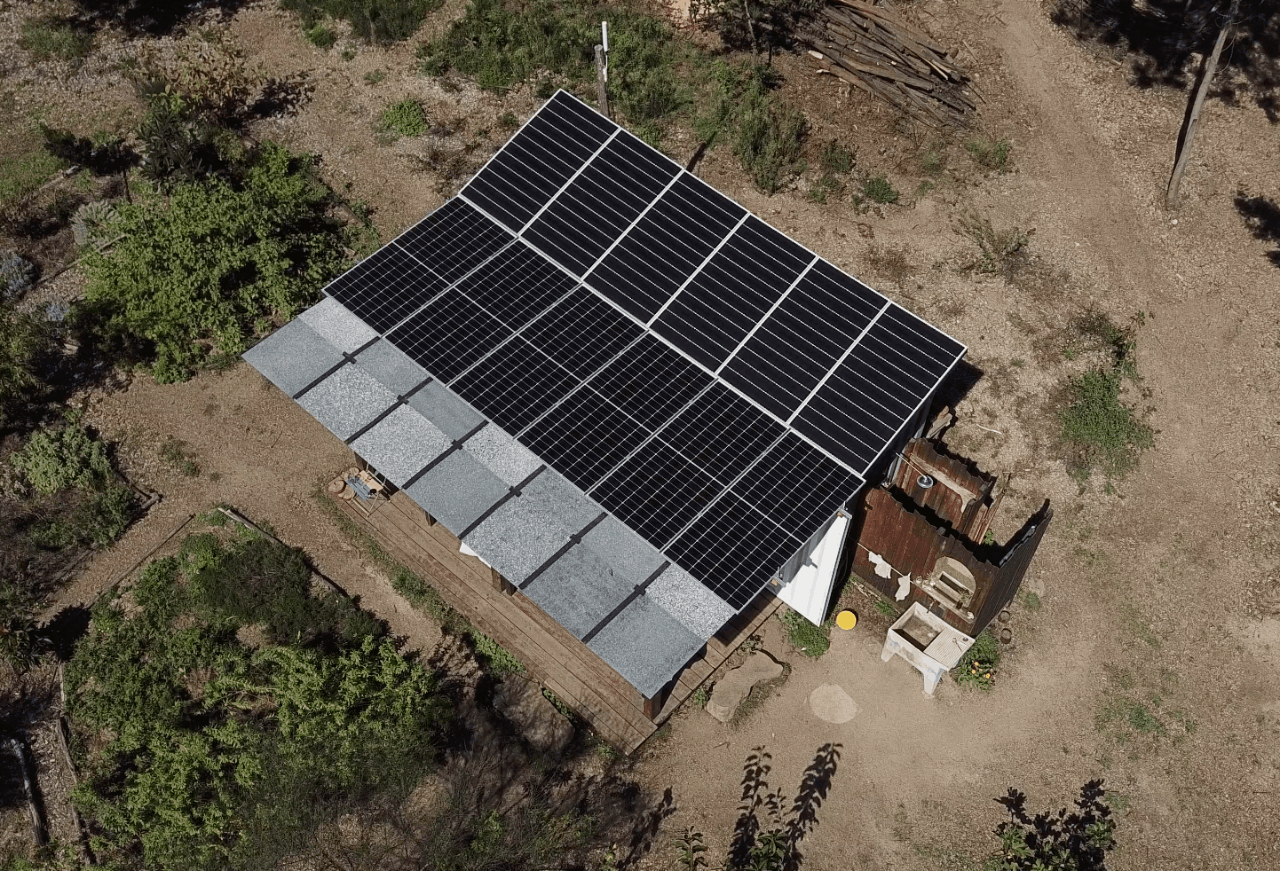
Installing the panels
Published 2yPublished almost 3 years ago
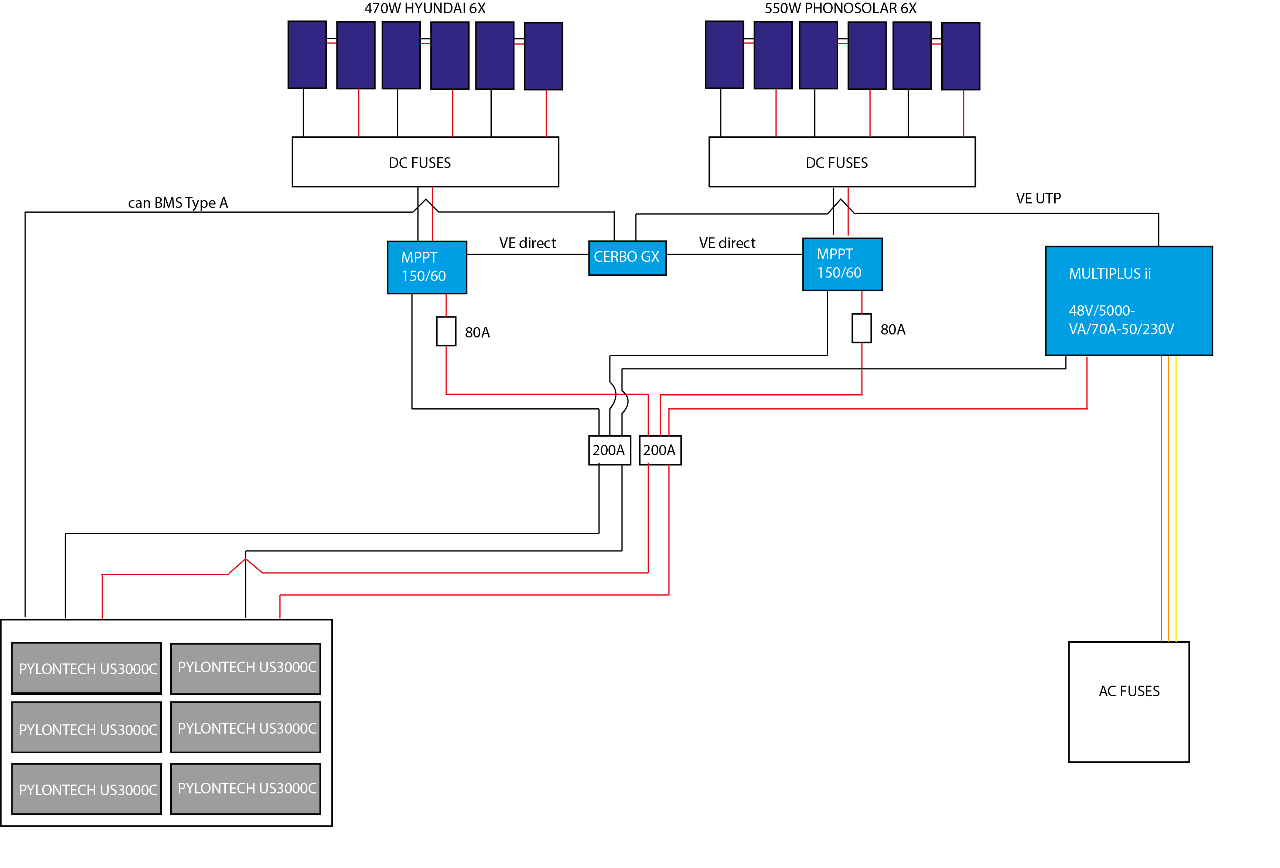
Once the frame was ready and installed we could install the panels. We use 6 x 480 watt, each set of two is wired in series to provide enough voltage to feed our 48V system.
Here you can find a video of the instalment of the panels
https://www.youtube.com/watch?v=yAhP06xTOZg
You can find a datasheet of the panels to download below.

%20--%3e%3csvg%20version='1.1'%20id='Calque_1'%20xmlns='http://www.w3.org/2000/svg'%20xmlns:xlink='http://www.w3.org/1999/xlink'%20x='0px'%20y='0px'%20viewBox='0%200%2027.2%2027.8'%20style='enable-background:new%200%200%2027.2%2027.8;'%20xml:space='preserve'%3e%3ctitle%3eicon%20redirect%20new%3c/title%3e%3cg%3e%3cpath%20d='M27.2,26.5c-0.1-5-0.3-10-0.4-15c0-0.7-0.6-1.2-1.2-1.2s-1.2,0.6-1.2,1.2c0.1,4.6,0.3,9.1,0.4,13.7%20c-3.9-0.2-7.7-0.6-11.6-0.4c-3.3,0.2-6.7,0.5-10,0.4C2.8,19.5,2.7,13.7,2.5,8c2.9-0.1,5.8-0.8,8.6-0.7c1.6,0.1,1.6-2.4,0-2.5%20C7.8,4.6,4.5,5.7,1.2,5.5c-0.6,0-1,0.3-1.1,0.7C0,6.3,0,6.4,0,6.6c0,0,0,0.1,0,0.1c0,0,0,0,0,0.1c0.2,6.6,0.4,13.2,0.5,19.7%20c0,0.6,0.4,1.3,1.2,1.4c3.8,0.1,7.5-0.2,11.3-0.4c4.4-0.3,8.6,0.2,12.9,0.4c0.6,0,1-0.3,1.1-0.7C27.1,26.9,27.2,26.7,27.2,26.5z'/%3e%3cpath%20d='M12,12.6c-0.2,0.7,0.2,1.4,0.9,1.5c0.7,0.2,1.4-0.2,1.5-0.9v0c0.6-2.2,1.4-4.5,3.1-6c1.3-1.2,3-1.9,4.7-2.7%20c-0.4,1.3-0.8,2.6-1.4,3.8c-0.6,1.5,1.8,2.1,2.4,0.7c0.8-1.9,1.5-3.9,2-5.9c0-0.1,0-0.2,0-0.3c0.3-0.6,0.1-1.5-0.7-1.8%20C22.3,0.4,20,0,17.7,0c-0.7,0-1.2,0.6-1.2,1.2s0.6,1.2,1.2,1.2c0.9,0,1.7,0.1,2.6,0.2c-1.7,0.8-3.4,1.7-4.8,3%20C13.6,7.6,12.7,10.1,12,12.6z'/%3e%3c/g%3e%3c/svg%3e)
5
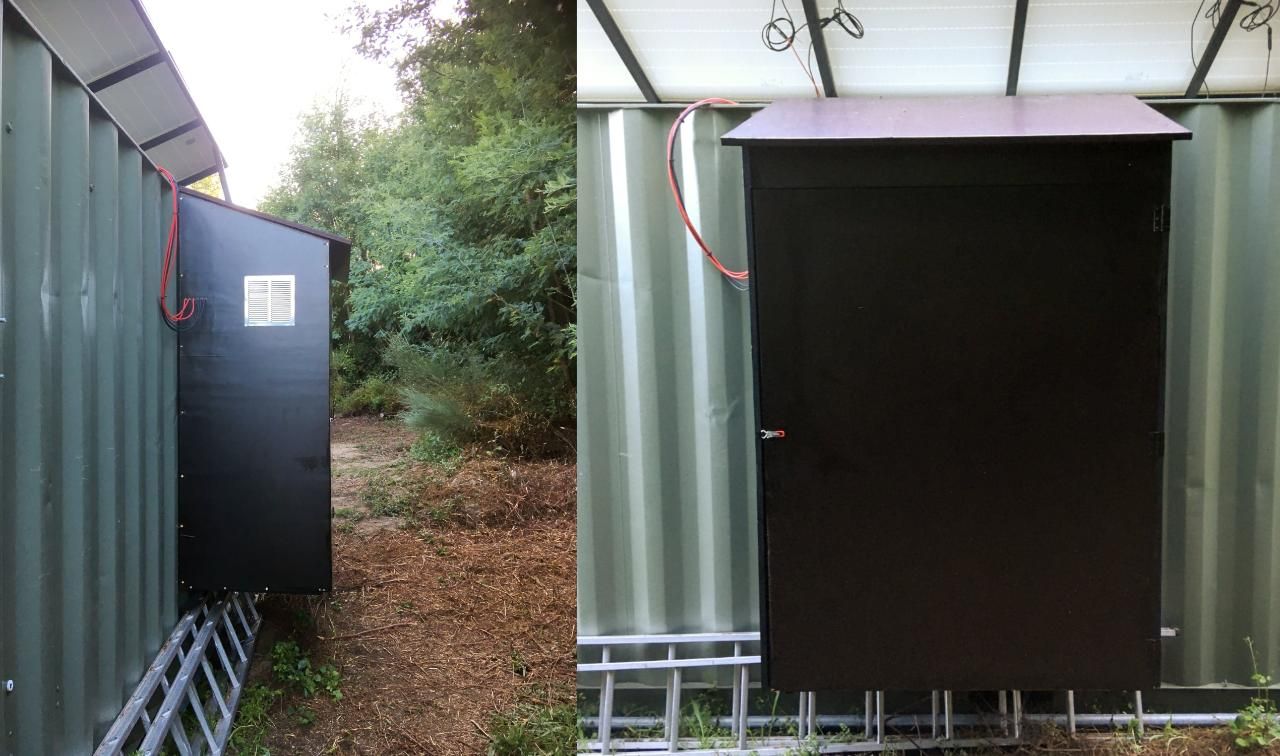
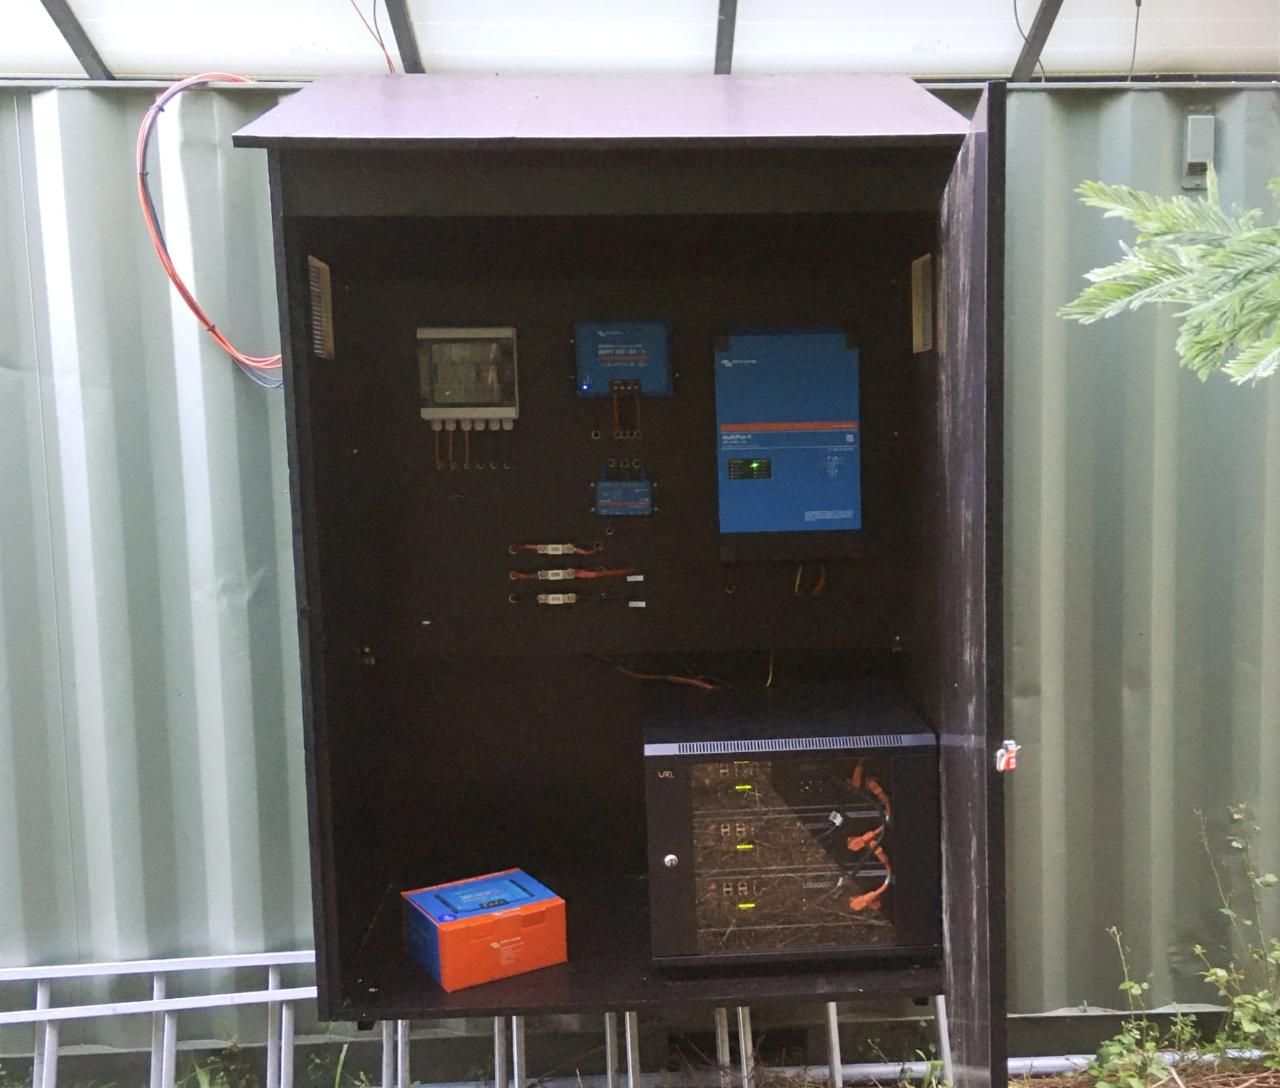
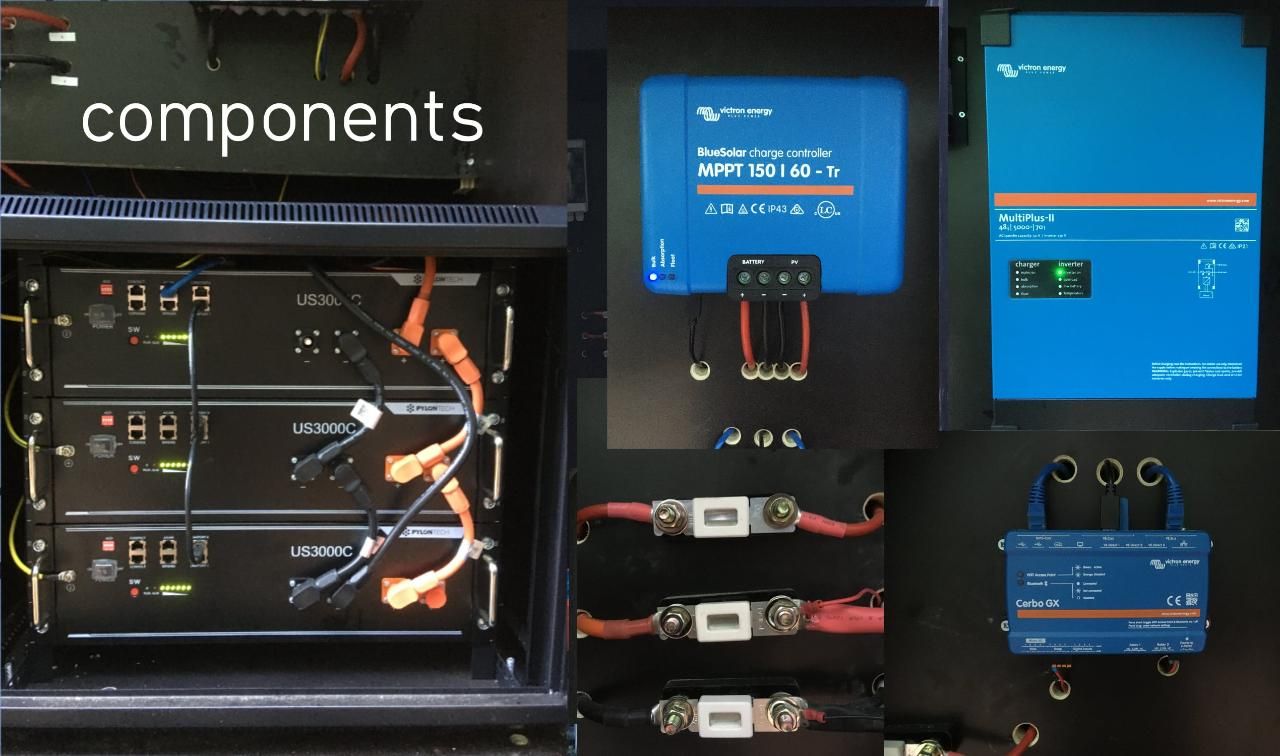
Installing the box and components
Published 2y. Edited 2yPublished almost 3 years ago. Last edit almost 3 years ago
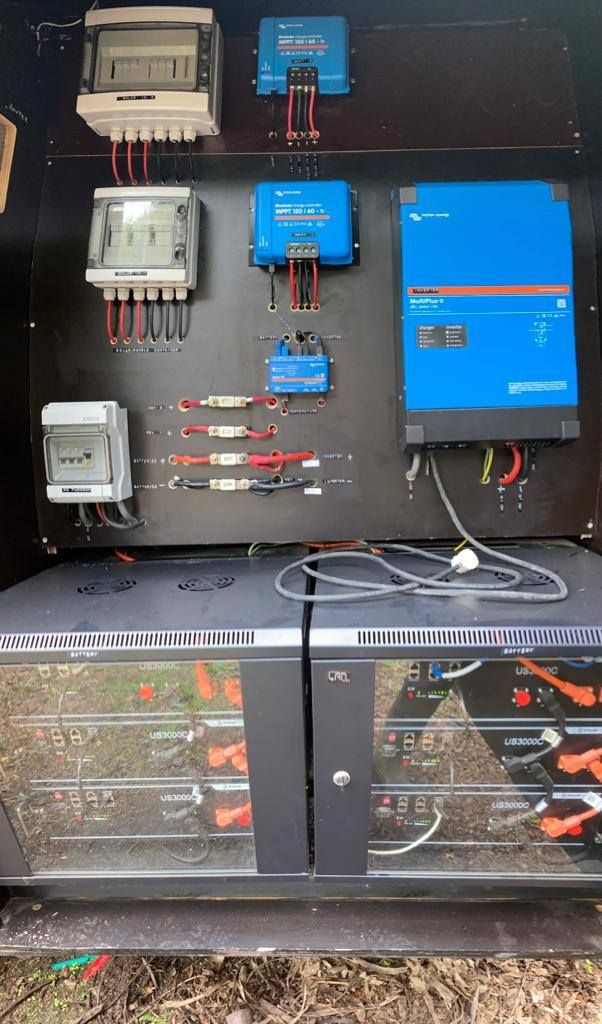
Once the panels were on the roof it was time to build the box, install the components and wire everything together. The box is made from coated plywood resting on a metal frame on the bottom but most weight is carried on the back wall. We tried to wire all the components inside very clean so it’s nice to show and explain to others how it works. And as you can see there is space to add another extra battery in case we need to scale up in the future
🎥 In this video you can see the making of the box and wiring electronics https://www.youtube.com/watch?v=aK62SWbpbNM
6
Running the system (download it)
Published 2y. Edited 1yPublished almost 3 years ago. Last edit about 1 year ago
The system is up and running. It also comes with an app to keep track of the usage and energy harvest. Very nice to get a better understanding of what appliances uses most electricity. By far most electricity is used for heating (kettle, water etc) Second is cooling (fridge) and then there are lights/phones/laptops etc. This is almost nothing compare to heating. We will continue to keep track of it
Below yo can download the original invoice, schematics and 3D model in case you need a reference for price or measurements. Let us know in the comments if it’s useful or you need something else.


7
3 Months Later
Published 2yPublished almost 3 years ago
Overall the system works very nice and stable. No problems with it and really fun to try and get the max out of a sunny day. However after a few months of usage (and more towards the winter) we noticed that the capacity is slightly low when there are a few days of clouds. We dont have enough battery capacity to sustain our electricity for that. So knowing that winter was coming + more people in the future we upgraded the battery. We know have 21KW available!
8
First 1 year and a half
Published 2yPublished over 2 years ago
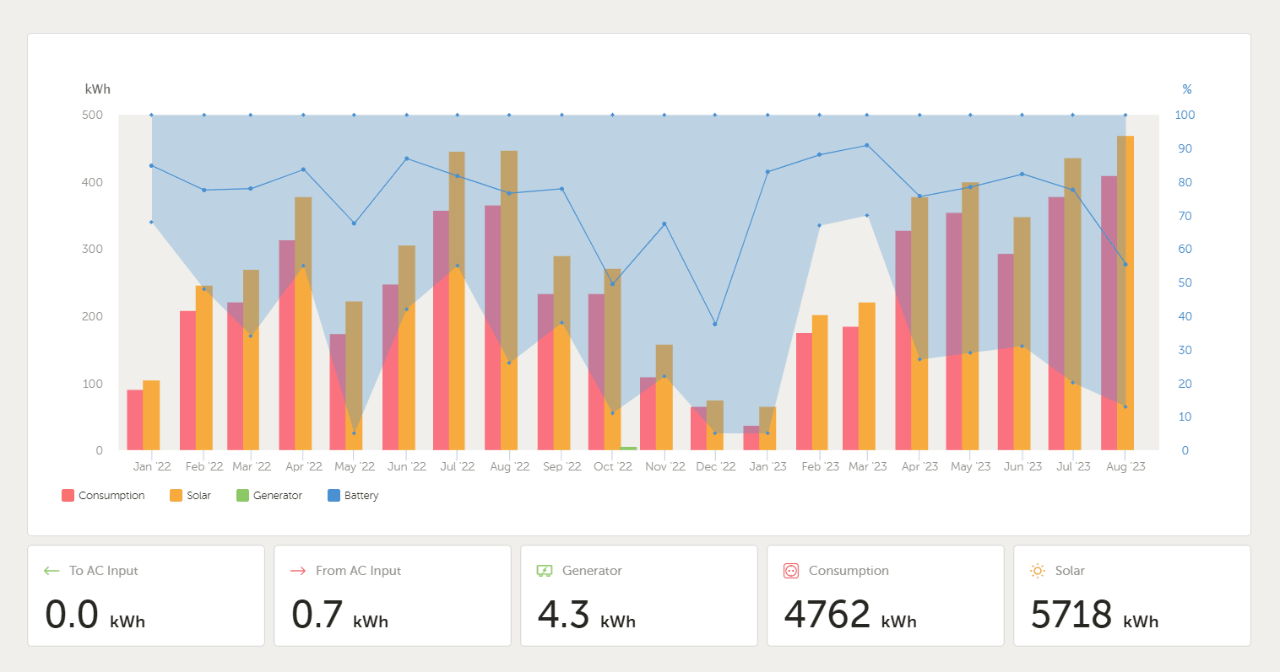
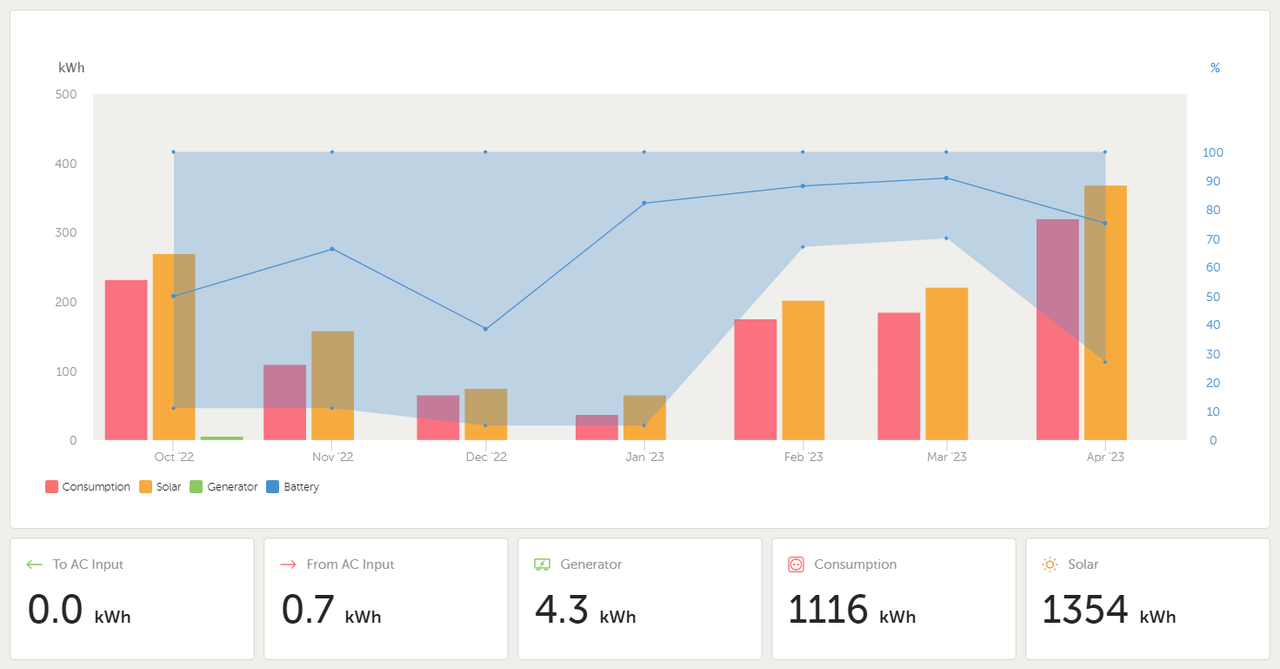
We have been using the system already for 1.5 years. The system and all its components have been quite stable so far. You can find all the data from this 1.5 year in the first image.
Season 2 (April 22 - November 22) second graph
Avarage people in the kamp was 10-15
The system hold quite good until the end of the season.
At the end of the season with 15 people and cloudy days it was a bit hard but we made it
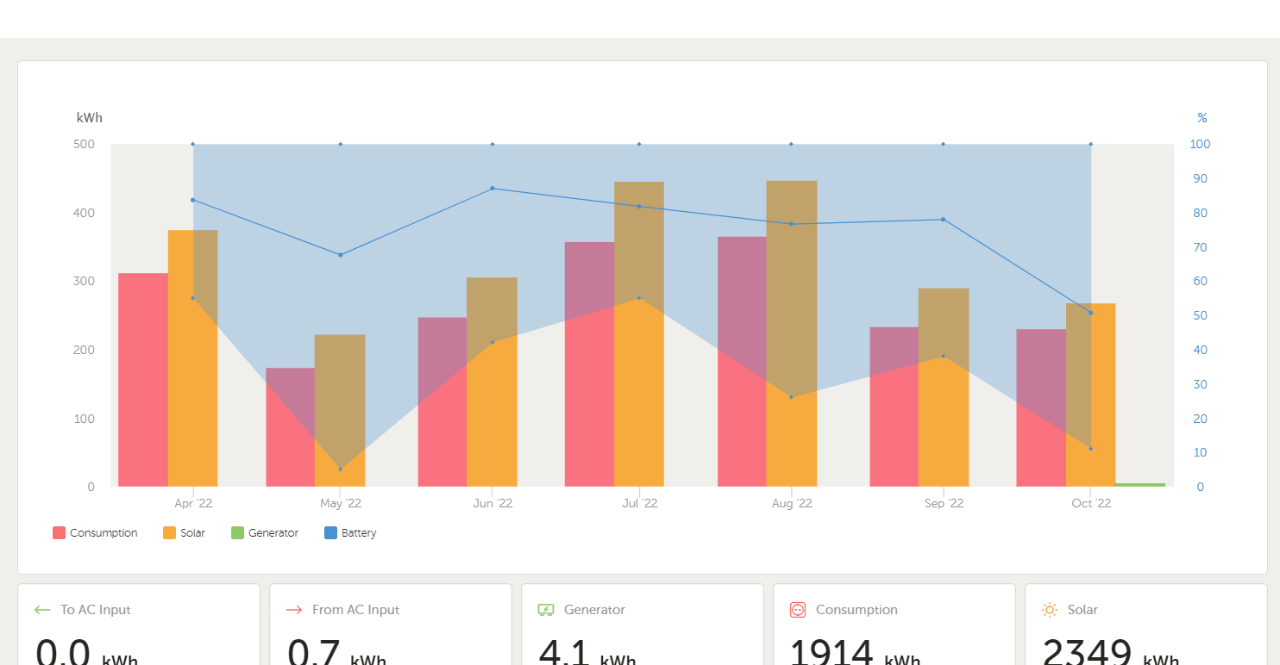
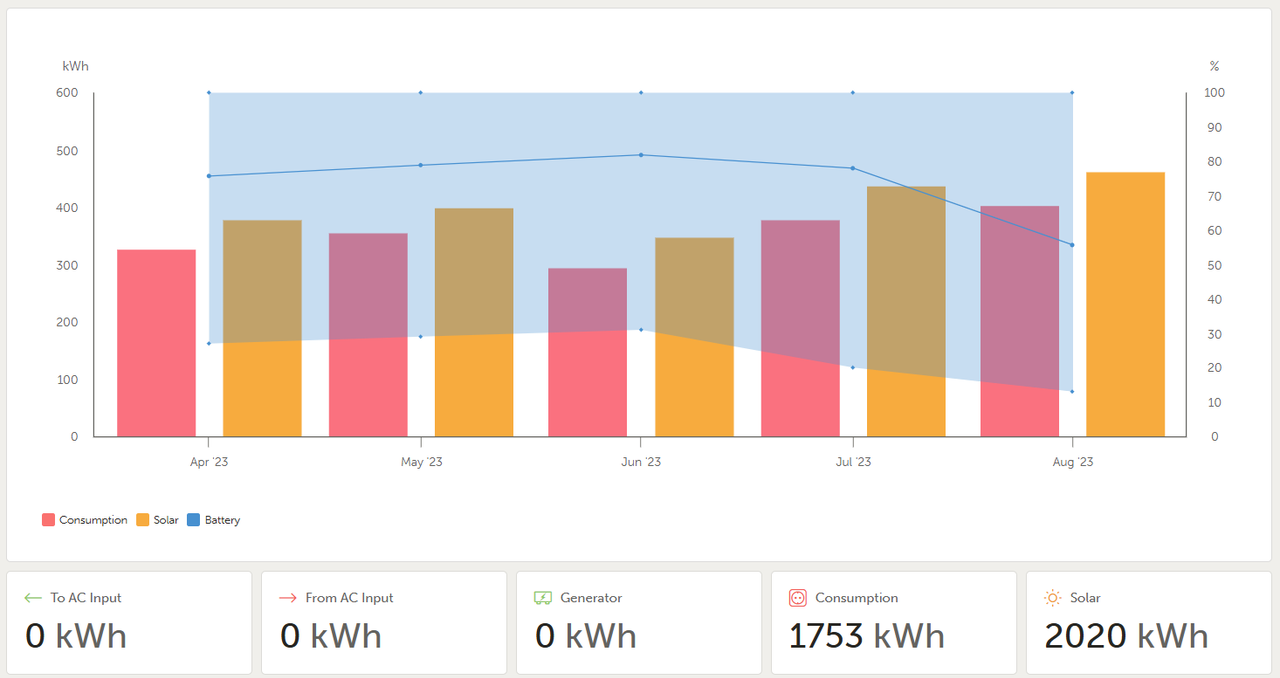
Season 3 (April 23 - August 23) third graph
Avarage people in the kamp was 20-25
It is been hard to fully charge the batteries even during summer
As soon as we have 2 cloudy days situation gets complicated
We should increase our systems, either increasing generating capacity or storage capacity. What do you think seeing this graphs?
9
Increasing our production capacity
Published 2y. Edited 2yPublished over 2 years ago. Last edit over 2 years ago
We have gone for almost doubling our solar panels. We have placed 6 new panels of 550W on top of our recycled plastic roof. We know the angle is not optimal, but we see it as a temporary set-up for the coming period until we figure out a more long-term energy source.
This decision came after analyzing the data and realizing that increasing the battery would give us just a bit more independence when not charging batteries, and increasing the production would benefit us in many more situations.
Now, we charge around double on cloudy days, and as soon as the sun shines a bit, we fast recharge our batteries. Another good point is our batteries would suffer less in the long run because they will be full more often.
You can find the schematics in the following images. We stick to the same elements, which still gives us a bit of freedom for the future if we decide to increase again our solar production.
10
Half a year with our new set up
Published 2yPublished about 2 years ago
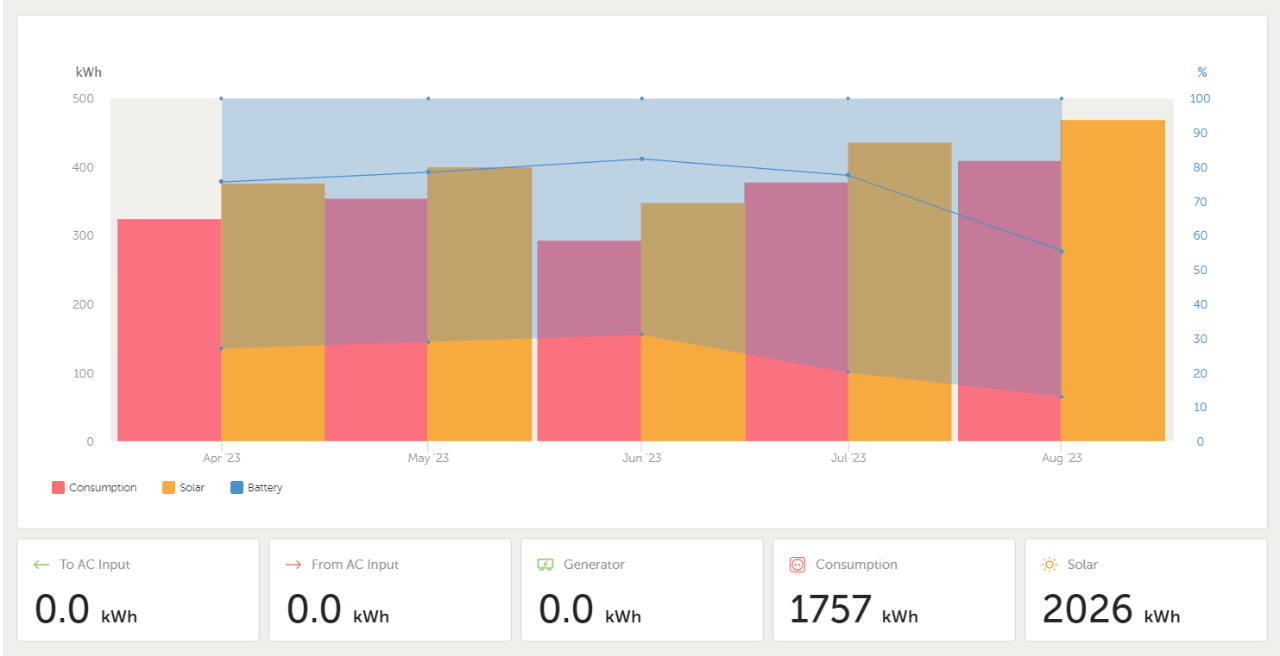
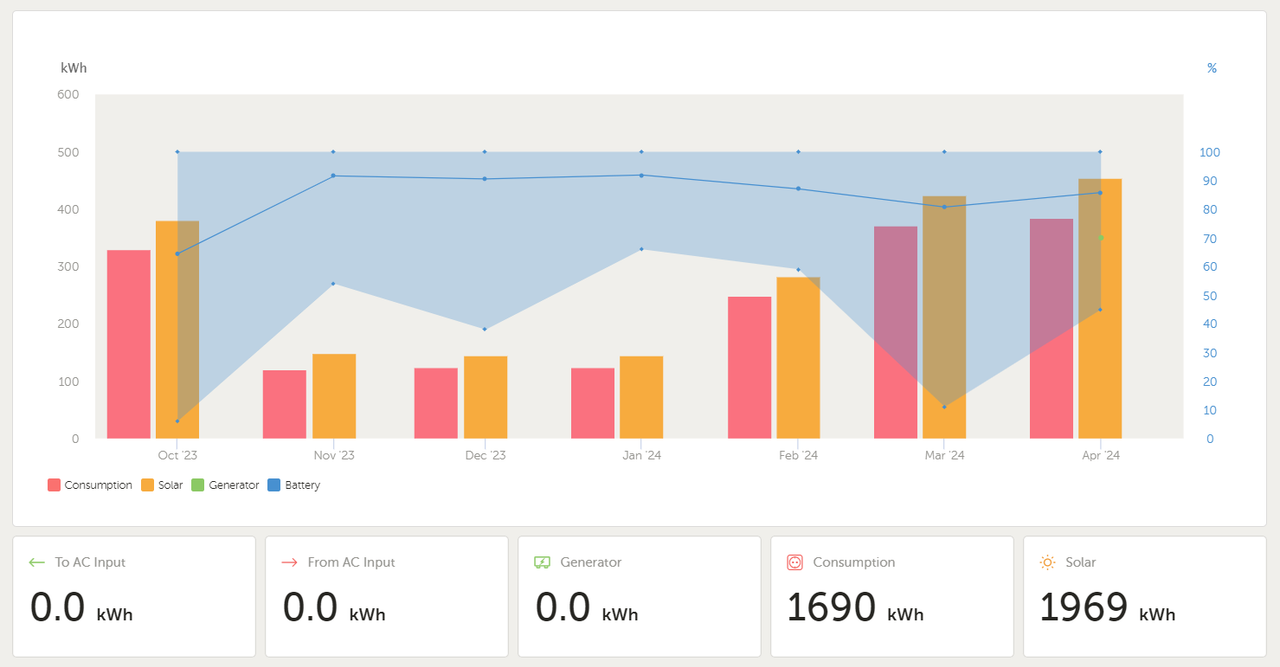
In the following graphics you can see the data collected in our first half a year doubling our solar production capacity compared with the same period of the year before
First graph. October 2023 - April 2024. New solar panels installed, a bit more than double of our old production capacity.
Second graph. October 2022 - April 2023
There was slightly less people during March - April 2023 compared with 2024. But the battery avarage in the last period of the year changed quite a lot. We notice specially when the sun shines a bit the battery recharge quite easily giving us a big boost every time.
Our critical period was from September to May usually and this was definetly a worth improvement to our solar system so far.
11
Challenges after 4 years
Published 9mo. Edited 9moPublished 10 months ago. Last edit 10 months ago
We had realized that after 4 years we are running into some challenges.
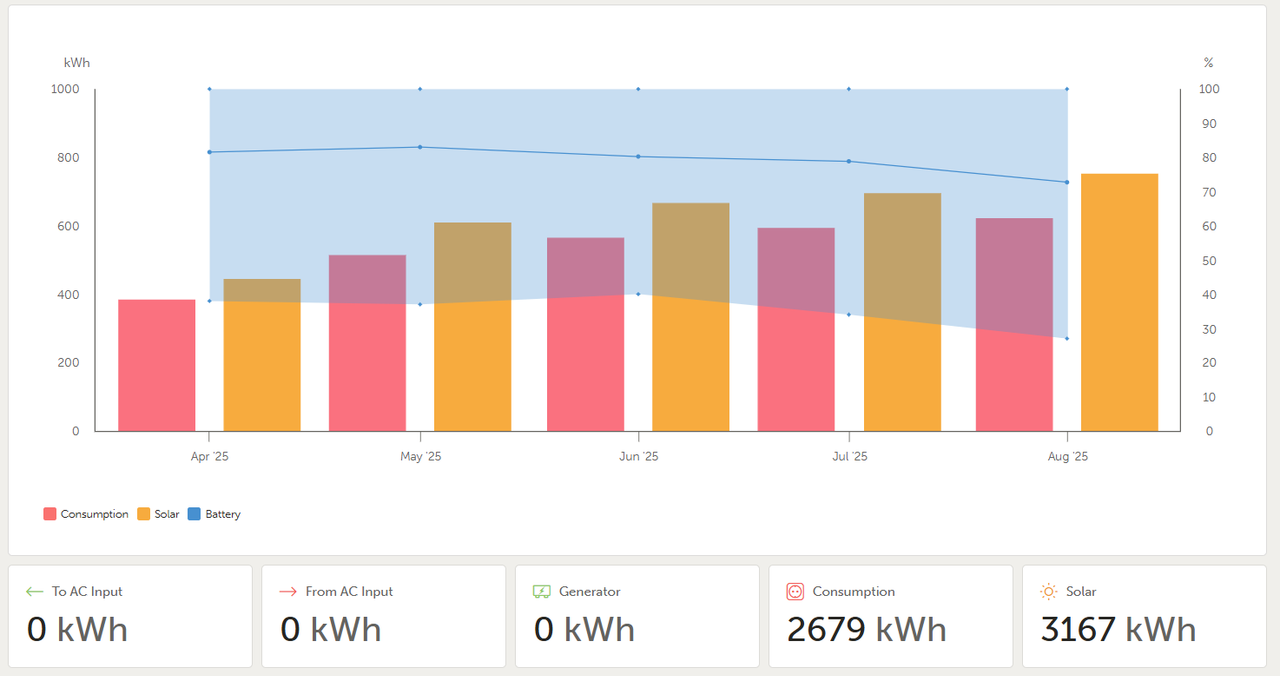
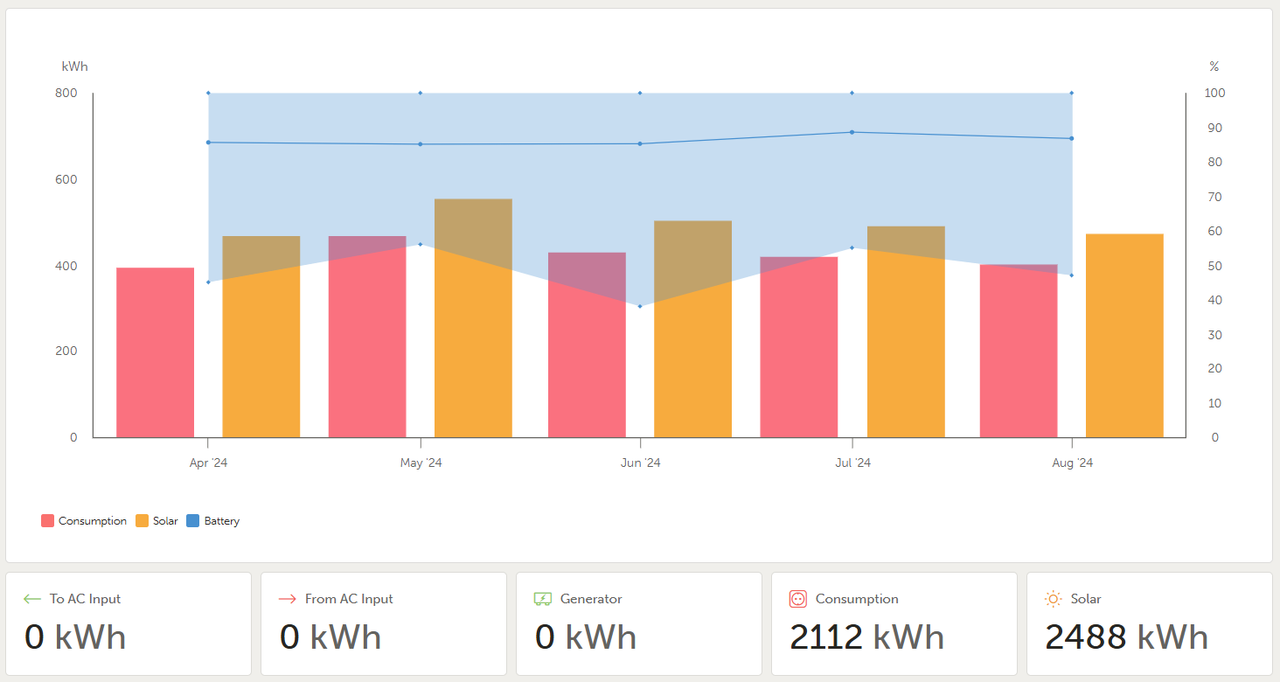
Project had grown and we are around 25 people working on site in different projects at the same time. Which makes us realize our system is a bit undersized for the amount of people and projects nowadays. We keep on growing our consumptions as you can see in the graphics of the last 3 seasons for the same periods of time in the year:
Graphic 1 is April`25 - August`25
Graphic 2 is April`24 - August`24
Graphic 3 is April`23 - August`23
Battery issues:
- More people and more usage. We use to have enough battery to run everything during season but this year with more people using the electricity we are running low more often than last year.
- Less battery capacity. After some calculations we also realized our battery capacity had decreased after 4 years from 21kW/h to around 18.5kW/h due to the degradation of the lithium batteries. Which is around a 10% of our capacity gone.
Inverter size:
- More projects at the same time and more electricity points in the land also increases the consumption we have at a time
- Sometimes we run into overloading our inverter (5kVa). Specially when running heavy tools at the same time in different locationg and not realizing (kettle, washing machine, cement mixer, chopsaw, van chargers...)
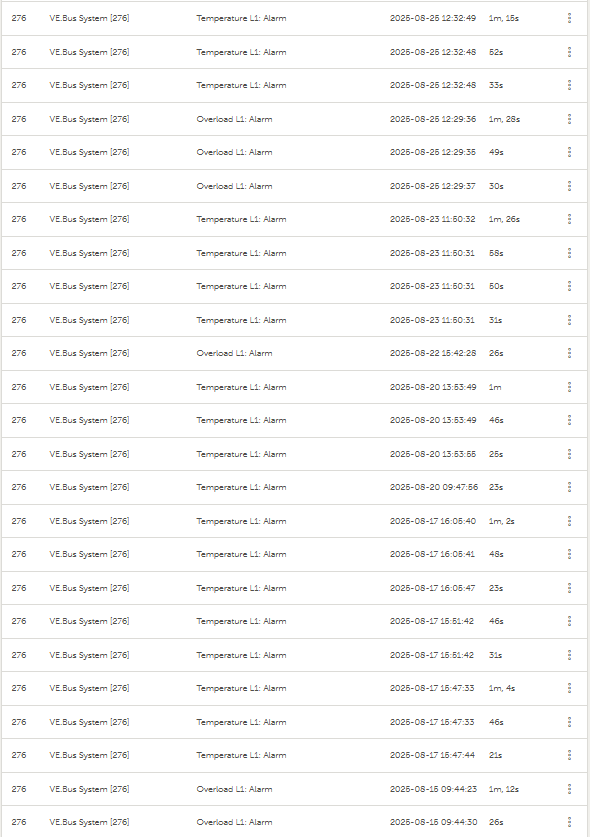
- Many times we don´t run into overloading but we run high consumption for long periods (2kW-3kW for a few minutes) and this causes that the inverter overheats and shuts our whole system down
- See alarm logs of a few days in the image 4 (Overloads and temperatures)
12
Hacking our inverter
Published 9mo. Edited 9moPublished 10 months ago. Last edit 10 months ago
As explained in the last step. One of our problems nowadays is the undersizing of our system (batteries and inverter). And we know in a close future we want to make a major upgrade when building the community center, creating an installation that can cover our needs for many more years.
One option was to upgrade our inverter for a bigger one. But this would be a costly operation and we would also need to think on how to integrate it with the future plans.
With our inverter we have 2 issues, temperature when running in high consumption for long periods and overloading. We decided to focus on the temperature issue to be able to address it quick and easy. Not going to solve all our problems, we will get rid of some of our temperature problems, but probably not all. Also we will be running our system in lower temperatures which is always better for all the components.
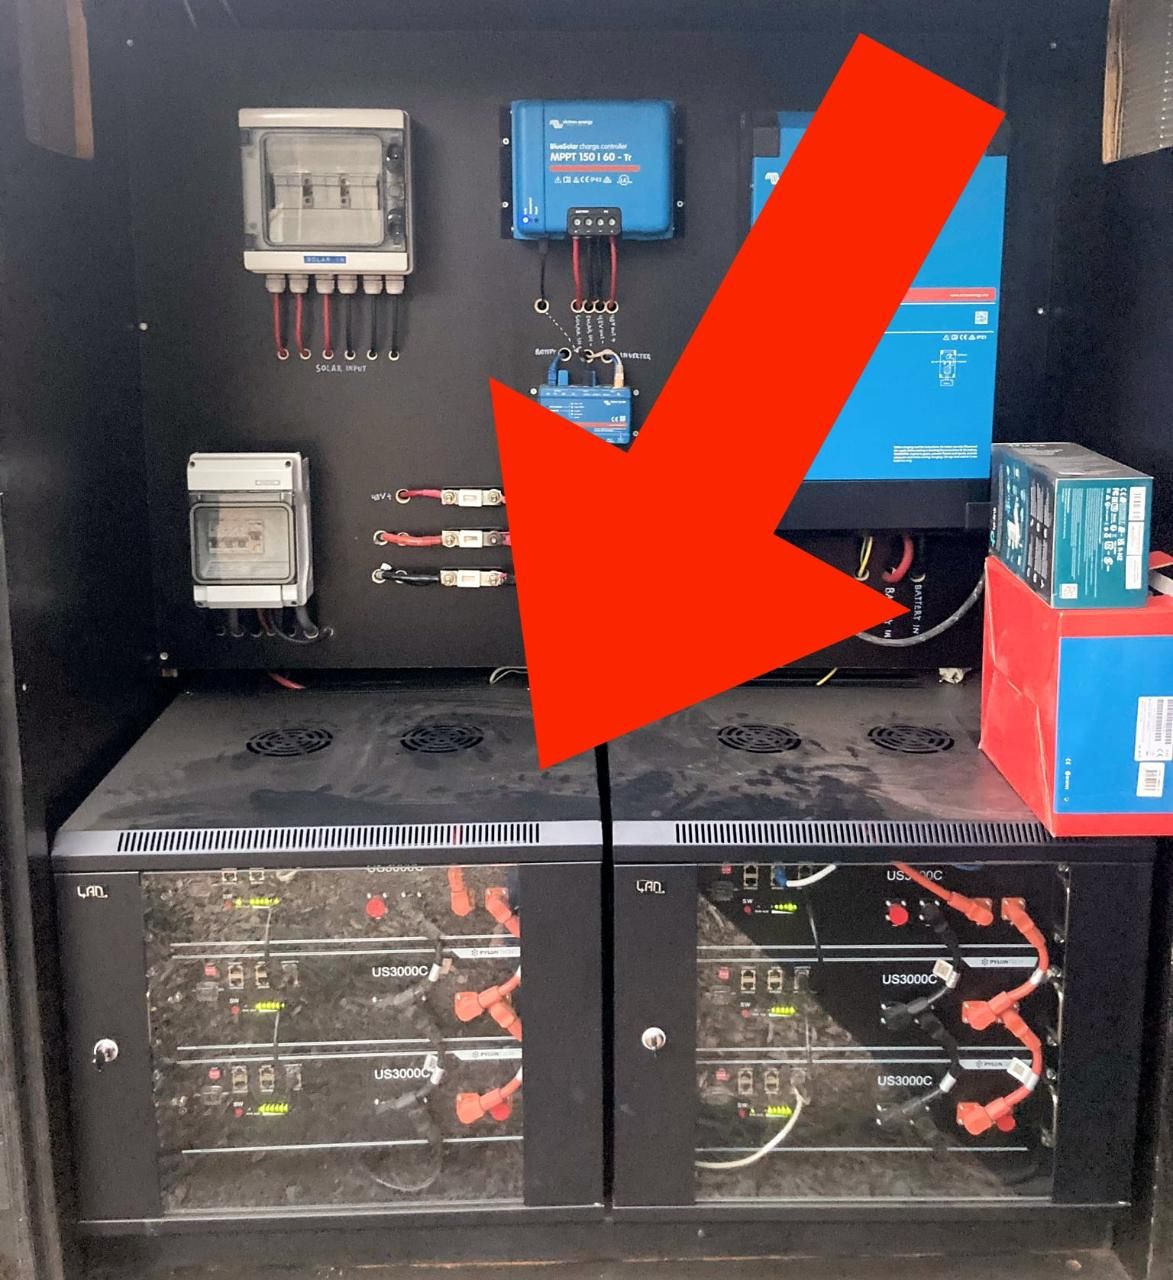
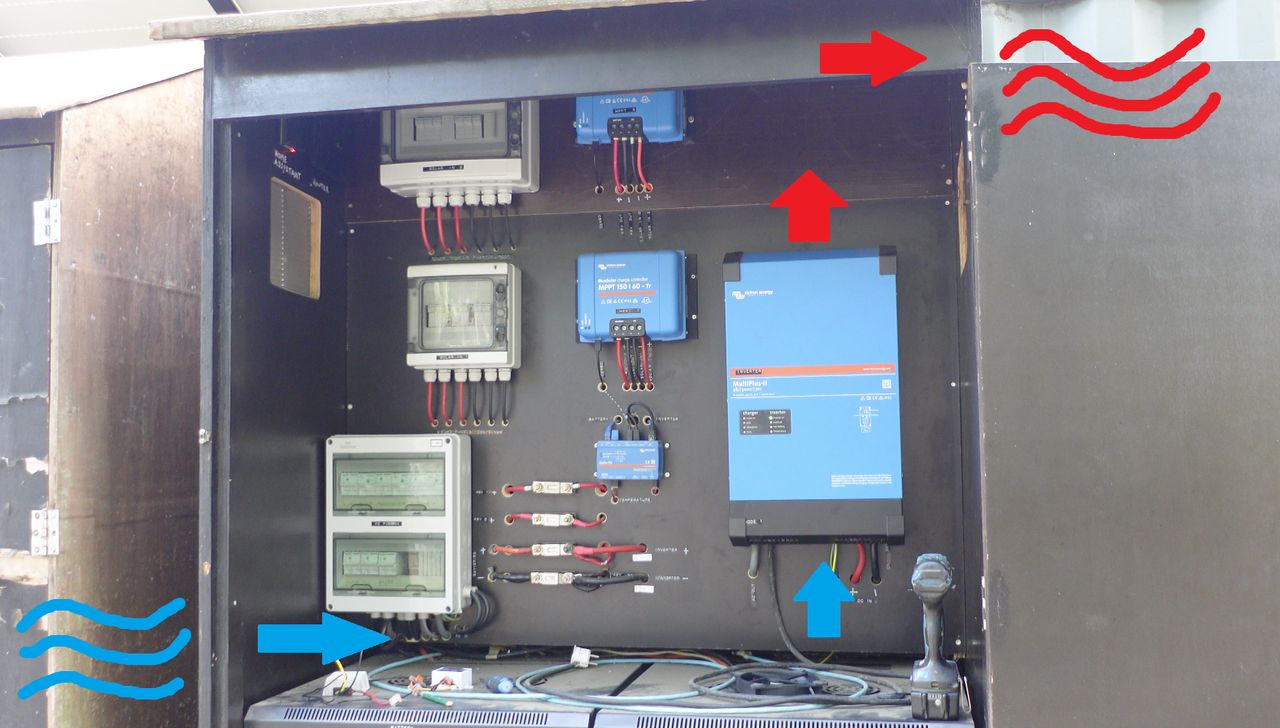
When addressing the temperature problems we look at the temperature of the whole box where all the components are located and to the internal temperature of the inverter. So we add forced ventilation for both:
For the box we added 2 fans of 140mm. One sucking air from outside at the bottom and shaded part of the box (coolest), the other one sucking the hot air to the outside in the top and sunnier part of the box (hottest)
We had added extra ventilation to the inverter with 2 fans of 80mm mounted in a 3d printed piece inside the inverter, designed for this purpose.
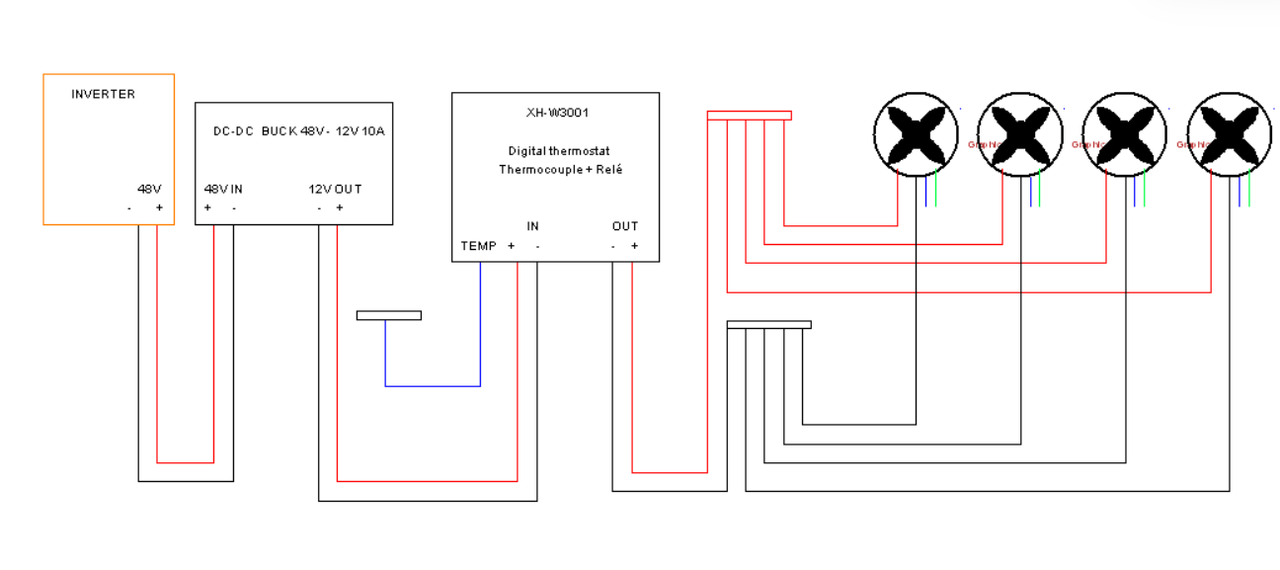
The energy to feed the system comes from the main 48V that goes from the batteries into the inverter.
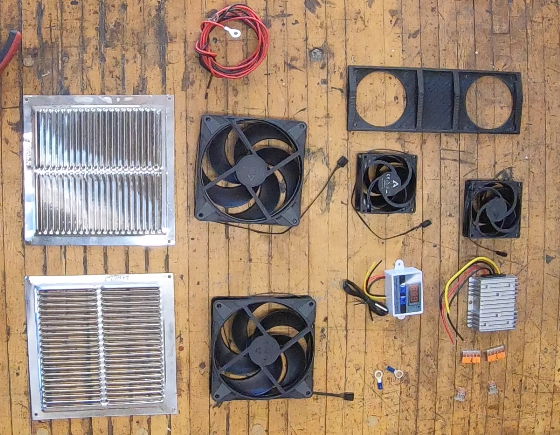
These are the parts used for the system:
- 2 X 140mm computer fans
- 2 X 80mm computer fans
- 1 X DC-DC Buck 48V - 12V with 10A max (48V to 12V converter)
- 1 X Thermostat XH-W3001 (Temperature controler with thermometer, controler and relé integrated)
Find attached the 3D Printing piece made by Nick Ebben and found in the Victron forums that fits perfectly in the bottom of the inverter.
https://community.victronenergy.com/t/multiplus-ii-48-5000-70-dual-80mm-fan-bracket-for-better-cooling/17035
%20--%3e%3csvg%20version='1.1'%20id='Layer_1'%20xmlns='http://www.w3.org/2000/svg'%20xmlns:xlink='http://www.w3.org/1999/xlink'%20x='0px'%20y='0px'%20viewBox='0%200%2064%2063'%20style='enable-background:new%200%200%2064%2063;'%20xml:space='preserve'%3e%3cstyle%20type='text/css'%3e%20.st0{fill:%2320B7EB;}%20.st1{fill:%23E9475A;}%20.st2{fill:%23FECE4E;}%20%3c/style%3e%3cdesc%3eCreated%20with%20Sketch.%3c/desc%3e%3cg%20id='Page-1'%3e%3cg%20id='OA-Logo-Black-Background'%3e%3cpath%20id='Shape'%20class='st0'%20d='M14.1,30.1c-1.5-0.8-8.6-3.8-14.1-7.8c1.8-3.4,3.1-5.6,5-9.1c2.7,1.1,1.9,0.5,4.6,1.7%20c0.8,0.4,10.1,4.5,13.8,6.2c2.4,1.1,4.7,2.2,7,3.3L43,30.5l8.1,3.9c4,2,7.2,3.5,11.3,5.5c0.5,0.3-3.7,9.4-3.7,9.4%20c-1.7-0.6-3.9-1.8-5.5-2.5c-4.7-2.1-9-3.9-13.7-6c-4-1.8-6.7-2.9-10.8-4.5C25,34.9,17.1,31.6,14.1,30.1z'/%3e%3cpath%20id='Shape_1_'%20class='st1'%20d='M12.1,54.9c-0.8,0.6-1.6,1.2-2.5,1.6c-0.4-0.5-0.9-1-1.3-1.5c-0.3-1.2-2.3-4.9-2.7-6.2%20c-0.1-0.4-0.7-2.2-0.8-2.6c0,0,5-3.4,8.2-5.9c3.2-2.6,6.2-5,9.3-7.5c1.4-1.1,3.9-2.5,5.3-3.5c2.5-1.7,13-9.1,15.6-10.5%20c5.4-3.3,11.1-6.3,16.8-9c1.7,3.5,1.8,3,3.8,6.9c0,0-17.8,13.5-22.7,17.1c-3.8,2.8-7.5,5.7-11.3,8.5c-1.7,1.3-3.5,2.4-5.2,3.7'/%3e%3cpath%20id='Shape_2_'%20class='st2'%20d='M20.8,2.9l-0.2-0.8C25,0,31.2-0.3,31.4,0.2c0.4,1.1,0.9,2.2,1.2,3.4c1.4,4.4,2.7,8.7,4,13.1%20c0.4,1.4,2.8,10,2.9,10.5c0.5,2.8,1.2,5.6,1.6,8.4c0.8,4.7,1.4,8.6,2.3,13.3c0.6,3.1,1.3,6.3,2.3,11.3c0,0-5.8,1.4-7.5,1.8%20c-0.8,0.2-1.5,0.4-2.4,0.6c-0.3-1.1-0.2-1.2-0.5-2.1c-0.9-3.7-1.8-7.3-2.6-11c-1.5-6.4-3-12.9-4.4-19.3%20c-1.2-5.4-2.6-10.7-4.4-15.9c-1-3.1-1.8-6.3-2.7-9.5C21.1,3.8,21,3.8,20.8,2.9z'/%3e%3c/g%3e%3c/g%3e%3c/svg%3e)