

Can we renovate granite walls?
With contributions from colline-the-lobster
Started 2y. Edited 1yStarted about 2 years ago. Last edit about 1 year agoConstruction
In Progress
RenovationBuildingNatural materials
More Information


%20--%3e%3csvg%20version='1.1'%20id='Layer_1'%20xmlns='http://www.w3.org/2000/svg'%20xmlns:xlink='http://www.w3.org/1999/xlink'%20x='0px'%20y='0px'%20viewBox='0%200%2064%2063'%20style='enable-background:new%200%200%2064%2063;'%20xml:space='preserve'%3e%3cstyle%20type='text/css'%3e%20.st0{fill:%23231F20;}%20%3c/style%3e%3cdesc%3eCreated%20with%20Sketch.%3c/desc%3e%3cg%20id='Page-1'%3e%3cg%20id='OA-Logo-Black-Background'%3e%3cpath%20id='Shape'%20class='st0'%20d='M14.1,30.1c-1.5-0.8-8.6-3.8-14.1-7.8c1.8-3.4,3.1-5.6,5-9.1c2.7,1.1,1.9,0.5,4.6,1.7%20c0.8,0.4,10.1,4.5,13.8,6.2c2.4,1.1,4.7,2.2,7,3.3L43,30.5l8.1,3.9c4,2,7.2,3.5,11.3,5.5c0.5,0.3-3.7,9.4-3.7,9.4%20c-1.7-0.6-3.9-1.8-5.5-2.5c-4.7-2.1-9-3.9-13.7-6c-4-1.8-6.7-2.9-10.8-4.5C25,34.9,17.1,31.6,14.1,30.1z'/%3e%3cpath%20id='Shape_1_'%20class='st0'%20d='M12.1,54.9c-0.8,0.6-1.6,1.2-2.5,1.6c-0.4-0.5-0.9-1-1.3-1.5c-0.3-1.2-2.3-4.9-2.7-6.2%20c-0.1-0.4-0.7-2.2-0.8-2.6c0,0,5-3.4,8.2-5.9c3.2-2.6,6.2-5,9.3-7.5c1.4-1.1,3.9-2.5,5.3-3.5c2.5-1.7,13-9.1,15.6-10.5%20c5.4-3.3,11.1-6.3,16.8-9c1.7,3.5,1.8,3,3.8,6.9c0,0-17.8,13.5-22.7,17.1c-3.8,2.8-7.5,5.7-11.3,8.5c-1.7,1.3-3.5,2.4-5.2,3.7'/%3e%3cpath%20id='Shape_2_'%20class='st0'%20d='M20.8,2.9l-0.2-0.8C25,0,31.2-0.3,31.4,0.2c0.4,1.1,0.9,2.2,1.2,3.4c1.4,4.4,2.7,8.7,4,13.1%20c0.4,1.4,2.8,10,2.9,10.5c0.5,2.8,1.2,5.6,1.6,8.4c0.8,4.7,1.4,8.6,2.3,13.3c0.6,3.1,1.3,6.3,2.3,11.3c0,0-5.8,1.4-7.5,1.8%20c-0.8,0.2-1.5,0.4-2.4,0.6c-0.3-1.1-0.2-1.2-0.5-2.1c-0.9-3.7-1.8-7.3-2.6-11c-1.5-6.4-3-12.9-4.4-19.3%20c-1.2-5.4-2.6-10.7-4.4-15.9c-1-3.1-1.8-6.3-2.7-9.5C21.1,3.8,21,3.8,20.8,2.9z'/%3e%3c/g%3e%3c/g%3e%3c/svg%3e)


1
What do we know about granite?
Published 2y. Edited 2yPublished about 2 years ago. Last edit about 2 years ago
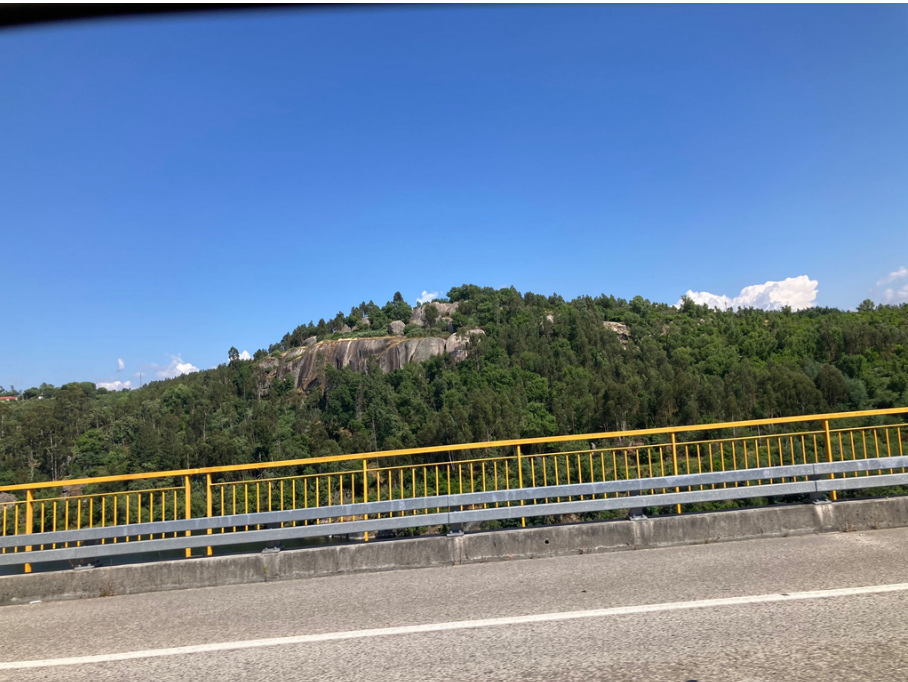
Granite is a very wide spread stone composed mostly of coarse-grained quartz and feldspars in varying proportions. You can find a lot on all continents. it’s a resistant and long-term material: it perfectly resists to time and weather constraints.
Natural granite stone has one of the highest compressive strength in comparison to other materials. Granite has a good thermal phase shift (inertia): it stocks heat and restitues it slowly during the night; it’s sustainable when it is locally sourced.
Furthermore, the stone can be directly reused from one construction to the other without any transformation. It is a stone we have in abondance here in Portugal.

2
How to assess the quality of our granite?
Published 2yPublished about 2 years ago
Granite can have differents qualities, this article we found is very useful.
https://criticalconcrete.com/how-to-build-a-stone-wall/
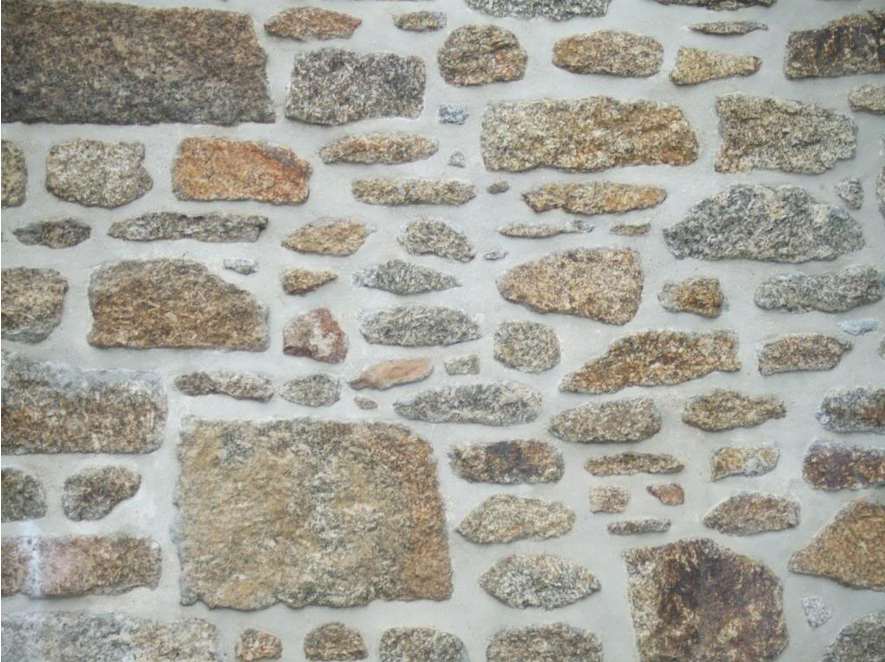
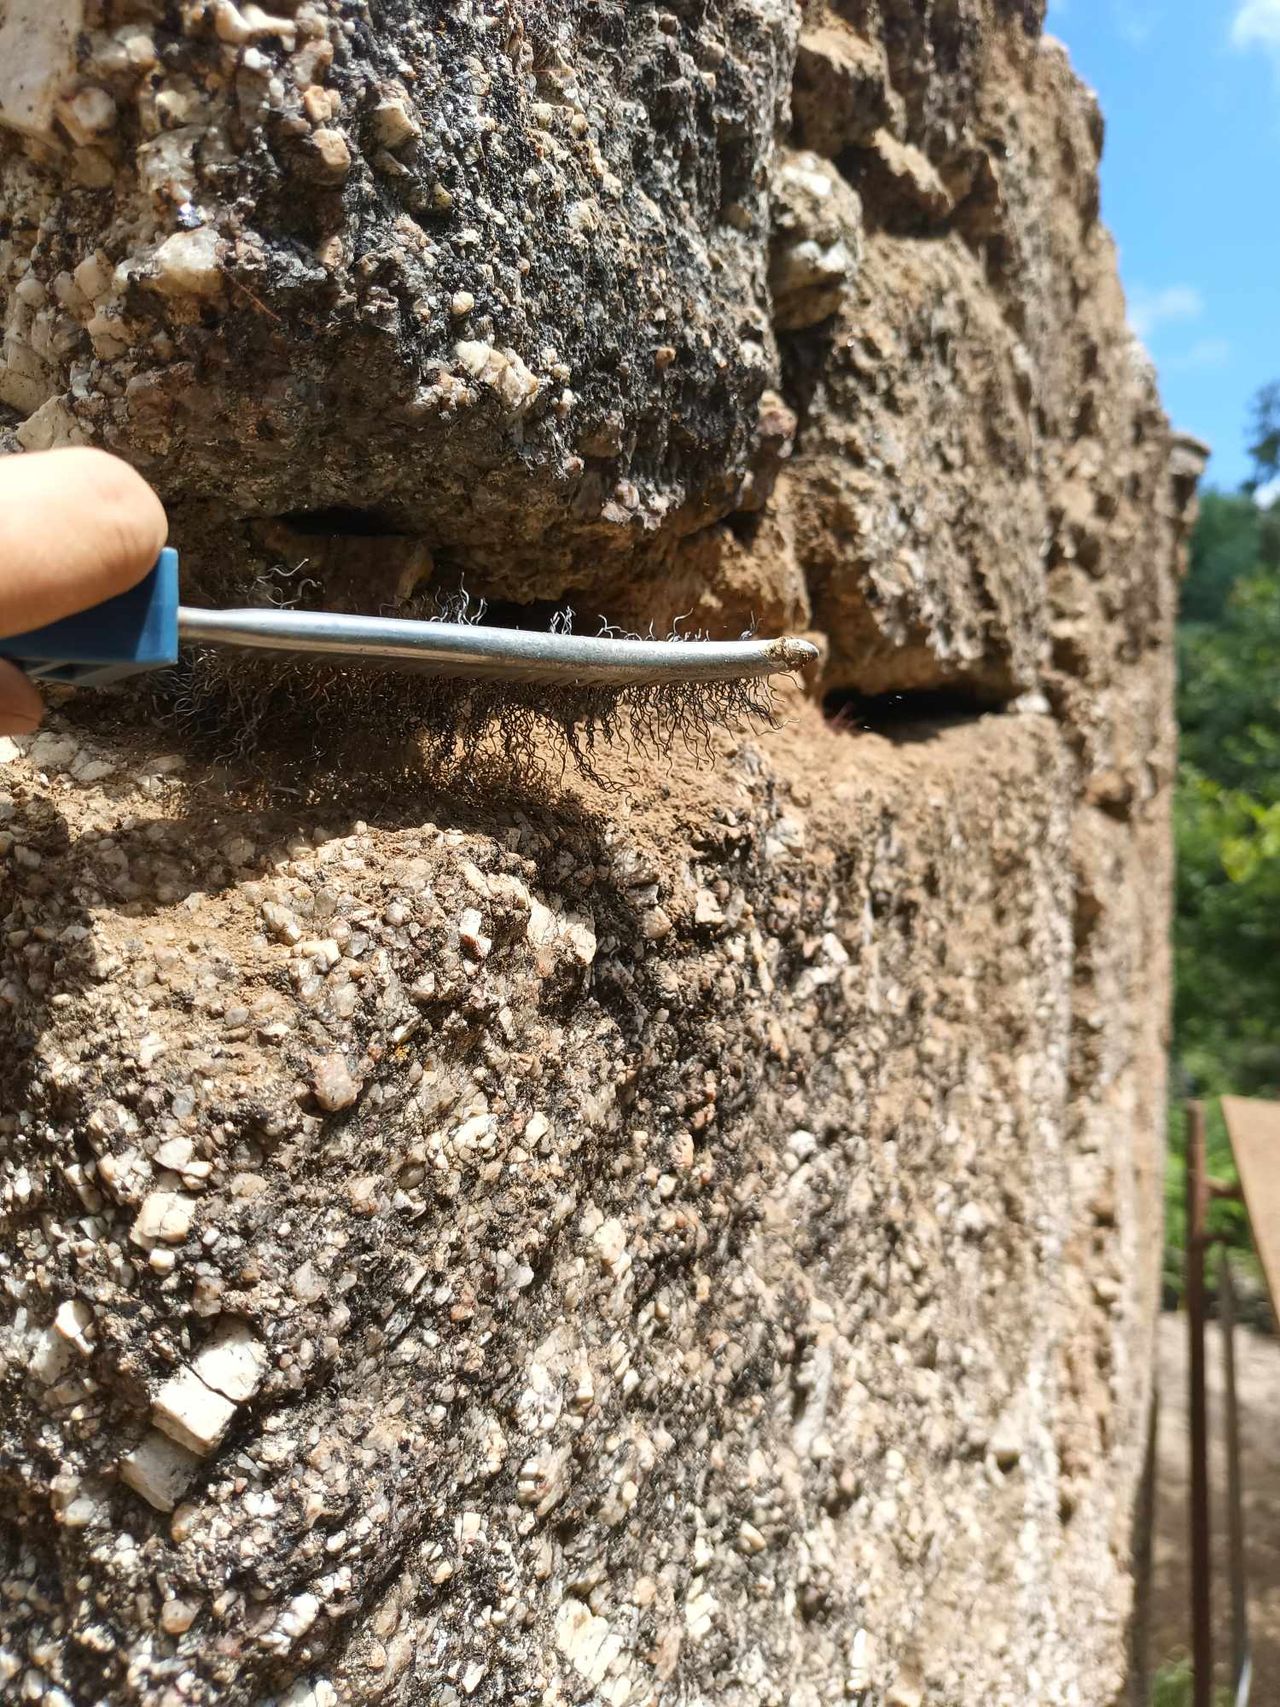
To check the quality of your granite stones, take a look to see if you notice any dings, dents or scratches; and also check the porosity. A granite very porous or irregular will need regular coats of sealant. Granite has a good thermal phase shift (inertia): it stocks heat and restitues it slowly during the night; it’s sustainable when it is locally sourced. Furthermore, the stone can be directly reused from one construction to the other without any transformation.
Touch you stone and establish the state of it by seeing if by running your hands on it, gravels forms and fall? Same goes for the mortar that you might have in between the stones. If your wall is showing evidence.
Each type of stone offer nonetheless very different qualities.

3
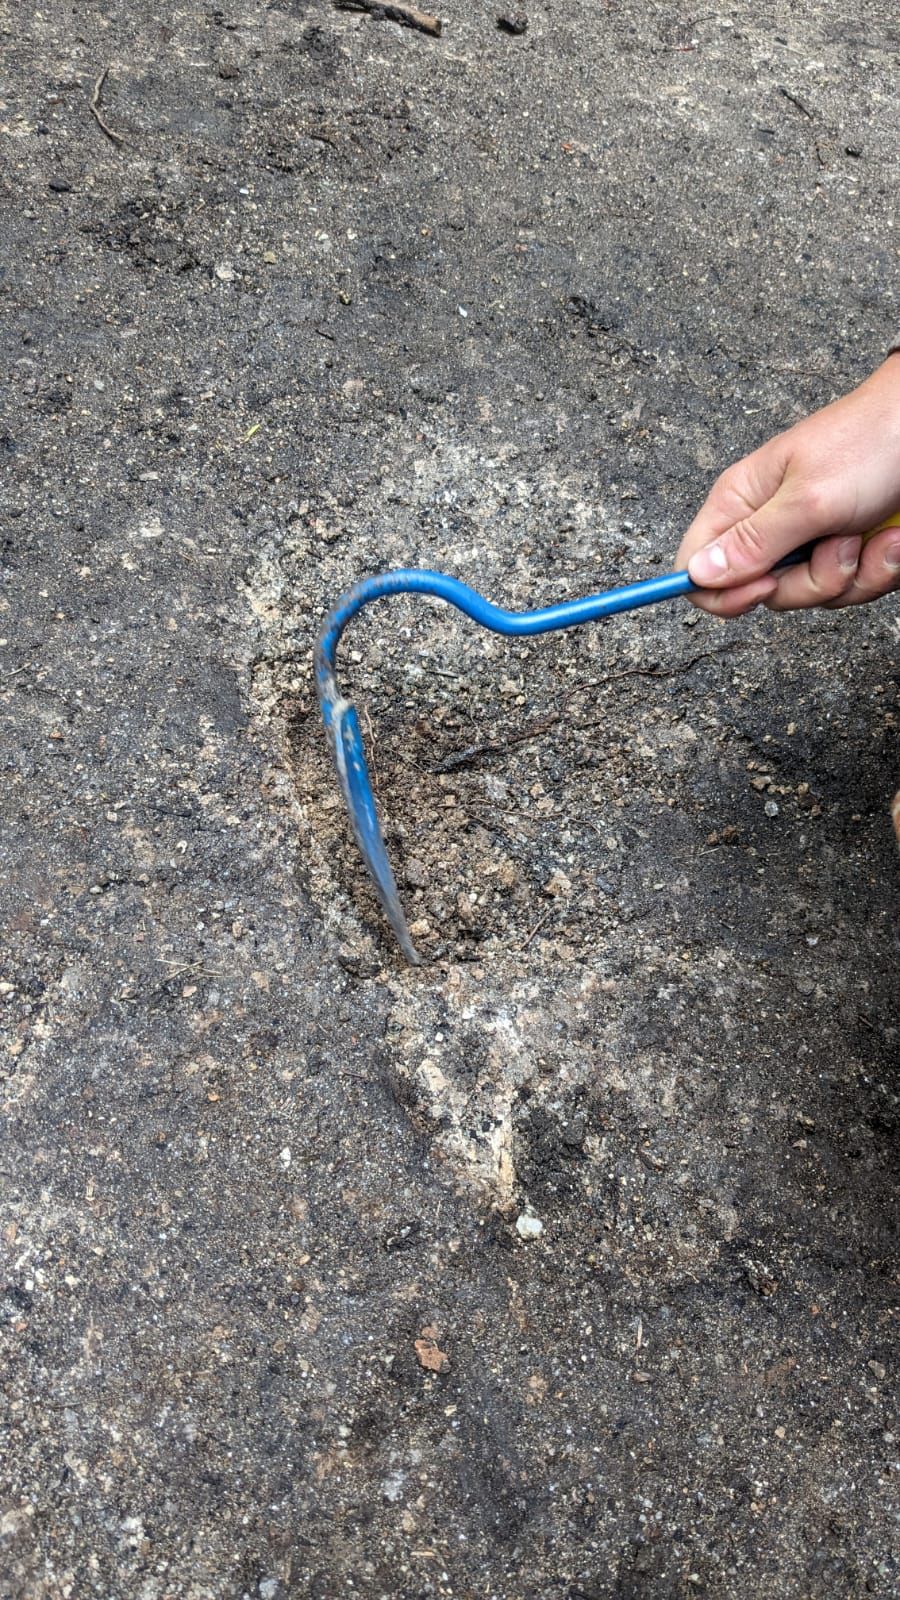
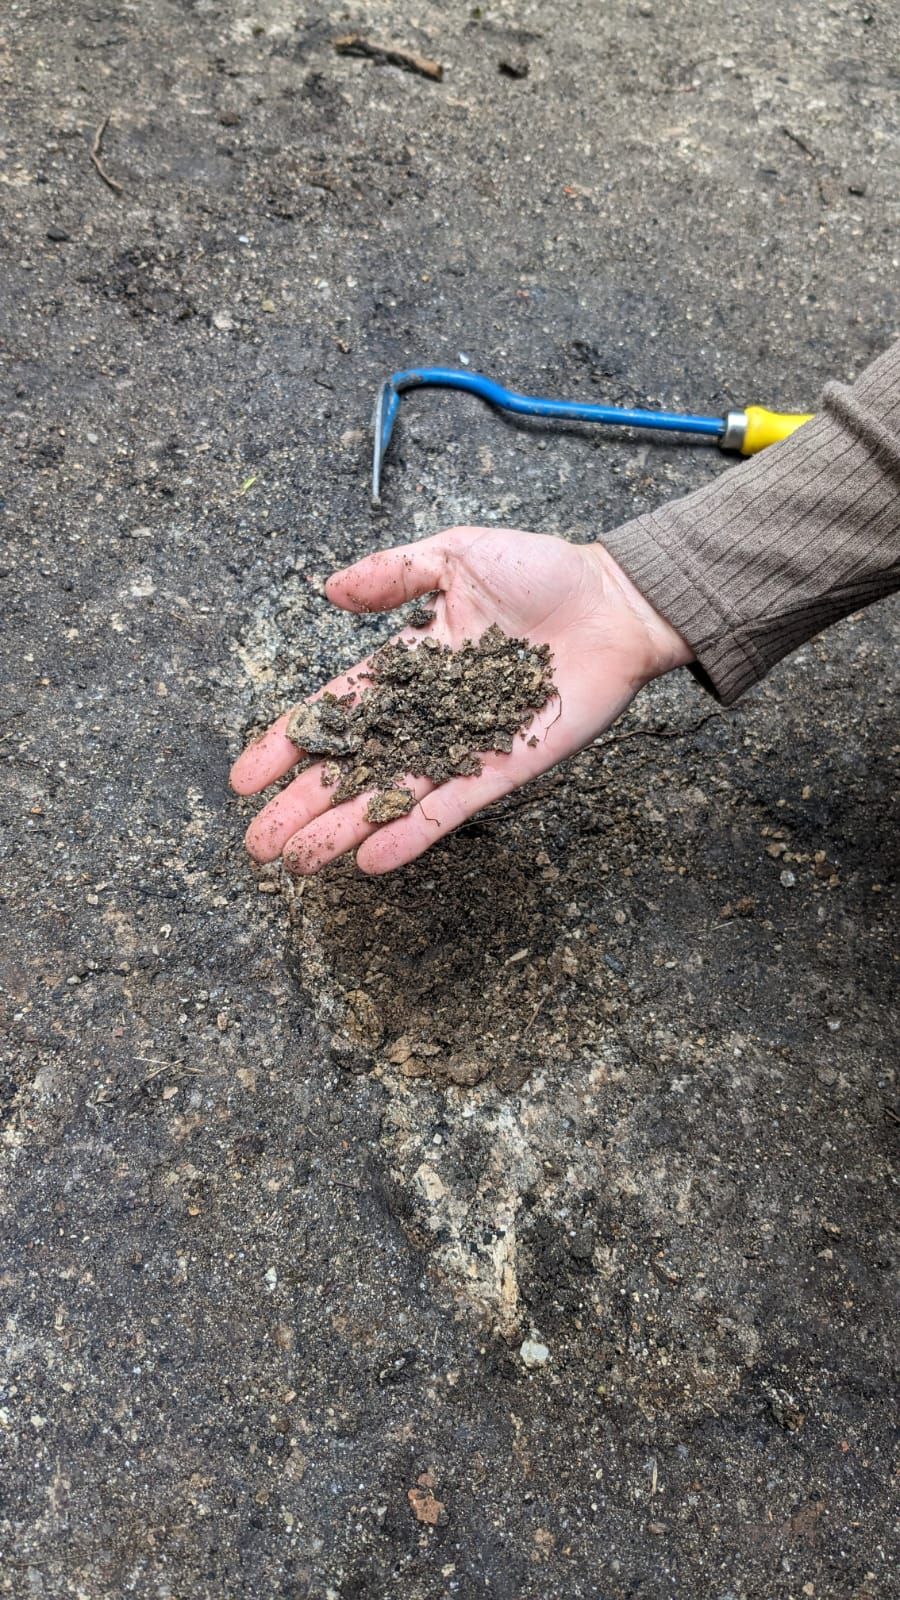
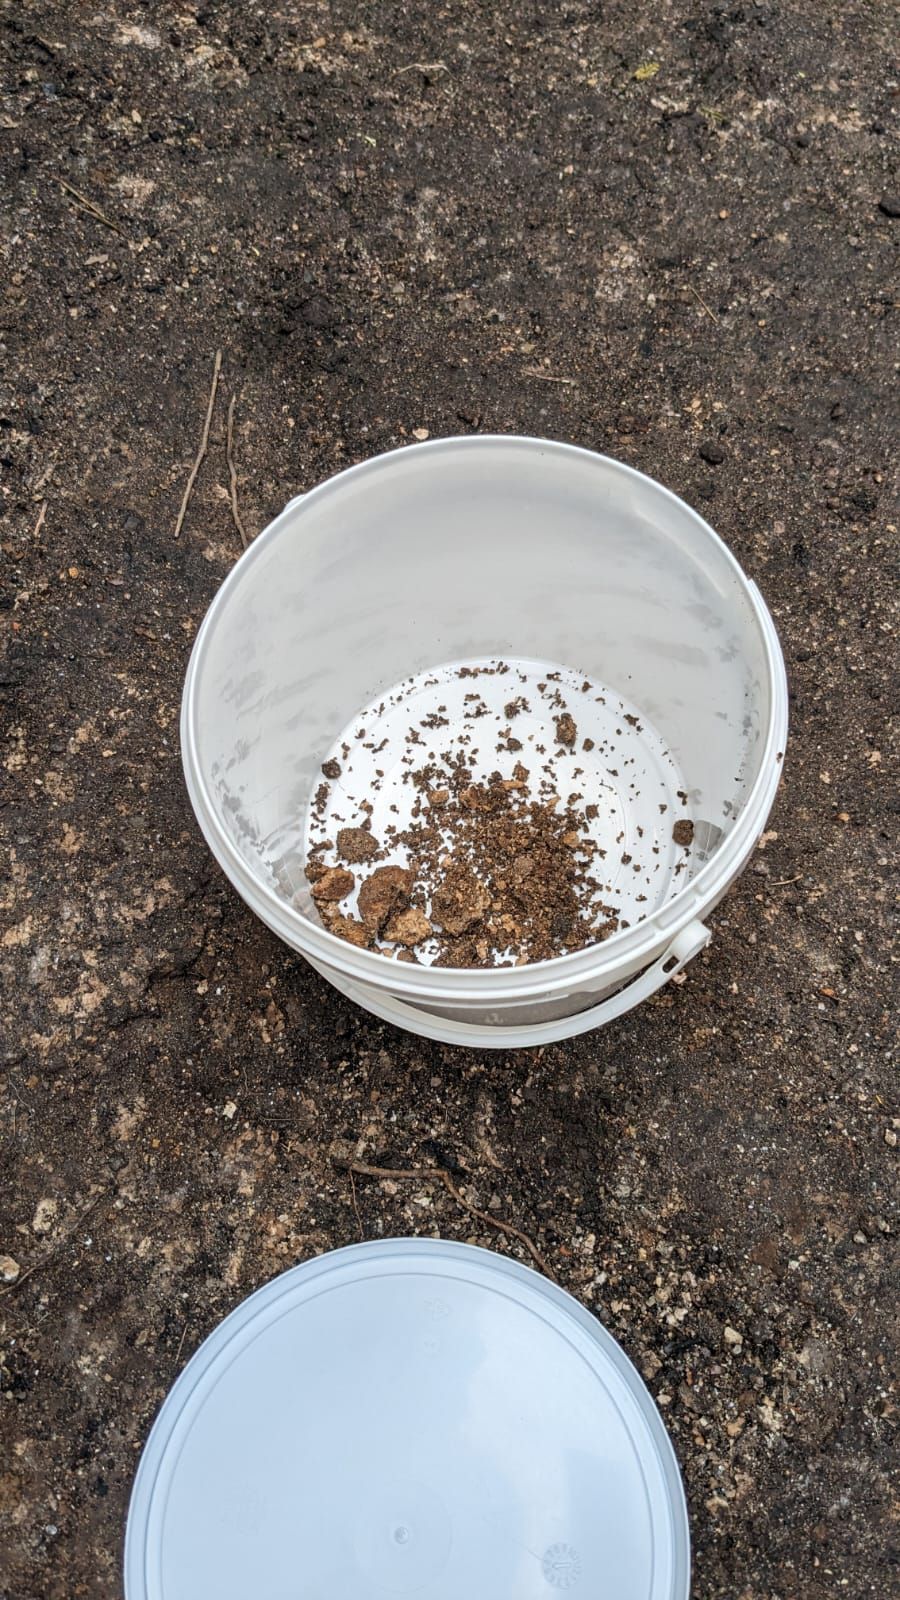
What is Decomposed Granite "GRUS"
Published 2yPublished about 2 years ago
While cleaning the ruin, we encountered a big granite stone floor. Only one problem, the stone floor seemed super brittle, like we could have dug it out with shovels. Could the stone have been rotting? Our guess is that we are dealing with decomposed granite. “grus”. The wikipedia is quite instructive about it: here is the link:
https://en.wikipedia.org/wiki/Decomposed_granite
Apparently, granite is made of 3 main rocks and one of them can rot, transforming into silica and clay, crumbling down into a gravel sized weather rocks. It is apparently used for petanque floor, alley, pavement, driveway, pathway,...
One of us suggested that we could try to use the falling silica and clay (kaolin?) and make it into a mortar, maybe even the mortar we would use to renovated it. that would really be a cool way of re-using a crumbling down wall…
4
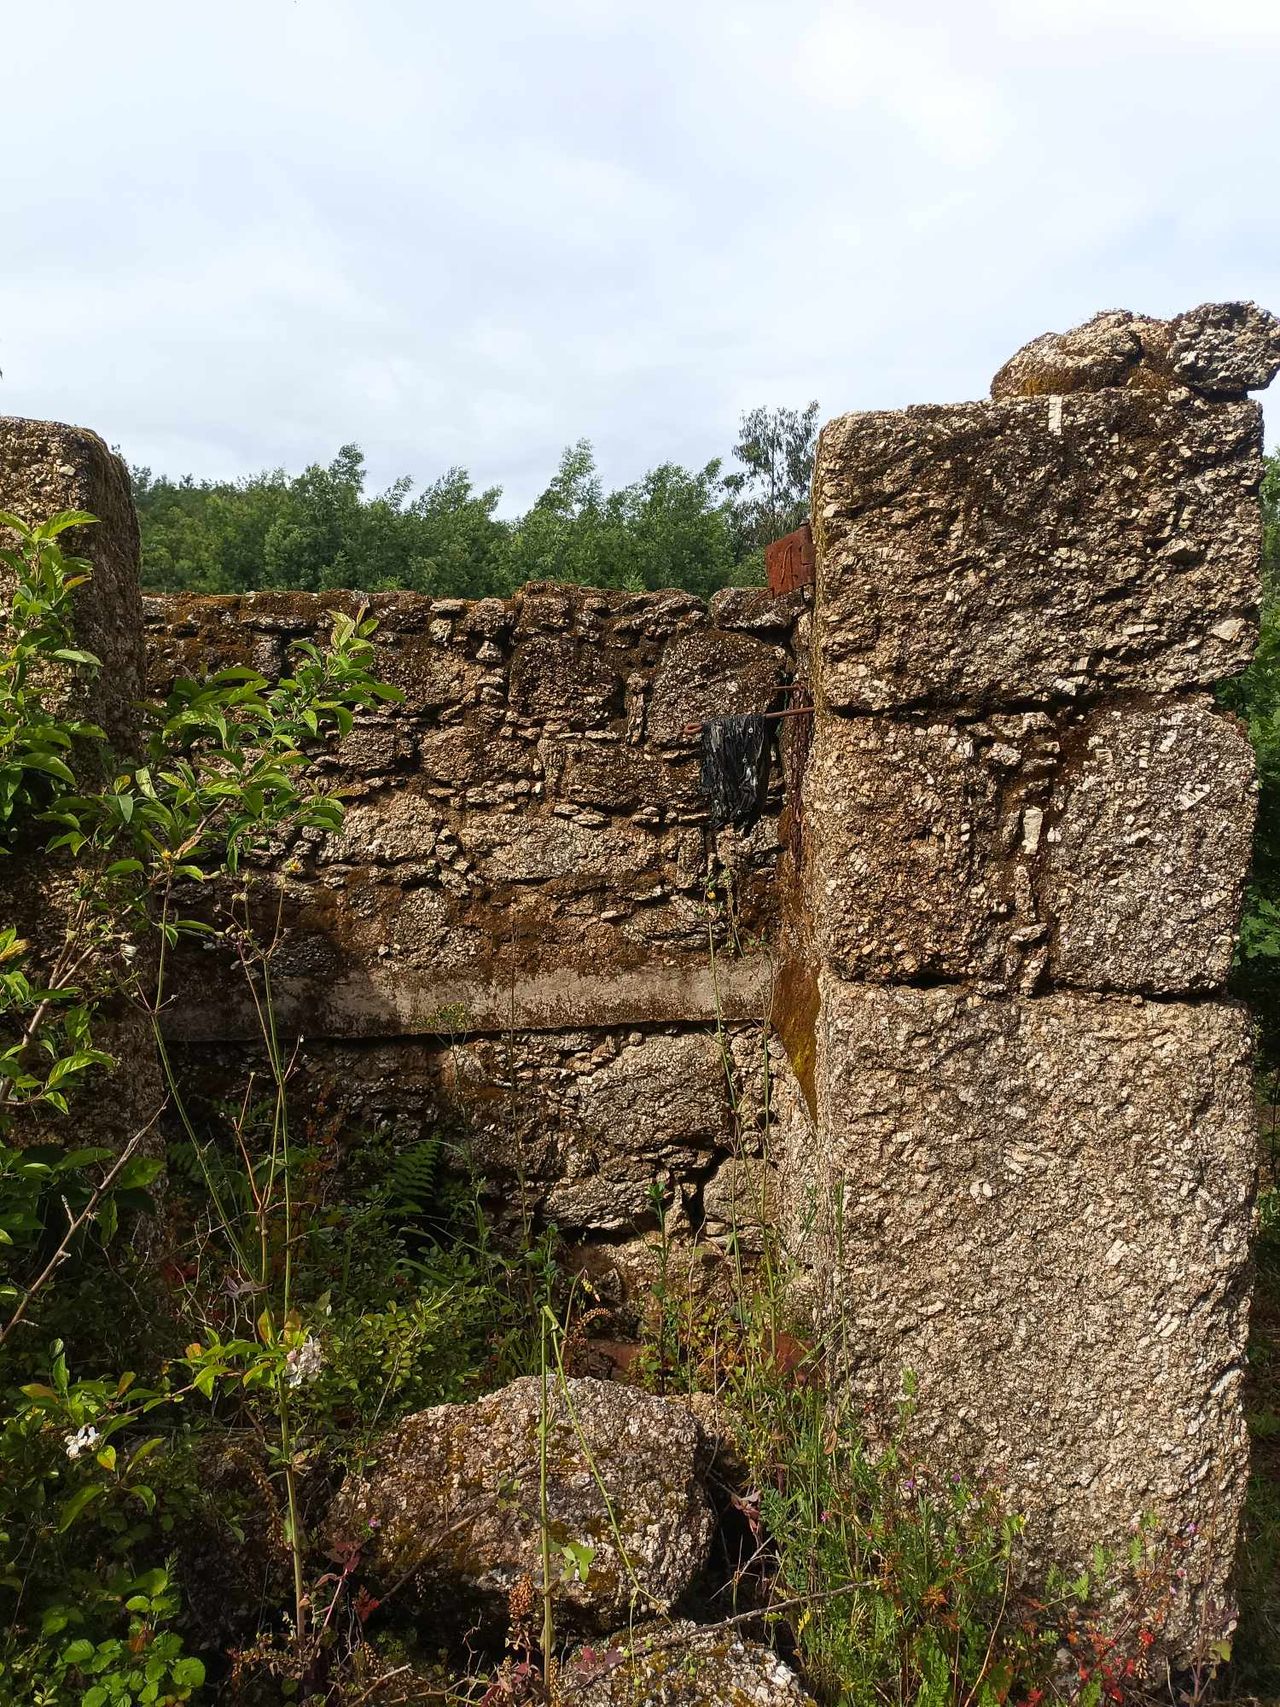
Can we understand how the wall was built?
Published 2yPublished about 2 years ago
In this article, you can find a bit more understanding of how wall are made:
https://criticalconcrete.com/how-to-build-a-stone-wall/
first we look and after we draw conclusion.
The mortar is falling apart, but the walls remain strong, no one of the big rocks are loose, they hold together and stay in place without support. We can then conclude that they built the wall ‘’dry’’ (meaning first without mortar) then added the mortar as an insolation and a filler.
We can also notice that some (not all) small stone are coming off with the mortar. that would mean that the ones that are stuck are structural, they are stabilizing the big stones. The loose ones on the other hands, probably were places to fill in the mortar.


5
Intro of refurbishing the walls
Published 1y. Edited 1yPublished almost 2 years ago. Last edit about 1 year ago
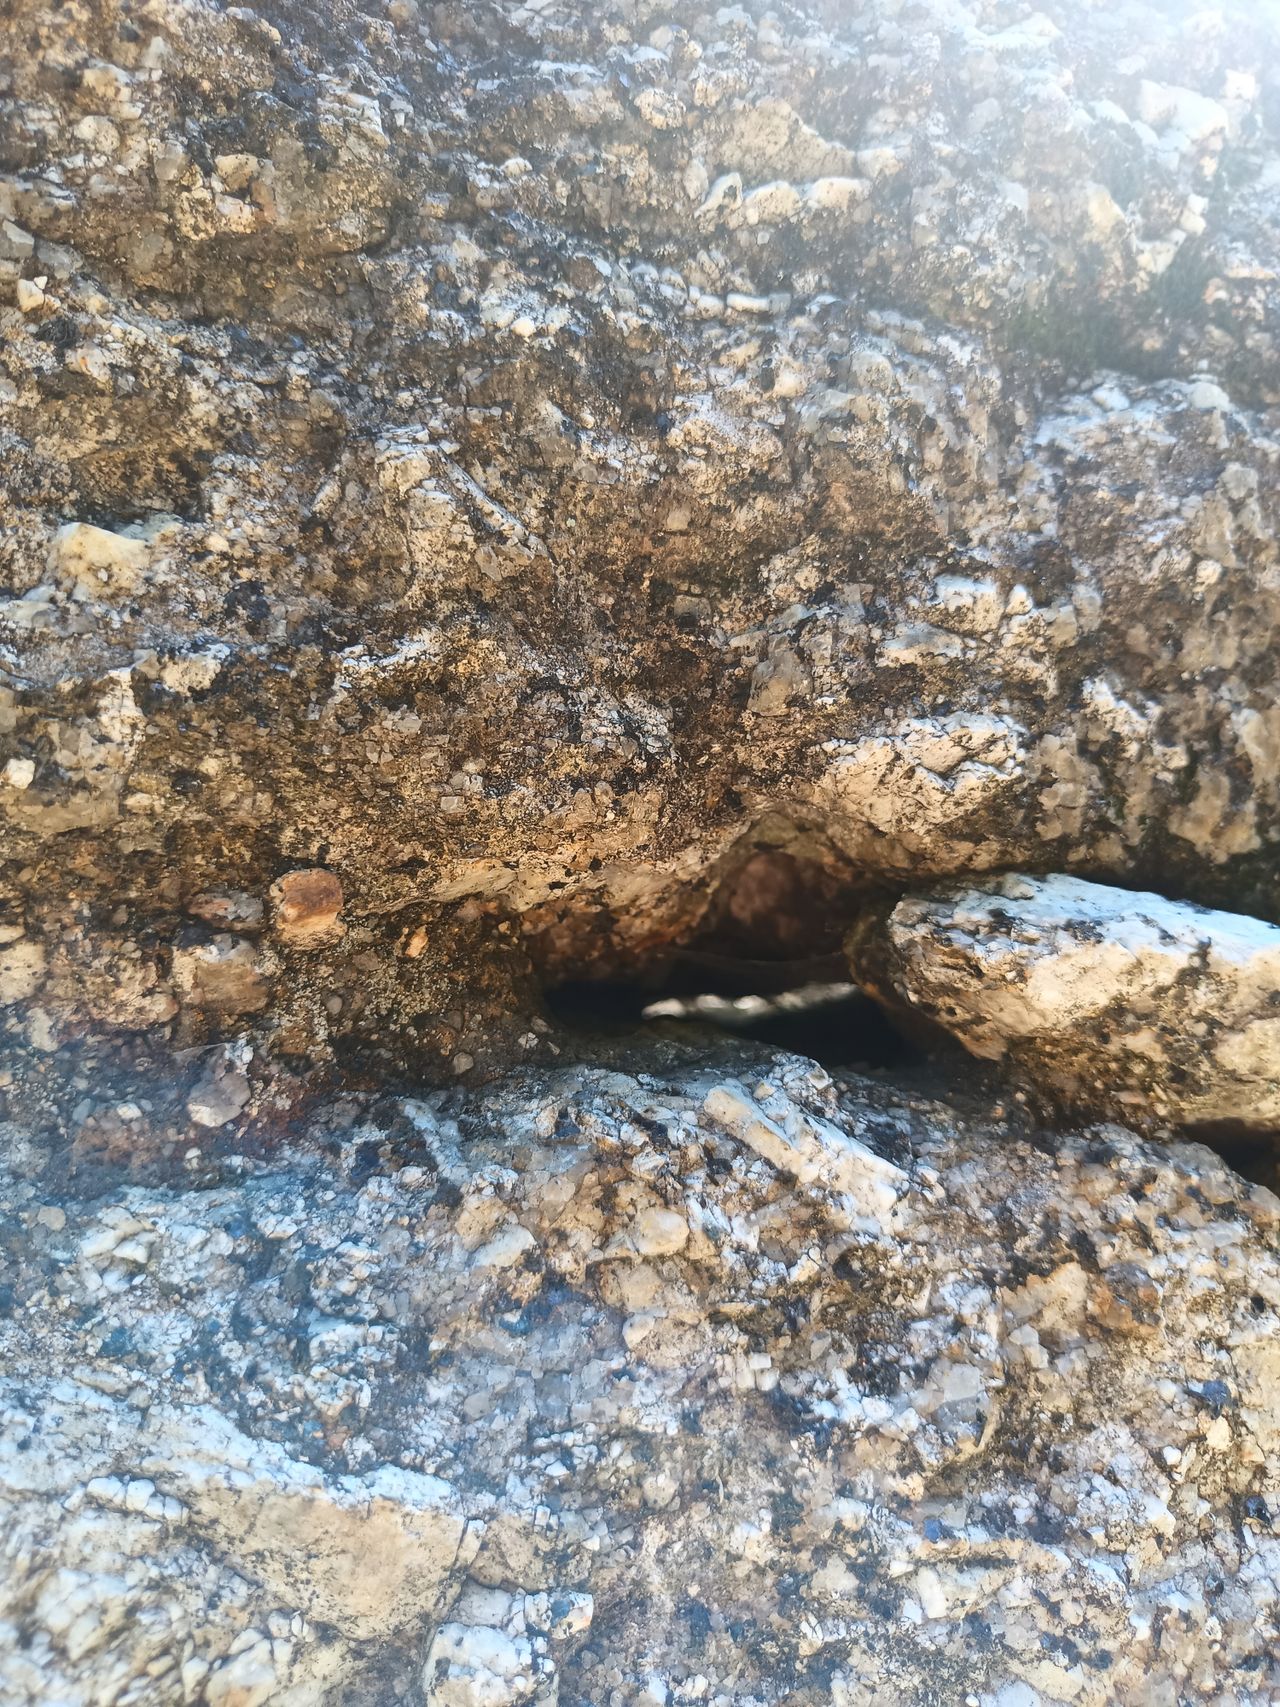
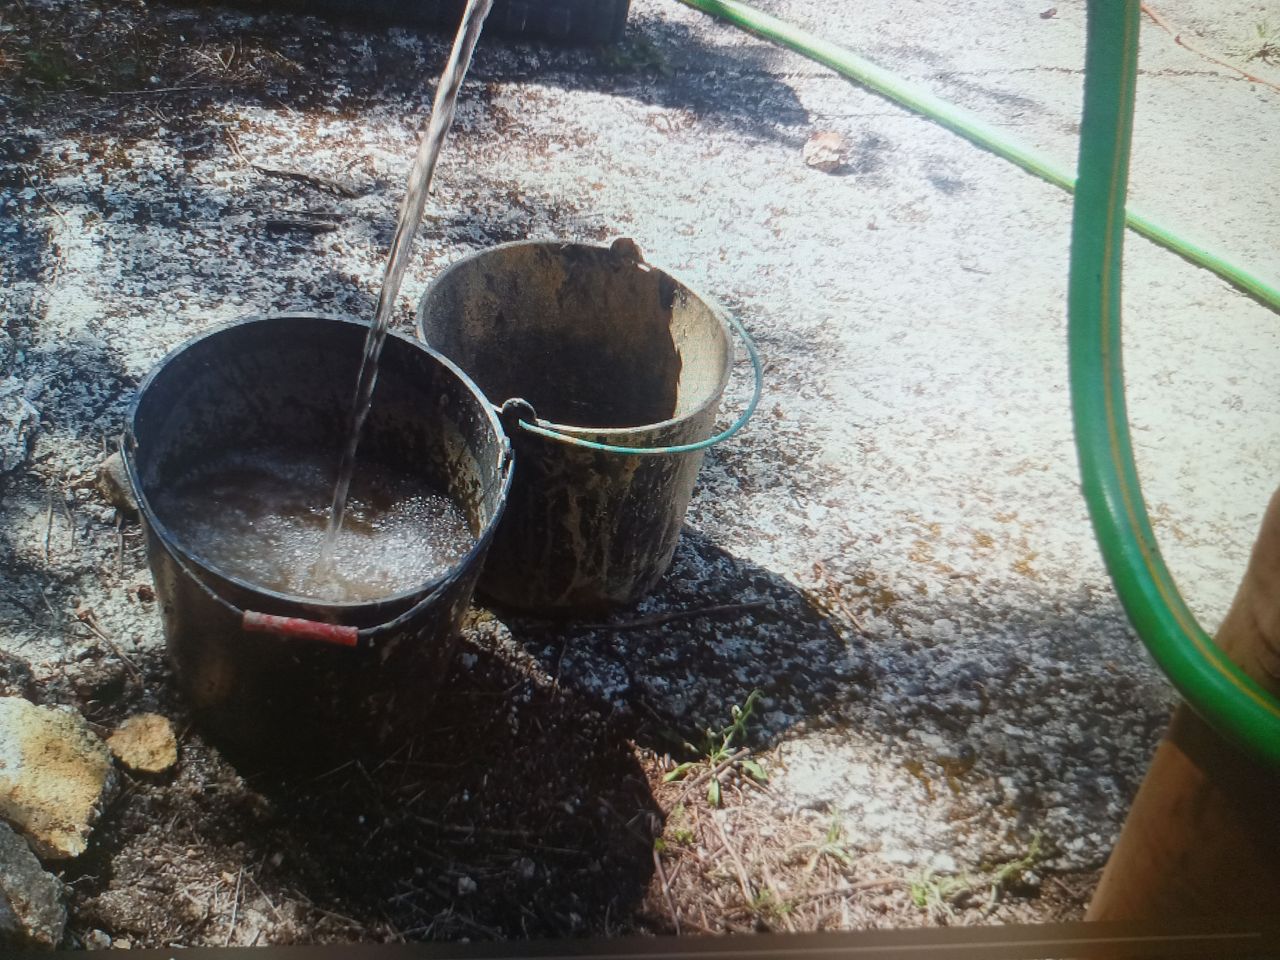
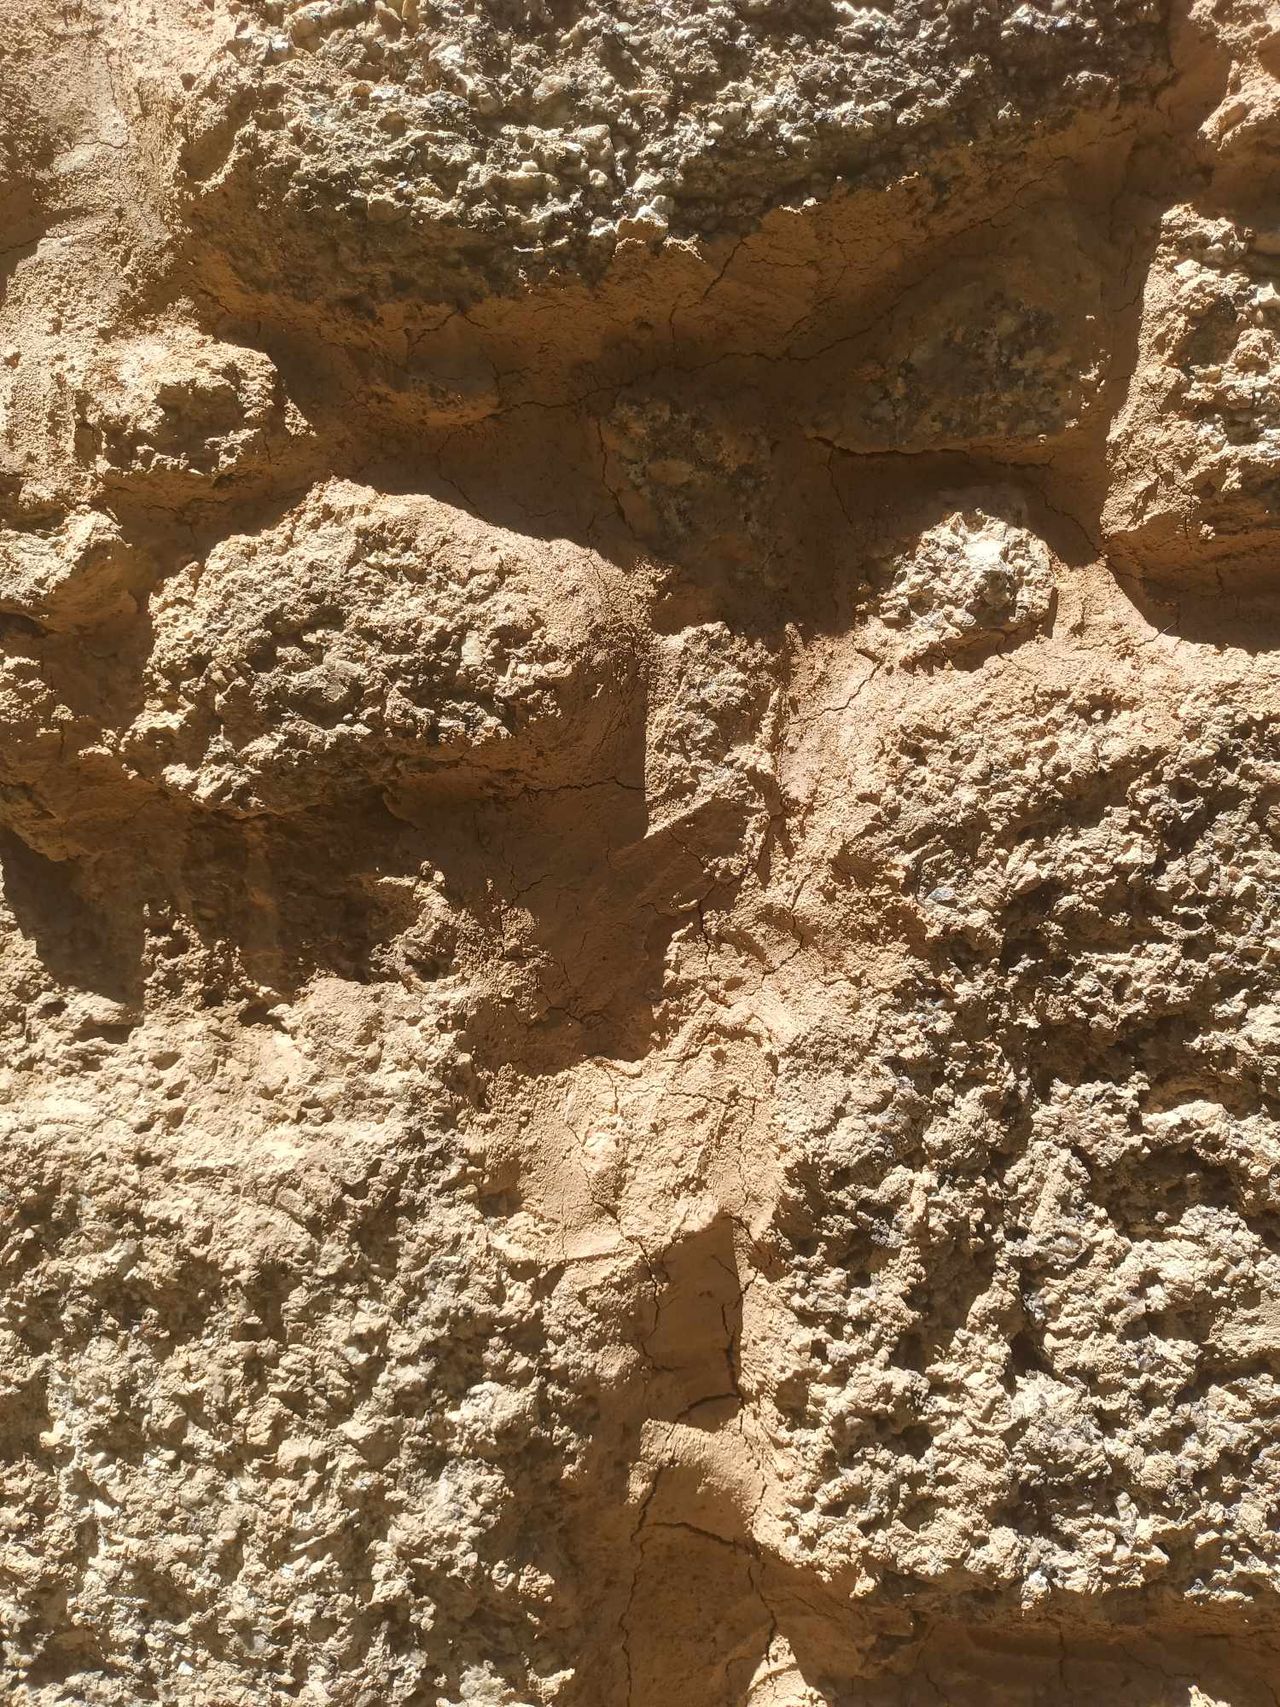
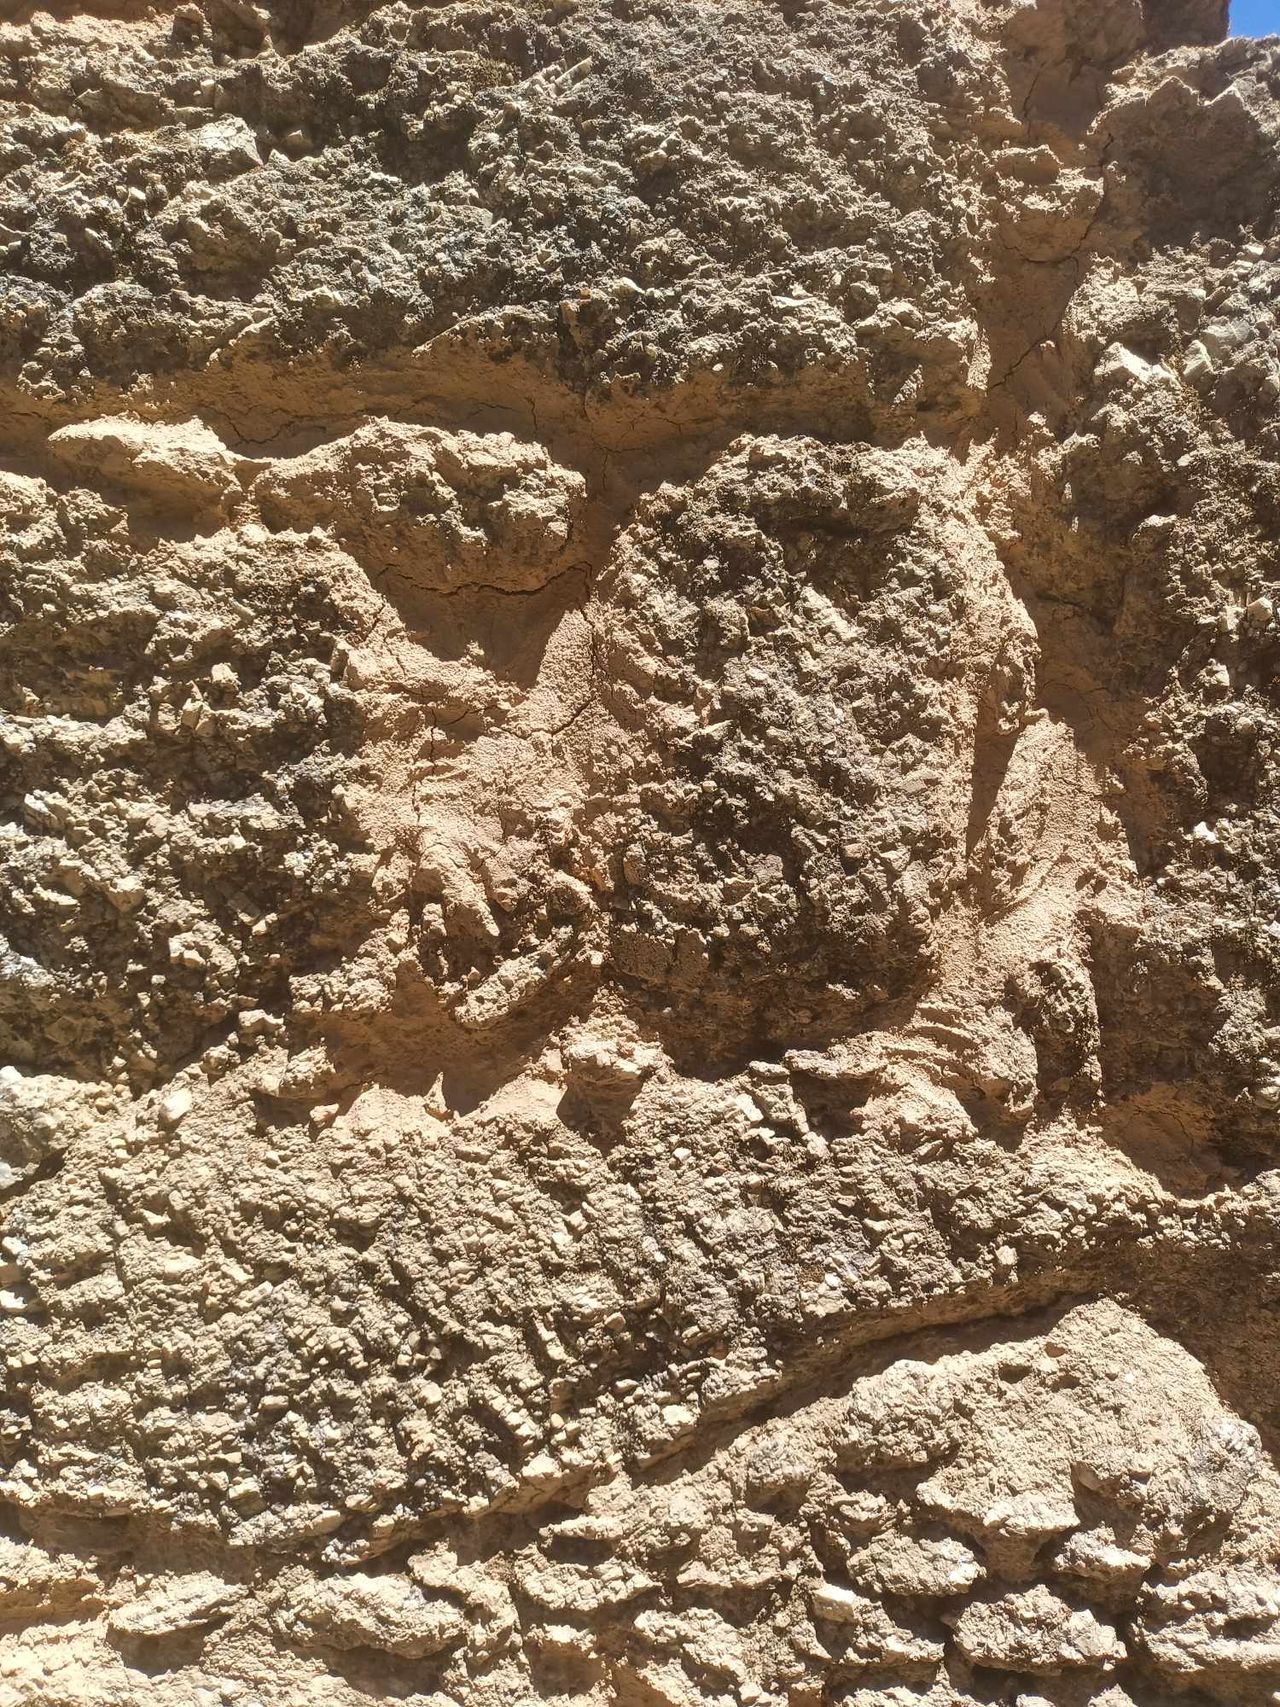
After time and fires, the mortar between the stones is completely eroded and exposed. You can even see large holes in some places. Our work will be to fill the spaces between the rocks with natural mortar. Before we start, this is our tools checklist and safety list.
Tools checklist:
+ Trowels
+ Cement mixer (bought on marketplace for 150e, draws little energy)
+ Water hose (2x50m to reach the ruin from BaseKamp)
+ Many many many buckets (we got 8)
+ Sponges (or brushes to splash the water onto the wall)
+ Drill and a mixing paddle
+ Metal brushes
+ Wheelbarrow
+ Tarp (protect tools and to have a clean place to dump the mix onto)
+ Chainlift
Safety check list
+ Safety shoes
+ Helmet
+ Dust masks for lime, clay, gruss, all mineral particules flying
+ Always work all on one side of the wall
+ Anchor the scaffolder to the wall for stability
+ Don’t take out the stone that aren’t loose, maybe they are structural
6
What are the steps to refurbish our wall?
Published 1y. Edited 1yPublished almost 2 years ago. Last edit almost 2 years ago
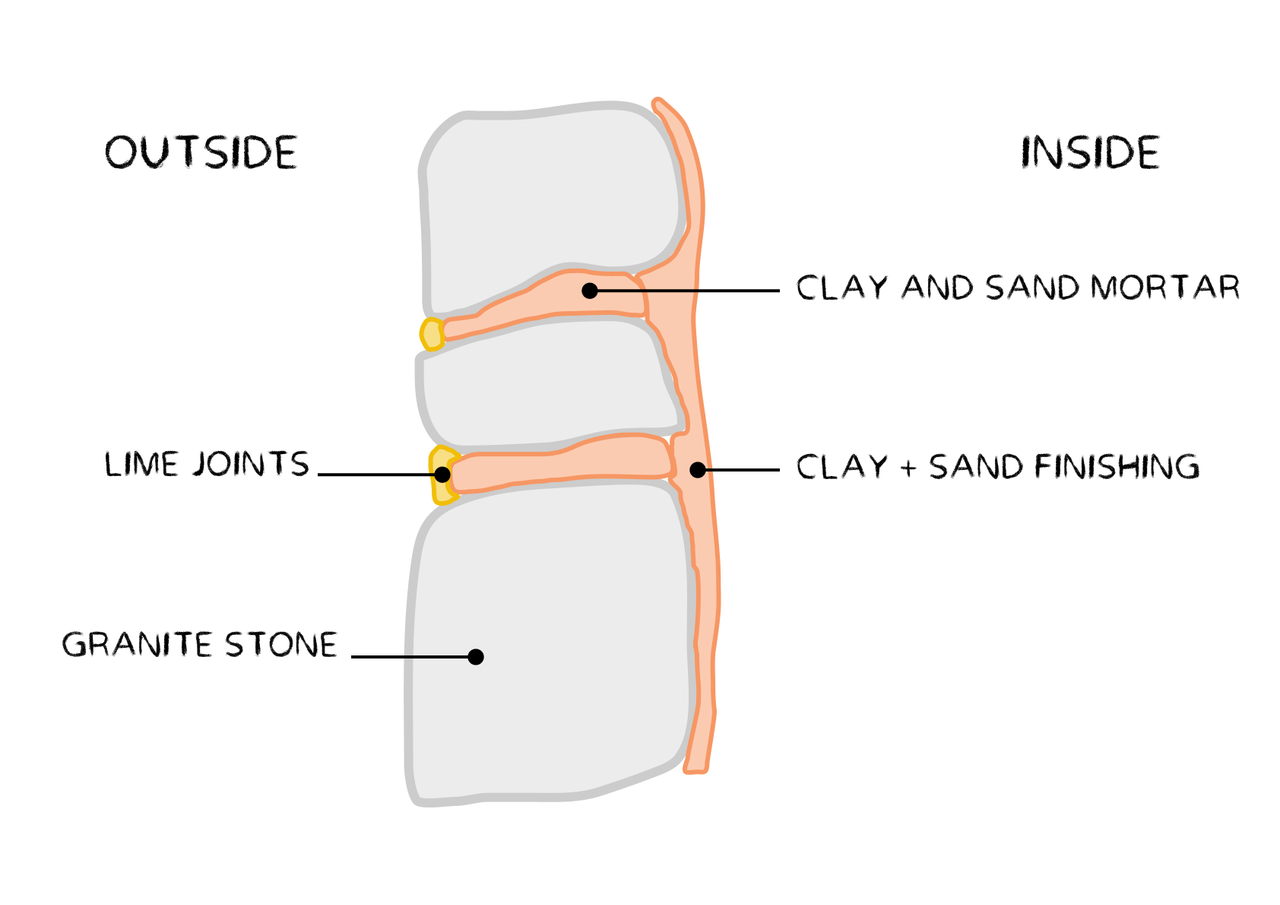
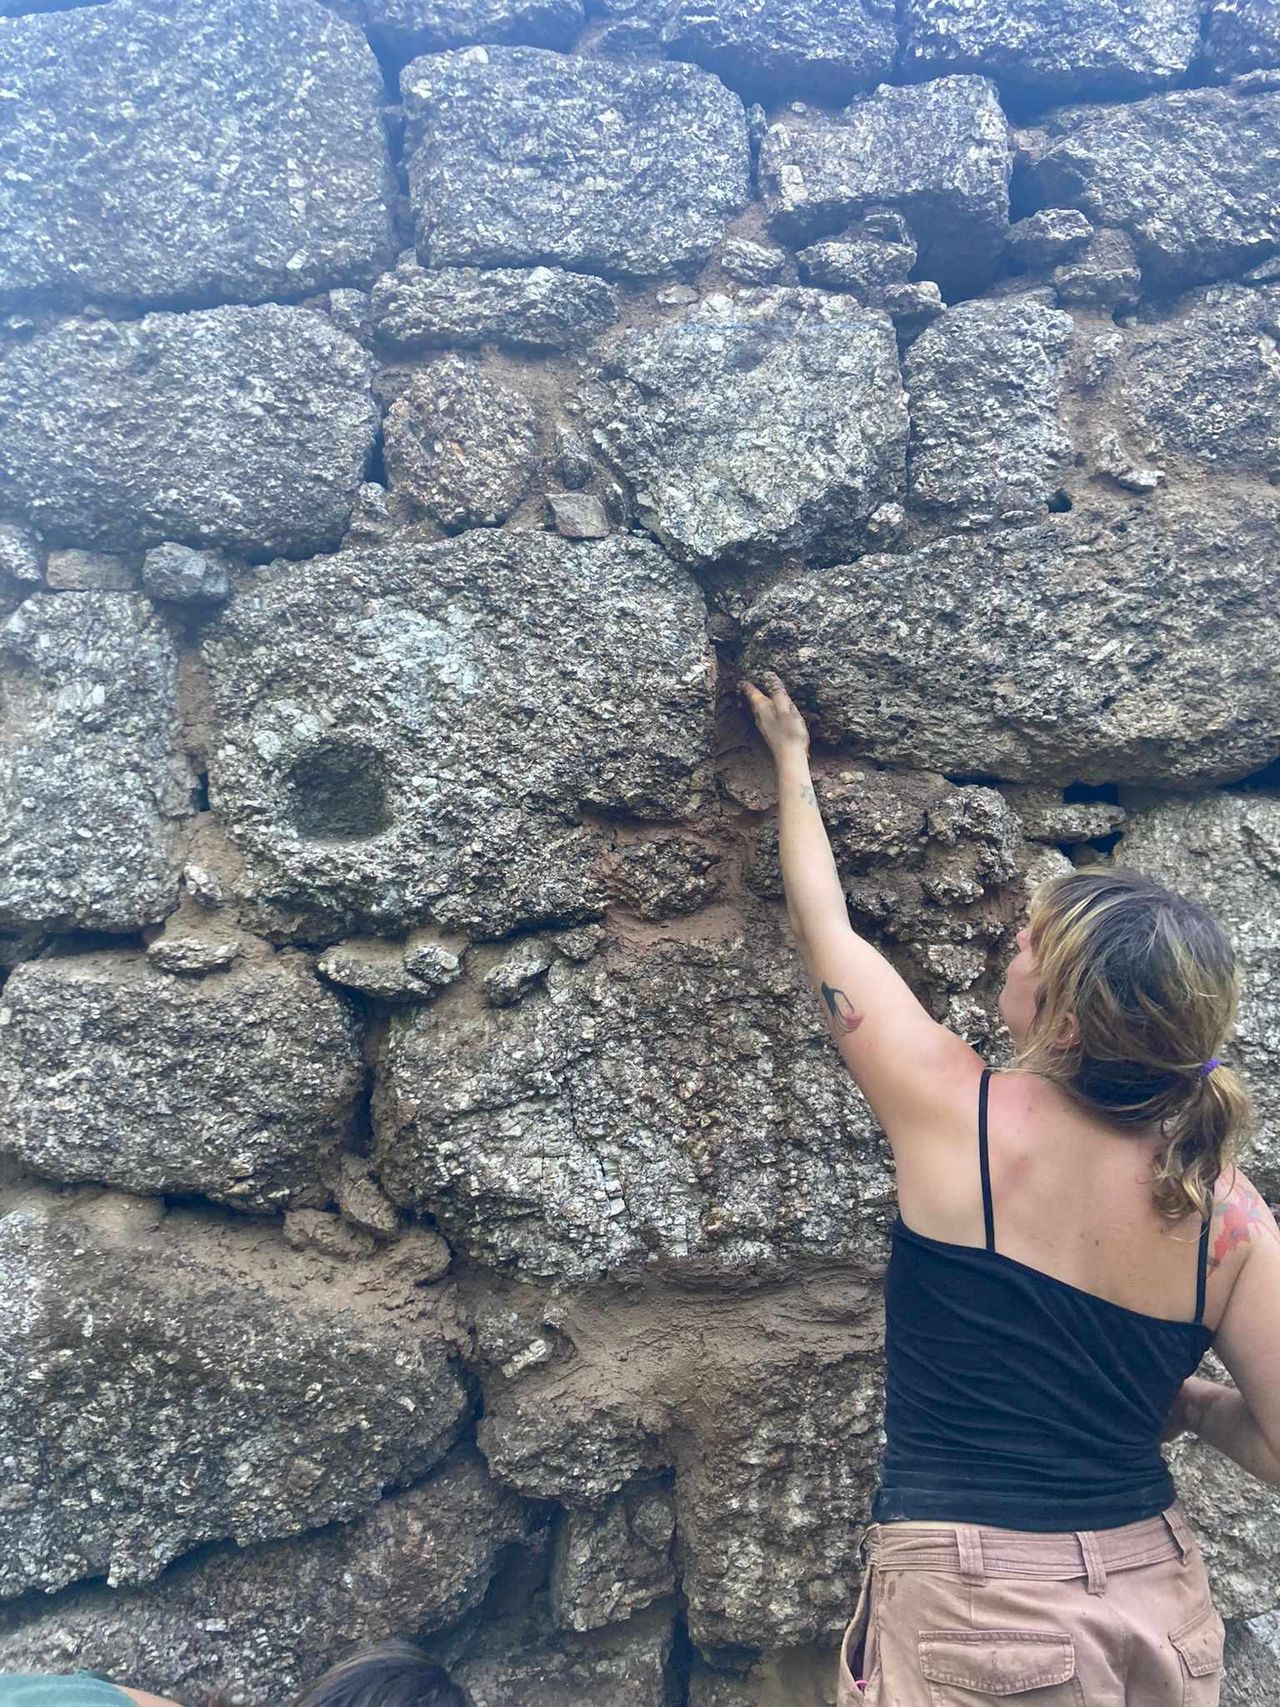
Mortar and dry stone
Looking at the ruin, we established that it is a dry stone wall. It means that the walls stand on themselves without mortar. The stones are balanced and stable. The mortar isn’t used as a structural element but as a filler material. We will use differents natural materials to fill the hole and make our mortar.
First we will fill the in-between the stones of the walls.
Then we will make the outside wall waterproof with a layer of lime on the joint.
And to finish, there will be some layers of clay/sand mix in the inside, harmonizing and insolation of the wall.


7
What is lime? How to find it?
Published 1y. Edited 1yPublished almost 2 years ago. Last edit almost 2 years ago
Use of lime mortar for stone work
Looking on the internet for cement alternatives, one of the most widely used is lime. It's a more ancient mortar material that can be applied very similarly to concrete. We found this website helpful:
https://criticalconcrete.com/lime-everything-you-need-to-know-to-get-started/
What we understand from it is that there are different types of lime on the construction market: Quicklime (reactive and corrosive, used in industrial and chemical settings), Hydrated Lime (Quicklime+water) and Hydraulic Lime [HL] (less altered, hardens when in contact with water, much like cement). We are most interested in the last one, specifically Natural Hydraulic Lime [NHL]. It is produced by burning limestone.
This website helps to understand how to make a mortar out of NHLime:
https://www.roundtowerlime.com/post/guide-to-mixing-natural-hydrualic-lime-mortar
There are 3 types of NHL:
NHL 2 - soft and slow, more flexible / conserving deterioration on stones and bricks / more permeable
NHL 3.5 - average use, general masonry
NHL 5 - Big jobs, strong and fast, use for intense water exposure.
*Good to know that it isn't always best to buy the strongest lime possible. The good lime is the one suiting your needs. This website helps understand how to choose the one you might need.
https://www.lime-mortars.co.uk/lime-mortar/guides/hydraulic-lime-which-nhl
NB “Argamassa de cal“ is lime mortar in Portuguese
How to find lime?
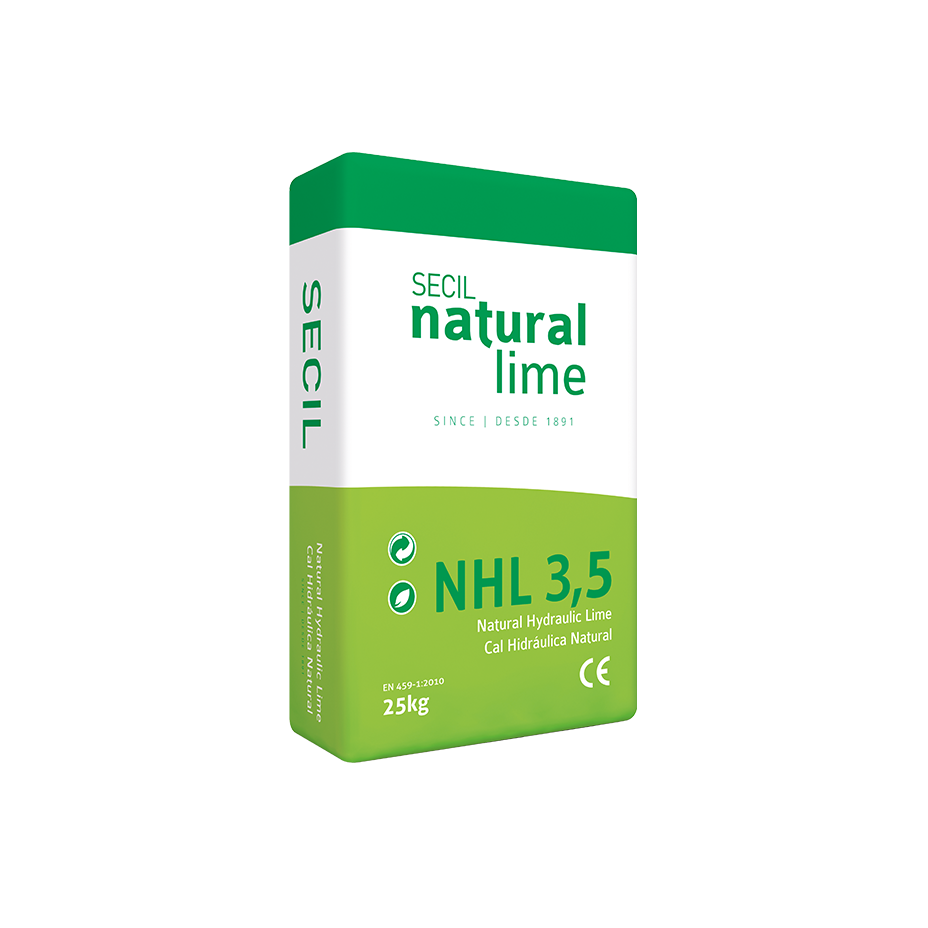
We struggle quite a bit to find Natural Hydraulic Lime. A lot of merchands had Hydraulic Lime cut with cement. We eventually found a shop specialized in mortar component, that worked with a company that make the NHL. The brand is called Secil and it is made here in Portugal. We did not look for other countries but with a little bit of web surfing, nothing is impossible.

8
What is clay and where to find it?
Published 1y. Edited 1yPublished almost 2 years ago. Last edit almost 2 years ago
Clay is a type of fine-grained natural soil material. Natural clays show a variety of colours from impurities, such as a reddish or brownish colour from small amounts of iron oxide.
Between one-half and two-thirds of the world's population live or work in buildings made with clay, often baked into brick, as an essential part of its load-bearing structure.
Where to find clay?
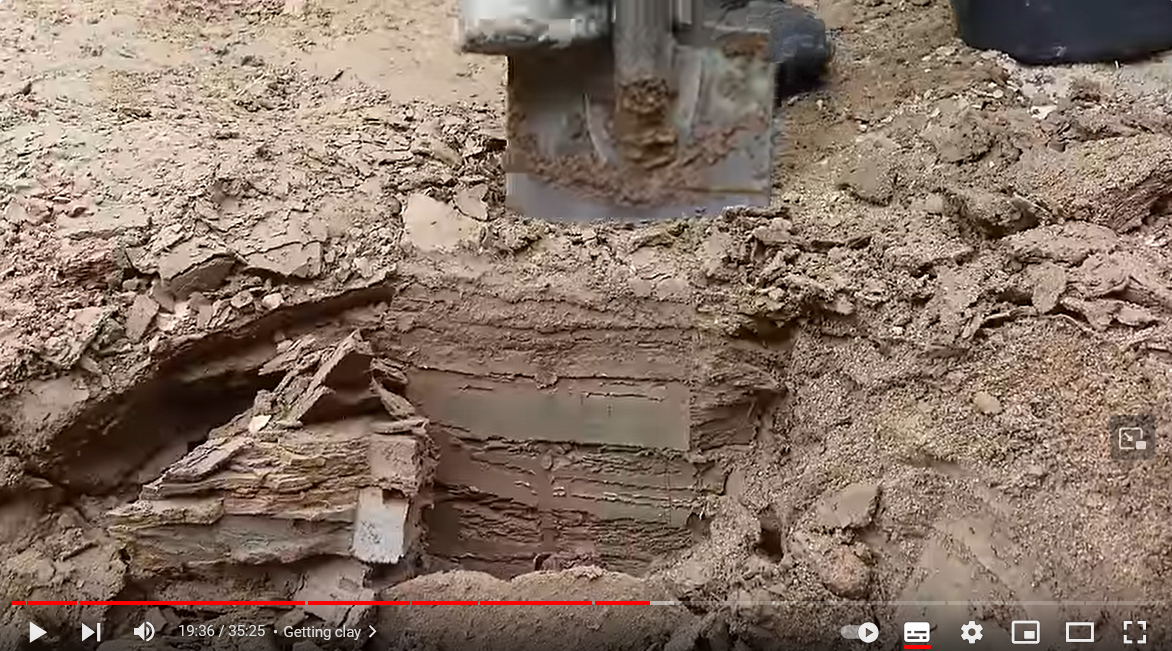
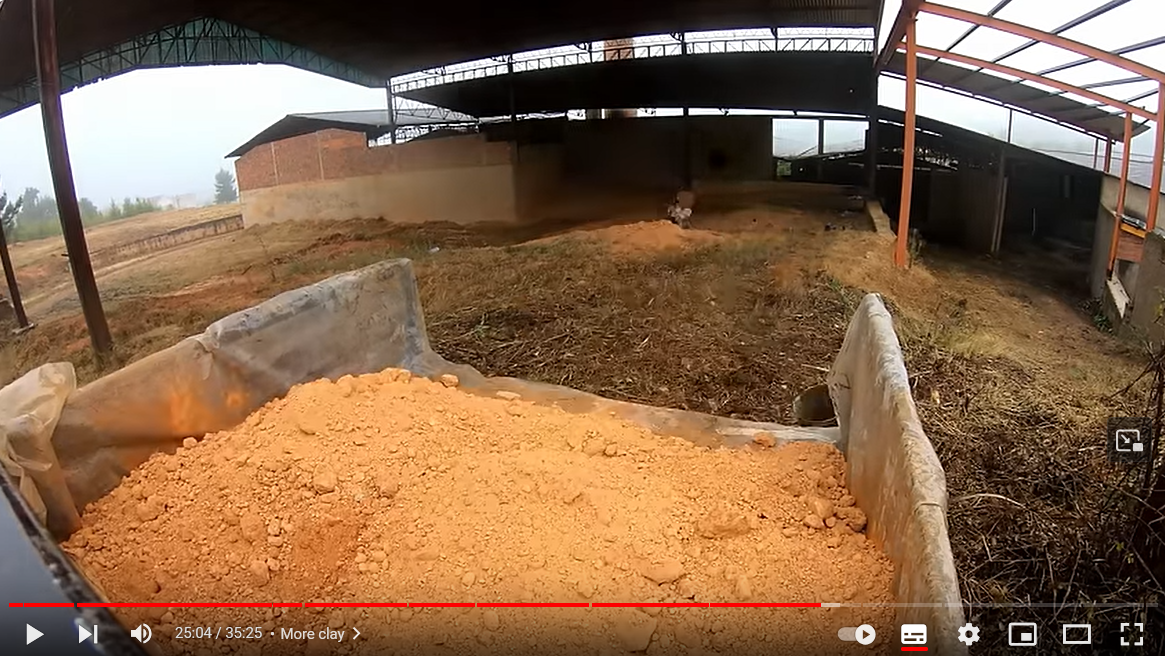
Finding clay was one of our biggest challenge. There was no “easy” access to a large quantity to build with it in the usual construction shops. They only offered expanded clay or ceramic 10kg leather hard clay super pure. We don’t need a very pure clay because we aren’t baking it. We need a place where we can come and dig ourselves with shovels and buckets. We need about a ton of it. We have to take less usual paths to get there. Calling tiles factories, a ceramic museum, consulting knowledgeable locals for a brick making atelier... Eventually, someone from the village told us that there used to be a clay hill, that ran out of material decades ago. We went out of despair and curiosity and we found clay, let’s see if we can get enough...
Later on, we heard about a closed brick factory that had left all their raw materials on-site. We went and took another pick-up loaded with good clay! The local intels were the solution!
9
How to make our mortar
Published 1y. Edited 1yPublished almost 2 years ago. Last edit almost 2 years ago
How to make a good mix?
Now comes the mathematical part:
A “normal” ratio is 1 part water, 1 part clay, 3 parts sand (volume). This is a ratio with pure clay.
One of our clays, the first one that we dug up from the hill, has a lot of sand already in it so we could adjust our ratio to it. A good mix is not too sticky (too much clay), not too loose (too much water) and not too brittle and hard (too much sand). If you did like us and dug your own clay, you can be sure that you will have to do this kind of readjustment.
If your mix cracks too much after drying, you need to add some sand in your ratio.
Remember to always mix the clay with the water first and then add the sand little by little.
There are different tests that you can run to find your good ratio.
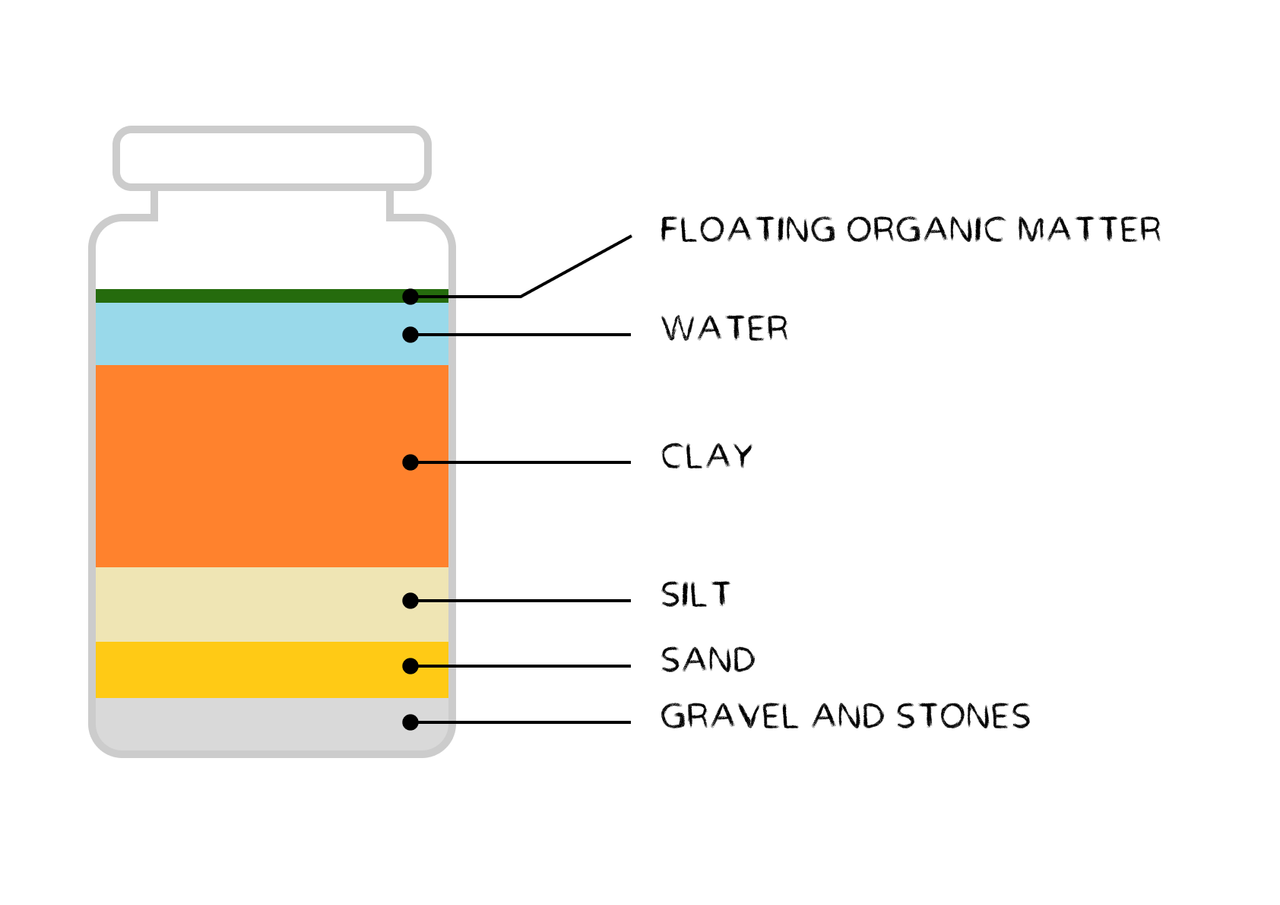
Test 1: The Mason Jar Soil Test
Fill a jar for a third with clay and for another third with water and shake the jar. Let it sit for two days and gravity will have separated all the components of your clay.
From bottom to top, you can find gravel and stones, then sand, then silt, then clay and floating around in the water is the organic matter that you don’t care about.
This first test should give you an idea of how much sand and silt are in your clay. You can then adapt your quantities to get your mix right.
Test 2: The Ball Test
To find the right ratio, make some balls with different quantities of sand added to your mix and observe them after drying. The strongest (hardest to break) has the right ratio.
Test 3: The shrinkage test
Put some of your mix inside of a mold, or a hole, and after two days, observe how much your clay has shrunk. It will give you an idea of how your clay acts when drying.


10
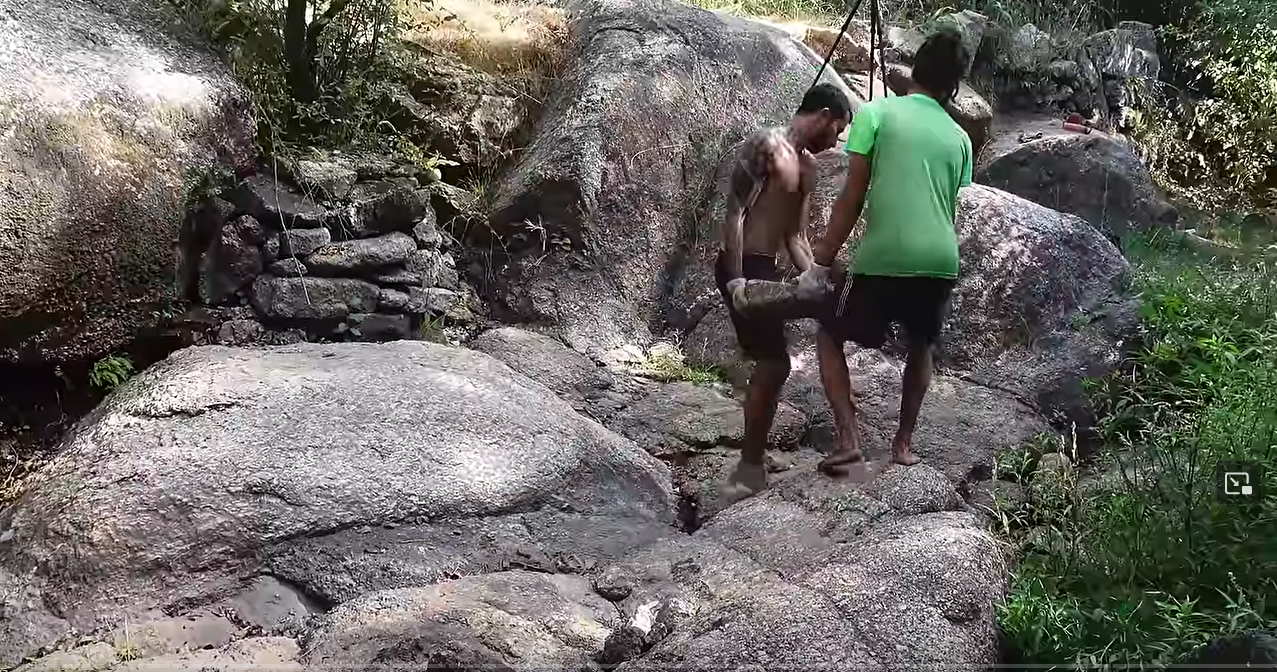
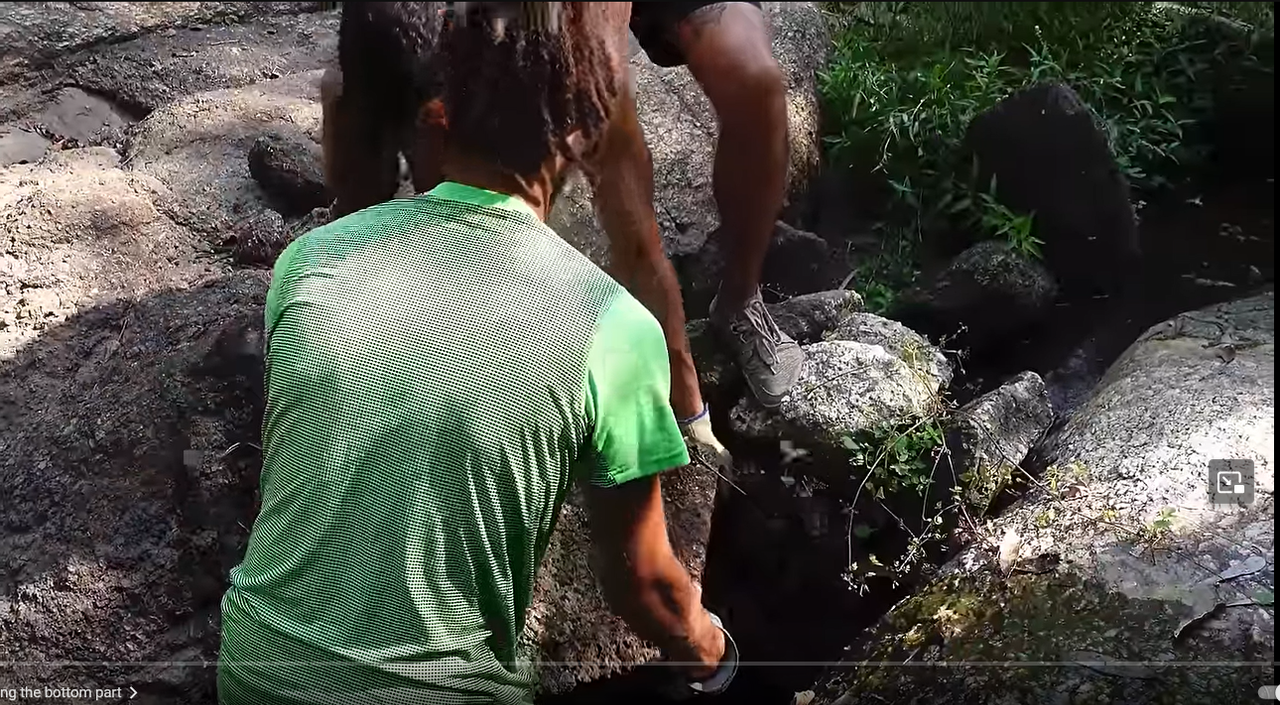
How to prepare the wall for the mortar?
Published 1yPublished almost 2 years ago
Before even starting the mortar filling work, we need to make sure the wall is ready to receive it:
Cleaning the stone from the moss (the lime plaster cannot grab onto organic matter) and digging into the pre-existing mortar (taking out the loose mortar and digging 1 or 2 centimeter in the solid one to make room for the lime plaster on the outside).
11
How to apply the mortar on the wall
Published 1yPublished over 1 year ago
The wall is ready to receive the clay and sand mortar.
For this step, we work starting from the top. We are bringing water, a sponge, cloth or brush in the water, a bucket of our mortar with one or two trowels and a bucket of stones for the filling.
After locating a place where the mortar is needed (a hole or a pre-existing mortar too far back), we wet the area to make it ready to receive our mixture.
Once wet, we apply the mixture with trowels or simply by hand, it is a bit more fun! If you go bear handed, remember to take care of your skin after, clay can really dry you out.
Apply the mortar with a down to top motion. If you are putting mortar in a too big volume and you can feel it falling out, it probably mean that you could help you with a stone. Put a bit or mortar, wet the perfect stone, wiggle it in and cover with more mortar.
If you mix feels to sticky = add some sand, if your mixture feels too dry = add water, too wet = add sand and clay, too sandy / grainy/ not sticky enough = add clay. Overall, the proportion are just a guide but you will understand the miture once in your hand.
You can try your mixture by putting a ball of it in your semi-closed hand and flip it around... If the clay mix stays for 5-10 sec, you are good to go!
Work your way down the wall.
If after some time, you see the clay and sand mortar drying and making cracks, you can re-wet it and go aver your work with a mortar that contains less clay and more sand. It is the clay that cracks while drying, the sand keeps it volume stable.
Here is the video where you can see us go through it:
https://www.youtube.com/watch?v=nygDCcH8cOw&t=1440s
This is a very cool, exciting and MESSY step of the process, enjoy!
12
Why did we choose to use lime
Published 1yPublished over 1 year ago
At this point, there are no more holes in the wall. All is filled, almost up to the surface of the rocks, maybe 2 cm below.
You have done the clay and sand mortar in the graph. Let's look at the graph for a moment.
The clay and sand mortar is an insulating binder that creates a block between the outside and the inside.
But this mortar is not waterproof, and we need to keep it dry and safe.
The next step is to put a big raincoat over it: the Lime Joints...!!
In all the places where we have been putting our clay and sand mortar, we will come and apply the lime joints. Lime work is bit more tricky because of the gear we need and also because it is the last finishing of the outter wall, it requires a bit of finess to get to a good and pleasant outcome.

13
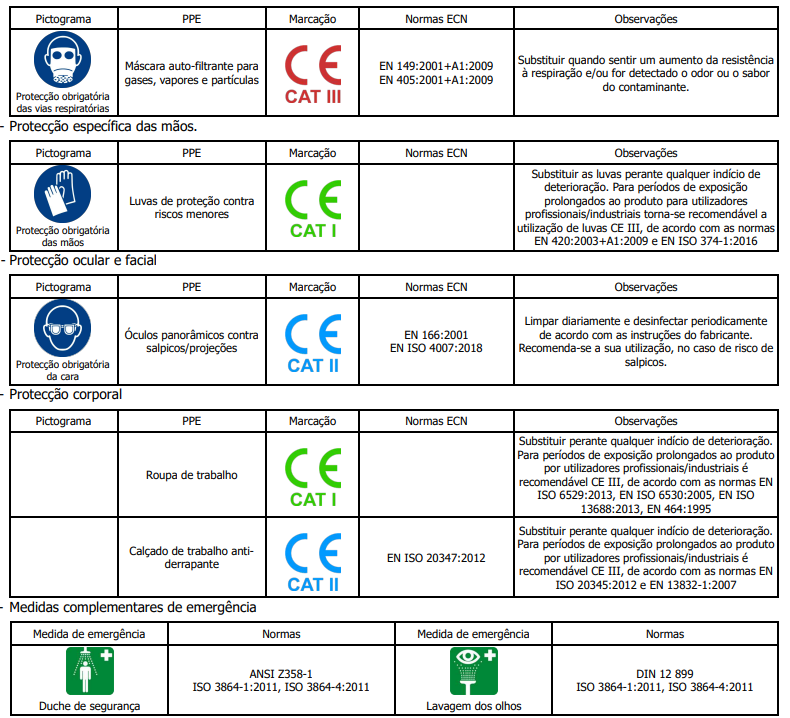
How to protect ourselves using lime
Published 1yPublished over 1 year ago
Lime is sold as a very thin and dry powder. Very thin particules that can get into your lungs, eyes and cause serious health damage. And after mixing with the sand and water, the lime will have a more liquid shape but will still be dangerous, especially for the skin and eyes.
So, no joke, we protect ouselves.
During the powder state: We are full one gear: Plastic gloves, we are using some very good thick plastic rubber gloves. Some goggles for the eyes and a dust mask. The mixing generates at lot of dust so we take extra care to stay away from those lime clouds.
During the mixed liquid state, we continue wearing the gloves and the eye protection, but we don't really feel the risk of the dust in the air anymore, as the powder is now blended with the wet sticky mixture. We feel confident not using dust mask but it is recommended to use them at all cost. This is a bit of a grey area. We are divided on the subject ourselves but at the end of the day, we take precaution for ourselves as adults. Everyone responsible for themselves and responsible to say something if they witness a situation that they estimate dangereous.
Having clear water on the construction site is quite important. You could get an lime related emergency that requires that you rince yourself, your eyes or your skin, etc,... Having water in case of a situation like these can save you great trouble.
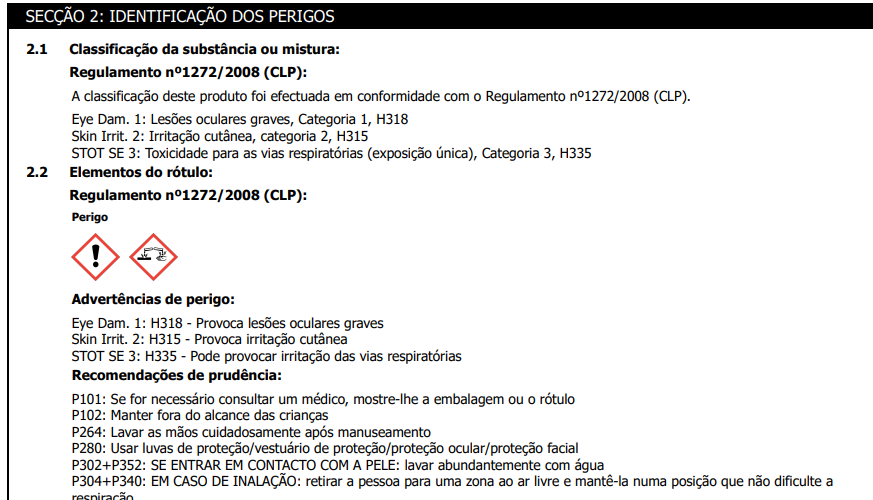
14
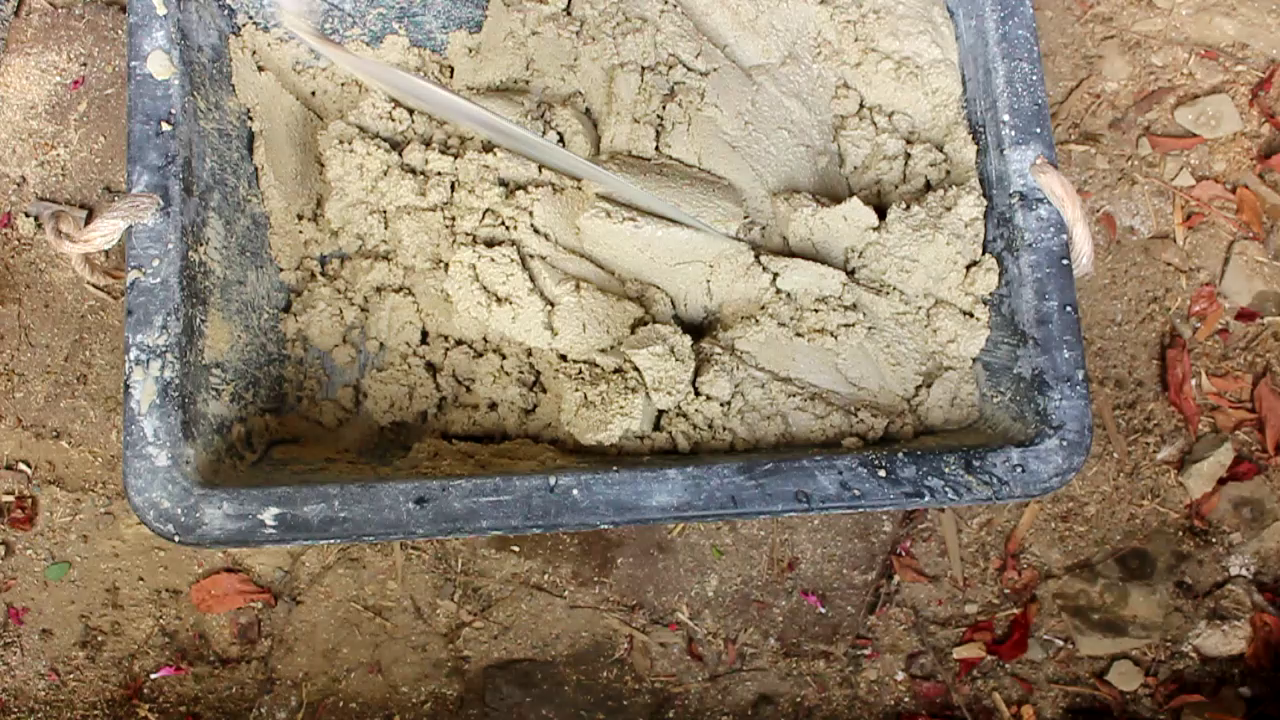
How to make a lime mix
Published 1yPublished over 1 year ago
We are going to mix our lime with sand.
The ratio we used is 1 of lime for 2,5 of sand and add water little by little until you obtain a mix that has the same consistency as the clay mix. You should be able to take some mix in your hand, make it settle in your hand and flip it around, it should stay there for at least 5 sec. You can also tell by sliding your trowel on top, you know you nailed it when, by adding a little pressure, you end up with a very smooth surface.
I found an article that explain more on the reason and story of the ratios: To go deeper.
https://www.buildingconservation.com/articles/mythmix/mythmix.htm
To recap the article, they explain how every lime is different and that after historical events and the apparition of portland cement, people started using the 1:3 ratio as a truth for all cement like binder. But the craftmanship behind is a little less predictible. The article itself doesn't give you much on how to determinate which ratio you should use. In the end, the easiest way to be sure of your ratio can simply be to make a test before using it on your wall.
also: don't freak out if your lime mix is grey. it will get white during the drying phase. And the drying takes longer than cement.

15
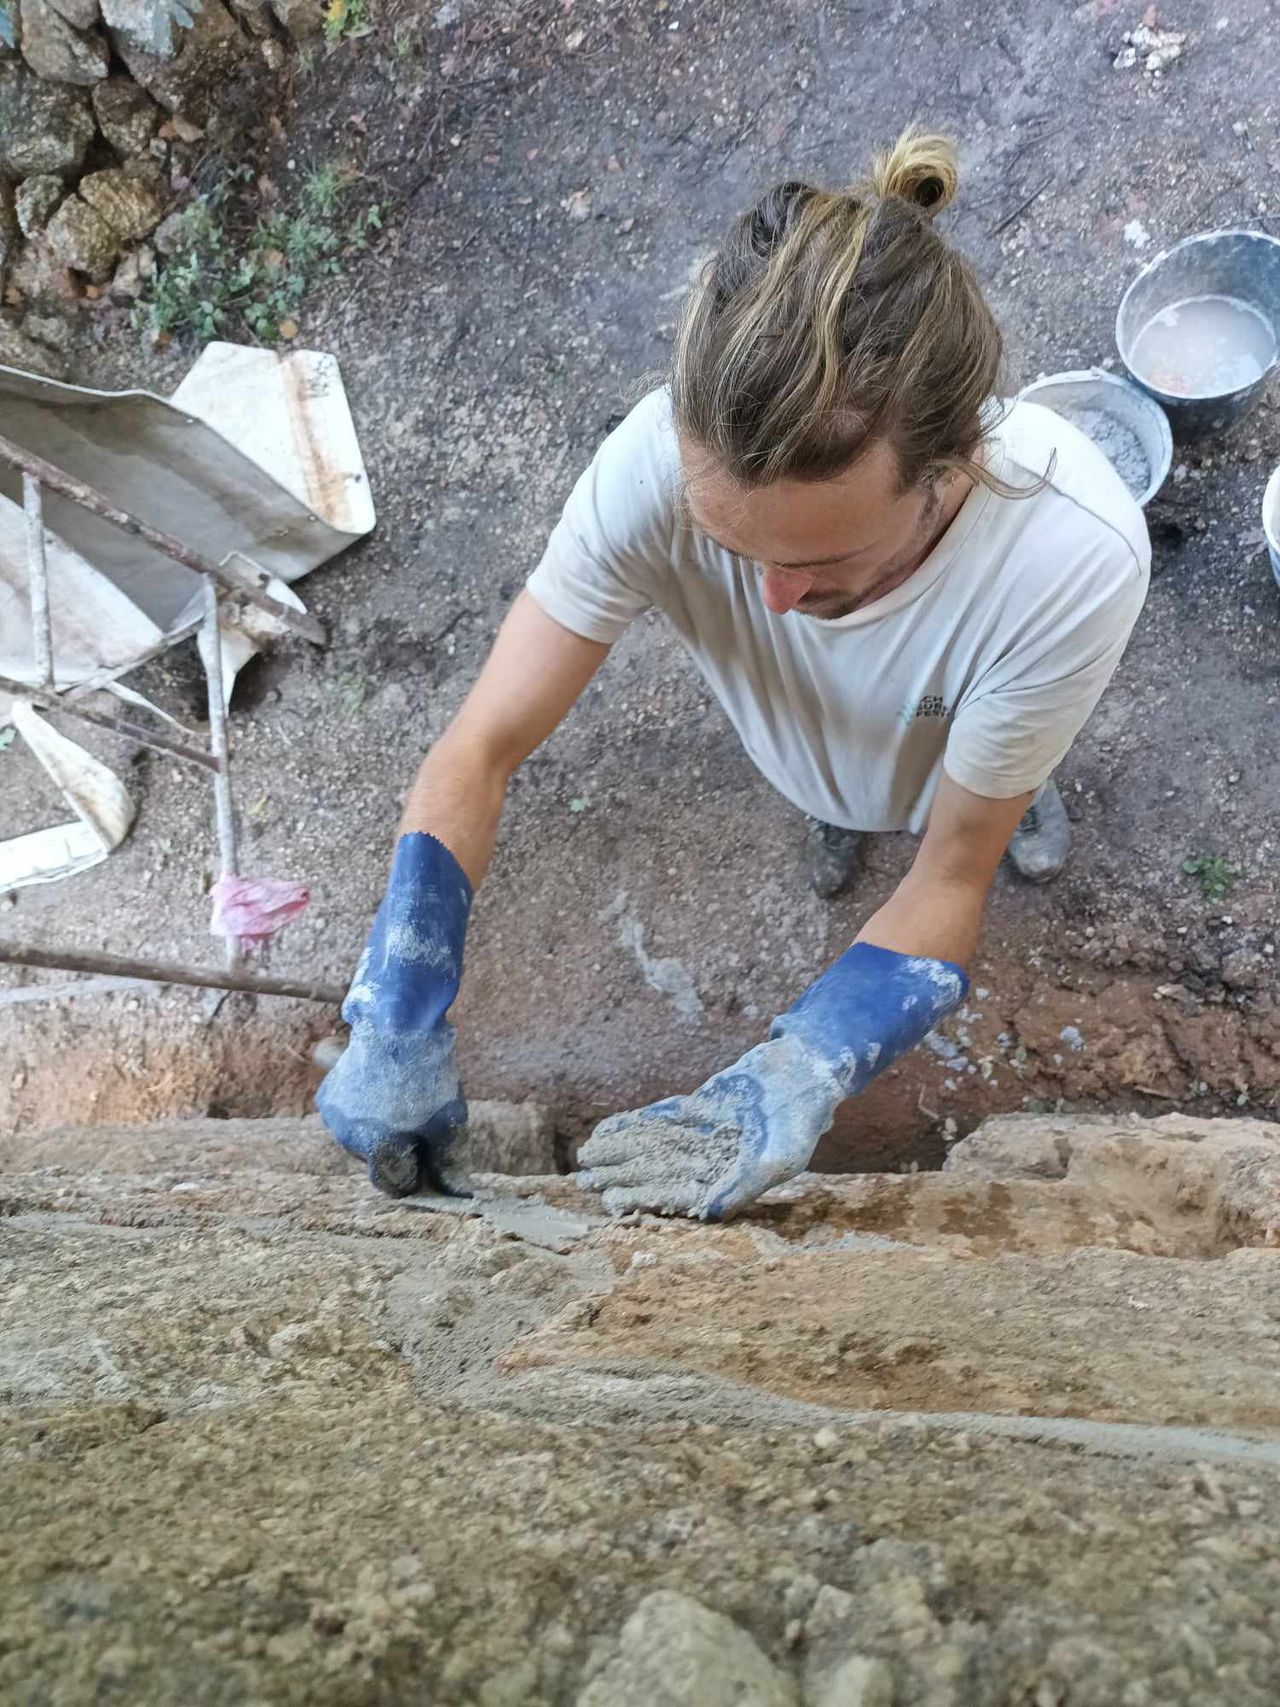
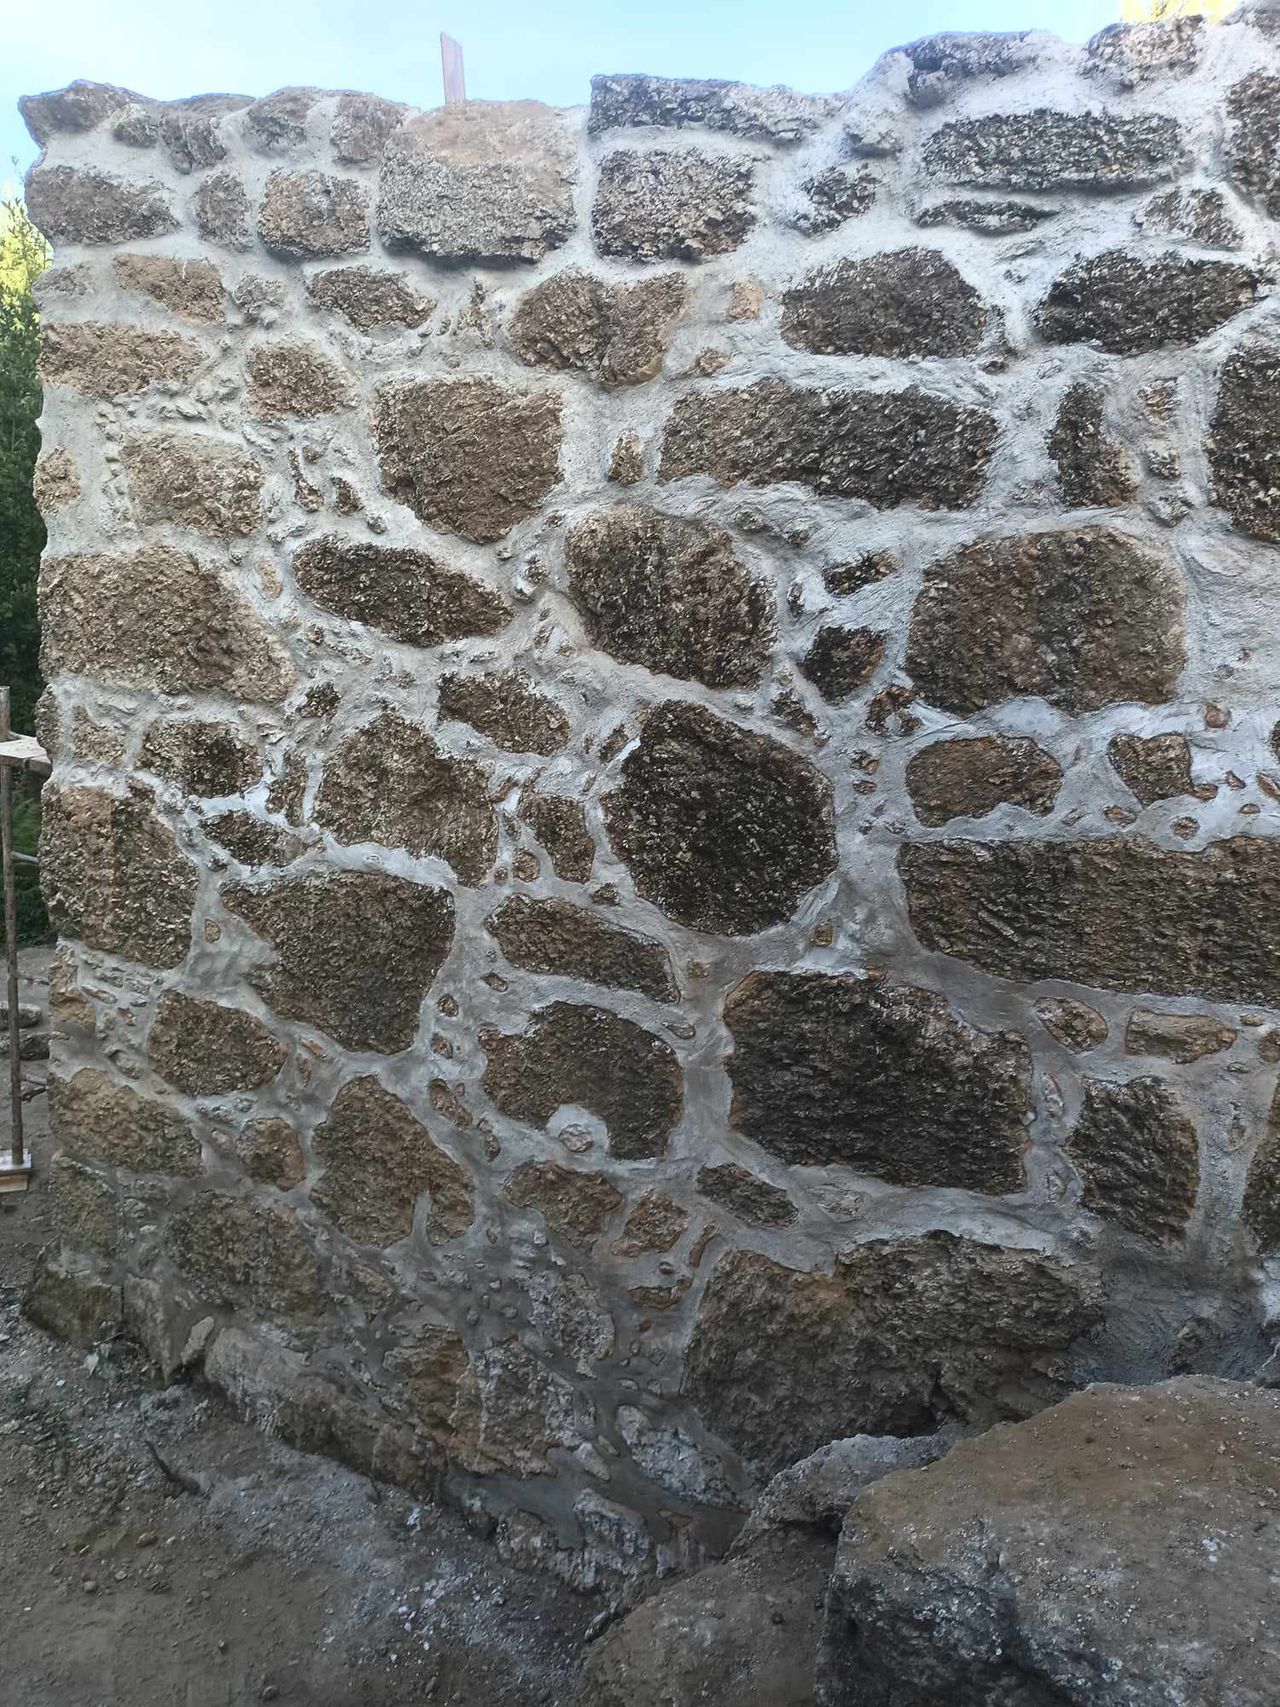
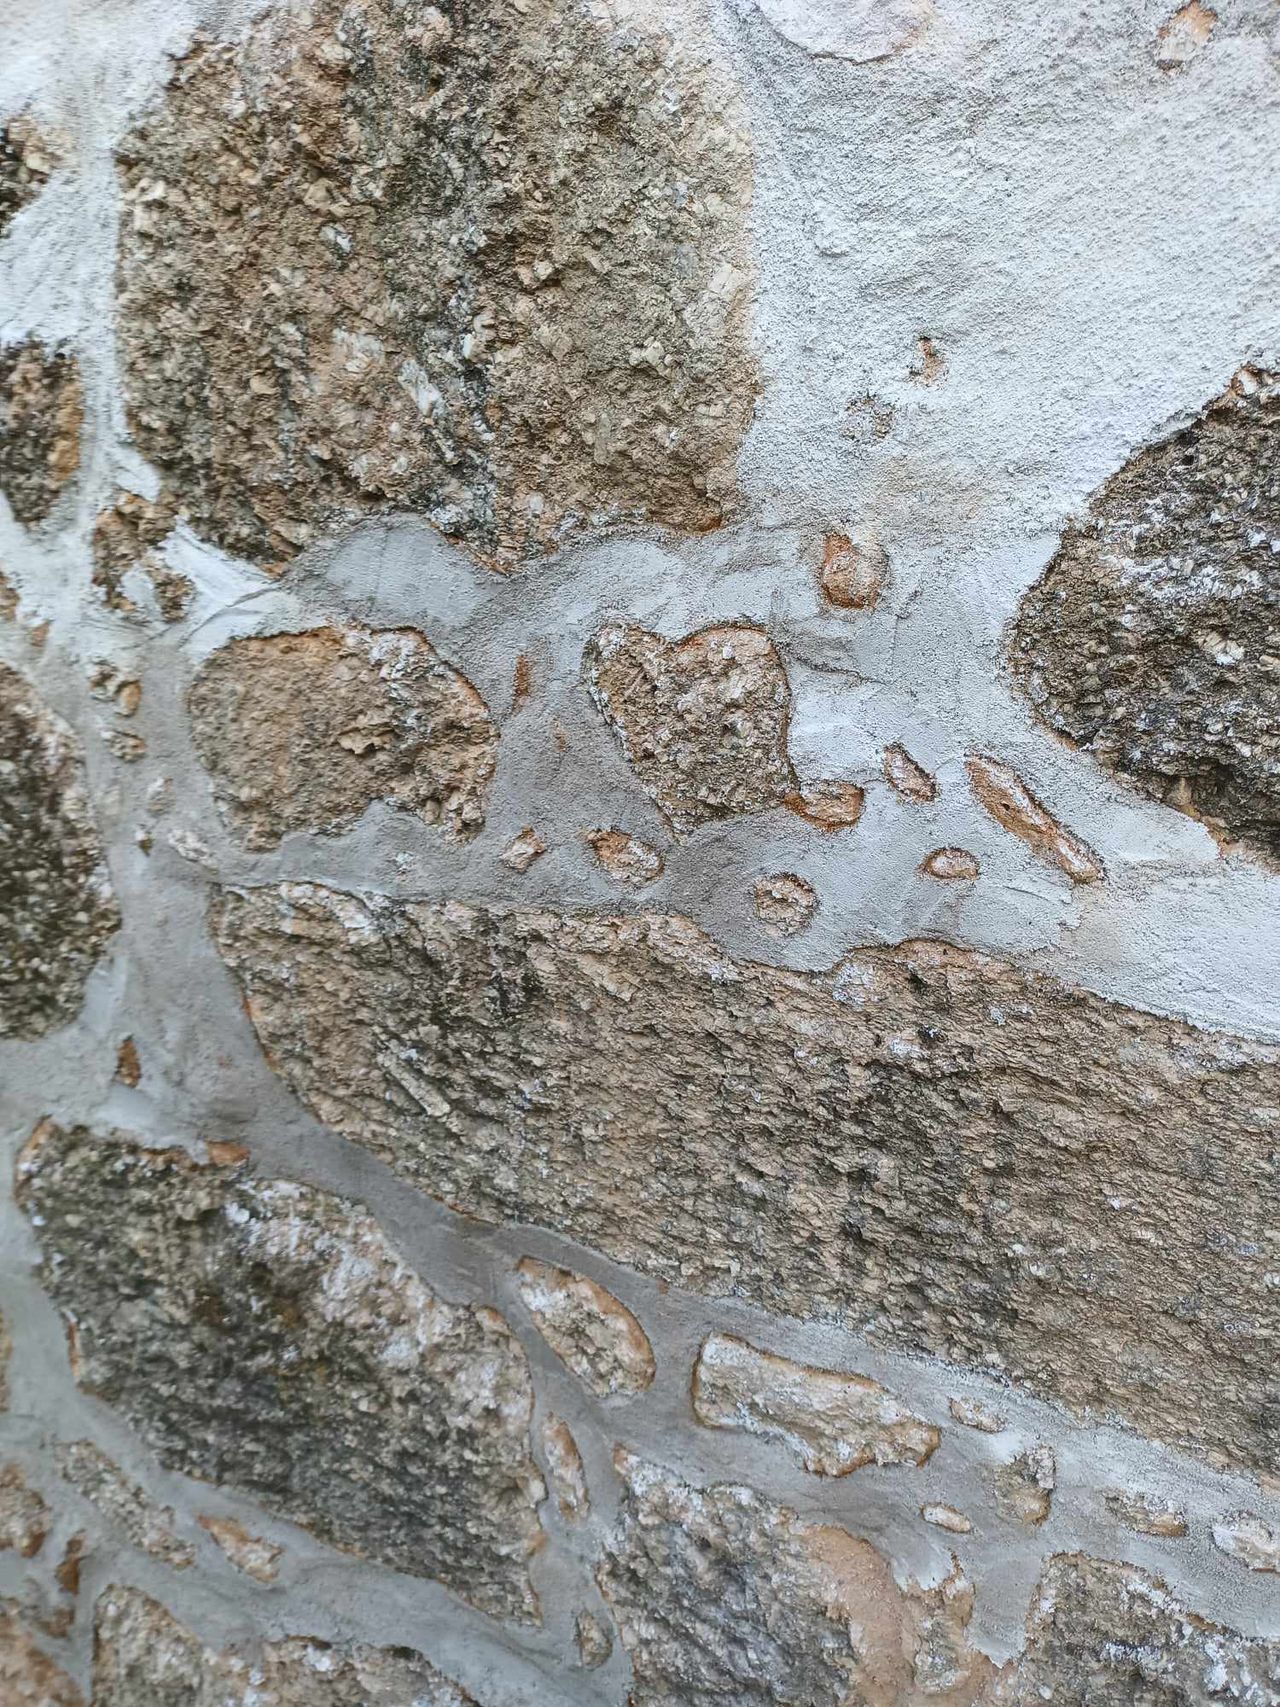
LIME JOINTS: How to repoint a wall with lime
Published 1yPublished over 1 year ago
You have made your lime mix. It is now time to repoint your wall: making those precise lime joints on the wall.
Much like clay, lime needs a wet surface to grab. So we are back with our water bucket full of sponges, brushes and other tools we found on the way. For this step, you will need a very thin trowel to push the lime in narrow corners.
Just like with the clay, we work from the top and make our way down.
And this is where it gets a bit tricky.
You want to get the lime mortar in the joint to cover all the clay mortar work you did, but you also want to leave the stone clean and sort of untouched. Once the lime touches the stone, it is hard to completly wash it away. To get to this level of precision, everybody had their technic.
One was grabbing lime mortar in their left hand (gloved) and with the right, they would use the trowel to guide the lime in the seams, the left hand full below to catch the fallen pieces. Some others whent more broad with a bigger trowel and pushed the mortar onto a larger surface. Some are just using their hands.
As long as the lime didn't overpass the stones, the job could be done is different level of delicatessness because we realised that another step could be added to correct it all.
So it goes like this:
1- You get the lime to cover all the clay work you have done, making sure it doesn't go passed the stones.
2- Then, you let it half-dry more or less 3 hours (depending on the weather : 2 hours sunny hot day, and 5 hours for a rainy day).
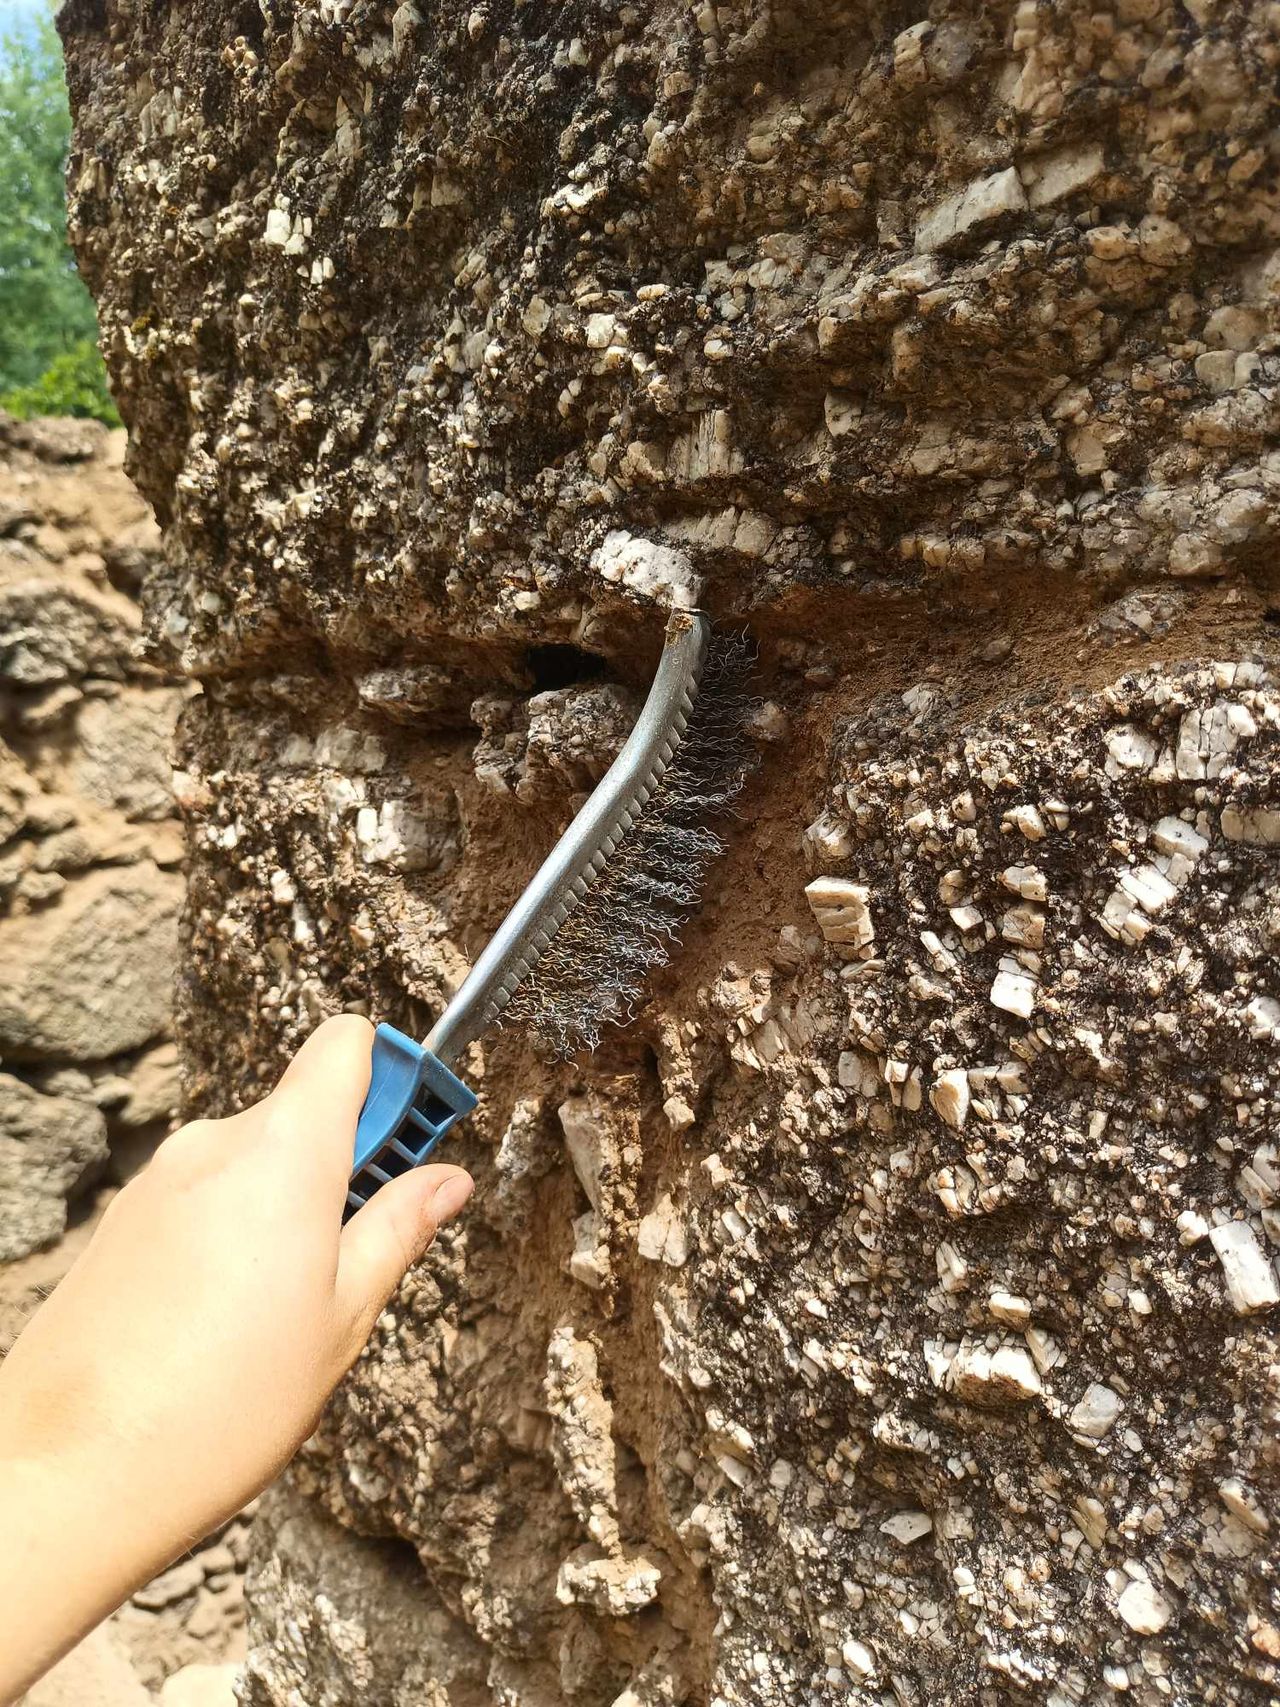
3- When it is half dry (or you could call it "leather hard". Hard enough to stay in place but soft enough so that you can still dent it.) you can come with you small trowel or a trowel with a sharp 90° angle and scrap the stone out. This last step is hard to explain in a text. Imagine having very roughly covered all your clay surface with lime mortar, you want now to aesthetically "free" the stones from the lime so you carve them out softly. You can also, while wearing your gloves, rub your hand over the rough lime job to even it out.
We will see more detail of this step explained in a video coming soon.
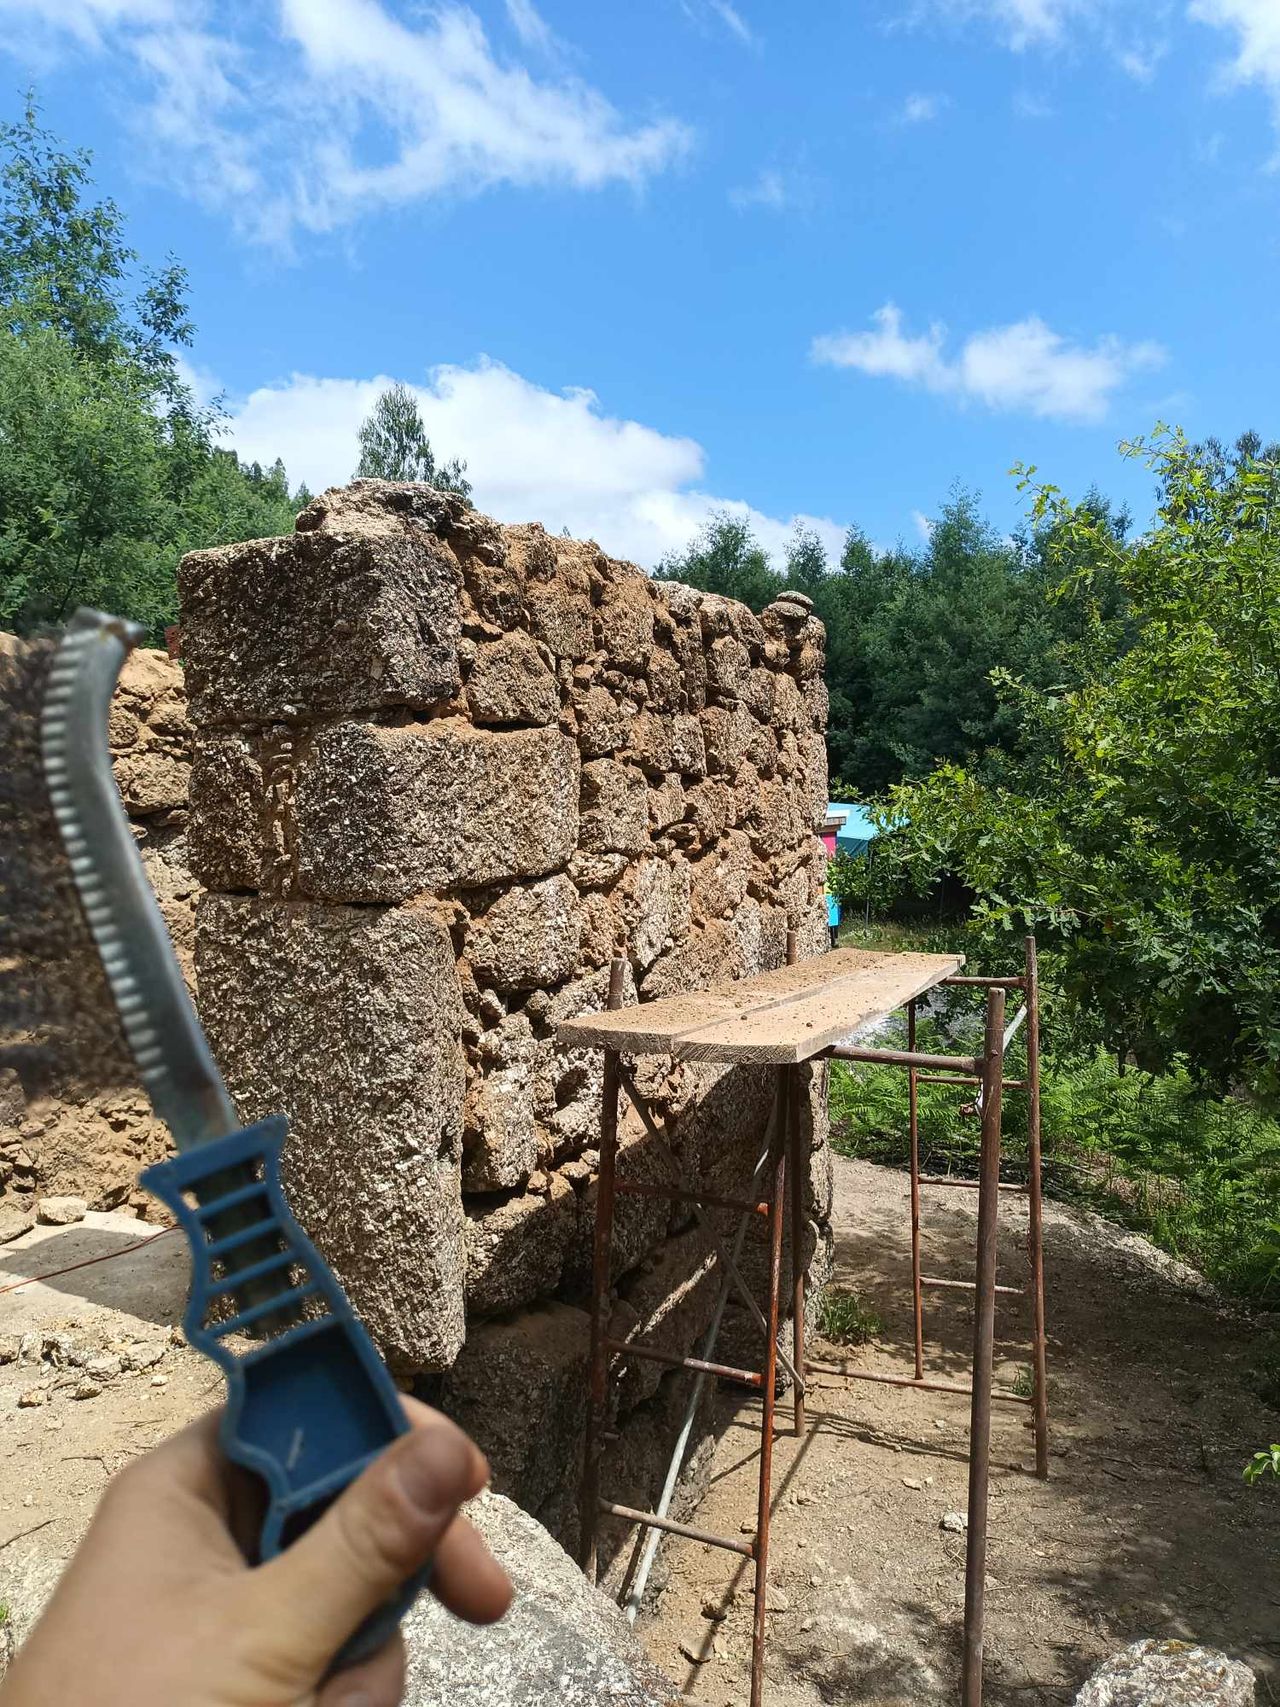
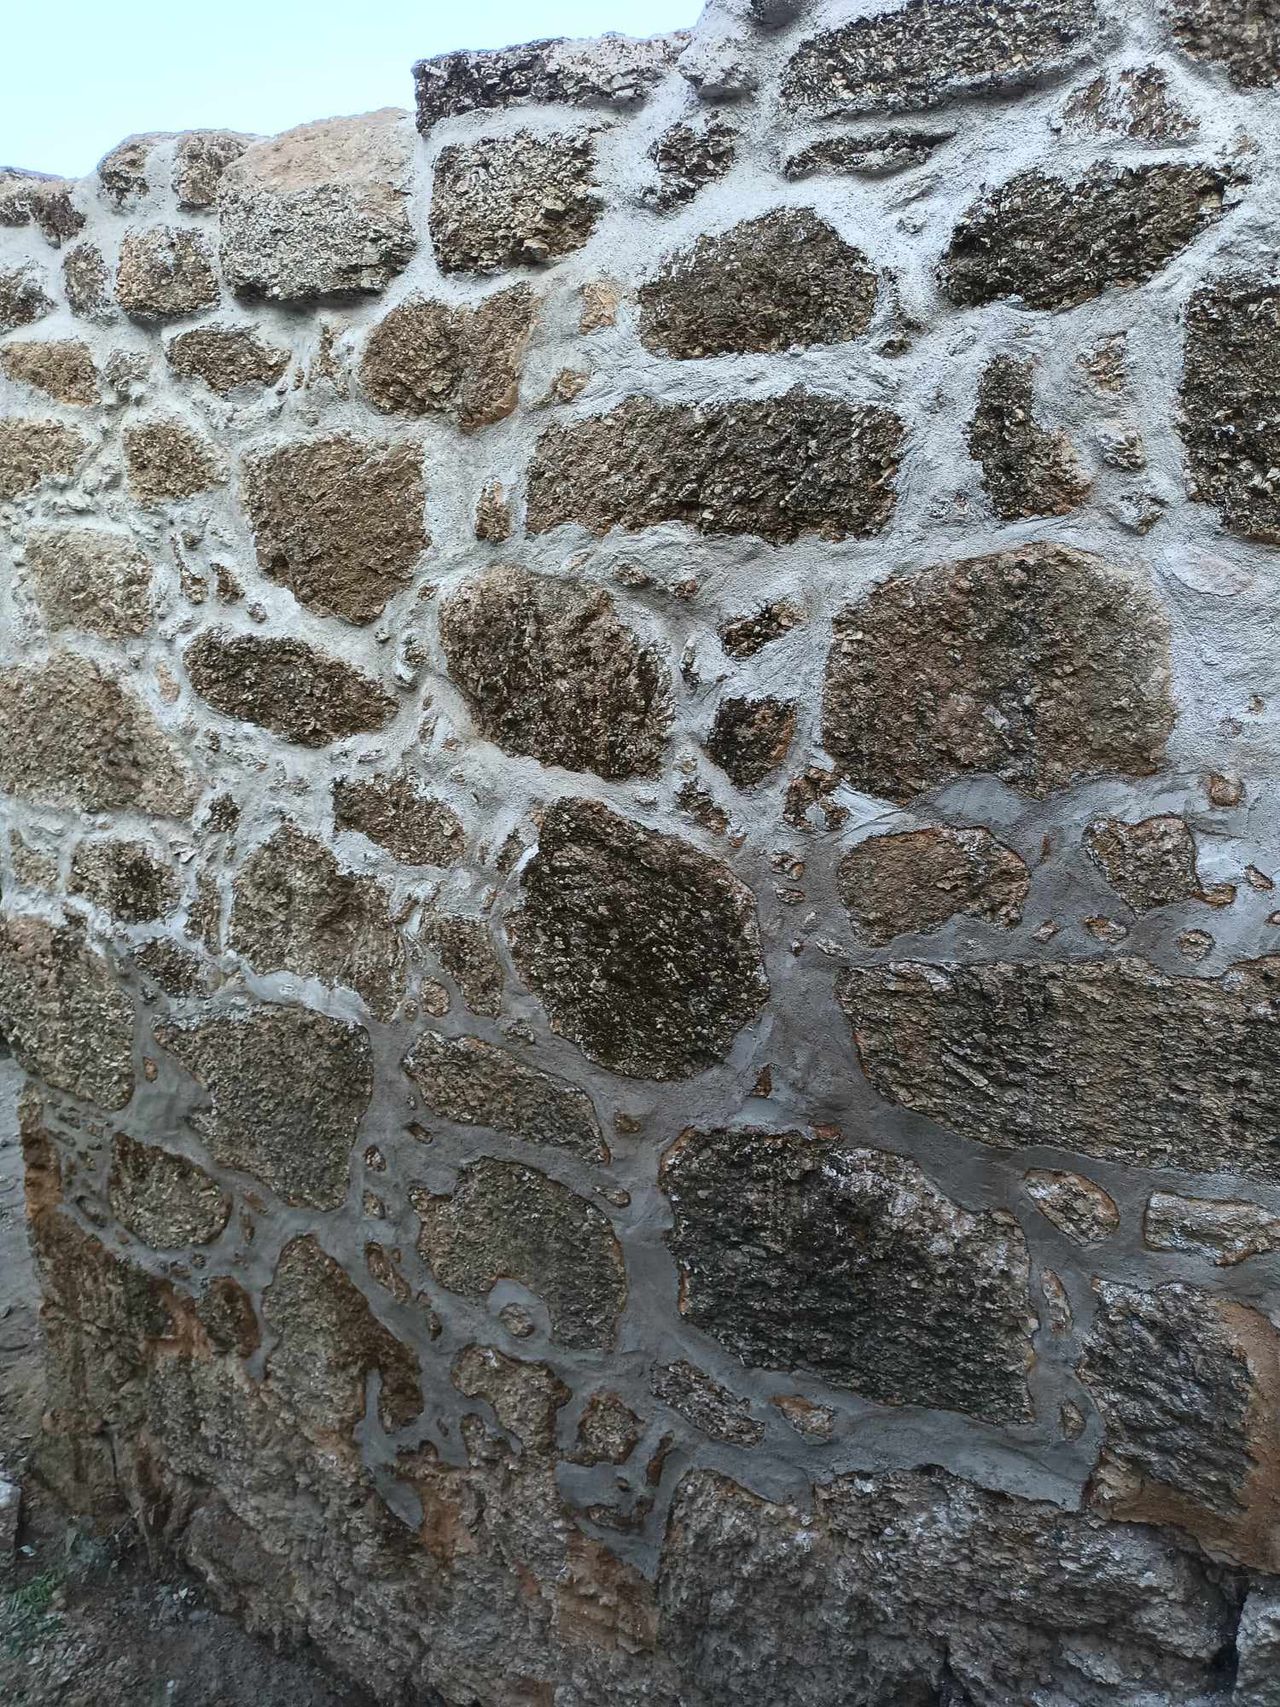
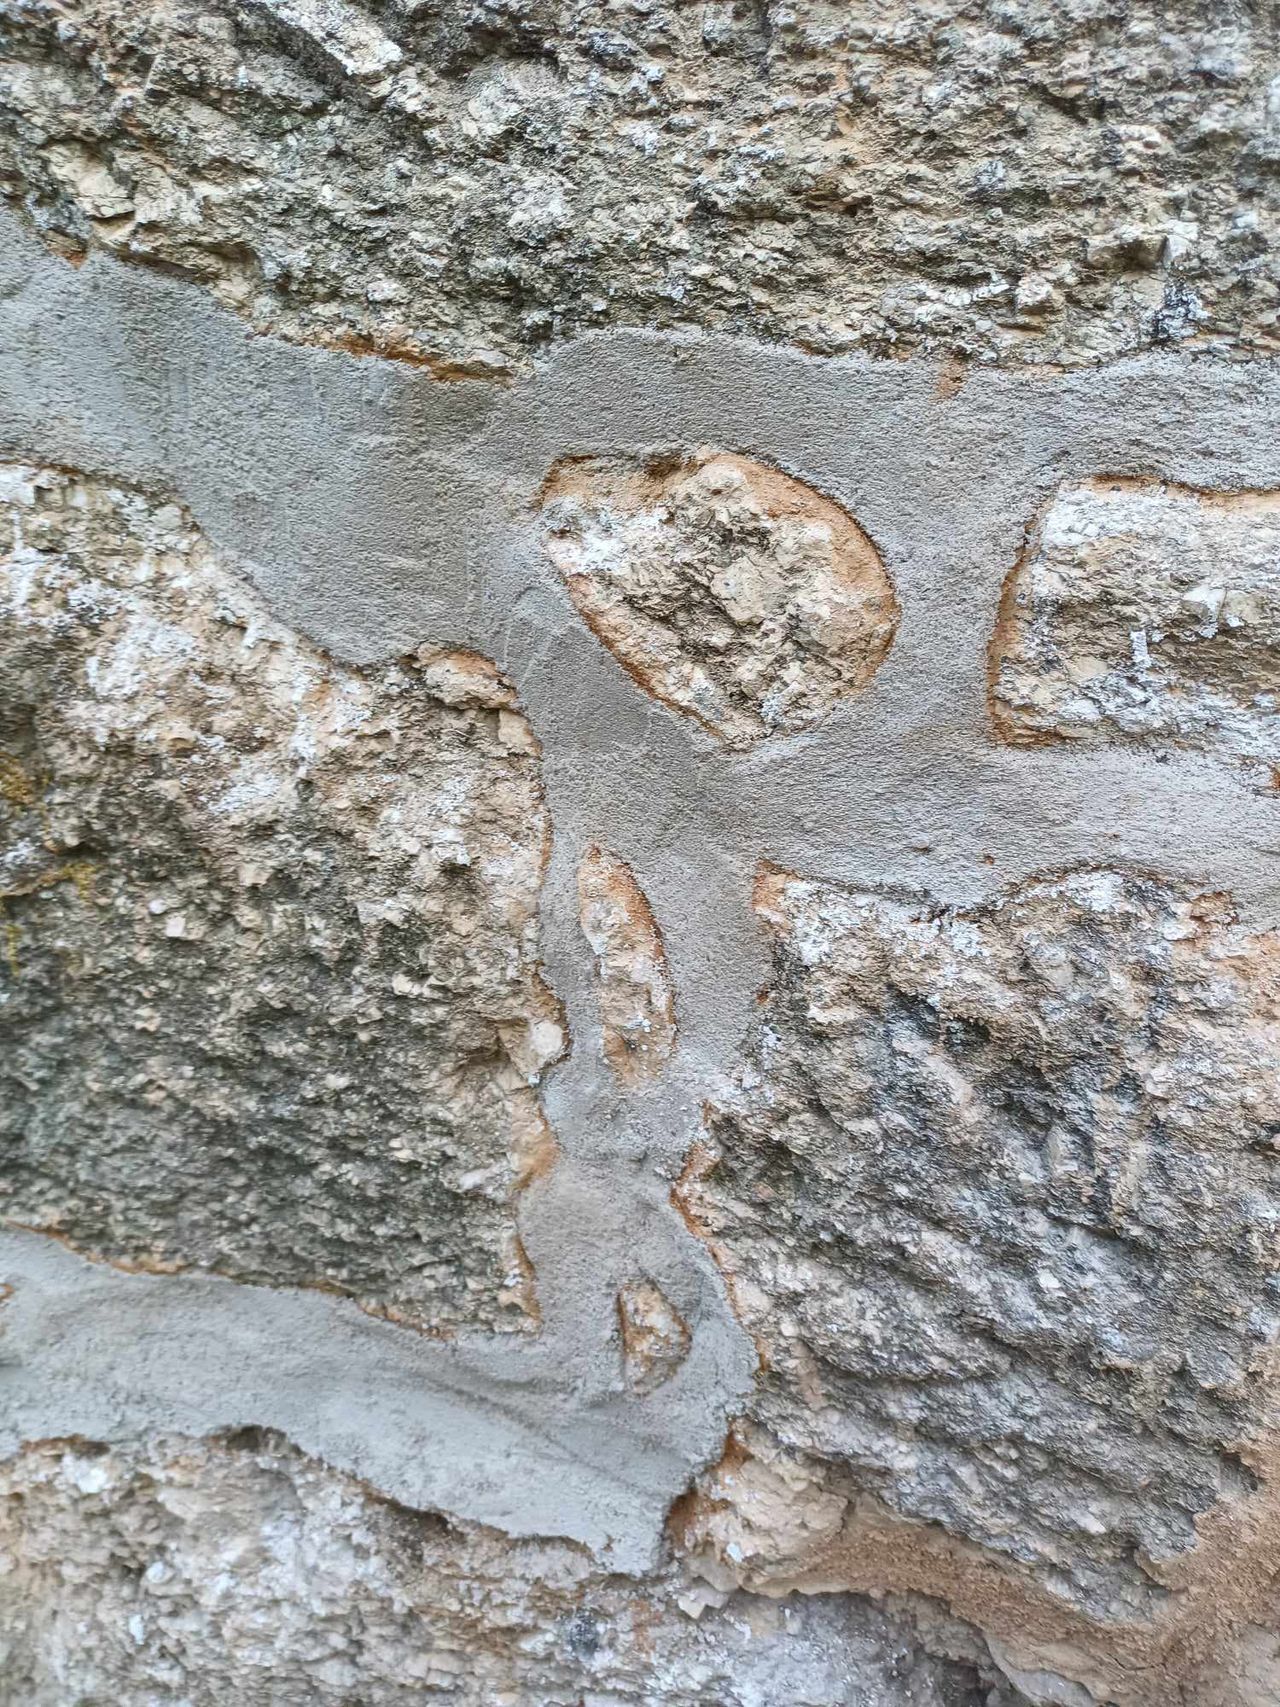
Maybe the photos can help you.
The First one is during the drying: the top part is dry and rough, the down part is finish and still wet, looking way sharper and nice.
The second picture is the filling in of lime the wall.
The third picture and 6th is a close up after the carving, you can see the sharpness.
The fourth picture is without a finishing, it looks...functional:)
16
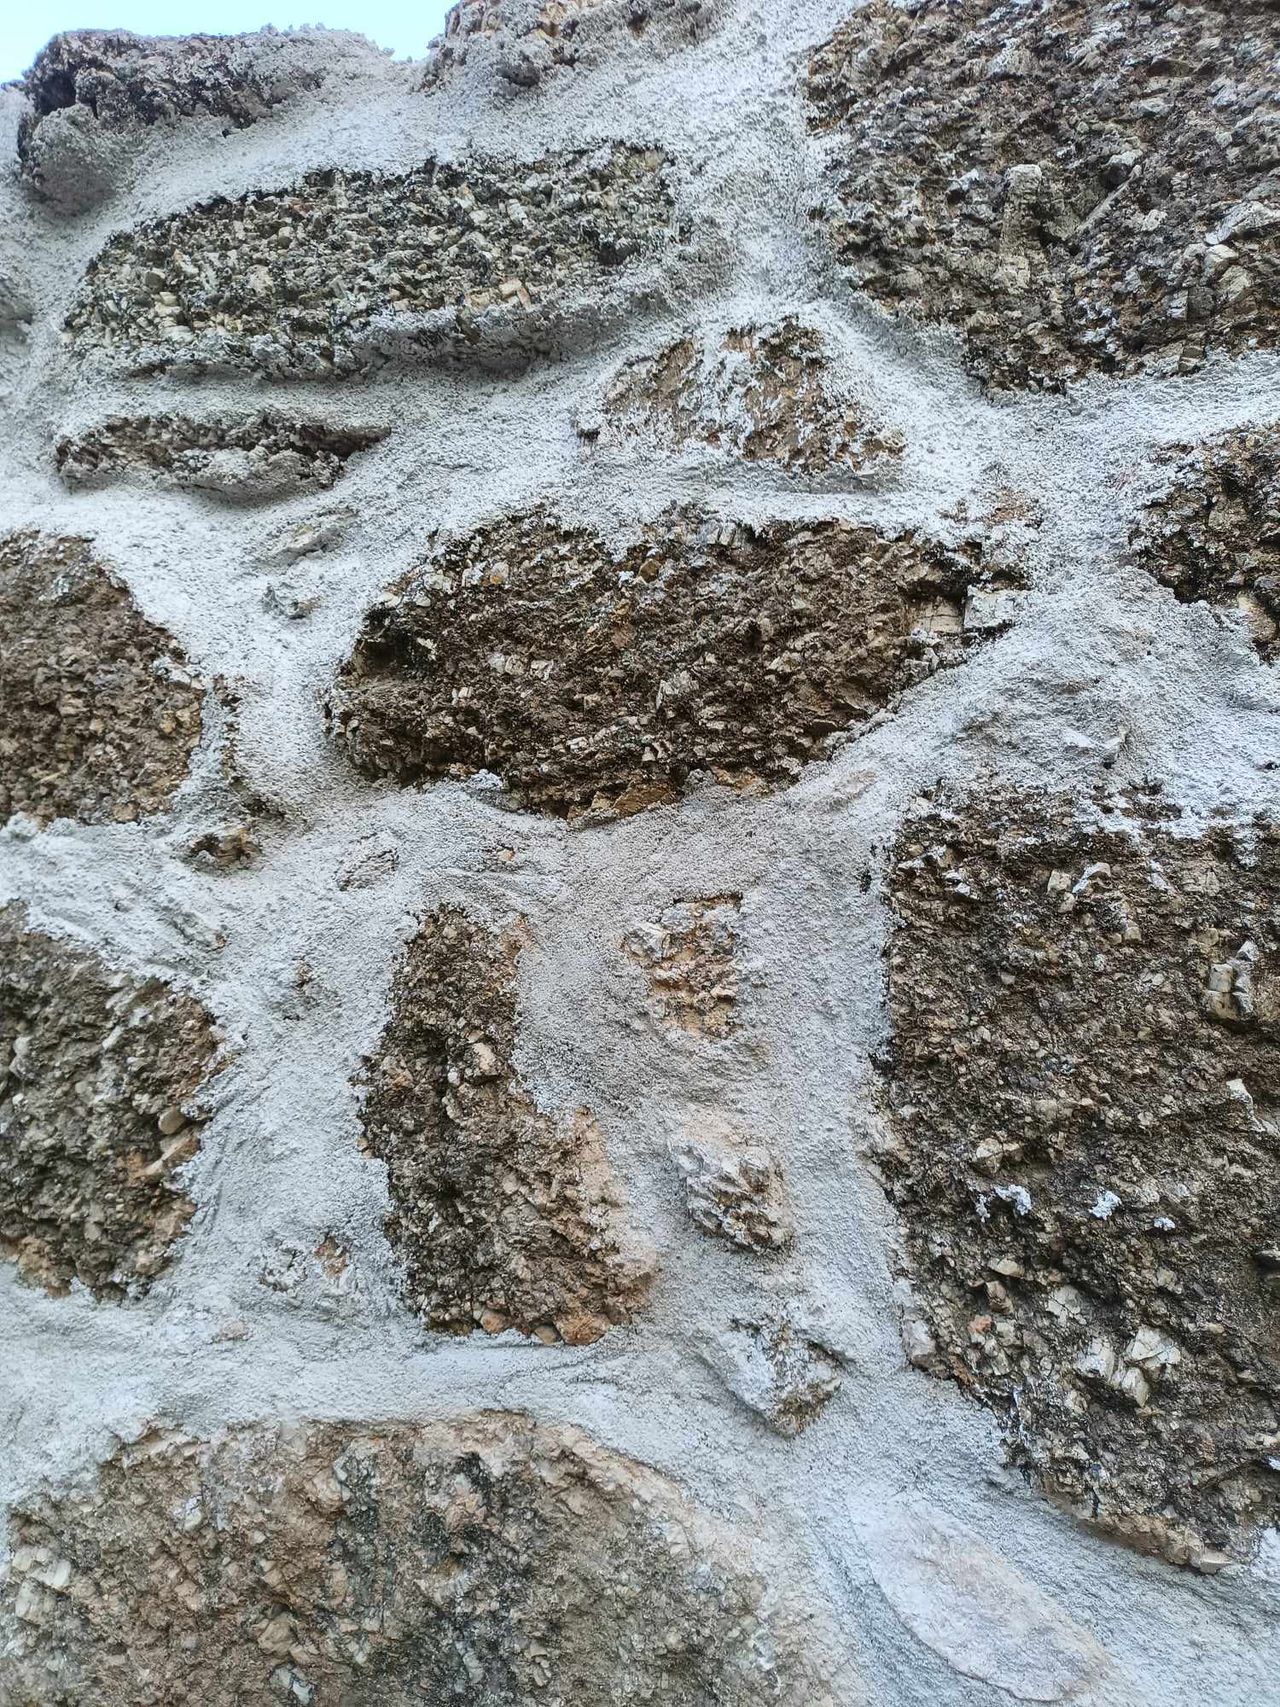
After the winter update
Published 1yPublished about 1 year ago
Our granite spent the winter with a big tile and lime coat. We went to see how the lime joints were doing. Here are some pictures. Overall it is still looking very fresh and white.


%20--%3e%3csvg%20version='1.1'%20id='Layer_1'%20xmlns='http://www.w3.org/2000/svg'%20xmlns:xlink='http://www.w3.org/1999/xlink'%20x='0px'%20y='0px'%20viewBox='0%200%2064%2063'%20style='enable-background:new%200%200%2064%2063;'%20xml:space='preserve'%3e%3cstyle%20type='text/css'%3e%20.st0{fill:%2320B7EB;}%20.st1{fill:%23E9475A;}%20.st2{fill:%23FECE4E;}%20%3c/style%3e%3cdesc%3eCreated%20with%20Sketch.%3c/desc%3e%3cg%20id='Page-1'%3e%3cg%20id='OA-Logo-Black-Background'%3e%3cpath%20id='Shape'%20class='st0'%20d='M14.1,30.1c-1.5-0.8-8.6-3.8-14.1-7.8c1.8-3.4,3.1-5.6,5-9.1c2.7,1.1,1.9,0.5,4.6,1.7%20c0.8,0.4,10.1,4.5,13.8,6.2c2.4,1.1,4.7,2.2,7,3.3L43,30.5l8.1,3.9c4,2,7.2,3.5,11.3,5.5c0.5,0.3-3.7,9.4-3.7,9.4%20c-1.7-0.6-3.9-1.8-5.5-2.5c-4.7-2.1-9-3.9-13.7-6c-4-1.8-6.7-2.9-10.8-4.5C25,34.9,17.1,31.6,14.1,30.1z'/%3e%3cpath%20id='Shape_1_'%20class='st1'%20d='M12.1,54.9c-0.8,0.6-1.6,1.2-2.5,1.6c-0.4-0.5-0.9-1-1.3-1.5c-0.3-1.2-2.3-4.9-2.7-6.2%20c-0.1-0.4-0.7-2.2-0.8-2.6c0,0,5-3.4,8.2-5.9c3.2-2.6,6.2-5,9.3-7.5c1.4-1.1,3.9-2.5,5.3-3.5c2.5-1.7,13-9.1,15.6-10.5%20c5.4-3.3,11.1-6.3,16.8-9c1.7,3.5,1.8,3,3.8,6.9c0,0-17.8,13.5-22.7,17.1c-3.8,2.8-7.5,5.7-11.3,8.5c-1.7,1.3-3.5,2.4-5.2,3.7'/%3e%3cpath%20id='Shape_2_'%20class='st2'%20d='M20.8,2.9l-0.2-0.8C25,0,31.2-0.3,31.4,0.2c0.4,1.1,0.9,2.2,1.2,3.4c1.4,4.4,2.7,8.7,4,13.1%20c0.4,1.4,2.8,10,2.9,10.5c0.5,2.8,1.2,5.6,1.6,8.4c0.8,4.7,1.4,8.6,2.3,13.3c0.6,3.1,1.3,6.3,2.3,11.3c0,0-5.8,1.4-7.5,1.8%20c-0.8,0.2-1.5,0.4-2.4,0.6c-0.3-1.1-0.2-1.2-0.5-2.1c-0.9-3.7-1.8-7.3-2.6-11c-1.5-6.4-3-12.9-4.4-19.3%20c-1.2-5.4-2.6-10.7-4.4-15.9c-1-3.1-1.8-6.3-2.7-9.5C21.1,3.8,21,3.8,20.8,2.9z'/%3e%3c/g%3e%3c/g%3e%3c/svg%3e)